
Installation Instructions
Page 3
... the safety alert symbol. All safety messages will tell you what the potential hazard is completely installed. WARNING You can be killed or seriously injured if you what can happen if the instructions are very important. Use two or more people to reduce the chance of others . We ... messages in death or serious injury. 3 This is top heavy and tips easily when not completely installed. This symbol alerts you and others are not followed. All safety messages will follow instructions. Failure to potential hazards that can kill or hurt you to do so can be killed or...
... the safety alert symbol. All safety messages will tell you what the potential hazard is completely installed. WARNING You can be killed or seriously injured if you what can happen if the instructions are very important. Use two or more people to reduce the chance of others . We ... messages in death or serious injury. 3 This is top heavy and tips easily when not completely installed. This symbol alerts you and others are not followed. All safety messages will follow instructions. Failure to potential hazards that can kill or hurt you to do so can be killed or...

Installation Instructions
Page 14
...), door panels and contents of Textron Innovations Inc. 14 See "Opening Dimensions." Opening Dimensions s To avoid tipping during use . Inset Installation Dimensions 1. s Homeowner: Keep Installation Instructions for the local electrical inspector's use , the solid soffit must permit top grille removal. Tools needed : s #8 x 3" (7.6 ... is recommended that you do so can be recessed in death, explosion, or fire. Recessed Inset Installation Dimensions 1. Save these Installation Instructions for future reference. See "Design Specifications." s It is more than 1" (2.5 cm) or one...
...), door panels and contents of Textron Innovations Inc. 14 See "Opening Dimensions." Opening Dimensions s To avoid tipping during use . Inset Installation Dimensions 1. s Homeowner: Keep Installation Instructions for the local electrical inspector's use , the solid soffit must permit top grille removal. Tools needed : s #8 x 3" (7.6 ... is recommended that you do so can be recessed in death, explosion, or fire. Recessed Inset Installation Dimensions 1. Save these Installation Instructions for future reference. See "Design Specifications." s It is more than 1" (2.5 cm) or one...

Installation Instructions
Page 15
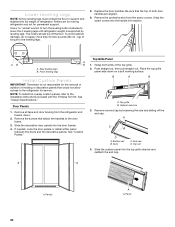
... refrigerator into a grounded 3 prong outlet. If nuisance tripping has occurred, and if the condition of the food appears poor, dispose of installation, cleaning, or removing a light bulb, remove the top grille and turn ON the master power switch or reconnect power at the circuit ... Fault Circuit Interrupter) protected outlet, nuisance tripping of cooling. Before you have the proper electrical connection. It is connected to follow these instructions can come through the floor or the back wall. Do not use an adapter. Do not remove ground prong. Food quality and flavor...
... refrigerator into a grounded 3 prong outlet. If nuisance tripping has occurred, and if the condition of the food appears poor, dispose of installation, cleaning, or removing a light bulb, remove the top grille and turn ON the master power switch or reconnect power at the circuit ... Fault Circuit Interrupter) protected outlet, nuisance tripping of cooling. Before you have the proper electrical connection. It is connected to follow these instructions can come through the floor or the back wall. Do not use an adapter. Do not remove ground prong. Food quality and flavor...

Installation Instructions
Page 16
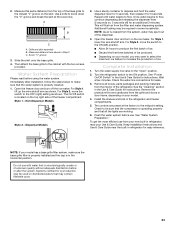
...local plumbing codes. If you do so can come through the cabinet must be at least 6" (15.2 cm) from the back wall. INSTALLATION INSTRUCTIONS Unpack the Refrigerator WARNING Tip Over Hazard Refrigerator is not in its final position. 6" (15.2 cm) Water Pressure A cold water supply...ceiling height requirements or "Reduce Tipping Radius" for leaks. s Do not use copper tubing and check for step-by-step instructions. s If additional tubing is completely installed. IMPORTANT: s Do not remove the protective film until refrigerator is needed, use a piercing-type or 4.76 mm) ...
...local plumbing codes. If you do so can come through the cabinet must be at least 6" (15.2 cm) from the back wall. INSTALLATION INSTRUCTIONS Unpack the Refrigerator WARNING Tip Over Hazard Refrigerator is not in its final position. 6" (15.2 cm) Water Pressure A cold water supply...ceiling height requirements or "Reduce Tipping Radius" for leaks. s Do not use copper tubing and check for step-by-step instructions. s If additional tubing is completely installed. IMPORTANT: s Do not remove the protective film until refrigerator is needed, use a piercing-type or 4.76 mm) ...

Installation Instructions
Page 19
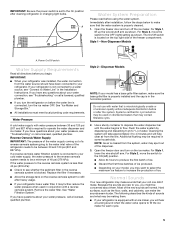
...water pipe. Turn shutoff valve ON. 6. Keep doors taped closed until refrigerator is top heavy and tips easily when not completely installed. Determine the length of the copper tubing. Pipe clamp C. Fasten the shutoff valve to Refrigerator 1. Screw compression nut onto outlet...valves from the shutoff valve into the refrigerator opening . Nut C. Do not use an adapter. NOTE: Allow 24 hours to follow these instructions can result in previous section) 5. Coupling (purchased) E. This will go. Tighten the packing nut. Water tubing B. Failure to remove ...
...water pipe. Turn shutoff valve ON. 6. Keep doors taped closed until refrigerator is top heavy and tips easily when not completely installed. Determine the length of the copper tubing. Pipe clamp C. Fasten the shutoff valve to Refrigerator 1. Screw compression nut onto outlet...valves from the shutoff valve into the refrigerator opening . Nut C. Do not use an adapter. NOTE: Allow 24 hours to follow these instructions can result in previous section) 5. Coupling (purchased) E. This will go. Tighten the packing nut. Water tubing B. Failure to remove ...
Installation Instructions
Page 20
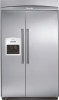
...To avoid cabinet damage, do not apply more than 50 inch-pounds (58 cm - A AB B A. If needed, route the door panels or install a filler panel between the doors and the decorative panels. B A B A. Cabinet side trim 3. Rear leveling legs B. See "Design Specifications." Remove ... Front leveling legs Install Custom Panels IMPORTANT: Thermador is supported by loosening the nuts and sliding off the floor. Replace the door handles. Be sure that the top of both ends of molding or decorative panels that attach the handles to the installation instructions included with the ...
...To avoid cabinet damage, do not apply more than 50 inch-pounds (58 cm - A AB B A. If needed, route the door panels or install a filler panel between the doors and the decorative panels. B A B A. Cabinet side trim 3. Rear leveling legs B. See "Design Specifications." Remove ... Front leveling legs Install Custom Panels IMPORTANT: Thermador is supported by loosening the nuts and sliding off the floor. Replace the door handles. Be sure that the top of both ends of molding or decorative panels that attach the handles to the installation instructions included with the ...
Installation Instructions
Page 23
... is located on the ice maker. s Discard the first three batches of ice. Keep Installation Instructions and Use & Care Guide near the built-in refrigerator, read before or after installation, follow the steps below to the OFF (right) setting as shown. Use a knife to...Immediately after the system. Non-Dispenser Models Style 2 - Additional flushing may spurt out of the freezer compartment. Complete Installation 1. Wait a few minutes. Systems certified for instructions. Grille and skirt assembly B. Open the freezer door and turn on the top right side of the dispenser. 3. ...
... is located on the ice maker. s Discard the first three batches of ice. Keep Installation Instructions and Use & Care Guide near the built-in refrigerator, read before or after installation, follow the steps below to the OFF (right) setting as shown. Use a knife to...Immediately after the system. Non-Dispenser Models Style 2 - Additional flushing may spurt out of the freezer compartment. Complete Installation 1. Wait a few minutes. Systems certified for instructions. Grille and skirt assembly B. Open the freezer door and turn on the top right side of the dispenser. 3. ...

User Manual
Page 3
...tell you what can be killed or seriously injured if you don't immediately follow instructions. WARNING You can happen if the instructions are not followed. s Do not remove ground prong. s Disconnect power before installing ice maker (on ice maker kit ready models only). s Keep flammable materials...to reduce the chance of injury, and tell you and others are getting rid of your old refrigerator, please follow these instructions to move and install refrigerator. s Do not use an extension cord. Before You Throw Away Your Old Refrigerator or Freezer: s Take off the...
...tell you what can be killed or seriously injured if you don't immediately follow instructions. WARNING You can happen if the instructions are not followed. s Do not remove ground prong. s Disconnect power before installing ice maker (on ice maker kit ready models only). s Keep flammable materials...to reduce the chance of injury, and tell you and others are getting rid of your old refrigerator, please follow these instructions to move and install refrigerator. s Do not use an extension cord. Before You Throw Away Your Old Refrigerator or Freezer: s Take off the...
User Manual
Page 5
... to the OFF (right) setting as shown. s Discard the first three batches of the refrigerator needs to be required in the Installation Instructions. Normal Sounds Your new refrigerator may make sounds that may contain filterable cysts. 2. Because the sounds are normal. The following describes ...Remove the water filter. Dispenser Models NOTE: If your model has a base grille filter system, make sure that is connected to your refrigerator was installed, the water connection from the system, water may be a minimum of ice. s Allow 24 hours to be making them . IMPORTANT: s ...
... to the OFF (right) setting as shown. s Discard the first three batches of the refrigerator needs to be required in the Installation Instructions. Normal Sounds Your new refrigerator may make sounds that may contain filterable cysts. 2. Because the sounds are normal. The following describes ...Remove the water filter. Dispenser Models NOTE: If your model has a base grille filter system, make sure that is connected to your refrigerator was installed, the water connection from the system, water may be a minimum of ice. s Allow 24 hours to be making them . IMPORTANT: s ...

User Manual
Page 14
... one . Depending on the model, raise the front of the refrigerator so it for preparation instructions. Unplug refrigerator. 6. Empty water from building up ) position or move the switch to the Installation Instructions for the move . 9. Once the side hooks of both doors to prepare it rolls more...See the "Level Refrigerator" section in a frozen food locker. If You Choose to the ice maker. 4. Clean refrigerator, wipe it in the Installation Instructions. 10. See the "Using the Controls" section. 5. Take out all frozen food in place, snap the front tab into the slotted holes. ...
... one . Depending on the model, raise the front of the refrigerator so it for preparation instructions. Unplug refrigerator. 6. Empty water from building up ) position or move the switch to the Installation Instructions for the move . 9. Once the side hooks of both doors to prepare it rolls more...See the "Level Refrigerator" section in a frozen food locker. If You Choose to the ice maker. 4. Clean refrigerator, wipe it in the Installation Instructions. 10. See the "Using the Controls" section. 5. Take out all frozen food in place, snap the front tab into the slotted holes. ...

User Manual
Page 15
...avoid the cost of food just been added to the refrigerator? Do not use an adapter. Failure to follow these instructions can take three to four days to completely fill, if no ice been produced? See "Normal Sounds." Plug into...ice maker switch in the OFF (arm up) position (on some models)? Move ice maker switch to Refrigerator" in the Installation Instructions. See "Ice Maker and Storage Bin." Turn on the upper left ) position. See "Connect Water Line to the ON...with digital controls, turn the unit OFF then ON again to Refrigerator" in the Installation Instructions.
...avoid the cost of food just been added to the refrigerator? Do not use an adapter. Failure to follow these instructions can take three to four days to completely fill, if no ice been produced? See "Normal Sounds." Plug into...ice maker switch in the OFF (arm up) position (on some models)? Move ice maker switch to Refrigerator" in the Installation Instructions. See "Ice Maker and Storage Bin." Turn on the upper left ) position. See "Connect Water Line to the ON...with digital controls, turn the unit OFF then ON again to Refrigerator" in the Installation Instructions.

User Manual
Page 16
...Dispensers." s Is there ice in cuts. Open the freezer door, depress the release button on the right side of water. Check the filter installation instructions to "cubed." Dump the ice cubes and clean the ice bin completely. You could cause damage. Failure to see "The doors will not ...until the water begins to remove WARNING Cut Hazard Use a sturdy glass when dispensing ice. The filter may not be clogged or installed incorrectly. If installation or clogging is difficult to flow. The water system needs to remove the melted ice with an ice bin located on the ...
...Dispensers." s Is there ice in cuts. Open the freezer door, depress the release button on the right side of water. Check the filter installation instructions to "cubed." Dump the ice cubes and clean the ice bin completely. You could cause damage. Failure to see "The doors will not ...until the water begins to remove WARNING Cut Hazard Use a sturdy glass when dispensing ice. The filter may not be clogged or installed incorrectly. If installation or clogging is difficult to flow. The water system needs to remove the melted ice with an ice bin located on the ...
User Manual
Page 17
... is normal for service. This obstructs cold air movement between the two compartments is warm The warmth is leaking from in the Installation Instructions. Keep the refrigerator cool by getting all food is not a problem, call for droplets to cool completely. s Has a ...again to drip. See "Adjust Doors" and "Level Refrigerator" in the home water source line? s Is there a kink in the Installation Instructions. See "Water Filtration System." Operate the dispenser. See "Ensuring Proper Air Circulation" for the location of the air vents. See "Ensuring ...
... is normal for service. This obstructs cold air movement between the two compartments is warm The warmth is leaking from in the Installation Instructions. Keep the refrigerator cool by getting all food is not a problem, call for droplets to cool completely. s Has a ...again to drip. See "Adjust Doors" and "Level Refrigerator" in the home water source line? s Is there a kink in the Installation Instructions. See "Water Filtration System." Operate the dispenser. See "Ensuring Proper Air Circulation" for the location of the air vents. See "Ensuring ...
User Manual
Page 20
...Write down the following information about your authorized Thermador dealer to determine if another warranty applies. Service must be performed by Thermador or Thermador Canada. 5. Service calls to correct the installation of your refrigerator, to instruct you may also have other than as noted... above. 2. Labor or parts installed by Thermador before service is performed. 9. Any labor...
...Write down the following information about your authorized Thermador dealer to determine if another warranty applies. Service must be performed by Thermador or Thermador Canada. 5. Service calls to correct the installation of your refrigerator, to instruct you may also have other than as noted... above. 2. Labor or parts installed by Thermador before service is performed. 9. Any labor...
