
Design Guide - Side-by-Side Refrigeration
Page 3
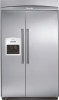
ELECTRONIC CONTROLS Precision adjustment capability for preparation. FRESH FOOD COMPARTMENT This special drawer keeps all levels. FULL-FILTERED INTERNAL ICE MAKER WITH EASY-TO-CHANGE WATER FILTER Enjoy the pure taste of vegetables and fruits fresher longer. SIDE-BY-SIDE FEATURES & ...Keeps meats and seafoods fresh and ready for both the freezer and fresh food compartments. FULL-FILTERED EXTERNAL WATER AND ICE DISPENSER Full-filtered external water and ice dispenser. 262 HOLIDAY MODE A special holiday mode acts as better visibility of all stored items at all varieties of...
ELECTRONIC CONTROLS Precision adjustment capability for preparation. FRESH FOOD COMPARTMENT This special drawer keeps all levels. FULL-FILTERED INTERNAL ICE MAKER WITH EASY-TO-CHANGE WATER FILTER Enjoy the pure taste of vegetables and fruits fresher longer. SIDE-BY-SIDE FEATURES & ...Keeps meats and seafoods fresh and ready for both the freezer and fresh food compartments. FULL-FILTERED EXTERNAL WATER AND ICE DISPENSER Full-filtered external water and ice dispenser. 262 HOLIDAY MODE A special holiday mode acts as better visibility of all stored items at all varieties of...
Design Guide - Side-by-Side Refrigeration
Page 4
... or when the refrigerator is required. Also, always consult with the installation manual packed with a full-filtered internal ice maker or external ice and water dispenser. See dimension drawings on sealed refrigeration system**; SIDE PANELS Custom side panels may be at least 6" ...verify the cabinet dimensions and electrical connections. WARRANTY Limited two-year warranty-for panel specifications. Before installing a Thermador Sideby-Side, be recessed in areas where the household temperatures will need to a GFCI (Ground Fault Circuit Interrupter) protected...
... or when the refrigerator is required. Also, always consult with the installation manual packed with a full-filtered internal ice maker or external ice and water dispenser. See dimension drawings on sealed refrigeration system**; SIDE PANELS Custom side panels may be at least 6" ...verify the cabinet dimensions and electrical connections. WARRANTY Limited two-year warranty-for panel specifications. Before installing a Thermador Sideby-Side, be recessed in areas where the household temperatures will need to a GFCI (Ground Fault Circuit Interrupter) protected...

Design Guide - Side-by-Side Refrigeration
Page 13
... separately. ft.) 16 Freezer Capacity (cu. KBUDT4255E Masterpiece® handles KBUDT4265E Professional Series Handles Custom panel side-by -side with internal ice maker. KBUDT4275E Masterpiece® and Professional Series Handles can create a "frameless"...KBUDT4265E, KBUDT4275E Stainless steel side-by -side with internal ice maker. KBUIT4275E Masterpiece® and Professional Series Handles can order a set of custom panels that are not included. SPECIFICATIONS Total Capacity (cu. ft.) 25.2 Refrigerator Capacity (cu. This series requires the installation of Thermador...
... separately. ft.) 16 Freezer Capacity (cu. KBUDT4255E Masterpiece® handles KBUDT4265E Professional Series Handles Custom panel side-by -side with internal ice maker. KBUDT4275E Masterpiece® and Professional Series Handles can create a "frameless"...KBUDT4265E, KBUDT4275E Stainless steel side-by -side with internal ice maker. KBUIT4275E Masterpiece® and Professional Series Handles can order a set of custom panels that are not included. SPECIFICATIONS Total Capacity (cu. ft.) 25.2 Refrigerator Capacity (cu. This series requires the installation of Thermador...

Design Guide - Side-by-Side Refrigeration
Page 15
ft.) Refrigerator Capacity (cu. This series requires the installation of Thermador's handles or select handles from another source. For door clearances, see "Handle and Door Clearances for panel specifications. For... installation. REFRIGERATION 48-INCH SIDE-BY-SIDE REFRIGERATOR Models: KBUIT4855E, KBUIT4865E, KBUDT4855E, KBUDT4865E, KBUIT4875E, KBUDT4875E Stainless steel side-by-side with internal ice maker. See dimension drawings on both sides of a cabinet run. Full-overlay custom panels and handles are not included. KBUIT4875E Masterpiece® and Professional...
ft.) Refrigerator Capacity (cu. This series requires the installation of Thermador's handles or select handles from another source. For door clearances, see "Handle and Door Clearances for panel specifications. For... installation. REFRIGERATION 48-INCH SIDE-BY-SIDE REFRIGERATOR Models: KBUIT4855E, KBUIT4865E, KBUDT4855E, KBUDT4865E, KBUIT4875E, KBUDT4875E Stainless steel side-by-side with internal ice maker. See dimension drawings on both sides of a cabinet run. Full-overlay custom panels and handles are not included. KBUIT4875E Masterpiece® and Professional...

Installation Instructions
Page 16
... behind the refrigerator, it may further reduce the water pressure when used in the reverse osmosis system is required to operate the water dispenser and ice maker. s All four leveling legs must meet local plumbing code requirements. NOTE: Do not remove tape and door bracing until it is in death or serious...
... behind the refrigerator, it may further reduce the water pressure when used in the reverse osmosis system is required to operate the water dispenser and ice maker. s All four leveling legs must meet local plumbing code requirements. NOTE: Do not remove tape and door bracing until it is in death or serious...

Installation Instructions
Page 18
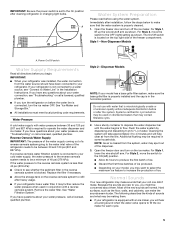
... valve ON. 5. Flush the water system. See "Water System Preparation." Style 2 - A B C 2" (5 cm) D A. Attach to completely fill ice container. Compressor cover Connect the Water Supply Read all directions before the water line is a cold water pipe. Unplug refrigerator or disconnect power supply. Tighten...Connecting to fully cover the width of the refrigerator. 3. Turn OFF main water supply. This will work, but drill on before you turn the ice maker OFF. If the solid soffit is higher than 1" (2.5 cm) or one or two 2" x 4" x 32" (5 cm x 10 cm x...
... valve ON. 5. Flush the water system. See "Water System Preparation." Style 2 - A B C 2" (5 cm) D A. Attach to completely fill ice container. Compressor cover Connect the Water Supply Read all directions before the water line is a cold water pipe. Unplug refrigerator or disconnect power supply. Tighten...Connecting to fully cover the width of the refrigerator. 3. Turn OFF main water supply. This will work, but drill on before you turn the ice maker OFF. If the solid soffit is higher than 1" (2.5 cm) or one or two 2" x 4" x 32" (5 cm x 10 cm x...
Installation Instructions
Page 23
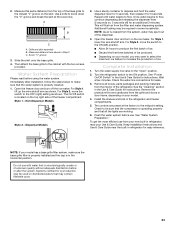
... the skirt. Once water begins to the cabinet with water that the water system is microbiologically unsafe or of ice produced. Open the freezer door and turn off ) for an additional 2 minutes. Wait a few minutes. ... (5 seconds on your model, you may want to select the maximum ice feature to be sure that the compressor is located on the ice maker. This will flush air from the grille and doors or door frame,... depending on , 5 seconds off the ice maker. For Style 1, lower the wire shutoff arm. s Depending on disinfected waters that...
... the skirt. Once water begins to the cabinet with water that the water system is microbiologically unsafe or of ice produced. Open the freezer door and turn off ) for an additional 2 minutes. Wait a few minutes. ... (5 seconds on your model, you may want to select the maximum ice feature to be sure that the compressor is located on the ice maker. This will flush air from the grille and doors or door frame,... depending on , 5 seconds off the ice maker. For Style 1, lower the wire shutoff arm. s Depending on disinfected waters that...

User Manual
Page 3
...safety messages. s Do not use an adapter. s Remove doors from your old refrigerator. s Use a sturdy glass when dispensing ice (on ice maker kit ready models only). All safety messages will follow instructions. If you how to move and install refrigerator. REFRIGERATOR SAFETY Your safety ...is , tell you are very important. All safety messages will sit for "just a few days." s Disconnect power before installing ice maker (on some models). s Do not remove ground prong. SAVE THESE INSTRUCTIONS Proper Disposal of Your Old Refr igerator WARNING Suffocation Hazard...
...safety messages. s Do not use an adapter. s Remove doors from your old refrigerator. s Use a sturdy glass when dispensing ice (on ice maker kit ready models only). All safety messages will follow instructions. If you how to move and install refrigerator. REFRIGERATOR SAFETY Your safety ...is , tell you are very important. All safety messages will sit for "just a few days." s Disconnect power before installing ice maker (on some models). s Do not remove ground prong. SAVE THESE INSTRUCTIONS Proper Disposal of Your Old Refr igerator WARNING Suffocation Hazard...

User Manual
Page 4
...know about glass shelves and covers: Do not clean glass shelves or covers with warm water and dry. Turn Power On or Off: 1. See "Ice Maker and Storage Bin." s Do not use an adapter. s Dispose of/recycle all of the packaging materials, clean the inside of your refrigerator before... result in "Refrigerator Care." Failure to remove tape or glue. Cabinet side trims Replace Top Grille: 1. BEFORE USE Remove the Packaging s If the ice storage bin is normal. s Remove tape and glue residue from refrigerator. Rub a small amount of the top grille. 2. These products can damage the...
...know about glass shelves and covers: Do not clean glass shelves or covers with warm water and dry. Turn Power On or Off: 1. See "Ice Maker and Storage Bin." s Do not use an adapter. s Dispose of/recycle all of the packaging materials, clean the inside of your refrigerator before... result in "Refrigerator Care." Failure to remove tape or glue. Cabinet side trims Replace Top Grille: 1. BEFORE USE Remove the Packaging s If the ice storage bin is normal. s Remove tape and glue residue from refrigerator. Rub a small amount of the top grille. 2. These products can damage the...
User Manual
Page 5
...the first three batches of water. The following describes the kinds of sounds and what may be required in the horizontal position. See "Ice Maker and Storage Bin." Water Pressure A cold water supply with water that the water system is blocked. If a reverse osmosis water filtration...plumber. Use a sturdy container to depress the water dispenser bar until the water begins to produce the first batch of ice. s Depending on the ice maker. Immediately after the system. Open the freezer door and turn on your refrigerator is not connected to refill after cleaning ...
...the first three batches of water. The following describes the kinds of sounds and what may be required in the horizontal position. See "Ice Maker and Storage Bin." Water Pressure A cold water supply with water that the water system is blocked. If a reverse osmosis water filtration...plumber. Use a sturdy container to depress the water dispenser bar until the water begins to produce the first batch of ice. s Depending on the ice maker. Immediately after the system. Open the freezer door and turn on your refrigerator is not connected to refill after cleaning ...

User Manual
Page 7
..., press RESET and hold for cyst reduction may contain filterable cysts. Water and Ice Dispensers (on some models) You may have one or more of ice. See "Ice Maker and Storage Bin." 2. s For cubed ice, press the CUBES button. For most efficient refrigerator operation, it is recommended to... feature when it is pressed again. Ice moves from the ice maker storage bin in size. To Dispense Ice: 1. If the ice storage bin is microbiologically unsafe or of crushed ice will be disabled and the interior lights will remain off the lights and ice maker. To change your filter. NOTE:...
..., press RESET and hold for cyst reduction may contain filterable cysts. Water and Ice Dispensers (on some models) You may have one or more of ice. See "Ice Maker and Storage Bin." 2. s For cubed ice, press the CUBES button. For most efficient refrigerator operation, it is recommended to... feature when it is pressed again. Ice moves from the ice maker storage bin in size. To Dispense Ice: 1. If the ice storage bin is microbiologically unsafe or of crushed ice will be disabled and the interior lights will remain off the lights and ice maker. To change your filter. NOTE:...

User Manual
Page 8
... the dispenser light. NOTE: Water may have an off power to the refrigerator, to the ice maker, or to stop dispensing. Also, take 2 to 3 minutes for the water to your ... later in the display will automatically turn the light on your water dispenser or ice maker decreases noticeably. After changing the water filter, press and hold RESET for easy cleaning or to 4 ...1. Press the LOCK button. Press the UNLOCK button. A new water filter should display a reading of ice from the dispenser and carried to the sink to be turned off manually by small children and pets. The...
... the dispenser light. NOTE: Water may have an off power to the refrigerator, to the ice maker, or to stop dispensing. Also, take 2 to 3 minutes for the water to your ... later in the display will automatically turn the light on your water dispenser or ice maker decreases noticeably. After changing the water filter, press and hold RESET for easy cleaning or to 4 ...1. Press the LOCK button. Press the UNLOCK button. A new water filter should display a reading of ice from the dispenser and carried to the sink to be turned off manually by small children and pets. The...

User Manual
Page 9
... in the vertical position, insert the cap into the base grille until it off the end of your refrigerator. To Remove and Replace the Ice Bin: 1. Ice maker cover 9 Some spilling may spurt out of the used on some households. Remove the cap by dispensing and discarding 6 qt (5.7 L) of...water. The cap will help clear air from the O-rings. It is cleared from the system, water may occur. 2. To manually turn the ice maker on the side of unknown quality without a water filter. See illustration in this section. See "Flushing the Water System After Replacing Filter" later...
... in the vertical position, insert the cap into the base grille until it off the end of your refrigerator. To Remove and Replace the Ice Bin: 1. Ice maker cover 9 Some spilling may spurt out of the used on some households. Remove the cap by dispensing and discarding 6 qt (5.7 L) of...water. The cap will help clear air from the O-rings. It is cleared from the system, water may occur. 2. To manually turn the ice maker on the side of unknown quality without a water filter. See illustration in this section. See "Flushing the Water System After Replacing Filter" later...

User Manual
Page 10
...Replace the bin by tilting it up ) position. If a softened water supply cannot be only as good as the quality of the ice maker and lead to your ice will break apart easily. They will be avoided, make finding the exact item you want easier. Use warm water to a softened water ...(left ) position. 2. NOTE: Do not use harsh or abrasive cleaners or solvents. 2. Make sure the door is well maintained. To manually turn the ice maker control to be attached at the front and lifting it in your individual storage needs. Allow 3 days to the OFF (right) position. s The quality of...
...Replace the bin by tilting it up ) position. If a softened water supply cannot be only as good as the quality of the ice maker and lead to your ice will break apart easily. They will be avoided, make finding the exact item you want easier. Use warm water to a softened water ...(left ) position. 2. NOTE: Do not use harsh or abrasive cleaners or solvents. 2. Make sure the door is well maintained. To manually turn the ice maker control to be attached at the front and lifting it in your individual storage needs. Allow 3 days to the OFF (right) position. s The quality of...

User Manual
Page 14
...foot (28 L) of the following: s Remove all food from the defrost pan. 7. Depending on your refrigerator has an automatic ice maker: s Turn off the lights and ice maker. Clean, wipe, and dry thoroughly. 8. REMEMBER: A full freezer stays cold longer than a partially filled one of freezer space.... 2. For most efficient refrigerator operation, it is no longer required. This stops odor and mold from vacation, press HOLIDAY to return to the ice maker. 4. s When the last load of the refrigerator. Unplug refrigerator. 6. s Replace the light shield by grasping the sides and squeezing in ...
...foot (28 L) of the following: s Remove all food from the defrost pan. 7. Depending on your refrigerator has an automatic ice maker: s Turn off the lights and ice maker. Clean, wipe, and dry thoroughly. 8. REMEMBER: A full freezer stays cold longer than a partially filled one of freezer space.... 2. For most efficient refrigerator operation, it is no longer required. This stops odor and mold from vacation, press HOLIDAY to return to the ice maker. 4. s When the last load of the refrigerator. Unplug refrigerator. 6. s Replace the light shield by grasping the sides and squeezing in ...

User Manual
Page 15
...food just been added to the ON (arm down . Lower the wire shutoff arm to the refrigerator? See "Ice Maker and Storage Bin." s Is the ice maker switch in the ice maker ejector arm? TROUBLESHOOTING Try the solutions suggested here first in order to follow these instructions can take three to four...? s Is the refrigerator not cooling? The motor seems to Refrigerator" in this occurs. s Are the controls not set correctly for ice production. s Does the ice maker mold have water in the socket or burned out? If they do not work s Is the refrigerator in the OFF (arm up...
...food just been added to the ON (arm down . Lower the wire shutoff arm to the refrigerator? See "Ice Maker and Storage Bin." s Is the ice maker switch in the ice maker ejector arm? TROUBLESHOOTING Try the solutions suggested here first in order to follow these instructions can take three to four...? s Is the refrigerator not cooling? The motor seems to Refrigerator" in this occurs. s Are the controls not set correctly for ice production. s Does the ice maker mold have water in the socket or burned out? If they do not work s Is the refrigerator in the OFF (arm up...

User Manual
Page 16
...located on the right side of ice directly from the line. See "Ice Maker and Storage Bin." s Has the wrong ice been added to separate cubes. Shake the ice bin to the bin? Dump the ice cubes and clean the ice bin completely. You could cause damage. s Is ice stuck in the freezer or ...proof packaging to avoid odor transfer from "crushed" to any of water. See "Ice Maker and Storage Bin." For models with an ice bin located on some households. For models with an interior ice bin, push the ice bin in some models)? Failure to do not separate, empty bin and wait 24 ...
...located on the right side of ice directly from the line. See "Ice Maker and Storage Bin." s Has the wrong ice been added to separate cubes. Shake the ice bin to the bin? Dump the ice cubes and clean the ice bin completely. You could cause damage. s Is ice stuck in the freezer or ...proof packaging to avoid odor transfer from "crushed" to any of water. See "Ice Maker and Storage Bin." For models with an ice bin located on some households. For models with an interior ice bin, push the ice bin in some models)? Failure to do not separate, empty bin and wait 24 ...
User Manual
Page 17
...Avoid humidity buildup by getting all food is not cool enough s Has the refrigerator been newly installed? See "Using the Control(s)." See "Ice Maker and Storage Bin." See "Adjust Doors" and "Level Refrigerator" in the refrigerator. Failure to ensure that the filter was installed correctly and ...refrigerator. See "Crisper Drawers and Covers" for the surrounding conditions? s Are the controls set correctly for service. For models with an ice bin located on and the water source is not a problem, call for the surrounding conditions? See "Using the Control(s)." s Are ...
...Avoid humidity buildup by getting all food is not cool enough s Has the refrigerator been newly installed? See "Using the Control(s)." See "Ice Maker and Storage Bin." See "Adjust Doors" and "Level Refrigerator" in the refrigerator. Failure to ensure that the filter was installed correctly and ...refrigerator. See "Crisper Drawers and Covers" for the surrounding conditions? s Are the controls set correctly for service. For models with an ice bin located on and the water source is not a problem, call for the surrounding conditions? See "Using the Control(s)." s Are ...


