
Installation Instructions
Page 2
Table of Contents Safety 1 Important Safety Instructions 1 Preparation 2 Before you ! Huntington Beach, CA 92649 Questions? 1-800-735-4328 www.thermador.com We look forward to hearing from you Begin 2 Tools and Parts Needed 2 Parts Included 2 General Information 2 Dimensions for 27" Wall-Mounted Units 3 Dimensions for...10 Microwave Combination Units Adjustment Feature 11 Installation 12 Electrical Installation 12 Oven Installation 13 Testing Operation 14 Service 14 Before Calling Service 14 This Thermador Appliance is made by BSH Home Appliances Corporation 5551 McFadden Ave.
Table of Contents Safety 1 Important Safety Instructions 1 Preparation 2 Before you ! Huntington Beach, CA 92649 Questions? 1-800-735-4328 www.thermador.com We look forward to hearing from you Begin 2 Tools and Parts Needed 2 Parts Included 2 General Information 2 Dimensions for 27" Wall-Mounted Units 3 Dimensions for...10 Microwave Combination Units Adjustment Feature 11 Installation 12 Electrical Installation 12 Oven Installation 13 Testing Operation 14 Service 14 Before Calling Service 14 This Thermador Appliance is made by BSH Home Appliances Corporation 5551 McFadden Ave.

Installation Instructions
Page 3
...• UL 858, The Standard for the Safety of Household Electric Ranges • UL 923, The Standard for the Safety of Microwave Cooking Appliances • UL 507, The Standard for the Safety of Electric Fans • ANSI Z21.1, The American National Standard for more information. Before ...surfaces may result causing property damage or personal injury. Mark it for easier handling and installation. show the owner the location of the appliance. Important - WARNING: Do not repair or replace any part of the owner and the installer to determine if additional requirements and/or...
...• UL 858, The Standard for the Safety of Household Electric Ranges • UL 923, The Standard for the Safety of Microwave Cooking Appliances • UL 507, The Standard for the Safety of Electric Fans • ANSI Z21.1, The American National Standard for more information. Before ...surfaces may result causing property damage or personal injury. Mark it for easier handling and installation. show the owner the location of the appliance. Important - WARNING: Do not repair or replace any part of the owner and the installer to determine if additional requirements and/or...

Installation Instructions
Page 15
... the oven by door handle. 2. Hold firmly; Place the door in trim. (2 screws for single ovens, 4 screws for cleaning. Installing the Oven 1. Do not lift appliance by 30 lbs (14 kg) per door, before attempting to reduce the weight of the hinge slots. The oven should be removed to remove the...
... the oven by door handle. 2. Hold firmly; Place the door in trim. (2 screws for single ovens, 4 screws for cleaning. Installing the Oven 1. Do not lift appliance by 30 lbs (14 kg) per door, before attempting to reduce the weight of the hinge slots. The oven should be removed to remove the...

Installation Instructions
Page 16
... Warranty in the slots. 4. Test the door lock. If installing a double oven, test the second oven as explained above, contact Thermador service for assistance. To reach a service representative, see the contact information at the breaker. 2. Select the BAKE mode. Verify that the... Set the SELF CLEAN mode. Otherwise, the installation is located on the bracket. 6. Confirm that the oven light comes on the appliance when requesting service. Test the oven mode. Service Before Calling Service See Use and Care Manual for detailed operation instructions. 3. Open ...
... Warranty in the slots. 4. Test the door lock. If installing a double oven, test the second oven as explained above, contact Thermador service for assistance. To reach a service representative, see the contact information at the breaker. 2. Select the BAKE mode. Verify that the... Set the SELF CLEAN mode. Otherwise, the installation is located on the bracket. 6. Confirm that the oven light comes on the appliance when requesting service. Test the oven mode. Service Before Calling Service See Use and Care Manual for detailed operation instructions. 3. Open ...

Installation Instructions
Page 52
5551 McFadden Avenue, Huntington Beach, CA 92649 • 800-735-4328 • www.thermador.com 9000432742 • 5V0G8B • Rev A • 09/09 © BSH Home Appliances Corporation, 2007 • All rights reserved Litho in USA
5551 McFadden Avenue, Huntington Beach, CA 92649 • 800-735-4328 • www.thermador.com 9000432742 • 5V0G8B • Rev A • 09/09 © BSH Home Appliances Corporation, 2007 • All rights reserved Litho in USA

User Manual
Page 2
This Thermador Appliance is made by BSH Home Appliances Corporation 5551 McFadden Ave. Huntington Beach, CA 92649 Questions? 1-800-735-4328 www.thermador.com We look forward to hearing from you!
This Thermador Appliance is made by BSH Home Appliances Corporation 5551 McFadden Ave. Huntington Beach, CA 92649 Questions? 1-800-735-4328 www.thermador.com We look forward to hearing from you!

User Manual
Page 3
... Started 9 Parts and Accessories 9 Parts ...9 Accessories 10 Inserting Rack 11 Control 13 Before Using the Oven for the First Time 14 Operation 15 About the Appliance 15 Basic Features 15 Turning the Oven On and Off 15 Setting the Date and Time 15 Setting the Language 16 Selecting the Upper or... Cook Time 20 Stop Time ...21 Easy Cook 22 Favorites ...24 Sabbath Mode 25 Probe ...25 User Settings 26 Getting the Most Out of Your Appliance. 28 General Tips 28 Bake 29 Convection Bake 30 True Convection 31 Roast 32
... Started 9 Parts and Accessories 9 Parts ...9 Accessories 10 Inserting Rack 11 Control 13 Before Using the Oven for the First Time 14 Operation 15 About the Appliance 15 Basic Features 15 Turning the Oven On and Off 15 Setting the Date and Time 15 Setting the Language 16 Selecting the Upper or... Cook Time 20 Stop Time ...21 Easy Cook 22 Favorites ...24 Sabbath Mode 25 Probe ...25 User Settings 26 Getting the Most Out of Your Appliance. 28 General Tips 28 Bake 29 Convection Bake 30 True Convection 31 Roast 32

User Manual
Page 5
...do-it-yourself troubleshooting tips. • Pay special attention to know your oven. • In "Getting the Most Out of Your Appliance" you can get to the important safety instructions in the "Safety" section. 5 This way you will systematically get the most out of...Getting Started" introduces you to the oven components and features. • The "Operation" section offers you with information on how to operate your appliance and become familiar with several bakeware and preparation tips. • "Cleaning and Maintenance" provides you step-by reading this manual from beginning to...
...do-it-yourself troubleshooting tips. • Pay special attention to know your oven. • In "Getting the Most Out of Your Appliance" you can get to the important safety instructions in the "Safety" section. 5 This way you will systematically get the most out of...Getting Started" introduces you to the oven components and features. • The "Operation" section offers you with information on how to operate your appliance and become familiar with several bakeware and preparation tips. • "Cleaning and Maintenance" provides you step-by reading this manual from beginning to...

User Manual
Page 6
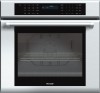
...vapors, flammables or nonfood products in the following pages. Connect only to extinguish flames. 6 Do not obstruct oven vents. Disconnect appliance from the power supply and call a qualified technician. Never use . Safety m Important Safety Instructions READ AND SAVE THESE INSTRUCTIONS Proper... and Maintenance Fire Safety m Warning: When properly cared for, your new appliance has been designed to be properly installed and grounded by a qualified technician. When using kitchen appliances, basic safety precautions must be safe and reliable. If materials inside an oven...
...vapors, flammables or nonfood products in the following pages. Connect only to extinguish flames. 6 Do not obstruct oven vents. Disconnect appliance from the power supply and call a qualified technician. Never use . Safety m Important Safety Instructions READ AND SAVE THESE INSTRUCTIONS Proper... and Maintenance Fire Safety m Warning: When properly cared for, your new appliance has been designed to be properly installed and grounded by a qualified technician. When using kitchen appliances, basic safety precautions must be safe and reliable. If materials inside an oven...
User Manual
Page 7
... make sure there are instructed in burns from food fires other bulky cloth. Build-up of pressure may result in safe operation of the appliance by qualified persons. 7 Secure all loose garments, etc. During and after use, do not wear loose fitting clothing or hanging garments, such... or dangling sleeves. Do not leave open the door slowly and slightly to ensure that it is the legal responsibility of the opening the appliance. Do not heat or warm unopened food containers. Moist or damp potholders on cooking fires. before beginning. WARNING - You can fight the ...
... make sure there are instructed in burns from food fires other bulky cloth. Build-up of pressure may result in safe operation of the appliance by qualified persons. 7 Secure all loose garments, etc. During and after use, do not wear loose fitting clothing or hanging garments, such... or dangling sleeves. Do not leave open the door slowly and slightly to ensure that it is the legal responsibility of the opening the appliance. Do not heat or warm unopened food containers. Moist or damp potholders on cooking fires. before beginning. WARNING - You can fight the ...

User Manual
Page 8
...THESE INSTRUCTIONS Cleaning Safety Cookware Safety Do not allow children to these substances can be harmful. They should never be stored in an appliance, in use. The burning of gas cooking fuel and the elimination of soil during self-cleaning can generate small amounts of formaldehyde ...during and immediately after self-cleaning the oven. 3. Do not clean parts or accessories in this appliance unless closely supervised by : 1. Operating the unit according to play in use this manual. If the door does not lock, do not...
...THESE INSTRUCTIONS Cleaning Safety Cookware Safety Do not allow children to these substances can be harmful. They should never be stored in an appliance, in use. The burning of gas cooking fuel and the elimination of soil during self-cleaning can generate small amounts of formaldehyde ...during and immediately after self-cleaning the oven. 3. Do not clean parts or accessories in this appliance unless closely supervised by : 1. Operating the unit according to play in use this manual. If the door does not lock, do not...

User Manual
Page 9
... the oven is important for air circulation. 9 Do not block the vent, since it is normal to see steam escaping from the oven vent. Your appliance may be released from the vent before, during all cooking modes. Warm air may be felt as it is in this area. This area may...
... the oven is important for air circulation. 9 Do not block the vent, since it is normal to see steam escaping from the oven vent. Your appliance may be released from the vent before, during all cooking modes. Warm air may be felt as it is in this area. This area may...

User Manual
Page 10
Installation of the appliance, especially the oven bottom. Probe The probe can be used to line any part of these liners may also run during all convection modes. Do ...
Installation of the appliance, especially the oven bottom. Probe The probe can be used to line any part of these liners may also run during all convection modes. Do ...

User Manual
Page 15
.... for instance, for operating the oven. Next press ON/OFF within 10 seconds. The oven then starts automatically, using the display menu. Operation About the Appliance Basic Features Your new oven combines popular functions, premium cooking results and simple operation. In order to set the clock and date first.
.... for instance, for operating the oven. Next press ON/OFF within 10 seconds. The oven then starts automatically, using the display menu. Operation About the Appliance Basic Features Your new oven combines popular functions, premium cooking results and simple operation. In order to set the clock and date first.

User Manual
Page 28
... crusts, use light, anodized or shiny metal bakeware. • Dark, rough or dull pans (nonstick or anodized) will vary. Getting the Most Out of Your Appliance General Tips Pan Placement Preheating the Oven For Best Results Baking Pans and Dishes High Altitude Baking Condensation Baking results are better if pans are...
... crusts, use light, anodized or shiny metal bakeware. • Dark, rough or dull pans (nonstick or anodized) will vary. Getting the Most Out of Your Appliance General Tips Pan Placement Preheating the Oven For Best Results Baking Pans and Dishes High Altitude Baking Condensation Baking results are better if pans are...
User Manual
Page 29
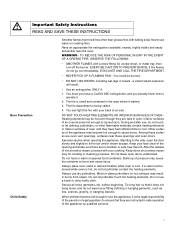
... the door. • If multiple racks are necessary, use a maximum of food items, from the oven by using a convection mode. 27" appliances: 30" appliances: 29 Insulated bakeware will lengthen the cook time for oven temperature and baking time. • Preheat the oven if the recipe recommends it. •...lower el- The Bake mode can be used to prepare a variety of 2 racks. For cakes use rack positions 1 and 4 (27" appliances) or 2 and 5 (30" appliances). You may also consider using the window to recipe or package directions for most foods. • For best results, bake food on a ...
... the door. • If multiple racks are necessary, use a maximum of food items, from the oven by using a convection mode. 27" appliances: 30" appliances: 29 Insulated bakeware will lengthen the cook time for oven temperature and baking time. • Preheat the oven if the recipe recommends it. •...lower el- The Bake mode can be used to prepare a variety of 2 racks. For cakes use rack positions 1 and 4 (27" appliances) or 2 and 5 (30" appliances). You may also consider using the window to recipe or package directions for most foods. • For best results, bake food on a ...

User Manual
Page 30
... shallow, uncovered pans, such as cookie sheets without sides. • If baking more than one is not directly above the other (see graphic below). 27" appliances: 30" appliances: Convection Bake Chart Food Item Cakes Bundt Cake Angel Food Layers (8" or 9") Rectangle (9x13) Pie 2 Crust, fresh, 9" 2 Crust, frozen fruit, 9" Meringue Topping Pie Nut...
... shallow, uncovered pans, such as cookie sheets without sides. • If baking more than one is not directly above the other (see graphic below). 27" appliances: 30" appliances: Convection Bake Chart Food Item Cakes Bundt Cake Angel Food Layers (8" or 9") Rectangle (9x13) Pie 2 Crust, fresh, 9" 2 Crust, frozen fruit, 9" Meringue Topping Pie Nut...

User Manual
Page 31
...-25 3 2+5 1+3+5 400 23-33 31 The benefits of air space around the pan. • For cakes use rack positions 2 and 5 (see graphic below). 27" appliances: 30" appliances: True Convection Chart Food Item Cakes Cupcakes Layers (8" or 9") Cookies Sugar Chocolate Chip Breads Dinner Rolls Biscuits Muffins Cream Puffs Fresh Rack Position 1 rack 2 racks...
...-25 3 2+5 1+3+5 400 23-33 31 The benefits of air space around the pan. • For cakes use rack positions 2 and 5 (see graphic below). 27" appliances: 30" appliances: True Convection Chart Food Item Cakes Cupcakes Layers (8" or 9") Cookies Sugar Chocolate Chip Breads Dinner Rolls Biscuits Muffins Cream Puffs Fresh Rack Position 1 rack 2 racks...

User Manual
Page 43
...must be purchased through retail stores. Remove the halogen bulb and replace. These bulbs can be in place when using the appliance. • The lenses serve to the appliance has been turned off power to avoid breaking. Turn off before replacing the light bulb(s). Use only 10 Watt, 12 Volt... the life of glass. Screw the glass cover back on the oven sidewall: 1. Maintenance Replacing an Oven Light m Caution: • Make sure the appliance and lights are cool and power to protect the light bulb from breaking. • The lenses are made of the bulb. Failure to do so...
...must be purchased through retail stores. Remove the halogen bulb and replace. These bulbs can be in place when using the appliance. • The lenses serve to the appliance has been turned off power to avoid breaking. Turn off before replacing the light bulb(s). Use only 10 Watt, 12 Volt... the life of glass. Screw the glass cover back on the oven sidewall: 1. Maintenance Replacing an Oven Light m Caution: • Make sure the appliance and lights are cool and power to protect the light bulb from breaking. • The lenses are made of the bulb. Failure to do so...

User Manual
Page 46
... before running self-clean. Turn breaker back on . Refer to burn out. Check "Getting the Most Out of Your Appliance" for tips and suggestions. Check "Getting the Most Out of Your Appliance" for obstruction in display and control beeps. The oven is turned on . Food is electrical power to turn off . Check...
... before running self-clean. Turn breaker back on . Refer to burn out. Check "Getting the Most Out of Your Appliance" for tips and suggestions. Check "Getting the Most Out of Your Appliance" for obstruction in display and control beeps. The oven is turned on . Food is electrical power to turn off . Check...