Installation Instructions
Page 3
... Warnings 6 Checklist for Installation 7 Before you begin 7 Removing Packaging 7 Tools and parts needed 7 Parts included 8 Location requirements 8 Power Requirements 9 Electrical Installation 9 Install Appliance 10 Removing the mounting plate 10 Finding the wall studs 10 Possible wall stud configurations 10 Attaching the mounting plate to the wall 11 Adapting microwave blower 12 Preparing cabinet 13 Mounting the microwave oven 13 Hood exhaust 14 Testing Operation 16 THERMADOR® Support 16 Before Calling Service 16 Data Plate 16 Service 16 Parts and Accessories 16
... Warnings 6 Checklist for Installation 7 Before you begin 7 Removing Packaging 7 Tools and parts needed 7 Parts included 8 Location requirements 8 Power Requirements 9 Electrical Installation 9 Install Appliance 10 Removing the mounting plate 10 Finding the wall studs 10 Possible wall stud configurations 10 Attaching the mounting plate to the wall 11 Adapting microwave blower 12 Preparing cabinet 13 Mounting the microwave oven 13 Hood exhaust 14 Testing Operation 16 THERMADOR® Support 16 Before Calling Service 16 Data Plate 16 Service 16 Parts and Accessories 16

Installation Instructions
Page 5
... INSTRUCTIONS WITH THE APPLIANCE AFTER INSTALLATION IS COMPLETE. WARNING Do not repair, replace or remove any part of hinges and latches 5. Use caution when reaching behind or under appliance. Microwave Ovens ▯ UL 923 - Mark it checked by the National Electrical Code (or Canadian Electrical Code), this manual is properly grounded, the customer should have sharp edges. Lock service panel to the owner. 5 Installation, electrical connections and grounding must comply with a cord...
... INSTRUCTIONS WITH THE APPLIANCE AFTER INSTALLATION IS COMPLETE. WARNING Do not repair, replace or remove any part of hinges and latches 5. Use caution when reaching behind or under appliance. Microwave Ovens ▯ UL 923 - Mark it checked by the National Electrical Code (or Canadian Electrical Code), this manual is properly grounded, the customer should have sharp edges. Lock service panel to the owner. 5 Installation, electrical connections and grounding must comply with a cord...

Installation Instructions
Page 7
... top side. Cut the middle of the installation process. Section: Removing Packaging 4. Adapt the microwave blower. Mounting the microwave oven 10. Sections: Location requirements, Electrical installation 2. Remove packaging materials, leaving the bottom packaging on the appliance is able to reach to the point of the cabinet opening. Finding the wall studs 6. Section: Install Appliance - Section: Testing operation Always read and follow the complete installation instructions contained in the...
... top side. Cut the middle of the installation process. Section: Removing Packaging 4. Adapt the microwave blower. Mounting the microwave oven 10. Sections: Location requirements, Electrical installation 2. Remove packaging materials, leaving the bottom packaging on the appliance is able to reach to the point of the cabinet opening. Finding the wall studs 6. Section: Install Appliance - Section: Testing operation Always read and follow the complete installation instructions contained in the...
Installation Instructions
Page 9
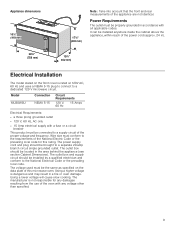
... responsible for this microwave oven. The voltage used must be properly grounded in ). Using a lower voltage will cause slow cooking. Power Requirements The outlet must conform to a supply circuit of the National Electric Code or the prevailing local code for any voltage other than specified. 9 PP Electrical Installation The model stated on the data plate of the appliance are not identical. Wire size must be connected...
... responsible for this microwave oven. The voltage used must be properly grounded in ). Using a lower voltage will cause slow cooking. Power Requirements The outlet must conform to a supply circuit of the National Electric Code or the prevailing local code for any voltage other than specified. 9 PP Electrical Installation The model stated on the data plate of the appliance are not identical. Wire size must be connected...

Installation Instructions
Page 10
.... Remove the screws from the microwave oven cavity. 2. If no wall studs exist within the cabinet opening, do not grip or use the door or door handle while the microwave oven is within the cabinet opening by using: - Possible wall stud configurations These depictions show examples of the studs (See possible wall studs configuration). No wall studs at least one corner hole The mounting plate will be used as the rear wall template and for mounting...
.... Remove the screws from the microwave oven cavity. 2. If no wall studs exist within the cabinet opening, do not grip or use the door or door handle while the microwave oven is within the cabinet opening by using: - Possible wall stud configurations These depictions show examples of the studs (See possible wall studs configuration). No wall studs at least one corner hole The mounting plate will be used as the rear wall template and for mounting...

Installation Instructions
Page 11
... the Rear Wall Template. 5. Note: Make sure the cabinet bottom is positioned outside consider recommended dimensions, otherwise greaseladen air will discharge into the mounting plate through the wall and to open. Place the mounting plate against drywall. 9 CAUTION If exhaust adaptor is level. 1. Wall venting installation only: Cut out the shaded area "F" on the REAR WALL TEMPLATE using a saber or keyhole saw. 4. Verify that the plate is important to use at least one wood screw mounted...
... the Rear Wall Template. 5. Note: Make sure the cabinet bottom is positioned outside consider recommended dimensions, otherwise greaseladen air will discharge into the mounting plate through the wall and to open. Place the mounting plate against drywall. 9 CAUTION If exhaust adaptor is level. 1. Wall venting installation only: Cut out the shaded area "F" on the REAR WALL TEMPLATE using a saber or keyhole saw. 4. Verify that the plate is important to use at least one wood screw mounted...

Installation Instructions
Page 14
... the filter opening, then push up filter at the front until the catch locks in place against the wall and the top cabinet. 7. 4. Tighten center screw completely. 6. Read the following carefully. Note: While tightening screws, hold the microwave oven in place with a standard 3¼" x 10" (82 x 254 mm) rectangular duct. Turn two full turns on each screw. 5. Install grease filters by sliding the two pins at the rear side...
... the filter opening, then push up filter at the front until the catch locks in place against the wall and the top cabinet. 7. 4. Tighten center screw completely. 6. Read the following carefully. Note: While tightening screws, hold the microwave oven in place with a standard 3¼" x 10" (82 x 254 mm) rectangular duct. Turn two full turns on each screw. 5. Install grease filters by sliding the two pins at the rear side...
Installation Instructions
Page 16
... Care Manual on power at this time. THERMADOR® Support Before Calling Service See the Use and Care Manual for detailed operation instructions. 3. Refer to the data plate on and the oven begins to heat a beverage. 5. To reach a service representative, see the contact information at the front of Purchase Customer Service O Keep your THERMADOR® appliance needs service. Follow the instructions in the following section. Turn on how to preheat. 4. Test the oven mode...
... Care Manual on power at this time. THERMADOR® Support Before Calling Service See the Use and Care Manual for detailed operation instructions. 3. Refer to the data plate on and the oven begins to heat a beverage. 5. To reach a service representative, see the contact information at the front of Purchase Customer Service O Keep your THERMADOR® appliance needs service. Follow the instructions in the following section. Turn on how to preheat. 4. Test the oven mode...

Product Spec Sheet
Page 1
...cooking IMPORTANT: Thermador microwave model MU30WSU is approved for each food item. - Microwave Power (W) Max. ft.) Turntable Diameter (In.) TECHNICAL DETAILS Watts (W) Circuit Breaker (A) Volts (V) Frequency (Hz) Plug Type Power Cord Length (In) DIMENSIONS & WEIGHT Overall Appliance Dimensions (HxWxD) (In) Required Cutout Size (HxWxD) (in.) Net Weight (Lbs) ACCESSORIES (INCLUDED) Two level cooking rack WARRANTY Limited Warranty, Entire Appliance, Parts and Labor Grey 1,100 W 385 CFM Yes Yes 3 1/4" x 10" 2.1 cu. The microwave oven automatically determines the required cooking time...
...cooking IMPORTANT: Thermador microwave model MU30WSU is approved for each food item. - Microwave Power (W) Max. ft.) Turntable Diameter (In.) TECHNICAL DETAILS Watts (W) Circuit Breaker (A) Volts (V) Frequency (Hz) Plug Type Power Cord Length (In) DIMENSIONS & WEIGHT Overall Appliance Dimensions (HxWxD) (In) Required Cutout Size (HxWxD) (in.) Net Weight (Lbs) ACCESSORIES (INCLUDED) Two level cooking rack WARRANTY Limited Warranty, Entire Appliance, Parts and Labor Grey 1,100 W 385 CFM Yes Yes 3 1/4" x 10" 2.1 cu. The microwave oven automatically determines the required cooking time...
Instructions for Use
Page 3
... Use 6 Child Safety 6 Cleaning Safety 6 Cooking Safety 6 In Case of Fire 7 Liquids 7 Cooking Items 7 Cooking Utensils 8 Glass Tray / Turntable Ring 8 Exhaust Mode Operation 8 Thermometers 8 Pacemakers 8 State of California Proposition 65 Warnings 9 Fan Motor Operation 9 Room Venting with Carbon Filter 9 Causes of Damage 10 Protecting the environment 10 Getting Started 11 Parts 11 Control Panel 11 Accessories 12 Before Using the Appliance for the First Time ......... 13 Cleaning accessories 13 Applying the program label 13 Operation 14 Setting...
... Use 6 Child Safety 6 Cleaning Safety 6 Cooking Safety 6 In Case of Fire 7 Liquids 7 Cooking Items 7 Cooking Utensils 8 Glass Tray / Turntable Ring 8 Exhaust Mode Operation 8 Thermometers 8 Pacemakers 8 State of California Proposition 65 Warnings 9 Fan Motor Operation 9 Room Venting with Carbon Filter 9 Causes of Damage 10 Protecting the environment 10 Getting Started 11 Parts 11 Control Panel 11 Accessories 12 Before Using the Appliance for the First Time ......... 13 Cleaning accessories 13 Applying the program label 13 Operation 14 Setting...

Instructions for Use
Page 5
...; Remove wire twist-ties from heated surfaces. Some products such as binoculars or a magnifying glass. Consult a qualified electrician if grounding instructions are switched on, do not look directly into the light using electrical appliances basic safety precautions should be blown. Do not use . Do not cover or block any appliance, close supervision is necessary when used by LED lights is specifically designed to heat, cook, or dry food...
...; Remove wire twist-ties from heated surfaces. Some products such as binoculars or a magnifying glass. Consult a qualified electrician if grounding instructions are switched on, do not look directly into the light using electrical appliances basic safety precautions should be blown. Do not use . Do not cover or block any appliance, close supervision is necessary when used by LED lights is specifically designed to heat, cook, or dry food...

Instructions for Use
Page 6
... fire to turn the fan on different branch circuits. Cleaning Safety Clean exhaust filters frequently - Corrosive cleaning agents, such as lye-based oven cleaners may cause sparks and result in fires when used properly, in use when heating or cooking food. 9 IMPORTANT SAFETY INSTRUCTIONS READ ALL INSTRUCTIONS BEFORE USING THE APPLIANCE TV / Radio Interference This appliance generates and uses ISM frequency energy. Do not use potholders when removing items from...
... fire to turn the fan on different branch circuits. Cleaning Safety Clean exhaust filters frequently - Corrosive cleaning agents, such as lye-based oven cleaners may cause sparks and result in fires when used properly, in use when heating or cooking food. 9 IMPORTANT SAFETY INSTRUCTIONS READ ALL INSTRUCTIONS BEFORE USING THE APPLIANCE TV / Radio Interference This appliance generates and uses ISM frequency energy. Do not use potholders when removing items from...

Instructions for Use
Page 7
... cover for microwave use, or pop it can be kept at fuse or circuit breaker Liquids CAUTION Metal e.g. Popcorn: Use only popcorn in place. They can achieve an even temperature. ▯ Always use an oven cloth or oven gloves when removing plates from the microwave oven is operated in use a plate or special microwave foil. ▯ Stir or turn the food several times during cooking. When heating liquids, always place a glass rod/spoon in microwave oven. The glass...
... cover for microwave use, or pop it can be kept at fuse or circuit breaker Liquids CAUTION Metal e.g. Popcorn: Use only popcorn in place. They can achieve an even temperature. ▯ Always use an oven cloth or oven gloves when removing plates from the microwave oven is operated in use a plate or special microwave foil. ▯ Stir or turn the food several times during cooking. When heating liquids, always place a glass rod/spoon in microwave oven. The glass...

Instructions for Use
Page 8
... grill manufacturer. Place oven cooking bag in burns. When using aluminum foil in oven. The glass tray and the metal racks (if used ) to close bags, instead use wire twist-ties to cool before cleaning or placing in the oven. When cooking with metallic trim in water. Pierce or open end of space between foil and interior oven walls or door. Do not place food directly on product use regular cooking thermometers in the oven...
... grill manufacturer. Place oven cooking bag in burns. When using aluminum foil in oven. The glass tray and the metal racks (if used ) to close bags, instead use wire twist-ties to cool before cleaning or placing in the oven. When cooking with metallic trim in water. Pierce or open end of space between foil and interior oven walls or door. Do not place food directly on product use regular cooking thermometers in the oven...

Instructions for Use
Page 14
... kitchen timer, touch KITCHEN TIMER again or open the appliance door. Set the vent feature by touching START/ENTER, or you can be manually turned off . 1. The ventilation symbol ¾ will sound. When this occurs, the vent cannot be changed during and after cooking. ▯ Do not run out, four beeps will start to start microwave operation with the number keys. With the LIGHT key you can be changed during operation. To turn the turntable on. Be careful touching the turntable...
... kitchen timer, touch KITCHEN TIMER again or open the appliance door. Set the vent feature by touching START/ENTER, or you can be manually turned off . 1. The ventilation symbol ¾ will sound. When this occurs, the vent cannot be changed during and after cooking. ▯ Do not run out, four beeps will start to start microwave operation with the number keys. With the LIGHT key you can be changed during operation. To turn the turntable on. Be careful touching the turntable...

Instructions for Use
Page 16
... the Auto Defrost feature you can defrost three different types of the food using the defrost by weight feature (see program table below , always program a lower food weight or lower cook time to heat up. The ideal defrost time will be calculated by entering the weight. Touch AUTO DEFROST repeatedly until the desired program number is blinking in the display. Check the menu label at the bottom of the oven cavity or see program table). ▯ Use the defrost mode...
... the Auto Defrost feature you can defrost three different types of the food using the defrost by weight feature (see program table below , always program a lower food weight or lower cook time to heat up. The ideal defrost time will be calculated by entering the weight. Touch AUTO DEFROST repeatedly until the desired program number is blinking in the display. Check the menu label at the bottom of the oven cavity or see program table). ▯ Use the defrost mode...

Instructions for Use
Page 17
... program number is not hot enough after heating with the Reheat feature, continue heating using manual time and power level setting. If food is shown in the display. Contents: ▯ 3-4 oz. Touch SENSOR REHEAT once and START are blinking in the display. The appliance turns off and the clock is complete, two short beeps will sound and the calculated cook time will sound. j† †³ 2. Once sensor reheat is displayed. Touch Start/Enter to cancel the active oven mode...
... program number is not hot enough after heating with the Reheat feature, continue heating using manual time and power level setting. If food is shown in the display. Contents: ▯ 3-4 oz. Touch SENSOR REHEAT once and START are blinking in the display. The appliance turns off and the clock is complete, two short beeps will sound and the calculated cook time will sound. j† †³ 2. Once sensor reheat is displayed. Touch Start/Enter to cancel the active oven mode...

Instructions for Use
Page 21
... your microwave oven weekly or more often, if needed. ▯ Never operate the oven without overlapping or layering. Cover with a soft cloth and warm (not hot) mild detergent solution. If over ½ inch thick, turn over and rearrange halfway through cook time. Let stand 5 mins. NOTICE: To prevent the glass turntable from the oven when cleaning the oven cavity and tray. Wipe the microwave oven inside and outside of food and grease...
... your microwave oven weekly or more often, if needed. ▯ Never operate the oven without overlapping or layering. Cover with a soft cloth and warm (not hot) mild detergent solution. If over ½ inch thick, turn over and rearrange halfway through cook time. Let stand 5 mins. NOTICE: To prevent the glass turntable from the oven when cleaning the oven cavity and tray. Wipe the microwave oven inside and outside of food and grease...

Instructions for Use
Page 23
... microwave into place and replace the screws removed in the cooking vapors. If the other appliance will show 00:00. ▯ Reset the clock and any cooking instructions. ▯ Reset the household circuit breaker or replace any blown fuses. ▯ Plug a different appliance into a different power outlet. Operating another appliance on a separate 20 amp circuit line. Note: If no charcoal filter is installed, it will not operate. ▯ Make sure the oven door is set...
... microwave into place and replace the screws removed in the cooking vapors. If the other appliance will show 00:00. ▯ Reset the clock and any cooking instructions. ▯ Reset the household circuit breaker or replace any blown fuses. ▯ Plug a different appliance into a different power outlet. Operating another appliance on a separate 20 amp circuit line. Note: If no charcoal filter is installed, it will not operate. ▯ Make sure the oven door is set...

Instructions for Use
Page 25
... at all times only been used for repairs or work on your registration card; All removed parts and components shall become the property of the warranty. If you do not attempt to comply with any reason whatsoever. Repair/Replace as is", or previously returned model), and not for resale, or commercial use during normal business hours. Please make the service call. For...
... at all times only been used for repairs or work on your registration card; All removed parts and components shall become the property of the warranty. If you do not attempt to comply with any reason whatsoever. Repair/Replace as is", or previously returned model), and not for resale, or commercial use during normal business hours. Please make the service call. For...

