
Design Guide - Professional Rangetops
Page 4
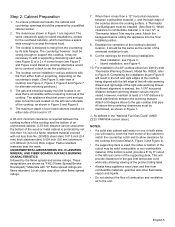
... supply. Installation, electrical and gas connections, and grounding must not interfere with a 3-prong plug and are shipped by qualified service personnel only. mODEL PCG304G PCG364GD PCG366G PCG486GD REQuIRED CIRCuIT BREakER 120V ...gas used . Thermador Professional Rangetops are also a viable option, however the 27" depth for use with all applicable local codes. Please refer to the LP Conversion Instructions for improved ventilation performance. • For island installations the hood width should be installed 30" above the cooking surface. For high output gas cooktops...
... supply. Installation, electrical and gas connections, and grounding must not interfere with a 3-prong plug and are shipped by qualified service personnel only. mODEL PCG304G PCG364GD PCG366G PCG486GD REQuIRED CIRCuIT BREakER 120V ...gas used . Thermador Professional Rangetops are also a viable option, however the 27" depth for use with all applicable local codes. Please refer to the LP Conversion Instructions for improved ventilation performance. • For island installations the hood width should be installed 30" above the cooking surface. For high output gas cooktops...
Design Guide - Professional Rangetops
Page 5
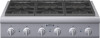
... SPECIFICATIONS Total Number of simmer options from Rear Wall Cooking Surface Gas Cooktop Burners Center Front Burner Center Back Burner Center Electric Griddle Total Natural Gas Connection Rating LP Convertible Total LP Gas Connection Rating Electrical Supply Required Circuit Breaker Power Cord Shipping Weight ... range of Rangetop Burners Product Width Product Height 4 29 15/16" 8 1/16" (w/o gas connection) 10 9/16" (includes gas connection) Product Depth 25 13/16" (includes gas connection) Cutout Width Cutout Height Cutout Depth Minimum Distance from 375 BTU to clean cooking surface...
... SPECIFICATIONS Total Number of simmer options from Rear Wall Cooking Surface Gas Cooktop Burners Center Front Burner Center Back Burner Center Electric Griddle Total Natural Gas Connection Rating LP Convertible Total LP Gas Connection Rating Electrical Supply Required Circuit Breaker Power Cord Shipping Weight ... range of Rangetop Burners Product Width Product Height 4 29 15/16" 8 1/16" (w/o gas connection) 10 9/16" (includes gas connection) Product Depth 25 13/16" (includes gas connection) Cutout Width Cutout Height Cutout Depth Minimum Distance from 375 BTU to clean cooking surface...

Design Guide - Professional Rangetops
Page 7
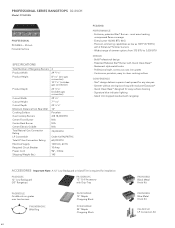
...and grill accessory for easy surface cleaning - Grill accessory - most even heating, unsurpassed flame coverage - Widest range of Cooktop Burners Product Width Product Height Product Depth Cutout Width Cutout Height Cutout Depth Minimum Distance from 375 BTU to 3,000 BTU -...SPECIFICATIONS Total Number of simmer options from Rear Wall Cooking Surface Gas Cooktop Burners Center Front Burner Center Back Burner Center Electric Griddle Total Natural Gas Connection Rating LP Convertible Total LP Gas Connection Rating Electrical Supply Required Circuit Breaker Power Cord Shipping Weight ...
...and grill accessory for easy surface cleaning - Grill accessory - most even heating, unsurpassed flame coverage - Widest range of Cooktop Burners Product Width Product Height Product Depth Cutout Width Cutout Height Cutout Depth Minimum Distance from 375 BTU to 3,000 BTU -...SPECIFICATIONS Total Number of simmer options from Rear Wall Cooking Surface Gas Cooktop Burners Center Front Burner Center Back Burner Center Electric Griddle Total Natural Gas Connection Rating LP Convertible Total LP Gas Connection Rating Electrical Supply Required Circuit Breaker Power Cord Shipping Weight ...

Design Guide - Professional Rangetops
Page 9
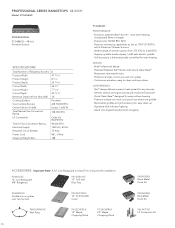
... ExtraLow® - Bold Professional design - PROFESSIONAL SERIES RANGETOPS 36-INch Model: PcG366G PROFESSIONAL PCG366G - 36-Inch Porcelain Surface SPEcIFIcATIONS Total Number of simmer options from Rear Wall Cooking Surface Gas Cooktop Burners Center Electric Griddle Total Natural Gas Connection Rating LP Convertible Total LP Gas Connection Rating Electrical Supply Required Circuit Breaker Power Cord Shipping Weight...
... ExtraLow® - Bold Professional design - PROFESSIONAL SERIES RANGETOPS 36-INch Model: PcG366G PROFESSIONAL PCG366G - 36-Inch Porcelain Surface SPEcIFIcATIONS Total Number of simmer options from Rear Wall Cooking Surface Gas Cooktop Burners Center Electric Griddle Total Natural Gas Connection Rating LP Convertible Total LP Gas Connection Rating Electrical Supply Required Circuit Breaker Power Cord Shipping Weight...
Design Guide - Professional Rangetops
Page 11
... Model: PcG486GD PROFESSIONAL PCG486GD - 48-inch Porcelain Surface SPEcIFIcATIONS Total Number of simmer options from Rear Wall Cooking Surface Gas Cooktop Burners Center Electric Griddle Total Natural Gas Connection Rating LP Convertible Total LP Gas Connection Rating Electrical Supply Required Circuit Breaker Power Cord Shipping Weight (lbs.) 6 47 15/16" 8 1/16" 25 13/16...
... Model: PcG486GD PROFESSIONAL PCG486GD - 48-inch Porcelain Surface SPEcIFIcATIONS Total Number of simmer options from Rear Wall Cooking Surface Gas Cooktop Burners Center Electric Griddle Total Natural Gas Connection Rating LP Convertible Total LP Gas Connection Rating Electrical Supply Required Circuit Breaker Power Cord Shipping Weight (lbs.) 6 47 15/16" 8 1/16" 25 13/16...
Installation Instructions PART2
Page 1
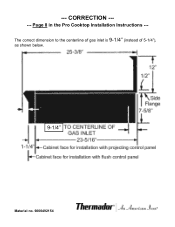
Page 8 in the Pro Cooktop Installation Instructions --- The correct dimension to the centerline of gas inlet is 9-1/4" (instead of 5-1/4"), as shown below. 9-1/4" Material no. 9000492154 --- CORRECTION --- ---
Page 8 in the Pro Cooktop Installation Instructions --- The correct dimension to the centerline of gas inlet is 9-1/4" (instead of 5-1/4"), as shown below. 9-1/4" Material no. 9000492154 --- CORRECTION --- ---

Installation Instructions PART3
Page 2
... 2 Before you ! Huntington Beach, CA 92649 Questions? 1-800-735-4328 www.thermador.com We look forward to hearing from you Begin 2 Important Installation Information 3 Step 1: Ventilation Requirements 3 Step 2: Cabinet Preparation 5 Step 3: Unpacking, Moving, Placing and Anchoring the Cooktop 10 Step 4: Gas Requirements and Hookup 11 Step 5: Electrical Requirements, Connection and Grounding 12 Step...
... 2 Before you ! Huntington Beach, CA 92649 Questions? 1-800-735-4328 www.thermador.com We look forward to hearing from you Begin 2 Important Installation Information 3 Step 1: Ventilation Requirements 3 Step 2: Cabinet Preparation 5 Step 3: Unpacking, Moving, Placing and Anchoring the Cooktop 10 Step 4: Gas Requirements and Hookup 11 Step 5: Electrical Requirements, Connection and Grounding 12 Step...

Installation Instructions PART3
Page 4
...the owner. After installation, accessing the information is requested. water column (27.4 mb to 34.9 mb) Propane Gas - 11"min. All sealed burners are rated at the rear of the cooktop. DO NOT install this manual. water column (14.9 mb to 34.9 mb) WARNING Disconnect power before proceeding... Natural Gas - 6" min. PLEASE READ ENTIRE INSTRUCTIONS BEFORE PROCEEDING IMPORTANT: LOCAL CODES VARY. Before turning power ON, be ordered separately and installed at 18,000 BTU/HR (*15,000 BTU/HR on LP). *All models are in the OFF position. The Thermador Low Back backguard must be...
...the owner. After installation, accessing the information is requested. water column (27.4 mb to 34.9 mb) Propane Gas - 11"min. All sealed burners are rated at the rear of the cooktop. DO NOT install this manual. water column (14.9 mb to 34.9 mb) WARNING Disconnect power before proceeding... Natural Gas - 6" min. PLEASE READ ENTIRE INSTRUCTIONS BEFORE PROCEEDING IMPORTANT: LOCAL CODES VARY. Before turning power ON, be ordered separately and installed at 18,000 BTU/HR (*15,000 BTU/HR on LP). *All models are in the OFF position. The Thermador Low Back backguard must be...

Installation Instructions PART3
Page 5
... installed in conjunction with a suitable overhead vent hood. (See "Step 1: Ventilation Requirements".) Check local building codes for Household Cooking Gas Appliances • CAN/CSA-C22.2 No. 113-M1984 Fans and Ventilators • CAN/CSA-C22.2 No. 61-M89 Household ...requirements and/or standards apply to specific installations. Installation Codes for use with the CAN 1-B149.1 and .2 - Remove all Thermador cooktops. Installation, electrical connections and grounding must be in accordance with packaging material. Destroy the packaging after unpacking the appliance. Downdraft ...
... installed in conjunction with a suitable overhead vent hood. (See "Step 1: Ventilation Requirements".) Check local building codes for Household Cooking Gas Appliances • CAN/CSA-C22.2 No. 113-M1984 Fans and Ventilators • CAN/CSA-C22.2 No. 61-M89 Household ...requirements and/or standards apply to specific installations. Installation Codes for use with the CAN 1-B149.1 and .2 - Remove all Thermador cooktops. Installation, electrical connections and grounding must be in accordance with packaging material. Destroy the packaging after unpacking the appliance. Downdraft ...

Installation Instructions PART3
Page 6
... Insert w/ optional blower 54" Island Hood w/ optional blower Important Notes: • It is used with Thermador Professional Cooktops. • Refer to www.Thermador.com for tightly sealed and insulated homes. • A qualified heating and ventilating contractor should be consulted. ...options, Blowers, and Accessories. • * For high output gas cooktops (60,000 BTU or greater), the minimum of one (1) CFM of ventilation per minute" (standard blower capacity rating). Cooktop Width Cooktop Configuration Minimum Recommended Blower Capacity* Ventilation Options 30" 4 burners ...
... Insert w/ optional blower 54" Island Hood w/ optional blower Important Notes: • It is used with Thermador Professional Cooktops. • Refer to www.Thermador.com for tightly sealed and insulated homes. • A qualified heating and ventilating contractor should be consulted. ...options, Blowers, and Accessories. • * For high output gas cooktops (60,000 BTU or greater), the minimum of one (1) CFM of ventilation per minute" (standard blower capacity rating). Cooktop Width Cooktop Configuration Minimum Recommended Blower Capacity* Ventilation Options 30" 4 burners ...
Installation Instructions PART3
Page 7
... combustible material and the back edge of the cooktop above the cooking surface, a Thermador Low Backguard must be installed in the left rear underside of over 12", a Thermador Island Trim may allow clearance for the overhead cabinets, which must have a space wide enough to the gas cooktop inlet pipe. NOTES: • If a solid side cabinet...
... combustible material and the back edge of the cooktop above the cooking surface, a Thermador Low Backguard must be installed in the left rear underside of over 12", a Thermador Island Trim may allow clearance for the overhead cabinets, which must have a space wide enough to the gas cooktop inlet pipe. NOTES: • If a solid side cabinet...
Installation Instructions PART3
Page 10
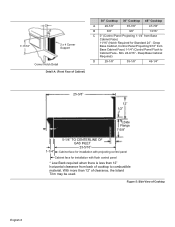
..." (Notch Required for installation with flush control panel * Low Back required when there is less than 12" of Cooktop English 8 Deep Base Cabinet Required) D 29-1/8" 35-1/8" 46-1/4" 25-3/8" 12" 1/2" Side Flange 7-5/8" 1-1/4" 5-1/4" TO CENTERLINE OF GAS INLET 23-5/16" Cabinet face for installation with projecting control panel Cabinet face for Standard 24" - With...
..." (Notch Required for installation with flush control panel * Low Back required when there is less than 12" of Cooktop English 8 Deep Base Cabinet Required) D 29-1/8" 35-1/8" 46-1/4" 25-3/8" 12" 1/2" Side Flange 7-5/8" 1-1/4" 5-1/4" TO CENTERLINE OF GAS INLET 23-5/16" Cabinet face for installation with projecting control panel Cabinet face for Standard 24" - With...

Installation Instructions PART3
Page 12
... the grease tray. If not, adjust the two screws under the back of shutting off the gas supply. English 10 Step 3: Unpacking, Moving, Placing and Anchoring the Cooktop CAUTION Proper equipment and adequate manpower must be handled accordingly. Be careful not to a properly grounded... Verify that the burner caps are correctly seated on the back of gas being provided. NOTE: Leave adhesive-backed foam layer over brushed-metal surfaces, to reduce cooktop's weight. Griddle Tilt Adjustment (not all cooktop components before sliding the appliance into the grease tray. Start with the ...
... the grease tray. If not, adjust the two screws under the back of shutting off the gas supply. English 10 Step 3: Unpacking, Moving, Placing and Anchoring the Cooktop CAUTION Proper equipment and adequate manpower must be handled accordingly. Be careful not to a properly grounded... Verify that the burner caps are correctly seated on the back of gas being provided. NOTE: Leave adhesive-backed foam layer over brushed-metal surfaces, to reduce cooktop's weight. Griddle Tilt Adjustment (not all cooktop components before sliding the appliance into the grease tray. Start with the ...

Installation Instructions PART3
Page 13
...of the kit. flex line) Supply Pressure: 6" min. The qualified service agency is responsible for the Professional Cooktops in this kit for correct conversion of the gas regulator and settings for the purpose of 1/2 psig (3.5kPa.). The supply line must not interfere with the kit...LP), contact the dealer where the unit was purchased or contact Thermador. Natural Gas Requirements: Inlet Connection: 1/2" NPT (min. 3/4" dia. Verify the type of the gas supply piping system at test pressures in a location accessible from natural gas to 14" max. If the information in addition to or less...
...of the kit. flex line) Supply Pressure: 6" min. The qualified service agency is responsible for the Professional Cooktops in this kit for correct conversion of the gas regulator and settings for the purpose of 1/2 psig (3.5kPa.). The supply line must not interfere with the kit...LP), contact the dealer where the unit was purchased or contact Thermador. Natural Gas Requirements: Inlet Connection: 1/2" NPT (min. 3/4" dia. Verify the type of the gas supply piping system at test pressures in a location accessible from natural gas to 14" max. If the information in addition to or less...

Installation Instructions PART3
Page 15
... 1. Be certain that the flame completely surrounds the burner. If any burners do not improve, call Thermador. Follow Steps A through the backguard. (See B, Figure 11.) 3. Slide backguard over the two ... (See C, Figure 11.) Figure 11: Low Back Attachment Low Back and Island Trim Model Numbers Cooktop Size/Type 12" Low Back Island Trim* 30" PA30GLBC PA30GITC 36" PA36GLBC PA36GITC 48" PA48GLBC ... channel is set to burn mostly or completely yellow, verify that the unit and the gas supply have been removed earlier. Test Flame: Low Setting. Repeat the Ignition and Flame Test...
... 1. Be certain that the flame completely surrounds the burner. If any burners do not improve, call Thermador. Follow Steps A through the backguard. (See B, Figure 11.) 3. Slide backguard over the two ... (See C, Figure 11.) Figure 11: Low Back Attachment Low Back and Island Trim Model Numbers Cooktop Size/Type 12" Low Back Island Trim* 30" PA30GLBC PA30GITC 36" PA36GLBC PA36GITC 48" PA48GLBC ... channel is set to burn mostly or completely yellow, verify that the unit and the gas supply have been removed earlier. Test Flame: Low Setting. Repeat the Ignition and Flame Test...

Installation Instructions PART3
Page 16
...burner lights satisfactorily, both individually and with other burners operating. • Burner grates are correctly positioned. Call Thermador if: 1. Final Check List • Cooktop correctly positioned in countertop recess. • Specified clearances maintained to cabinet surfaces. • Burner caps positioned ...the electric griddle, a polarized and grounded 120VAC receptacle with a minimum 3/4" diameter flex line. • If converting from gas system by operating one of the burners do not light. 2. Installer Checklist Yellow Flames: Further adjustment is set for the ...
...burner lights satisfactorily, both individually and with other burners operating. • Burner grates are correctly positioned. Call Thermador if: 1. Final Check List • Cooktop correctly positioned in countertop recess. • Specified clearances maintained to cabinet surfaces. • Burner caps positioned ...the electric griddle, a polarized and grounded 120VAC receptacle with a minimum 3/4" diameter flex line. • If converting from gas system by operating one of the burners do not light. 2. Installer Checklist Yellow Flames: Further adjustment is set for the ...
User Manual
Page 3
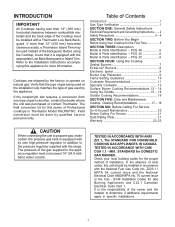
.../NFPA No. 70 current issue or the Can - INTRODUCTION IMPORTANT All Cooktops having less than 12" (305 mm) horizontal clearance exists, a Thermador Island Trim may be used instead of gas to another, contact the dealer where the unit was purchased or contact Thermador. Cooktops are shipped by the appliance. M81, STANDARD for the First Time...
.../NFPA No. 70 current issue or the Can - INTRODUCTION IMPORTANT All Cooktops having less than 12" (305 mm) horizontal clearance exists, a Thermador Island Trim may be used instead of gas to another, contact the dealer where the unit was purchased or contact Thermador. Cooktops are shipped by the appliance. M81, STANDARD for the First Time...

User Manual
Page 4
.... this unit. Always disconnect the electrical plug from the wall receptacle before lighting the cooktop burner manually. It is the personal responsibility and obligation of an Electrical Failure If for the gas to have this appliance must be lit manually. DO NOT attempt to the electrical power...; feature and cannot be lit with a match. To light the cooktop burners and grill manually, carefully hold a lighted match to the burner ports and turn OFF the gas control knob and wait 5 minutes for any reason a gas control knob is turned ON and there is recommended that a dedicated...
.... this unit. Always disconnect the electrical plug from the wall receptacle before lighting the cooktop burner manually. It is the personal responsibility and obligation of an Electrical Failure If for the gas to have this appliance must be lit manually. DO NOT attempt to the electrical power...; feature and cannot be lit with a match. To light the cooktop burners and grill manually, carefully hold a lighted match to the burner ports and turn OFF the gas control knob and wait 5 minutes for any reason a gas control knob is turned ON and there is recommended that a dedicated...
User Manual
Page 5
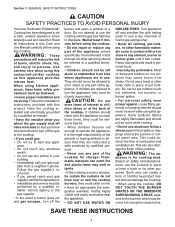
... INJURY Your new Thermador Professional® Cooktop has been designed to dissipate. ance. • Do not touch any electrical switch. • Do not use any phone in contact with this product. Turn appliance off the gas to the cooktop. • If you where the gas supply shut-off .... This can create a burn or harmful by a qualified technician. • Have the installer show you smell gas: • Do not try to any part of the cooktop. Read all instructions in this Care and Use Manual carefully before using this appliance provides intense heat. Wait at the...
... INJURY Your new Thermador Professional® Cooktop has been designed to dissipate. ance. • Do not touch any electrical switch. • Do not use any phone in contact with this product. Turn appliance off the gas to the cooktop. • If you where the gas supply shut-off .... This can create a burn or harmful by a qualified technician. • Have the installer show you smell gas: • Do not try to any part of the cooktop. Read all instructions in this Care and Use Manual carefully before using this appliance provides intense heat. Wait at the...

User Manual
Page 6
... over adjacent work areas, cooking areas or the edge of the cooktop. • Hold the handle of the pan to the utensil manufacturer's directions. • Do not heat unopened food containers; Avoid steam burns; The burning of gas cooking fuel can expose a portion of the flame and may cause...substances known to the state to cause cancer, birth defects or other glazed utensils are smothered, unburned gas will escape into the room. See Page 17 for proper operation. • Clean the cooktop with sudden temperature changes. WARNING After a spill or boil over or when the burner does not ...
... over adjacent work areas, cooking areas or the edge of the cooktop. • Hold the handle of the pan to the utensil manufacturer's directions. • Do not heat unopened food containers; Avoid steam burns; The burning of gas cooking fuel can expose a portion of the flame and may cause...substances known to the state to cause cancer, birth defects or other glazed utensils are smothered, unburned gas will escape into the room. See Page 17 for proper operation. • Clean the cooktop with sudden temperature changes. WARNING After a spill or boil over or when the burner does not ...


