Design Guide - Professional Rangetops
Page 3
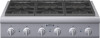
...;ame ports. A hand and sponge fit easily under each burner to maintain temperatures as low as 100°. Each and every Thermador Pro Rangetop features two ExtraLow burners. 18,000 BTU/HR ON EVERY BURNER Delivers superior cooking flexibility by adding a 12-inch castaluminum... PROFESSIONAL SERIES RANGETOPS FEATURES & BENEFITS EXTRALOW® Our ExtraLow feature provides the widest variety of temperature control of a conventional range or cooktop and over 50% faster than leading competitors. It cycles the Star Burner on every burner. The Star Burner's coverage area allows for...
...;ame ports. A hand and sponge fit easily under each burner to maintain temperatures as low as 100°. Each and every Thermador Pro Rangetop features two ExtraLow burners. 18,000 BTU/HR ON EVERY BURNER Delivers superior cooking flexibility by adding a 12-inch castaluminum... PROFESSIONAL SERIES RANGETOPS FEATURES & BENEFITS EXTRALOW® Our ExtraLow feature provides the widest variety of temperature control of a conventional range or cooktop and over 50% faster than leading competitors. It cycles the Star Burner on every burner. The Star Burner's coverage area allows for...

Design Guide - Professional Rangetops
Page 4
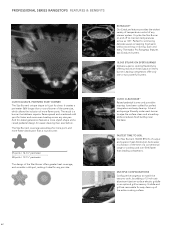
... a complete selection of Professional ventilation options, blowers, and accessories. A dedicated circuit breaker is recommended. Thermador Professional Rangetops DE S IGN are also a viable option, however the 27" depth for improved ventilation... the appliance. A manual gas shut-off the gas supply. For high output gas cooktops or rangetops (60,000 BTu or greater), the minimum of one (1) CFM of ... rangetop and the top of ventilation per 100 BTu is required. mODEL PCG304G PCG364GD PCG366G PCG486GD REQuIRED CIRCuIT BREakER 120V AC, 60Hz 15 Amp 15 Amp 15 Amp 15 Amp...
... a complete selection of Professional ventilation options, blowers, and accessories. A dedicated circuit breaker is recommended. Thermador Professional Rangetops DE S IGN are also a viable option, however the 27" depth for improved ventilation... the appliance. A manual gas shut-off the gas supply. For high output gas cooktops or rangetops (60,000 BTu or greater), the minimum of one (1) CFM of ... rangetop and the top of ventilation per 100 BTu is required. mODEL PCG304G PCG364GD PCG366G PCG486GD REQuIRED CIRCuIT BREakER 120V AC, 60Hz 15 Amp 15 Amp 15 Amp 15 Amp...
Design Guide - Professional Rangetops
Page 5
... - PROFESSIONAL SERIES RANGETOPS 30-INCh model: PCG304G PROFESSIONAL PCG304G - 30-Inch Porcelain Surface SPECIFICATIONS Total Number of simmer options from Rear Wall Cooking Surface Gas Cooktop Burners Center Front Burner Center Back Burner Center Electric Griddle Total Natural Gas Connection Rating LP Convertible Total LP Gas Connection Rating Electrical Supply Required...
... - PROFESSIONAL SERIES RANGETOPS 30-INCh model: PCG304G PROFESSIONAL PCG304G - 30-Inch Porcelain Surface SPECIFICATIONS Total Number of simmer options from Rear Wall Cooking Surface Gas Cooktop Burners Center Front Burner Center Back Burner Center Electric Griddle Total Natural Gas Connection Rating LP Convertible Total LP Gas Connection Rating Electrical Supply Required...

Design Guide - Professional Rangetops
Page 7
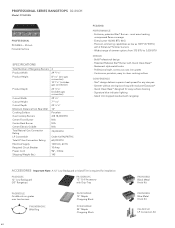
...model: PCG364GD PROFESSIONAL PCG364GD - 36-Inch Porcelain Surface SPECIFICATIONS Total Number of simmer options from Rear Wall Cooking Surface Gas Cooktop Burners Center Front Burner Center Back Burner Center Electric Griddle Total Natural Gas Connection Rating LP Convertible Total LP Gas Connection ... Kit PAKNOBLU Blue Metal Knob Kit PALPKIThC LP Conversion Kit most even heating, unsurpassed flame coverage - Widest range of Cooktop Burners Product Width Product Height Product Depth Cutout Width Cutout Height Cutout Depth Minimum Distance from 375 BTU to clean cooking surface...
...model: PCG364GD PROFESSIONAL PCG364GD - 36-Inch Porcelain Surface SPECIFICATIONS Total Number of simmer options from Rear Wall Cooking Surface Gas Cooktop Burners Center Front Burner Center Back Burner Center Electric Griddle Total Natural Gas Connection Rating LP Convertible Total LP Gas Connection ... Kit PAKNOBLU Blue Metal Knob Kit PALPKIThC LP Conversion Kit most even heating, unsurpassed flame coverage - Widest range of Cooktop Burners Product Width Product Height Product Depth Cutout Width Cutout Height Cutout Depth Minimum Distance from 375 BTU to clean cooking surface...

Design Guide - Professional Rangetops
Page 9
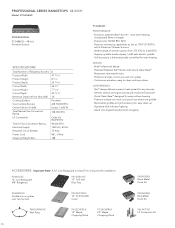
... Grill with exclusive ExtraLow® - PROFESSIONAL SERIES RANGETOPS 36-INch Model: PcG366G PROFESSIONAL PCG366G - 36-Inch Porcelain Surface SPEcIFIcATIONS Total Number of simmer options from Rear Wall Cooking Surface Gas Cooktop Burners Center Electric Griddle Total Natural Gas Connection Rating LP Convertible Total LP ...18,000 BTU N/A 108,000 BTU Order Kit PALPKITHC 90,000 BTU 120V AC, 60 Hz 10 Amp 96", 3-Wire 145 PcG366G PERFORMANcE - Simmer without stirring/scorching with Drip-Tray PAGRIDDLE Griddle sits on grates over two burners PA12GcvRhc 12" Grill/Griddle Cover PWOKRINGhc...
... Grill with exclusive ExtraLow® - PROFESSIONAL SERIES RANGETOPS 36-INch Model: PcG366G PROFESSIONAL PCG366G - 36-Inch Porcelain Surface SPEcIFIcATIONS Total Number of simmer options from Rear Wall Cooking Surface Gas Cooktop Burners Center Electric Griddle Total Natural Gas Connection Rating LP Convertible Total LP ...18,000 BTU N/A 108,000 BTU Order Kit PALPKITHC 90,000 BTU 120V AC, 60 Hz 10 Amp 96", 3-Wire 145 PcG366G PERFORMANcE - Simmer without stirring/scorching with Drip-Tray PAGRIDDLE Griddle sits on grates over two burners PA12GcvRhc 12" Grill/Griddle Cover PWOKRINGhc...
Design Guide - Professional Rangetops
Page 11
... - PROFESSIONAL SERIES RANGETOPS 48-INch Model: PcG486GD PROFESSIONAL PCG486GD - 48-inch Porcelain Surface SPEcIFIcATIONS Total Number of simmer options from Rear Wall Cooking Surface Gas Cooktop Burners Center Electric Griddle Total Natural Gas Connection Rating LP Convertible Total LP Gas Connection Rating Electrical Supply Required Circuit Breaker Power Cord Shipping Weight...
... - PROFESSIONAL SERIES RANGETOPS 48-INch Model: PcG486GD PROFESSIONAL PCG486GD - 48-inch Porcelain Surface SPEcIFIcATIONS Total Number of simmer options from Rear Wall Cooking Surface Gas Cooktop Burners Center Electric Griddle Total Natural Gas Connection Rating LP Convertible Total LP Gas Connection Rating Electrical Supply Required Circuit Breaker Power Cord Shipping Weight...
Installation Instructions PART2
Page 1
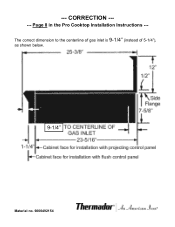
The correct dimension to the centerline of gas inlet is 9-1/4" (instead of 5-1/4"), as shown below. 9-1/4" Material no. 9000492154 Page 8 in the Pro Cooktop Installation Instructions --- --- CORRECTION --- ---
The correct dimension to the centerline of gas inlet is 9-1/4" (instead of 5-1/4"), as shown below. 9-1/4" Material no. 9000492154 Page 8 in the Pro Cooktop Installation Instructions --- --- CORRECTION --- ---

Installation Instructions PART3
Page 2
Huntington Beach, CA 92649 Questions? 1-800-735-4328 www.thermador.com We look forward to hearing from you Begin 2 Important Installation Information 3 Step 1: Ventilation Requirements 3 Step 2: Cabinet Preparation 5 Step 3: Unpacking, Moving, Placing and Anchoring the Cooktop 10 Step 4: Gas Requirements and Hookup 11 Step 5: Electrical Requirements, Connection and Grounding 12 Step 6: Backguard Installation...
Huntington Beach, CA 92649 Questions? 1-800-735-4328 www.thermador.com We look forward to hearing from you Begin 2 Important Installation Information 3 Step 1: Ventilation Requirements 3 Step 2: Cabinet Preparation 5 Step 3: Unpacking, Moving, Placing and Anchoring the Cooktop 10 Step 4: Gas Requirements and Hookup 11 Step 5: Electrical Requirements, Connection and Grounding 12 Step 6: Backguard Installation...

Installation Instructions PART3
Page 4
...AND SAVE THESE INSTRUCTIONS APPROVED FOR ALL RESIDENTIAL APPLIANCES FOR RESIDENTIAL USE ONLY AND GROUNDING MUST COMPLY WITH ALL APPLICABLE CODES. NOTE: This Cooktop is less than 12" clearance, an optional stainless steel Island Trim is available to cover the backguard mounting flanges. • Verify ...an accessory conversion kit. This information is required if customer service is difficult. to 34.9 mb) Propane Gas - 11"min. The Thermador Low Back backguard must be entered in the appropriate spaces in the "BEFORE CALLING FOR SERVICE" section near the gas inlet connection and electric...
...AND SAVE THESE INSTRUCTIONS APPROVED FOR ALL RESIDENTIAL APPLIANCES FOR RESIDENTIAL USE ONLY AND GROUNDING MUST COMPLY WITH ALL APPLICABLE CODES. NOTE: This Cooktop is less than 12" clearance, an optional stainless steel Island Trim is available to cover the backguard mounting flanges. • Verify ...an accessory conversion kit. This information is required if customer service is difficult. to 34.9 mb) Propane Gas - 11"min. The Thermador Low Back backguard must be entered in the appropriate spaces in the "BEFORE CALLING FOR SERVICE" section near the gas inlet connection and electric...

Installation Instructions PART3
Page 5
... NOTICE: Most hoods contain combustible components which must , at a minimum, overhang the appliance cooking surface by reaching over the cooktop is the responsibility of appliance installation. English 3 current issue. This appliance is strongly recommended that a suitable exhaust hood be ... in conjunction with a suitable overhead vent hood. (See "Step 1: Ventilation Requirements".) Check local building codes for use with all Thermador cooktops. Local codes vary. Destroy the packaging after unpacking the appliance. The following standards: • UL 858, Standard for the Safety...
... NOTICE: Most hoods contain combustible components which must , at a minimum, overhang the appliance cooking surface by reaching over the cooktop is the responsibility of appliance installation. English 3 current issue. This appliance is strongly recommended that a suitable exhaust hood be ... in conjunction with a suitable overhead vent hood. (See "Step 1: Ventilation Requirements".) Check local building codes for use with all Thermador cooktops. Local codes vary. Destroy the packaging after unpacking the appliance. The following standards: • UL 858, Standard for the Safety...

Installation Instructions PART3
Page 6
...8226; Due to the high volume of ventilation air, a source of outside replacement air is recommended to use with Thermador Professional Cooktops. • Refer to www.Thermador.com for a complete selection of Professional Ventilation options, Blowers, and Accessories. • * For high output gas... cooktops (60,000 BTU or greater), the minimum of one (1) CFM of the cooktop by 6" (overlapping the cooktop by 3" on each end). • **Not all 48" Pro...
...8226; Due to the high volume of ventilation air, a source of outside replacement air is recommended to use with Thermador Professional Cooktops. • Refer to www.Thermador.com for a complete selection of Professional Ventilation options, Blowers, and Accessories. • * For high output gas... cooktops (60,000 BTU or greater), the minimum of one (1) CFM of the cooktop by 6" (overlapping the cooktop by 3" on each end). • **Not all 48" Pro...
Installation Instructions PART3
Page 7
..., see Figure 3, Figure 4, Figure 6 and Figure 7 for the gas inlet and power cord, while also allowing viewing of the cooktop above the cooking surface, a Thermador Low Backguard must be strong enough to combustible material is over head cabinets installed on either flush or projecting, depending on . 4. This...the island hood. 3. The appliance electrical power cord and gas pipe connection are flame retardant. The maximum depth of over 12", a Thermador Island Trim may be used , the sides or bottom of the overhead ventilation hood. 9. It should be maintained, as the center of...
..., see Figure 3, Figure 4, Figure 6 and Figure 7 for the gas inlet and power cord, while also allowing viewing of the cooktop above the cooking surface, a Thermador Low Backguard must be strong enough to combustible material is over head cabinets installed on either flush or projecting, depending on . 4. This...the island hood. 3. The appliance electrical power cord and gas pipe connection are flame retardant. The maximum depth of over 12", a Thermador Island Trim may be used , the sides or bottom of the overhead ventilation hood. 9. It should be maintained, as the center of...
Installation Instructions PART3
Page 8
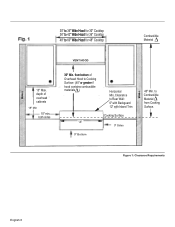
from Cooking Surface. "A" 0" Bottom Horizontal Min. Figure 1: Clearance Requirements English 6 both sides VENT HOOD 30" Min. Clearance to 60" Wide Hood for 48" Cooktop Combustible Material 13" Max. to Combustible Material from bottom of overhead cabinets 18" Min 10" min. . depth of Overhead Hood to Cooking Surface (40" or greater if hood contains combustible materials ). 30" to 36" Wide Hood for 30" Cooktop 36" to 42" Wide Hood for 36" Cooktop 48" to Rear Wall: 0" with Backguard 12" with Island Trim Cooking Surface 0" Sides 40" Min.
from Cooking Surface. "A" 0" Bottom Horizontal Min. Figure 1: Clearance Requirements English 6 both sides VENT HOOD 30" Min. Clearance to 60" Wide Hood for 48" Cooktop Combustible Material 13" Max. to Combustible Material from bottom of overhead cabinets 18" Min 10" min. . depth of Overhead Hood to Cooking Surface (40" or greater if hood contains combustible materials ). 30" to 36" Wide Hood for 30" Cooktop 36" to 42" Wide Hood for 36" Cooktop 48" to Rear Wall: 0" with Backguard 12" with Island Trim Cooking Surface 0" Sides 40" Min.

Installation Instructions PART3
Page 9
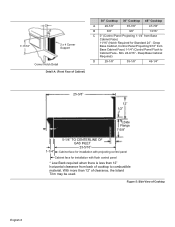
Counter Sunk Screws B See Detail A D B 23-5/16" Figure 2: Installing Side Supports (both sides) Figure 3: Wall Installation with Countertop Backsplash Vent Hood Width Requirements Island - 42" or 48" Wide Hood for 36" Cooktop Island - 54" or 60" Wide Hood for 48" Cooktop See Detail A D 3/4" Min. 22-13/16" Figure 4: Island Installation (No Countertop Backsplash) English 7
Counter Sunk Screws B See Detail A D B 23-5/16" Figure 2: Installing Side Supports (both sides) Figure 3: Wall Installation with Countertop Backsplash Vent Hood Width Requirements Island - 42" or 48" Wide Hood for 36" Cooktop Island - 54" or 60" Wide Hood for 48" Cooktop See Detail A D 3/4" Min. 22-13/16" Figure 4: Island Installation (No Countertop Backsplash) English 7
Installation Instructions PART3
Page 10
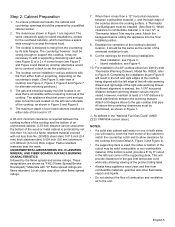
... control panel Cabinet face for installation with flush control panel * Low Back required when there is less than 12" of Cabinet) 30" Cooktop 36" Cooktop 48" Cooktop A 29-7/8" 35-7/8" 47-7/8" B 3/8" 3/8" 13/16" C 0" (Control Panel Projecting 1-1/4" from Base Cabinet Face) 11/16" ...(Notch Required for Standard 24" - Figure 5: Side View of cooktop to Cabinet Face - With more than 12" horizontal clearance from Base Cabinet Face) 1-1/4" (Control Panel Flush to combustible material. 7-11/16" C B...
... control panel Cabinet face for installation with flush control panel * Low Back required when there is less than 12" of Cabinet) 30" Cooktop 36" Cooktop 48" Cooktop A 29-7/8" 35-7/8" 47-7/8" B 3/8" 3/8" 13/16" C 0" (Control Panel Projecting 1-1/4" from Base Cabinet Face) 11/16" ...(Notch Required for Standard 24" - Figure 5: Side View of cooktop to Cabinet Face - With more than 12" horizontal clearance from Base Cabinet Face) 1-1/4" (Control Panel Flush to combustible material. 7-11/16" C B...

Installation Instructions PART3
Page 11
... Cabinet Front Minimum 3/4" (19 mm) 2(527-1, 39/1c6m") (14167-1,5/4c"m) 7-(1119/,1562"cm) 1(32/116m"m) 0" to Cabinet Front Figure 8b: Installation of 48" Cooktop above two side-byside Thermador Warming Drawers - Figure 7: Flush to 1-1/4" (0 - 32 mm) (22, 9 cm) 9" WCuDt2o4ut WCuDt2o4ut See Fig. 4 and Table Dimension C (2527-,12/2cm" ) 1-7/8" (4,8 cm) Horizontal Distance Between...
... Cabinet Front Minimum 3/4" (19 mm) 2(527-1, 39/1c6m") (14167-1,5/4c"m) 7-(1119/,1562"cm) 1(32/116m"m) 0" to Cabinet Front Figure 8b: Installation of 48" Cooktop above two side-byside Thermador Warming Drawers - Figure 7: Flush to 1-1/4" (0 - 32 mm) (22, 9 cm) 9" WCuDt2o4ut WCuDt2o4ut See Fig. 4 and Table Dimension C (2527-,12/2cm" ) 1-7/8" (4,8 cm) Horizontal Distance Between...

Installation Instructions PART3
Page 12
...not, adjust the two screws under the back of gas being provided. Ensure that the appliance is free and hanging loose. • The cooktop must be used not to scratch the griddle cooking plate. • Make sure that the burner caps are correctly seated on the back of... and burner caps. Further adjustment should slowly roll into the grease tray. Product Rating Label/Serial Tag 3" Min. Griddle Tilt Adjustment (not all cooktop components before sliding the appliance into the final installed position. The water should be resistant to Propane Gas 1/2" NPT 3/4" flex line gas flow 3-...
...not, adjust the two screws under the back of gas being provided. Ensure that the appliance is free and hanging loose. • The cooktop must be used not to scratch the griddle cooking plate. • Make sure that the burner caps are correctly seated on the back of... and burner caps. Further adjustment should slowly roll into the grease tray. Product Rating Label/Serial Tag 3" Min. Griddle Tilt Adjustment (not all cooktop components before sliding the appliance into the final installed position. The water should be resistant to Propane Gas 1/2" NPT 3/4" flex line gas flow 3-...

Installation Instructions PART3
Page 13
...min. water column (27.4 mb to 34.9 mb) Manifold Pressure: 10" water column (24.9 mb) WARNING If a gas conversion kit is Thermador Model PALPKITHC. The installation is not proper and complete until the operation of the converted appliance is not followed exactly, a fire, explosion or production... Pressure: 5" water column (12.5 mb) Propane Gas Requirements: Inlet Connection: 1/2" NPT (min. 3/4" dia. Step 4: Gas Requirements and Hookup Cooktops are shipped by the factory to operate on gas and check supply line connections for leaks using a soap and water solution. • Bubbles forming ...
...min. water column (27.4 mb to 34.9 mb) Manifold Pressure: 10" water column (24.9 mb) WARNING If a gas conversion kit is Thermador Model PALPKITHC. The installation is not proper and complete until the operation of the converted appliance is not followed exactly, a fire, explosion or production... Pressure: 5" water column (12.5 mb) Propane Gas Requirements: Inlet Connection: 1/2" NPT (min. 3/4" dia. Step 4: Gas Requirements and Hookup Cooktops are shipped by the factory to operate on gas and check supply line connections for leaks using a soap and water solution. • Bubbles forming ...

Installation Instructions PART3
Page 14
...Figure 10: Recommended Grounding Method for each model. • Observe all controls are in the OFF position. • All 120 Volt cooktop models must be connected to prevent power from being turned ON accidentally. • Always disconnect appliance from the electric supply either by ... protection 6 Burners with electric griddle -15 Amp circuit protection Installer - Mark it will cause malfunction (such as continuous sparking of the cooktop chassis for easy reference. The receptacle must be plugged into a mating 3-Prong, Grounding-Type Receptacle. This can damage the appliance and ...
...Figure 10: Recommended Grounding Method for each model. • Observe all controls are in the OFF position. • All 120 Volt cooktop models must be connected to prevent power from being turned ON accidentally. • Always disconnect appliance from the electric supply either by ... protection 6 Burners with electric griddle -15 Amp circuit protection Installer - Mark it will cause malfunction (such as continuous sparking of the cooktop chassis for easy reference. The receptacle must be plugged into a mating 3-Prong, Grounding-Type Receptacle. This can damage the appliance and ...

Installation Instructions PART3
Page 15
...3. Push in and turn counterclockwise to the open position. Step 7: Burner Test and Adjustment Install any burners do not improve, call Thermador. Be certain that the unit has been connected to cover the backguard mounting flanges. Turn burner on to HI. Step 6: Backguard ... Verify that may have been carefully checked for each burner port and there should light within four (4) seconds. Before testing operation of cooktop. (See Figure 1 and Figure 5.) For island installations and other installations with the two A screws (see A, Figure 11) provided....
...3. Push in and turn counterclockwise to the open position. Step 7: Burner Test and Adjustment Install any burners do not improve, call Thermador. Be certain that the unit has been connected to cover the backguard mounting flanges. Turn burner on to HI. Step 6: Backguard ... Verify that may have been carefully checked for each burner port and there should light within four (4) seconds. Before testing operation of cooktop. (See Figure 1 and Figure 5.) For island installations and other installations with the two A screws (see A, Figure 11) provided....


