
Installation Manual
Page 3
... the cast aluminum base and prevents tipover. Ensure the anti-tip bracket is engaged when the range is responsible for the Local Gas Inspector's use. Do not operate the range without the anti-tip bracket in the vicinity of anti-tip bracket. WHAT TO DO IF ...-tip bracket is not followed exactly, a fire or explosion may void the warranty. is being installed. 2. Range should not move more than 36" (914mm). WARNING: Disconnect power before installing. Carefully tip range forward pulling from a neighbor's phone. Shut-off valve must be longer than 1 inch (2.5cm). Installer is...
... the cast aluminum base and prevents tipover. Ensure the anti-tip bracket is engaged when the range is responsible for the Local Gas Inspector's use. Do not operate the range without the anti-tip bracket in the vicinity of anti-tip bracket. WHAT TO DO IF ...-tip bracket is not followed exactly, a fire or explosion may void the warranty. is being installed. 2. Range should not move more than 36" (914mm). WARNING: Disconnect power before installing. Carefully tip range forward pulling from a neighbor's phone. Shut-off valve must be longer than 1 inch (2.5cm). Installer is...
Installation Manual
Page 5
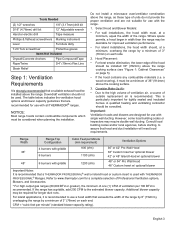
...above the cooking surface. 3. CFM = "cubic feet per Minute (min requirement) Ventilation Options 4 burners with griddle 36" 6 burners 800 (cfm) 1100 (cfm) 36" or 42" Pro Wall Hood 36" Custom Insert w/ optional blower 42" or 48" Island Hood w/ optional blower 48" 6 burners with griddle ...options and blower capacity guidelines that a THERMADOR PROFESSIONAL® wall or island hood or custom insert is recommended that are designed for use with THERMADOR PROFESSIONAL® Ranges. Where space permits, a hood larger in width than the range may require double wall ducting. a wood...
...above the cooking surface. 3. CFM = "cubic feet per Minute (min requirement) Ventilation Options 4 burners with griddle 36" 6 burners 800 (cfm) 1100 (cfm) 36" or 42" Pro Wall Hood 36" Custom Insert w/ optional blower 42" or 48" Island Hood w/ optional blower 48" 6 burners with griddle ...options and blower capacity guidelines that a THERMADOR PROFESSIONAL® wall or island hood or custom insert is recommended that are designed for use with THERMADOR PROFESSIONAL® Ranges. Where space permits, a hood larger in width than the range may require double wall ducting. a wood...

Installation Manual
Page 6
... be sealed. • When there is a 36" (914mm) minimum clearance required between combustible material and the back edge of a flame retardant material covered with "O" flame spread ratings are required. English 4 Materials with not less than 1/4" (6mm) of the range above the cooking surface, a THERMADOR® Low Back or High Shelf must be...
... be sealed. • When there is a 36" (914mm) minimum clearance required between combustible material and the back edge of a flame retardant material covered with "O" flame spread ratings are required. English 4 Materials with not less than 1/4" (6mm) of the range above the cooking surface, a THERMADOR® Low Back or High Shelf must be...

Installation Manual
Page 7
... Current Edition). *The range height is adjustable. to model. For 36" Ranges {36" (914mm) or 42" (1067mm) Wide Hood {42" (1067mm) or 48" (1219mm) for Island For 48" Ranges {48" (1219mm) 54" (1372mm), or 60" (1524mm) Wide Hood {54" (1372mm) for Island 36" Range - 36" (914mm) 48" Range - 48" (1219mm)... Min. distance between overhead cabinets of the range top must be at the same level or above the countertop ...
... Current Edition). *The range height is adjustable. to model. For 36" Ranges {36" (914mm) or 42" (1067mm) Wide Hood {42" (1067mm) or 48" (1219mm) for Island For 48" Ranges {48" (1219mm) 54" (1372mm), or 60" (1524mm) Wide Hood {54" (1372mm) for Island 36" Range - 36" (914mm) 48" Range - 48" (1219mm)... Min. distance between overhead cabinets of the range top must be at the same level or above the countertop ...

Installation Manual
Page 8
...911mm) 251/8" (638mm) minimum recess depth 281/2" (723mm) 483/4" (1238mm) Installation with Included Flush Island Trim 36" (914mm) min to combustible materials 12" (305mm) Min to the inner wall. English 6 Flush Island Trim ...used under the cantilever counter top, there should be a 1/8" (3mm) gap from the rear of the Flush Island Trim accessory. 36 3/4" Max (933mm) 35 7/8" Min (911mm) As defined in the "National Fuel Gas Code" (ANSI Z223.1, ...counter surface should have a cantilever edge meeting the back section of the range to Combustible with Low Back or High Shelf...
...911mm) 251/8" (638mm) minimum recess depth 281/2" (723mm) 483/4" (1238mm) Installation with Included Flush Island Trim 36" (914mm) min to combustible materials 12" (305mm) Min to the inner wall. English 6 Flush Island Trim ...used under the cantilever counter top, there should be a 1/8" (3mm) gap from the rear of the Flush Island Trim accessory. 36 3/4" Max (933mm) 35 7/8" Min (911mm) As defined in the "National Fuel Gas Code" (ANSI Z223.1, ...counter surface should have a cantilever edge meeting the back section of the range to Combustible with Low Back or High Shelf...

Installation Manual
Page 9
...91/8" (232mm) 231/8" (587mm) B 73/8" (187mm) 7" (178mm) C 73/8" (187mm) 7" (587mm) D 91/8" (232mm) 77/8" (200mm) 10" (254mm) 3" (76mm) 2" (51mm) A B C D 36" (913mm) 48" (1219mm) Notice: • If not already present, install gas shut-off valve in an easily accessible location. • Make sure all users know .... Refer to its own high pressure regulator in the floor under the appliance must be connected to the pressure regulator supplied with a range supply cord kit or by carefully pulling on a rope or twine looped around the gas or electrical supply line which it may be...
...91/8" (232mm) 231/8" (587mm) B 73/8" (187mm) 7" (178mm) C 73/8" (187mm) 7" (587mm) D 91/8" (232mm) 77/8" (200mm) 10" (254mm) 3" (76mm) 2" (51mm) A B C D 36" (913mm) 48" (1219mm) Notice: • If not already present, install gas shut-off valve in an easily accessible location. • Make sure all users know .... Refer to its own high pressure regulator in the floor under the appliance must be connected to the pressure regulator supplied with a range supply cord kit or by carefully pulling on a rope or twine looped around the gas or electrical supply line which it may be...

Installation Manual
Page 10
...this may have sharp edges. This will allow the range to facilitate handling. Figure 4: Wall Connection Chart A Shipping Weight Weight without packing materials Without door(s), burner caps, and oven racks 36" Range 420 lbs (191 kg) 360 lbs (163 kg) 260 lbs (118 kg) 48" Range 590 lbs (268 kg) 530 lbs (240 ...kg) 390 lbs (177 kg) Caution DO NOT lift the range by the oven door's handle, as shown in 1. English 8 ...
...this may have sharp edges. This will allow the range to facilitate handling. Figure 4: Wall Connection Chart A Shipping Weight Weight without packing materials Without door(s), burner caps, and oven racks 36" Range 420 lbs (191 kg) 360 lbs (163 kg) 260 lbs (118 kg) 48" Range 590 lbs (268 kg) 530 lbs (240 ...kg) 390 lbs (177 kg) Caution DO NOT lift the range by the oven door's handle, as shown in 1. English 8 ...

Installation Manual
Page 18
... supply, disconnect power to unit by turning off the proper circuit breaker or disconnecting the proper fuse. In the absence of the range, for access by a qualified electrician. MODEL TYPE 36" 48" Chart B: Electrical Supply Circuit Requirements VOLTAGE 240/208 VAC 240/208 VAC CIRCUIT RATING 40 Amps 50 Amps FREQUENCY 60...
... supply, disconnect power to unit by turning off the proper circuit breaker or disconnecting the proper fuse. In the absence of the range, for access by a qualified electrician. MODEL TYPE 36" 48" Chart B: Electrical Supply Circuit Requirements VOLTAGE 240/208 VAC 240/208 VAC CIRCUIT RATING 40 Amps 50 Amps FREQUENCY 60...

Installation Manual
Page 21
...of the hood will vary upon need. Parts Included Tools Needed (10) 1" (25.4mm) Phillips screwdriver or screws drill 30", 36", 48" (760mm, 913mm, 1218mm) (1) Backsplash Tape measure 42" (1070mm) (1) Installation Guide Pencil • To protect against ...range forward to gain access to secure both the top and bottom of the hood overlaps the backsplash 11/2" (38mm). Wall Studs Space screws evenly across top & bottom Figure 16: Backsplash Installation English 19 Remove protective plastic. Locate and lightly mark wall studs. Backsplash Installation (PA [30,36...
...of the hood will vary upon need. Parts Included Tools Needed (10) 1" (25.4mm) Phillips screwdriver or screws drill 30", 36", 48" (760mm, 913mm, 1218mm) (1) Backsplash Tape measure 42" (1070mm) (1) Installation Guide Pencil • To protect against ...range forward to gain access to secure both the top and bottom of the hood overlaps the backsplash 11/2" (38mm). Wall Studs Space screws evenly across top & bottom Figure 16: Backsplash Installation English 19 Remove protective plastic. Locate and lightly mark wall studs. Backsplash Installation (PA [30,36...

Installation Manual
Page 25
... before use. Canadian Pro Grand® 48" Dual Fuel Range w/ Steam Oven Pro Grand® 48" Dual Fuel Range w/ Steam Oven - Canadian Pro Grand® 36" Dual Fuel Range 6 Burner Pro Grand® 36" Dual Fuel Range 6 Burner - Canadian WARNING: To reduce the risk of the...Gloves Figure 21: High Shelf & Low Back Front View English 23 Backguard Installation PRD364JDGU PRD364JDGC PRD366JGU PRD366JGC PRD486JDGU PRD486JDGC PRD48JDSGU PRD48JDSGC AVAILABLE FOR THESE MODELS: Pro Grand® 36" Dual Fuel Range 4 Burner Griddle Pro Grand® 36" Dual Fuel Range 4 Burner Griddle -
... before use. Canadian Pro Grand® 48" Dual Fuel Range w/ Steam Oven Pro Grand® 48" Dual Fuel Range w/ Steam Oven - Canadian Pro Grand® 36" Dual Fuel Range 6 Burner Pro Grand® 36" Dual Fuel Range 6 Burner - Canadian WARNING: To reduce the risk of the...Gloves Figure 21: High Shelf & Low Back Front View English 23 Backguard Installation PRD364JDGU PRD364JDGC PRD366JGU PRD366JGC PRD486JDGU PRD486JDGC PRD48JDSGU PRD48JDSGC AVAILABLE FOR THESE MODELS: Pro Grand® 36" Dual Fuel Range 4 Burner Griddle Pro Grand® 36" Dual Fuel Range 4 Burner Griddle -

Installation Manual
Page 26
...panel flange Model Low Back High Shelf Flush Island Trim Backguard Kit Model Numbers 36" 48" 48" Steam PA36JLBG PA48JLBG PA48JLBSG PA36JHSG PA48JHSG PA48JHSSG Included on Range Included on Range Included on Range The backguard must be used. Mounts inside side panel flange 4. Depending on... of the range. 5. Re-install screws in the front face of the range above the cooking surface, a THERMADOR® Low Back or High Shelf must be attached before sliding the range into the back of the range. 4. Align the back panel of the range. When clearance...
...panel flange Model Low Back High Shelf Flush Island Trim Backguard Kit Model Numbers 36" 48" 48" Steam PA36JLBG PA48JLBG PA48JLBSG PA36JHSG PA48JHSG PA48JHSSG Included on Range Included on Range Included on Range The backguard must be used. Mounts inside side panel flange 4. Depending on... of the range. 5. Re-install screws in the front face of the range above the cooking surface, a THERMADOR® Low Back or High Shelf must be attached before sliding the range into the back of the range. 4. Align the back panel of the range. When clearance...

Installation Manual
Page 30
... Tools Needed T-20 Torx head screwdriver or drill Protective Work Gloves 1. Mounting hole locations (x2) Figure 28: Toe Kick Panel Installation English 28 Beneath the range, with the holes and flange facing up, wrap the Toe Kick Panel around the cast aluminum base. 4. Toe Kick Panel (optional) (PA...
... Tools Needed T-20 Torx head screwdriver or drill Protective Work Gloves 1. Mounting hole locations (x2) Figure 28: Toe Kick Panel Installation English 28 Beneath the range, with the holes and flange facing up, wrap the Toe Kick Panel around the cast aluminum base. 4. Toe Kick Panel (optional) (PA...


