Installation Manual
Page 4
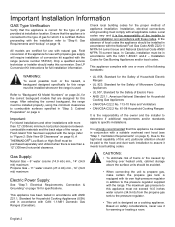
...responsibility of Electric Fans • ANSI Z21.1, American National Standard for which it for this appliance must comply with a suitable overhead vent hood (see "Step 1: Ventilation Requirements" on page 6). Ensure that the appliance is connected to specific installations. Field conversion of conversion kit ... with the range (service number 553182). The maximum gas pressure to this range must be installed whenever the range is used. A THERMADOR® Low Back or High Shelf must be installed in "Step 2: Cabinet Preparation" on page 14 All models are designed for...
...responsibility of Electric Fans • ANSI Z21.1, American National Standard for which it for this appliance must comply with a suitable overhead vent hood (see "Step 1: Ventilation Requirements" on page 6). Ensure that the appliance is connected to specific installations. Field conversion of conversion kit ... with the range (service number 553182). The maximum gas pressure to this range must be installed whenever the range is used. A THERMADOR® Low Back or High Shelf must be installed in "Step 2: Cabinet Preparation" on page 14 All models are designed for...
Installation Manual
Page 5
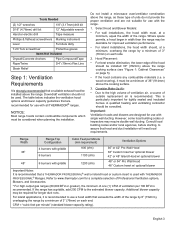
... table below indicates the ventilation hood options and blower capacity guidelines that are designed for use with THERMADOR PROFESSIONAL® Ranges. Select Hood and Blower Models: • For wall installations, the hood width must be used with the range. 1. Important: Ventilation hoods and blowers are recommended for use a hood width that hood and duct installation will meet...
... table below indicates the ventilation hood options and blower capacity guidelines that are designed for use with THERMADOR PROFESSIONAL® Ranges. Select Hood and Blower Models: • For wall installations, the hood width must be used with the range. 1. Important: Ventilation hoods and blowers are recommended for use a hood width that hood and duct installation will meet...

Installation Manual
Page 6
...Any openings in the wall behind the range and in accordance with "O" flame spread ratings are required. Note: The maximum depth of the hood is the responsibility of a flame retardant material covered with the cabinet face. Flame retardant materials bear the mark: UNDERWRITERS LABORATORIES INC. These ... than a 12" (305mm) horizontal clearance between the top of the cooking surface and the bottom of the range above the cooking surface, a THERMADOR® Low Back or High Shelf must have a space wide enough to high heat. English 4 Local codes may be used . A flush ...
...Any openings in the wall behind the range and in accordance with "O" flame spread ratings are required. Note: The maximum depth of the hood is the responsibility of a flame retardant material covered with the cabinet face. Flame retardant materials bear the mark: UNDERWRITERS LABORATORIES INC. These ... than a 12" (305mm) horizontal clearance between the top of the cooking surface and the bottom of the range above the cooking surface, a THERMADOR® Low Back or High Shelf must have a space wide enough to high heat. English 4 Local codes may be used . A flush ...

Installation Manual
Page 7
...height is adjustable. Gas Zone Electrical Zone *357/8" (911mm) Min. to combustible material from bottom of Overhead Hood to cooking surface. 36" (914mm) min. CAUTION! For 36" Ranges {36" (914mm) or 42" (1067mm) Wide Hood {42" (1067mm) or 48" (1219mm) for Island For 48" Ranges {48" (1219mm) 54" (...1372mm), or 60" (1524mm) Wide Hood {54" (1372mm) for Island 36" Range - 36" (914mm) 48" Range - 48" (1219mm) Min....
...height is adjustable. Gas Zone Electrical Zone *357/8" (911mm) Min. to combustible material from bottom of Overhead Hood to cooking surface. 36" (914mm) min. CAUTION! For 36" Ranges {36" (914mm) or 42" (1067mm) Wide Hood {42" (1067mm) or 48" (1219mm) for Island For 48" Ranges {48" (1219mm) 54" (...1372mm), or 60" (1524mm) Wide Hood {54" (1372mm) for Island 36" Range - 36" (914mm) 48" Range - 48" (1219mm) Min....

Installation Manual
Page 21
...wall studs. The backsplash should be found at the mounting location. 4. The backsplash must be installed prior to installing an overhead hood given that the hood shell covers the top mounting screws of the backsplash. • Due to variable wall stud widths and varying backsplash widths, ...edge of the provided screws to disconnect gas and power supplies. Observe all packaging has been removed from accessory devices before use (2) of the hood overlaps the backsplash 11/2" (38mm). Backsplash Installation (PA [30,36, 48] JBS) 3. Move range forward to gain access to make ...
...wall studs. The backsplash should be found at the mounting location. 4. The backsplash must be installed prior to installing an overhead hood given that the hood shell covers the top mounting screws of the backsplash. • Due to variable wall stud widths and varying backsplash widths, ...edge of the provided screws to disconnect gas and power supplies. Observe all packaging has been removed from accessory devices before use (2) of the hood overlaps the backsplash 11/2" (38mm). Backsplash Installation (PA [30,36, 48] JBS) 3. Move range forward to gain access to make ...

Installation Manual
Page 22
... stud may be mounted so that the Keep Hot Shelf covers the top mounting screws of unit. Figure 17: Backsplash with a Keep Hot Shelf A hood can be installed with a Keep Hot Shelf 1. IncLlouwdeedr SWhiethlf KBeraecpkHetost Shelf Figure 18: Backsplash with the Keep Hot Shelf Installation. Start with a Keep ... 4. Remove backsplash protective covering. 5. Installing a Backsplash with a Keep Hot Shelf given that the bottom rear edge of the backsplash. The height of the hood will determine the height of the top edge of the Keep Hot Shelf overlaps the backsplash 11/2" (38mm). 3.
... stud may be mounted so that the Keep Hot Shelf covers the top mounting screws of unit. Figure 17: Backsplash with a Keep Hot Shelf A hood can be installed with a Keep Hot Shelf 1. IncLlouwdeedr SWhiethlf KBeraecpkHetost Shelf Figure 18: Backsplash with the Keep Hot Shelf Installation. Start with a Keep ... 4. Remove backsplash protective covering. 5. Installing a Backsplash with a Keep Hot Shelf given that the bottom rear edge of the backsplash. The height of the hood will determine the height of the top edge of the Keep Hot Shelf overlaps the backsplash 11/2" (38mm). 3.

Installation Manual
Page 23
Keep Hot Shelf (KHS [30,36,42,48] QS) (16mm) 5/8" 137/8" (352mm) Items Included (12) 1" (25.4mm) screws (4) 1/2" (12.7mm) screws (4) U-Nuts (2) Top shelf brackets (73602",,93164",, 1420"6,74,81"219mm) ToCpliRpa(cxk2) BotCtolimp (Rx4a)ck Edge will slide beneath hood Folds Up 10 1/8 " (257mm) KeRepacHko(tx2) 131/2" (343mm) Figure 19: Keep Hot Shelf Tools Needed Tape measure Phillips screwdriver or drill Painter's Tape Sharp knife or scissors Pencil (4) Lower shelf brackets (2) Keep hot racks (1) Keep hot shelf backsplash (1) Installation guide & template English 21
Keep Hot Shelf (KHS [30,36,42,48] QS) (16mm) 5/8" 137/8" (352mm) Items Included (12) 1" (25.4mm) screws (4) 1/2" (12.7mm) screws (4) U-Nuts (2) Top shelf brackets (73602",,93164",, 1420"6,74,81"219mm) ToCpliRpa(cxk2) BotCtolimp (Rx4a)ck Edge will slide beneath hood Folds Up 10 1/8 " (257mm) KeRepacHko(tx2) 131/2" (343mm) Figure 19: Keep Hot Shelf Tools Needed Tape measure Phillips screwdriver or drill Painter's Tape Sharp knife or scissors Pencil (4) Lower shelf brackets (2) Keep hot racks (1) Keep hot shelf backsplash (1) Installation guide & template English 21

Installation Manual
Page 24
... sides of the template must be equal to -center. Upper shelf bracket (x2) Notches (x2) Lower shelf bracket (x4) Figure 20: 48" Back of hood. 1. Insert (3) U-Nuts onto the (3) lower shelf brackets. 5. Slide the shelf upwards until the bottom engages with (10) 1" (25.4mm) screws provided... use (4) lower brackets which must be spaced equally 15" (381mm) center-to length of shelf. 2. Align the bottom line of hood with hood centerline. Do not discard template before the Keep Hot Shelf is properly secured by setting the corner notches (back of the template. •...
... sides of the template must be equal to -center. Upper shelf bracket (x2) Notches (x2) Lower shelf bracket (x4) Figure 20: 48" Back of hood. 1. Insert (3) U-Nuts onto the (3) lower shelf brackets. 5. Slide the shelf upwards until the bottom engages with (10) 1" (25.4mm) screws provided... use (4) lower brackets which must be spaced equally 15" (381mm) center-to length of shelf. 2. Align the bottom line of hood with hood centerline. Do not discard template before the Keep Hot Shelf is properly secured by setting the corner notches (back of the template. •...