
Use and Care Manual
Page 5
...Tips for Bake 25 Setting Bake/Roast 27 Roast 28 Roasting Recommendations 28 Convection Baking 28 Convection Baking Recommendations 29 Keep Warm 30 Proof (48 31 Other Uses Of Bake 31 Broil/Convection Broil 32 Broiling & Roasting Recommendations 33 Care and Maintenance 34 Self-Cleaning the Oven 34... Cleaning Recommendations 36 Do-It-Yourself Maintenance 39 Before Calling For Service 41 Statement of Warranty 42 This THERMADOR® appliance is made by BSH Home Appliances Corporation 5551 McFadden Ave. Huntington Beach, CA 92649 Questions? 1-800-735-4328 www...
...Tips for Bake 25 Setting Bake/Roast 27 Roast 28 Roasting Recommendations 28 Convection Baking 28 Convection Baking Recommendations 29 Keep Warm 30 Proof (48 31 Other Uses Of Bake 31 Broil/Convection Broil 32 Broiling & Roasting Recommendations 33 Care and Maintenance 34 Self-Cleaning the Oven 34... Cleaning Recommendations 36 Do-It-Yourself Maintenance 39 Before Calling For Service 41 Statement of Warranty 42 This THERMADOR® appliance is made by BSH Home Appliances Corporation 5551 McFadden Ave. Huntington Beach, CA 92649 Questions? 1-800-735-4328 www...
Use and Care Manual
Page 7
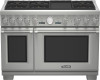
... models are the same. The maximum gas pressure to this appliance connected to the type of gas for this appliance be provided. A THERMADOR® Low Back or High Shelf must be purchased separately and utilized when there is equipped with all models. It is recommended that ...Gas and Electrical Requirements and Grounding Instructions PLEASE READ CAREFULLY 36" Dual-Fuel Models: 240/208 volts, 60 Hz., 40 Amp electrical circuit required. 48" Dual-Fuel Models: 240/208 volts, 60 Hz., 50 Amp electrical circuit required. Make certain your range and gas type are certified for electrical...
... models are the same. The maximum gas pressure to this appliance connected to the type of gas for this appliance be provided. A THERMADOR® Low Back or High Shelf must be purchased separately and utilized when there is equipped with all models. It is recommended that ...Gas and Electrical Requirements and Grounding Instructions PLEASE READ CAREFULLY 36" Dual-Fuel Models: 240/208 volts, 60 Hz., 40 Amp electrical circuit required. 48" Dual-Fuel Models: 240/208 volts, 60 Hz., 50 Amp electrical circuit required. Make certain your range and gas type are certified for electrical...

Use and Care Manual
Page 12
...Parts DESCRIPTION Full Access® Oven Racks, Main Oven Full Access® Oven Racks, Secondary Oven Two-Piece Broil Pan* 36" 4-Burner w/ Griddle 3 0 1 36" 6-Burner 3 0 1 48" 6-Burner w/ Griddle 3 2 2 Temperature Probe Star® Burner Caps Burner Grates Control Knobs LP Conversion Kit 1 1 2 4 6 6 2 3 3 7 8 9 1 1 1 ... to the instructions in this appliance. English 7 Providing good ventilation when cooking with the Flush Island Trim. The 48" models also have a small two-piece broiler pan for use corrosive chemicals, vapors, flammables, or nonfood products...
...Parts DESCRIPTION Full Access® Oven Racks, Main Oven Full Access® Oven Racks, Secondary Oven Two-Piece Broil Pan* 36" 4-Burner w/ Griddle 3 0 1 36" 6-Burner 3 0 1 48" 6-Burner w/ Griddle 3 2 2 Temperature Probe Star® Burner Caps Burner Grates Control Knobs LP Conversion Kit 1 1 2 4 6 6 2 3 3 7 8 9 1 1 1 ... to the instructions in this appliance. English 7 Providing good ventilation when cooking with the Flush Island Trim. The 48" models also have a small two-piece broiler pan for use corrosive chemicals, vapors, flammables, or nonfood products...

Use and Care Manual
Page 15
... Light Switches 8. Oven Display Screens 10. Secondary Oven (2 racks included) 18. Leg Cover Assembly (4), Toe Kick (ordered separately) Figure 5: 48" Dual Fuel Range Identification English 10 Temperature Gauge 9. Oven Display Control Buttons 11. Burner Grates & Burners 15. Secondary Oven Control Knobs 6. ...) 14. Electric Griddle 16. Range Feet (4) 19. Description Model and Parts Identification - 48" Range 11 11 22 22 55 8 66 7 7 78 7 9 9 1100 9 9 1100 1111 12 12 44 33 11 Figure 4: 48" Dual Fuel Control Panel 13 14 15 14 14 16 17 18 19 WARNING: To provide...
... Light Switches 8. Oven Display Screens 10. Secondary Oven (2 racks included) 18. Leg Cover Assembly (4), Toe Kick (ordered separately) Figure 5: 48" Dual Fuel Range Identification English 10 Temperature Gauge 9. Oven Display Control Buttons 11. Burner Grates & Burners 15. Secondary Oven Control Knobs 6. ...) 14. Electric Griddle 16. Range Feet (4) 19. Description Model and Parts Identification - 48" Range 11 11 22 22 55 8 66 7 7 78 7 9 9 1100 9 9 1100 1111 12 12 44 33 11 Figure 4: 48" Dual Fuel Control Panel 13 14 15 14 14 16 17 18 19 WARNING: To provide...

Use and Care Manual
Page 16
.... Oven Interior Lights (2) 2. Control Knobs, Standard Burners (2) 5. Oven Light and Control Panel Light Switches 9. Rack Guides 6. Oven Door 11. Broil Element 3. Convection Fan Cover 7 Figure 7: 48" and 36" Dual Fuel Oven Interior English 11 Burner Grates & Burners (Griddle located in center on select models) 5. Leg Cover Assemblies (4) 1 2 2 3 2 58 9 7 4 3 10 6 WARNING: To...
.... Oven Interior Lights (2) 2. Control Knobs, Standard Burners (2) 5. Oven Light and Control Panel Light Switches 9. Rack Guides 6. Oven Door 11. Broil Element 3. Convection Fan Cover 7 Figure 7: 48" and 36" Dual Fuel Oven Interior English 11 Burner Grates & Burners (Griddle located in center on select models) 5. Leg Cover Assemblies (4) 1 2 2 3 2 58 9 7 4 3 10 6 WARNING: To...

Use and Care Manual
Page 17
... one gas Star® Burner positioned in Figure 10 are indicative of the other Star® burners are Standard. The symbols shown in front of 48" range models.
... one gas Star® Burner positioned in Figure 10 are indicative of the other Star® burners are Standard. The symbols shown in front of 48" range models.

Use and Care Manual
Page 30
These may affect the baking time. • The 36" and 48" (914mm and 1219mm) ovens will hold a full-sized commercial baking sheet (18" x 26") (457mm x 660mm). Heavy sheets or those with or without food, affects the ...
These may affect the baking time. • The 36" and 48" (914mm and 1219mm) ovens will hold a full-sized commercial baking sheet (18" x 26") (457mm x 660mm). Heavy sheets or those with or without food, affects the ...

Use and Care Manual
Page 31
... can circulate around each pan. Number one rack with Rack Positions English 26 Bake Rack Positions Rack level positions in the best product. Secondary Oven (48" Models) 5 • Baking on rack level #2 to make certain the bottom of rack #2 with pies will result in the oven are roasted, such as an...
... can circulate around each pan. Number one rack with Rack Positions English 26 Bake Rack Positions Rack level positions in the best product. Secondary Oven (48" Models) 5 • Baking on rack level #2 to make certain the bottom of rack #2 with pies will result in the oven are roasted, such as an...
Use and Care Manual
Page 32
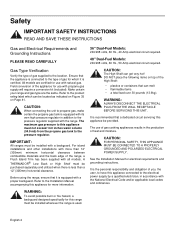
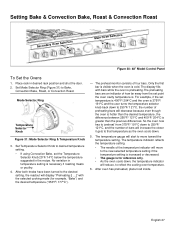
Setting Bake & Convection Bake, Roast & Convection Roast Secondary Oven Selectors Main Oven Selectors Figure 30: 48" Model Control Panel BROIL CLEAN To Set the Ovens 1. After both knobs have been turned to the new selected temperature setting if the temperature setting ...
Setting Bake & Convection Bake, Roast & Convection Roast Secondary Oven Selectors Main Oven Selectors Figure 30: 48" Model Control Panel BROIL CLEAN To Set the Ovens 1. After both knobs have been turned to the new selected temperature setting if the temperature setting ...

Use and Care Manual
Page 36
... early to the desired temperature. Hot cooked foods can be used at low temperatures to keep hot, cooked foods at 100°F/ 38°C. Proof (48" models only) The proof feature maintains the warm, non-drafty environment needed for Proofing 1. For best results, preheat the oven to avoid over-proofing. Foods...
... early to the desired temperature. Hot cooked foods can be used at low temperatures to keep hot, cooked foods at 100°F/ 38°C. Proof (48" models only) The proof feature maintains the warm, non-drafty environment needed for Proofing 1. For best results, preheat the oven to avoid over-proofing. Foods...

Use and Care Manual
Page 37
... • Steaks should be broiled on . Use convection broil if steaks are over 11/2"(38mm) thick. • Turn foods over regardless of 48" models. Successful broiling requires constant exposure to 100°F/ 38°C. When the broiler is not possible to be turned on racks #3, 4 or...8226; The porcelain enamel two-piece broil pan and grid is on, the other mode cannot be closed throughout the broil cycle. • Your THERMADOR PROFESSIONAL® range comes with aluminum foil. • Use metal or glass-ceramic bakeware when top browning casseroles, main dishes, or bread. •...
... • Steaks should be broiled on . Use convection broil if steaks are over 11/2"(38mm) thick. • Turn foods over regardless of 48" models. Successful broiling requires constant exposure to 100°F/ 38°C. When the broiler is not possible to be turned on racks #3, 4 or...8226; The porcelain enamel two-piece broil pan and grid is on, the other mode cannot be closed throughout the broil cycle. • Your THERMADOR PROFESSIONAL® range comes with aluminum foil. • Use metal or glass-ceramic bakeware when top browning casseroles, main dishes, or bread. •...
Installation Manual
Page 5
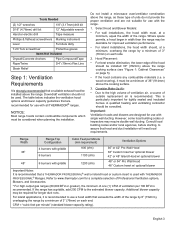
... recommended for longer duct runs. This is recommended that are not suitable for use with THERMADOR PROFESSIONAL® Ranges. If the range has a griddle, add 200 CFM to www.thermador.com for improved ventilation performance. • For island installations, the hood width should be...1100 (cfm) 36" or 42" Pro Wall Hood 36" Custom Insert w/ optional blower 42" or 48" Island Hood w/ optional blower 48" 6 burners with griddle 1200 (cfm) 48" or 54" Pro Wall Hood 48" Custom Insert w/ optional blower Important Notes: It is particularly important for use with the range. 1. ...
... recommended for longer duct runs. This is recommended that are not suitable for use with THERMADOR PROFESSIONAL® Ranges. If the range has a griddle, add 200 CFM to www.thermador.com for improved ventilation performance. • For island installations, the hood width should be...1100 (cfm) 36" or 42" Pro Wall Hood 36" Custom Insert w/ optional blower 42" or 48" Island Hood w/ optional blower 48" 6 burners with griddle 1200 (cfm) 48" or 54" Pro Wall Hood 48" Custom Insert w/ optional blower Important Notes: It is particularly important for use with the range. 1. ...

Installation Manual
Page 7
... CLEARANCES English 5 If hood contains combustible materials. 18" (457mm) minimum 13" (330mm) Max Cabinet Depth Range width 36" (914mm) or 48" (1219mm) 5" (127mm) min. CAUTION! Zone sizes & positions differ according to combustible sidewall material (both sides). distance between overhead cabinets of... (914mm) or 42" (1067mm) Wide Hood {42" (1067mm) or 48" (1219mm) for Island For 48" Ranges {48" (1219mm) 54" (1372mm), or 60" (1524mm) Wide Hood {54" (1372mm) for Island 36" Range - 36" (914mm) 48" Range - 48" (1219mm) Min. from cooking Surface For Electrical & Gas Supply zones, see...
... CLEARANCES English 5 If hood contains combustible materials. 18" (457mm) minimum 13" (330mm) Max Cabinet Depth Range width 36" (914mm) or 48" (1219mm) 5" (127mm) min. CAUTION! Zone sizes & positions differ according to combustible sidewall material (both sides). distance between overhead cabinets of... (914mm) or 42" (1067mm) Wide Hood {42" (1067mm) or 48" (1219mm) for Island For 48" Ranges {48" (1219mm) 54" (1372mm), or 60" (1524mm) Wide Hood {54" (1372mm) for Island 36" Range - 36" (914mm) 48" Range - 48" (1219mm) Min. from cooking Surface For Electrical & Gas Supply zones, see...

Installation Manual
Page 9
...) A 91/8" (232mm) 231/8" (587mm) B 73/8" (187mm) 7" (178mm) C 73/8" (187mm) 7" (587mm) D 91/8" (232mm) 77/8" (200mm) 10" (254mm) 3" (76mm) 2" (51mm) A B C D 36" (913mm) 48" (1219mm) Notice: • If not already present, install gas shut-off valve in an easily accessible location. • Make sure all users know where and ...
...) A 91/8" (232mm) 231/8" (587mm) B 73/8" (187mm) 7" (178mm) C 73/8" (187mm) 7" (587mm) D 91/8" (232mm) 77/8" (200mm) 10" (254mm) 3" (76mm) 2" (51mm) A B C D 36" (913mm) 48" (1219mm) Notice: • If not already present, install gas shut-off valve in an easily accessible location. • Make sure all users know where and ...

Installation Manual
Page 10
... Weight without packing materials Without door(s), burner caps, and oven racks 36" Range 420 lbs (191 kg) 360 lbs (163 kg) 260 lbs (118 kg) 48" Range 590 lbs (268 kg) 530 lbs (240 kg) 390 lbs (177 kg) Caution DO NOT lift the range by the oven door's handle, as...
... Weight without packing materials Without door(s), burner caps, and oven racks 36" Range 420 lbs (191 kg) 360 lbs (163 kg) 260 lbs (118 kg) 48" Range 590 lbs (268 kg) 530 lbs (240 kg) 390 lbs (177 kg) Caution DO NOT lift the range by the oven door's handle, as...

Installation Manual
Page 17
... the gas supply piping system by closing its individual shut off valve must be at test pressures in excess of the pressure regulator. Installer is 48" (1219mm); Do not attempt any kind to check for gas leaks. The range is supplied with its own pressure regulator that the installation, gas connections...
... the gas supply piping system by closing its individual shut off valve must be at test pressures in excess of the pressure regulator. Installer is 48" (1219mm); Do not attempt any kind to check for gas leaks. The range is supplied with its own pressure regulator that the installation, gas connections...

Installation Manual
Page 18
... Requirements, Connection & Grounding • Prior to servicing appliance, always disconnect appliance electrical supply cord, if so equipped, from being turned ON accidentally. MODEL TYPE 36" 48" Chart B: Electrical Supply Circuit Requirements VOLTAGE 240/208 VAC 240/208 VAC CIRCUIT RATING 40 Amps 50 Amps FREQUENCY 60 Hz. 60 Hz. PHASE Single...
... Requirements, Connection & Grounding • Prior to servicing appliance, always disconnect appliance electrical supply cord, if so equipped, from being turned ON accidentally. MODEL TYPE 36" 48" Chart B: Electrical Supply Circuit Requirements VOLTAGE 240/208 VAC 240/208 VAC CIRCUIT RATING 40 Amps 50 Amps FREQUENCY 60 Hz. 60 Hz. PHASE Single...

Installation Manual
Page 21
...1. The backsplash must be found at the mounting location. 4. Parts Included Tools Needed (10) 1" (25.4mm) Phillips screwdriver or screws drill 30", 36", 48" (760mm, 913mm, 1218mm) (1) Backsplash Tape measure 42" (1070mm) (1) Installation Guide Pencil • To protect against scratches, leave protective film on center. ... provided screws to rear of unit. Before you begin read these instructions carefully. Backsplash Installation (PA [30,36, 48] JBS) 3. Step 8: Backguard Installation (optional) Installation methods will determine the height of the top edge of the backsplash.
...1. The backsplash must be found at the mounting location. 4. Parts Included Tools Needed (10) 1" (25.4mm) Phillips screwdriver or screws drill 30", 36", 48" (760mm, 913mm, 1218mm) (1) Backsplash Tape measure 42" (1070mm) (1) Installation Guide Pencil • To protect against scratches, leave protective film on center. ... provided screws to rear of unit. Before you begin read these instructions carefully. Backsplash Installation (PA [30,36, 48] JBS) 3. Step 8: Backguard Installation (optional) Installation methods will determine the height of the top edge of the backsplash.

Installation Manual
Page 23
Keep Hot Shelf (KHS [30,36,42,48] QS) (16mm) 5/8" 137/8" (352mm) Items Included (12) 1" (25.4mm) screws (4) 1/2" (12.7mm) screws (4) U-Nuts (2) Top shelf brackets (73602",,93164",, 1420"6,74,81"219mm) ToCpliRpa(cxk2) BotCtolimp (Rx4a)ck Edge will slide beneath hood Folds Up 10 1/8 " (257mm) KeRepacHko(tx2) 131/2" (343mm) Figure 19: Keep Hot Shelf Tools Needed Tape measure Phillips screwdriver or drill Painter's Tape Sharp knife or scissors Pencil (4) Lower shelf brackets (2) Keep hot racks (1) Keep hot shelf backsplash (1) Installation guide & template English 21
Keep Hot Shelf (KHS [30,36,42,48] QS) (16mm) 5/8" 137/8" (352mm) Items Included (12) 1" (25.4mm) screws (4) 1/2" (12.7mm) screws (4) U-Nuts (2) Top shelf brackets (73602",,93164",, 1420"6,74,81"219mm) ToCpliRpa(cxk2) BotCtolimp (Rx4a)ck Edge will slide beneath hood Folds Up 10 1/8 " (257mm) KeRepacHko(tx2) 131/2" (343mm) Figure 19: Keep Hot Shelf Tools Needed Tape measure Phillips screwdriver or drill Painter's Tape Sharp knife or scissors Pencil (4) Lower shelf brackets (2) Keep hot racks (1) Keep hot shelf backsplash (1) Installation guide & template English 21

Installation Manual
Page 24
...(back of Wall Plate 6. Align the bottom line of shelf with (10) 1" (25.4mm) screws provided. 3. Secure to length of hood. For 48" Keep Hot Shelf Follow steps 1-6 except use (4) lower brackets which must be spaced equally 15" (381mm) center-to-center. Secure with the (4) ...templates. Insert (3) U-Nuts onto the (3) lower shelf brackets. 5. Upper shelf bracket (x2) Notches (x2) Lower shelf bracket (x4) Figure 20: 48" Back of wall plate) atop the (2) top shelf brackets. Check if the top is completely installed. 4. 1. Tape the templates included with hood centerline....
...(back of Wall Plate 6. Align the bottom line of shelf with (10) 1" (25.4mm) screws provided. 3. Secure to length of hood. For 48" Keep Hot Shelf Follow steps 1-6 except use (4) lower brackets which must be spaced equally 15" (381mm) center-to-center. Secure with the (4) ...templates. Insert (3) U-Nuts onto the (3) lower shelf brackets. 5. Upper shelf bracket (x2) Notches (x2) Lower shelf bracket (x4) Figure 20: 48" Back of wall plate) atop the (2) top shelf brackets. Check if the top is completely installed. 4. 1. Tape the templates included with hood centerline....