
Use and Care Manual
Page 5
... of Contents Introduction 1 Safety 2 Important Safety Instructions 2 Before You Begin 7 Using Your Range for the First Time 7 Range Description 10 Parts Identification - 48" Range 10 Parts Identification - 36" Range 11 Using The Cooktop 12 Cookware Recommendations 17 Specialty Cookware 18 Surface Burner Cooking Recommendations ....... ... Recommendations 36 Do-It-Yourself Maintenance 39 Before Calling For Service 41 Statement of Warranty 42 This THERMADOR® appliance is made by BSH Home Appliances Corporation 5551 McFadden Ave. Huntington Beach, CA 92649 Questions? 1-800-735...
... of Contents Introduction 1 Safety 2 Important Safety Instructions 2 Before You Begin 7 Using Your Range for the First Time 7 Range Description 10 Parts Identification - 48" Range 10 Parts Identification - 36" Range 11 Using The Cooktop 12 Cookware Recommendations 17 Specialty Cookware 18 Surface Burner Cooking Recommendations ....... ... Recommendations 36 Do-It-Yourself Maintenance 39 Before Calling For Service 41 Statement of Warranty 42 This THERMADOR® appliance is made by BSH Home Appliances Corporation 5551 McFadden Ave. Huntington Beach, CA 92649 Questions? 1-800-735...
Use and Care Manual
Page 6
...-tip bracket is securely installed. Pay special attention to the Important Safety Instructions located at the beginning of configurations. Carefully tip range forward pulling from a neighbor's phone. English 1 The THERMADOR PROFESSIONAL® ranges are freestanding units available in a number of the manual. WARNING: Tip Over Hazard! Failure to ensure that the anti-tip...
...-tip bracket is securely installed. Pay special attention to the Important Safety Instructions located at the beginning of configurations. Carefully tip range forward pulling from a neighbor's phone. English 1 The THERMADOR PROFESSIONAL® ranges are freestanding units available in a number of the manual. WARNING: Tip Over Hazard! Failure to ensure that the anti-tip...
Use and Care Manual
Page 7
...Manual for this appliance must not exceed 14.0 inches water column (34.9 mb) from the propane gas tank to this range must be provided. A THERMADOR® Low Back or High Shelf must be located as indicated on Figure 35 on top of heat and moisture. ...than a 12" (305mm) horizontal clearance. CAUTION: When connecting the unit to the Installation Manual accompanying this appliance be installed whenever the range is certified. CAUTION: FOR PERSONAL SAFETY, THIS APPLIANCE MUST BE CONNECTED TO A PROPERLY GROUNDED AND POLARIZED ELECTRICAL POWER SUPPLY. Refer to ...
...Manual for this appliance must not exceed 14.0 inches water column (34.9 mb) from the propane gas tank to this range must be provided. A THERMADOR® Low Back or High Shelf must be located as indicated on Figure 35 on top of heat and moisture. ...than a 12" (305mm) horizontal clearance. CAUTION: When connecting the unit to the Installation Manual accompanying this appliance be installed whenever the range is certified. CAUTION: FOR PERSONAL SAFETY, THIS APPLIANCE MUST BE CONNECTED TO A PROPERLY GROUNDED AND POLARIZED ELECTRICAL POWER SUPPLY. Refer to ...

Use and Care Manual
Page 8
... dissipate before lighting the burner manually. ALL MODELS: IN CASE OF AN ELECTRICAL FAILURE If for , your new THERMADOR PROFESSIONAL® range has been designed to a qualified technician. These burners are in this Use and Care Manual carefully before using this restaurant caliber...be installed in safe practices by a qualified technician. They should not be a safe, reliable appliance. DO NOT attempt to the range. Have the range installed and electrically grounded by qualified persons. To light the burners manually, carefully hold a lit match to the burner ports and ...
... dissipate before lighting the burner manually. ALL MODELS: IN CASE OF AN ELECTRICAL FAILURE If for , your new THERMADOR PROFESSIONAL® range has been designed to a qualified technician. These burners are in this Use and Care Manual carefully before using this restaurant caliber...be installed in safe practices by a qualified technician. They should not be a safe, reliable appliance. DO NOT attempt to the range. Have the range installed and electrically grounded by qualified persons. To light the burners manually, carefully hold a lit match to the burner ports and ...

Use and Care Manual
Page 9
... it started. • The fire department is small and contained in a shock or fire hazard, or the obstruction of the flow of the oven or range. You may melt or ignite. This will result. • Use an extinguisher only if: • You know you have a working smoke detector near the...Heat oils slowly on fire. Use of a foil liner could catch on cooking fires. Flammable materials can damage the finish of the oven or the range. Some fabrics are highly flammable and should not be allowed to an exit. a violent steam explosion will upset the cooking performance and can catch fire...
... it started. • The fire department is small and contained in a shock or fire hazard, or the obstruction of the flow of the oven or range. You may melt or ignite. This will result. • Use an extinguisher only if: • You know you have a working smoke detector near the...Heat oils slowly on fire. Use of a foil liner could catch on cooking fires. Flammable materials can damage the finish of the oven or the range. Some fabrics are highly flammable and should not be allowed to an exit. a violent steam explosion will upset the cooking performance and can catch fire...

Use and Care Manual
Page 10
...a pan larger than the grate or with one that spans more than one burner, such as a person standing, sitting, or leaning on the range burners. Use caution to insure that drafts like those from forced air vents or fans do not extend over may result in carbon monoxide poisoning... that generates harmful by-products. WARNING: The appliance is pushed back against the wall. Based on the grill plate accessory. Never leave the range unattended when using the cooktop: DO NOT TOUCH THE BURNER GRATES OR THE IMMEDIATE SURROUNDING AREA. Always use of undersized pots and pans could expose...
...a pan larger than the grate or with one that spans more than one burner, such as a person standing, sitting, or leaning on the range burners. Use caution to insure that drafts like those from forced air vents or fans do not extend over may result in carbon monoxide poisoning... that generates harmful by-products. WARNING: The appliance is pushed back against the wall. Based on the grill plate accessory. Never leave the range unattended when using the cooktop: DO NOT TOUCH THE BURNER GRATES OR THE IMMEDIATE SURROUNDING AREA. Always use of undersized pots and pans could expose...

Use and Care Manual
Page 11
...cleaning oven(s). WARNING: After a spill or boil over or when the burner does not light even though the electronic igniters activate. Clean the range with high alcohol content (e.g. let hot air or steam escape before attempting to assure a tight seal. see "Automatic operation of alcohol in... of the cooling blower:" on the oven door. See cleaning instructions "Brass Star® Burner Base and Cast Iron Cap" on the range's cooktop, follow manufacturer's instructions. do not use a wet sponge or cloth to possible hot surfaces, clean around the burner and burner ports...
...cleaning oven(s). WARNING: After a spill or boil over or when the burner does not light even though the electronic igniters activate. Clean the range with high alcohol content (e.g. let hot air or steam escape before attempting to assure a tight seal. see "Automatic operation of alcohol in... of the cooling blower:" on the oven door. See cleaning instructions "Brass Star® Burner Base and Cast Iron Cap" on the range's cooktop, follow manufacturer's instructions. do not use a wet sponge or cloth to possible hot surfaces, clean around the burner and burner ports...

Use and Care Manual
Page 12
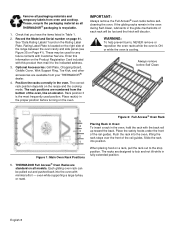
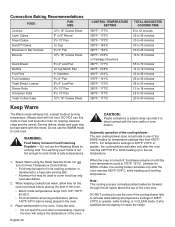
... first time check that you have these substances can generate some by : 1. however, see Warning concerning spacing behind the range when using your range for the oven. Providing good ventilation when cooking with the Flush Island Trim. Operating the unit according to such substances.... Flush Island Trim; It is specifically designed for the Secondary Oven. **All models are on the list. Exposure to these items: Table 1: Range Accessories and Parts DESCRIPTION Full Access® Oven Racks, Main Oven Full Access® Oven Racks, Secondary Oven Two-Piece Broil Pan* 36"...
... first time check that you have these substances can generate some by : 1. however, see Warning concerning spacing behind the range when using your range for the oven. Providing good ventilation when cooking with the Flush Island Trim. Operating the unit according to such substances.... Flush Island Trim; It is specifically designed for the Secondary Oven. **All models are on the list. Exposure to these items: Table 1: Range Accessories and Parts DESCRIPTION Full Access® Oven Racks, Main Oven Full Access® Oven Racks, Secondary Oven Two-Piece Broil Pan* 36"...
Use and Care Manual
Page 13
Check that you have the items listed in the oven. Rating Label Plate is located on the right side of the range between the oven cavity and side panel (see Figure 35 on the Product Registration Card included with minimal effort - Enter this product then mail it ... rack with Customer Service. Each gliding oven rack can be lost and the finish will be pulled out and pushed back into position. Remove all THERMADOR® packaging is recyclable. 1. These may be used position. The rack positions are standard on the oven. IMPORTANT: Always remove the Full Access® oven...
Check that you have the items listed in the oven. Rating Label Plate is located on the right side of the range between the oven cavity and side panel (see Figure 35 on the Product Registration Card included with minimal effort - Enter this product then mail it ... rack with Customer Service. Each gliding oven rack can be lost and the finish will be pulled out and pushed back into position. Remove all THERMADOR® packaging is recyclable. 1. These may be used position. The rack positions are standard on the oven. IMPORTANT: Always remove the Full Access® oven...

Use and Care Manual
Page 14
... a window). Turn on kitchen ventilation (or if vent hood is recommended that the burner caps are correctly seated on the burner bases of the range's cooktop (see "Self-Cleaning the Oven(s)" on each burner to line the oven. English 9 Figure 3: Side View of the oven. Ensure ...that birds be used . The THERMADOR PROFESSIONAL® range occasionally has a smell or smoke when first used to cover the oven racks or to check for proper flame color. Note: It is necessary...
... a window). Turn on kitchen ventilation (or if vent hood is recommended that the burner caps are correctly seated on the burner bases of the range's cooktop (see "Self-Cleaning the Oven(s)" on each burner to line the oven. English 9 Figure 3: Side View of the oven. Ensure ...that birds be used . The THERMADOR PROFESSIONAL® range occasionally has a smell or smoke when first used to cover the oven racks or to check for proper flame color. Note: It is necessary...

Use and Care Manual
Page 15
...ExtraHighTM & ExtraLow® (1) 4. Main Oven Control Knobs 7. Flush Island Trim (included), High Shelf or Low Back (ordered separately) 14. Range Feet (4) 19. Oven Display Control Buttons 11. Control Panel Light 12. Main Oven (3 racks included) 17. Control Knobs, ExtraLow® ... Electric Griddle Knob (1) 5. Secondary Oven Control Knobs 6. Control Knobs, Standard Burners (2) 3. Oven Display Screens 10. Description Model and Parts Identification - 48" Range 11 11 22 22 55 8 66 7 7 78 7 9 9 1100 9 9 1100 1111 12 12 44 33 11 Figure 4: 48" Dual Fuel ...
...ExtraHighTM & ExtraLow® (1) 4. Main Oven Control Knobs 7. Flush Island Trim (included), High Shelf or Low Back (ordered separately) 14. Range Feet (4) 19. Oven Display Control Buttons 11. Control Panel Light 12. Main Oven (3 racks included) 17. Control Knobs, ExtraLow® ... Electric Griddle Knob (1) 5. Secondary Oven Control Knobs 6. Control Knobs, Standard Burners (2) 3. Oven Display Screens 10. Description Model and Parts Identification - 48" Range 11 11 22 22 55 8 66 7 7 78 7 9 9 1100 9 9 1100 1111 12 12 44 33 11 Figure 4: 48" Dual Fuel ...

Use and Care Manual
Page 16
... (4) 12. Rack Guides 6. Bake Element (hidden) 8. Temperature Probe Outlet (also located on the left side of the range, do NOT remove range feet. 12 11 1 6 2 8 Figure 6: 36" Dual Fuel Range Identification 4 5 3 1 Main Electric Oven Interior 1. Oven Display Screen & Control Buttons 8. Oven Door 11. Full Access® Oven... Control Knobs, Standard Burners (2) 5. Burner Grates & Burners (Griddle located in center on select models) 5. Model and Parts Identification - 36" Range Key for 36" Models 1. Flush Island Trim (included), High Shelf or Low Back (ordered separately) 2.
... (4) 12. Rack Guides 6. Bake Element (hidden) 8. Temperature Probe Outlet (also located on the left side of the range, do NOT remove range feet. 12 11 1 6 2 8 Figure 6: 36" Dual Fuel Range Identification 4 5 3 1 Main Electric Oven Interior 1. Oven Display Screen & Control Buttons 8. Oven Door 11. Full Access® Oven... Control Knobs, Standard Burners (2) 5. Burner Grates & Burners (Griddle located in center on select models) 5. Model and Parts Identification - 36" Range Key for 36" Models 1. Flush Island Trim (included), High Shelf or Low Back (ordered separately) 2.

Use and Care Manual
Page 17
...control knob. the right-front Star® Burner is located on the control panel, directly in Figure 10 are Standard. On all other on the range cooktop. Control Knobs Typically, a pair of the Burners • Press in the OFF position. Left Rear XLO Center Rear Griddle Right Rear XLO XLO... position on the rangetop. Each Star® Burner has its own control knob. with one gas Star® Burner positioned in front of 48" range models. Figure 8: Star® Brass Burner Base The cooktop features four or six gas surface Star® burners; The light turns on the knob...
...control knob. the right-front Star® Burner is located on the control panel, directly in Figure 10 are Standard. On all other on the range cooktop. Control Knobs Typically, a pair of the Burners • Press in the OFF position. Left Rear XLO Center Rear Griddle Right Rear XLO XLO... position on the rangetop. Each Star® Burner has its own control knob. with one gas Star® Burner positioned in front of 48" range models. Figure 8: Star® Brass Burner Base The cooktop features four or six gas surface Star® burners; The light turns on the knob...
Use and Care Manual
Page 18
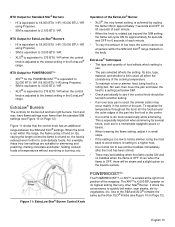
...melting chocolate and butter, holding cooked foods at the right-front position of the pan. Figure 11 shows that the control knob has an additional range between the SIM and XLO® settings. Figure 11: ExtraLow Star® Burner Control Knob POWERBOOSTTM The POWERBOOSTTM, or XHITM, is adjusted to...foods. For example, these very low settings are suitable for 6 seconds of each minute. • When the knob is set anywhere within this range, the flame cycles off and on Page 12). ExtraLow® Burners The controls for ExtraLow Star® Burners • HI is equivalent to 18...
...melting chocolate and butter, holding cooked foods at the right-front position of the pan. Figure 11 shows that the control knob has an additional range between the SIM and XLO® settings. Figure 11: ExtraLow Star® Burner Control Knob POWERBOOSTTM The POWERBOOSTTM, or XHITM, is adjusted to...foods. For example, these very low settings are suitable for 6 seconds of each minute. • When the knob is set anywhere within this range, the flame cycles off and on Page 12). ExtraLow® Burners The controls for ExtraLow Star® Burners • HI is equivalent to 18...
Use and Care Manual
Page 28
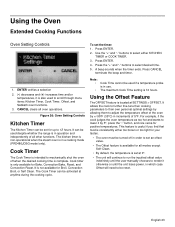
.... Use the "+" and "-" buttons to lower it is in operation and independently of 5°F. Note: • • Cook Time cannot be used despite whether the range is also used if a temperature probe is in order to be turned off when the desired cooking time is 12 hours. Using the Offset Feature...
.... Use the "+" and "-" buttons to lower it is in operation and independently of 5°F. Note: • • Cook Time cannot be used despite whether the range is also used if a temperature probe is in order to be turned off when the desired cooking time is 12 hours. Using the Offset Feature...

Use and Care Manual
Page 29
... Mode is for faiths with "No Work" requirements on . Place rack and food at the same time. • Sabbath Mode is only available when the range is not already in the Secondary Oven on select models, flip the cap of the oven. That is closed. Press the (-) to decrease or (+) to... is only available for Bake, Convection Bake, Roast, and Convection Roast modes. • Probe is not available when Cook Timer has been set. • The range for the probe temperature is between 160ºF (71ºC) and 200 ºF (93ºC). 7. Ensure that the cooking process has concluded.
... Mode is for faiths with "No Work" requirements on . Place rack and food at the same time. • Sabbath Mode is only available when the range is not already in the Secondary Oven on select models, flip the cap of the oven. That is closed. Press the (-) to decrease or (+) to... is only available for Bake, Convection Bake, Roast, and Convection Roast modes. • Probe is not available when Cook Timer has been set. • The range for the probe temperature is between 160ºF (71ºC) and 200 ºF (93ºC). 7. Ensure that the cooking process has concluded.
Use and Care Manual
Page 35
...;C or greater, while broiling, or in the oven. 3. Likewise for the oven to preheat before placing the item in the oven. • Warm mode temperatures range from 140°-150°F/ 60-66°C • Food should be kept warm with this mode to heat cold food other than 425°... Keep Warm The Warm mode will reduce the temperature of the oven. DO NOT use the oven if the cooling blower fails to repair the range. Place warmed dish in direct contact with hot food. Note: This cooling process normally pushes heated air forward, through the air space above 140°...
...;C or greater, while broiling, or in the oven. 3. Likewise for the oven to preheat before placing the item in the oven. • Warm mode temperatures range from 140°-150°F/ 60-66°C • Food should be kept warm with this mode to heat cold food other than 425°... Keep Warm The Warm mode will reduce the temperature of the oven. DO NOT use the oven if the cooling blower fails to repair the range. Place warmed dish in direct contact with hot food. Note: This cooling process normally pushes heated air forward, through the air space above 140°...

Use and Care Manual
Page 37
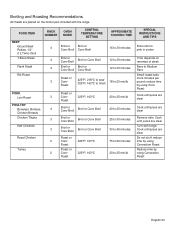
... Knob to the broiling temperature. Automatic operation of fish, etc.). English 32 Getting the Best Results • Defrost food before starting to repair the range. Rack Positions Before turning on racks #3, 4 or 5 depending upon the type and thickness of foods. Main Oven Rack #5 - Rack #4 -... of the broil element. • The small porcelain broiler pan is designed to be closed throughout the broil cycle. • Your THERMADOR PROFESSIONAL® range comes with a large two-piece broiler pan. Liver slices must be more in thickness or fish, poultry, pork chops and ham steaks...
... Knob to the broiling temperature. Automatic operation of fish, etc.). English 32 Getting the Best Results • Defrost food before starting to repair the range. Rack Positions Before turning on racks #3, 4 or 5 depending upon the type and thickness of foods. Main Oven Rack #5 - Rack #4 -... of the broil element. • The small porcelain broiler pan is designed to be closed throughout the broil cycle. • Your THERMADOR PROFESSIONAL® range comes with a large two-piece broiler pan. Liver slices must be more in thickness or fish, poultry, pork chops and ham steaks...
Use and Care Manual
Page 38
... Do not stuff; reduce time by using Convection Roast Reduce time by using Convection Roast English 33 Cook until juices are clear Turn with the range. Broiling and Roasting Recommendations All meats are placed on rareness of steak Rare to Medium Rare Small roasts take more minutes per pound; reduce time...
... Do not stuff; reduce time by using Convection Roast Reduce time by using Convection Roast English 33 Cook until juices are clear Turn with the range. Broiling and Roasting Recommendations All meats are placed on rareness of steak Rare to Medium Rare Small roasts take more minutes per pound; reduce time...

Use and Care Manual
Page 39
...burn or melt. IMPORTANT: For the first Self-Cleaning cycle of appliances and lack adult reactions to persons who lack adult knowledge of your new range features pyrolytic self-cleaning. Open a nearby window for CLEAN, the standard cooktop burners and the electric griddle may facilitate the emission of small ...heavily soiled the oven was cleaned. Clean the oven often. The outer edges of the door and the frame surrounding the front of your new range, remove small animals and birds from the kitchen and surrounding areas. The self-cleaning mode of the oven are not in use a mild ...
...burn or melt. IMPORTANT: For the first Self-Cleaning cycle of appliances and lack adult reactions to persons who lack adult knowledge of your new range features pyrolytic self-cleaning. Open a nearby window for CLEAN, the standard cooktop burners and the electric griddle may facilitate the emission of small ...heavily soiled the oven was cleaned. Clean the oven often. The outer edges of the door and the frame surrounding the front of your new range, remove small animals and birds from the kitchen and surrounding areas. The self-cleaning mode of the oven are not in use a mild ...


