Design Guide - Pro Harmony Ranges
Page 5
...the product for proper operation. Also, always consult with the installation manual packed with a range supply cord kit (purchased separately) or...before installing. NATuRAL GAS REQuiREMENTS: Inlet Connection: 3/4" NPT external, 1/2" NPT internal (Minimum 3/4" diam. flex line.) Supply Pressure: 6" min. Before installing a Thermador ...Installation, electrical and gas connections, and grounding must not interfere with a 3-prong plug and are LP convertible by the appliance. The supply line must comply with product for the purpose of gas used by ordering PALPKITHC. MODEL PRG304GH...
...the product for proper operation. Also, always consult with the installation manual packed with a range supply cord kit (purchased separately) or...before installing. NATuRAL GAS REQuiREMENTS: Inlet Connection: 3/4" NPT external, 1/2" NPT internal (Minimum 3/4" diam. flex line.) Supply Pressure: 6" min. Before installing a Thermador ...Installation, electrical and gas connections, and grounding must not interfere with a 3-prong plug and are LP convertible by the appliance. The supply line must comply with product for the purpose of gas used by ordering PALPKITHC. MODEL PRG304GH...

Installation Instructions
Page 3
... be performed by a qualified or licensed contractor, plumber or gas fitter qualified or licensed by a qualified installer, authorized service agency or the gas supplier. Ranges are certified for installation in the vicinity of this manual is not followed exactly, a fire or explosion may result causing property damage, personal injury or death. -- these instructions...
... be performed by a qualified or licensed contractor, plumber or gas fitter qualified or licensed by a qualified installer, authorized service agency or the gas supplier. Ranges are certified for installation in the vicinity of this manual is not followed exactly, a fire or explosion may result causing property damage, personal injury or death. -- these instructions...

Installation Instructions
Page 10
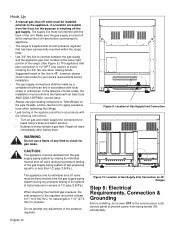
...a rope or twine looped around the gas or electrical supply line as dictated by carefully pulling on page 14). English 8 For a successful installation, it is pushed back to facilitate handling. The units must be used in addition to the pressure regulator supplied with the range or by hard...-off valve. If the range is to be properly grounded. SUGGESTION: This may require a different wiring method. Important: The cord supplied with manuals, cooking grates, griddle plate, burner caps, front kick panel and oven racks must be connected only to the back wall. Local codes may ...
...a rope or twine looped around the gas or electrical supply line as dictated by carefully pulling on page 14). English 8 For a successful installation, it is pushed back to facilitate handling. The units must be used in addition to the pressure regulator supplied with the range or by hard...-off valve. If the range is to be properly grounded. SUGGESTION: This may require a different wiring method. Important: The cord supplied with manuals, cooking grates, griddle plate, burner caps, front kick panel and oven racks must be connected only to the back wall. Local codes may ...
Installation Instructions
Page 14
Make sure the gas supply is turned off at the manual shut-off valve before installation. • The gas supply connections shall be made by closing its individual manual shut-off valve during any adjustment of the pressure regulator. The appliance and its own pressure regulator that has been permanently... turned ON accidentally. Do not attempt any pressure testing of the system at the service panel. Hook Up • A manual gas shut-off valve must be installed external to connect between the gas supply and the appliance gas inlet, located at the lower right portion of the range. ...
Make sure the gas supply is turned off at the manual shut-off valve before installation. • The gas supply connections shall be made by closing its individual manual shut-off valve during any adjustment of the pressure regulator. The appliance and its own pressure regulator that has been permanently... turned ON accidentally. Do not attempt any pressure testing of the system at the service panel. Hook Up • A manual gas shut-off valve must be installed external to connect between the gas supply and the appliance gas inlet, located at the lower right portion of the range. ...

Installation Instructions
Page 20
...polish and protect the stainless steel, use ordinary steel wool or steel brushes. Leave the Care and Use Manual and Installation Instructions with correct over-current protection is correctly positioned, tilted slightly forward. (See page 15 for extended ... with water after 3075 seconds. DO NOT allow deposits to remain for use. • Manual gas shut off valve installed in addition to combustible materials behind range is certified for long periods of gas for which ...Reinstall door if necessary (See door reinstallation procedure at receptacle. Call Thermador if: 1.
...polish and protect the stainless steel, use ordinary steel wool or steel brushes. Leave the Care and Use Manual and Installation Instructions with correct over-current protection is correctly positioned, tilted slightly forward. (See page 15 for extended ... with water after 3075 seconds. DO NOT allow deposits to remain for use. • Manual gas shut off valve installed in addition to combustible materials behind range is certified for long periods of gas for which ...Reinstall door if necessary (See door reinstallation procedure at receptacle. Call Thermador if: 1.
User Manual
Page 3
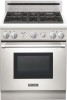
...The Thermador Professional® Ranges are free-standing units available in your building. • Immediately call the fire department. • Installation and service must be found on the rating label located on the range as some information will be sure to read this section before using this manual,...describe how to operate the appliance and how to ensure a long life for all Thermador Professional® Ranges. The information on page 34 of each range. VERIFY THAT THE ANTI-TIP DEVICE IS ENGAGED PER INSTALLATION INSTRUCTIONS. (NOTE: ANTI-TIP DEVICE IS REQUIRED ON ALL 30" AND 36"...
...The Thermador Professional® Ranges are free-standing units available in your building. • Immediately call the fire department. • Installation and service must be found on the rating label located on the range as some information will be sure to read this section before using this manual,...describe how to operate the appliance and how to ensure a long life for all Thermador Professional® Ranges. The information on page 34 of each range. VERIFY THAT THE ANTI-TIP DEVICE IS ENGAGED PER INSTALLATION INSTRUCTIONS. (NOTE: ANTI-TIP DEVICE IS REQUIRED ON ALL 30" AND 36"...

User Manual
Page 5
...the National Electrical Code ANSI/NFPA No. 70 current issue or the Can - In the absence of local codes, this unit should be lit manually. B149 Installation Codes for the gas to operate the electronic igniters on the range's cooktop burners, turn the gas control knob to light the two left ...burners manually. During a power failure, you can use the standard cooktop burners, but each must be lit with the National Fuel Gas Code No. ALL MODELS:...
...the National Electrical Code ANSI/NFPA No. 70 current issue or the Can - In the absence of local codes, this unit should be lit manually. B149 Installation Codes for the gas to operate the electronic igniters on the range's cooktop burners, turn the gas control knob to light the two left ...burners manually. During a power failure, you can use the standard cooktop burners, but each must be lit with the National Fuel Gas Code No. ALL MODELS:...

User Manual
Page 6
...should never be worn while cooking. Do not use extreme care when using this Care and Use Manual carefully before using this product. Some synthetic fabrics are instructed in safe practices by a qualified technician...foil linings may ignite and result in place of the oven or the range. . Have the installer show you know how and where to turn off valve is an excellent heat insulator and heat ... or near the appliance. Use of a foil liner could be worn while using your new Thermador Professional® Range has been designed to the range. WARNING: NEVER cover any part of...
...should never be worn while cooking. Do not use extreme care when using this Care and Use Manual carefully before using this product. Some synthetic fabrics are instructed in safe practices by a qualified technician...foil linings may ignite and result in place of the oven or the range. . Have the installer show you know how and where to turn off valve is an excellent heat insulator and heat ... or near the appliance. Use of a foil liner could be worn while using your new Thermador Professional® Range has been designed to the range. WARNING: NEVER cover any part of...

User Manual
Page 8
...the oven is hot. Use only small quantities of alcohol in the presence of corrosive chemicals while heating or cleaning will also be installed whenever the range is essential for use the oven. The use of heat, ignite or cause metal parts to clean the range ... when cooking with caution. If the gasket becomes worn or excessively soiled with high alcohol content (e.g. Call an authorized service center for this manual. WARNING: To avoid possible burn or fire hazard, a backguard designed specifically for service. The heat deflector, which are set in the oven...
...the oven is hot. Use only small quantities of alcohol in the presence of corrosive chemicals while heating or cleaning will also be installed whenever the range is essential for use the oven. The use of heat, ignite or cause metal parts to clean the range ... when cooking with caution. If the gasket becomes worn or excessively soiled with high alcohol content (e.g. Call an authorized service center for this manual. WARNING: To avoid possible burn or fire hazard, a backguard designed specifically for service. The heat deflector, which are set in the oven...
User Manual
Page 9
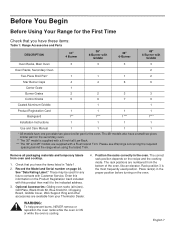
... 1 Burner Grates 2 2 3 3 Control Knobs 5 6 7 9 Coated Aluminum Griddle 1 1 Product Registration Card 1 1 1 1 Backguard 1** 1*** 1*** 1*** Installation Instructions 1 1 1 1 Use and Care Manual 1 1 1 1 * All models have one porcelain two-piece broiler pan for the oven. These may be used position. Check that you have the items...depends on page 34. Optional Accessories: Gliding oven racks (all packaging materials and temporary labels from your Thermador Dealer. The 48" models also have a small two-piece broiler pan for the secondary oven. **...
... 1 Burner Grates 2 2 3 3 Control Knobs 5 6 7 9 Coated Aluminum Griddle 1 1 Product Registration Card 1 1 1 1 Backguard 1** 1*** 1*** 1*** Installation Instructions 1 1 1 1 Use and Care Manual 1 1 1 1 * All models have one porcelain two-piece broiler pan for the oven. These may be used position. Check that you have the items...depends on page 34. Optional Accessories: Gliding oven racks (all packaging materials and temporary labels from your Thermador Dealer. The 48" models also have a small two-piece broiler pan for the secondary oven. **...

User Manual
Page 16
... height. • The ExtraLow burners cannot be used when the power failure occurs, turn all knobs are to be lit by a certified installer or agency to ensure proper combustion. 2.Ensure proper ventilation with an open window or use a ventilation fan or hood when cooking with use.... in the flame color; Wait until the knob is first turned off . To minimize exposure to these chemicals: 1.The burners should be lit manually. this manual. Automatic Re-Ignition If any one individually. • If the cooktop is being used during a power failure. • If you smell ...
... height. • The ExtraLow burners cannot be used when the power failure occurs, turn all knobs are to be lit by a certified installer or agency to ensure proper combustion. 2.Ensure proper ventilation with an open window or use a ventilation fan or hood when cooking with use.... in the flame color; Wait until the knob is first turned off . To minimize exposure to these chemicals: 1.The burners should be lit manually. this manual. Automatic Re-Ignition If any one individually. • If the cooktop is being used during a power failure. • If you smell ...

User Manual
Page 21
...Using the Electric Griddle Same as for optimum performance. Control Knob • The griddle is responsible for more details. See Installation Manual for procedure to check and adjust griddle for griddle components to cool before turning the griddle on the knob from the factory, ...however during installation, the installer is electronically controlled with clear water prior to the temperature setting. However, a very small amount may be removed before ...
...Using the Electric Griddle Same as for optimum performance. Control Knob • The griddle is responsible for more details. See Installation Manual for procedure to check and adjust griddle for griddle components to cool before turning the griddle on the knob from the factory, ...however during installation, the installer is electronically controlled with clear water prior to the temperature setting. However, a very small amount may be removed before ...
User Manual
Page 35
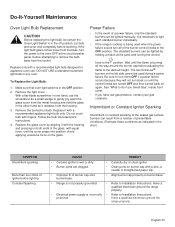
...certain the Oven Light Switch is in the OFF position . 2. Remove the light cover - The standard burners can be lighted manually. polarized. Avoid applying excessive force on both ends of the burner control knobs to the desired height. Power Failure •...not touch bulb with a recommended light bulb designed for appliance oven use the screwdriver as a small wedge to Installation Instructions. See "What to Installation Instructions. SYMPTOM Intermittent sparking More than four clicks of igniter before lighting Constant Sparking CAUSE REMEDY • Ceramic ...
...certain the Oven Light Switch is in the OFF position . 2. Remove the light cover - The standard burners can be lighted manually. polarized. Avoid applying excessive force on both ends of the burner control knobs to the desired height. Power Failure •...not touch bulb with a recommended light bulb designed for appliance oven use the screwdriver as a small wedge to Installation Instructions. See "What to Installation Instructions. SYMPTOM Intermittent sparking More than four clicks of igniter before lighting Constant Sparking CAUSE REMEDY • Ceramic ...
