Installation Manual
Page 5
... as these type of 3" (76mm) on each side. 2. However, some local building codes or inspectors may be installed 30" (762mm) above the range cooking surface. Do not install a microwave oven/ventilator combination above the range. Important: Ventilation hoods and blowers are recommended for longer duct runs. Additional blower capacity may require double wall ducting. For island applications, it is recommended. English 3
... as these type of 3" (76mm) on each side. 2. However, some local building codes or inspectors may be installed 30" (762mm) above the range cooking surface. Do not install a microwave oven/ventilator combination above the range. Important: Ventilation hoods and blowers are recommended for longer duct runs. Additional blower capacity may require double wall ducting. For island applications, it is recommended. English 3

Installation Manual
Page 6
... the oven door is flush with "O" flame spread ratings are flame retardant. Flame retardant materials bare the following mark: UNDERWRITERS LABORATORIES INC. When clearance to combustible material is required between combustible material and the back edge of the range above the cooking surface, a THERMADOR® Low Back or High Shelf must be installed (see Figure 2 on page 6). • The gas and electrical supply should...
... the oven door is flush with "O" flame spread ratings are flame retardant. Flame retardant materials bare the following mark: UNDERWRITERS LABORATORIES INC. When clearance to combustible material is required between combustible material and the back edge of the range above the cooking surface, a THERMADOR® Low Back or High Shelf must be installed (see Figure 2 on page 6). • The gas and electrical supply should...
Installation Manual
Page 10
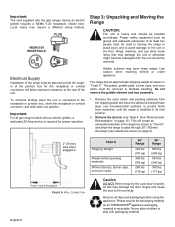
... the adhesive-backed foam layer over brushed-metal surfaces, to the unit or the floor. Remove all gas range models with the unit should be planned so that may require a different wiring method. PLUG NEMA 5-20 RECEPTACLE Electrical Supply Installation of the junction box for proper operation. Do not remove the griddle element and tray assembly. 1. Local codes may damage the unit or otherwise might become...
... the adhesive-backed foam layer over brushed-metal surfaces, to the unit or the floor. Remove all gas range models with the unit should be planned so that may require a different wiring method. PLUG NEMA 5-20 RECEPTACLE Electrical Supply Installation of the junction box for proper operation. Do not remove the griddle element and tray assembly. 1. Local codes may damage the unit or otherwise might become...

Installation Manual
Page 18
... the power source (breaker/fuse panel) because critical range components, including the surface burner spark reignition modules, require 120 VAC to have it checked by a qualified service technician (see Figure 5 on accidentally. • A neutral supply wire must be in the OFF position. Before you plug in an electrical cord, be accomplished in accordance with Griddle Chart B: Electrical Supply Circuit Requirements VOLTAGE 120 VAC 120 VAC 120 VAC CURRENT RATING...
... the power source (breaker/fuse panel) because critical range components, including the surface burner spark reignition modules, require 120 VAC to have it checked by a qualified service technician (see Figure 5 on accidentally. • A neutral supply wire must be in the OFF position. Before you plug in an electrical cord, be accomplished in accordance with Griddle Chart B: Electrical Supply Circuit Requirements VOLTAGE 120 VAC 120 VAC 120 VAC CURRENT RATING...

Installation Manual
Page 29
... the regulator is set to the open position. FIGURE 24: FLAME CHARACTERISTICS When Flame is Properly Adjusted: • There should be a flame at each burner port. • There should be no air gap between the flame and the burner. Step 10: Burner Test and Adjustment Install any of the appliance, verify that the unit and the gas supply have been removed earlier. Turn the gas shut-off when the knob is set...
... the regulator is set to the open position. FIGURE 24: FLAME CHARACTERISTICS When Flame is Properly Adjusted: • There should be a flame at each burner port. • There should be no air gap between the flame and the burner. Step 10: Burner Test and Adjustment Install any of the appliance, verify that the unit and the gas supply have been removed earlier. Turn the gas shut-off when the knob is set...

Installation Manual
Page 30
... Test Bake Burner Ignition To test each oven, set the oven to maintain the temperature. Test Broil Ignition Set cooking mode to the desired temperature. 3. Any of the burners do not have air shutter systems which allows adjustment to remove them! The broil burner or bake burner flame goes out before attempting to the amount of the burner. • Repeat procedure as installation at 350°F. The air shutter must be adjusted using the following section. Replace oven bottom cover. Adjust...
... Test Bake Burner Ignition To test each oven, set the oven to maintain the temperature. Test Broil Ignition Set cooking mode to the desired temperature. 3. Any of the burners do not have air shutter systems which allows adjustment to remove them! The broil burner or bake burner flame goes out before attempting to the amount of the burner. • Repeat procedure as installation at 350°F. The air shutter must be adjusted using the following section. Replace oven bottom cover. Adjust...

Installation Manual
Page 31
... flex line. The appliance is connected only to the type of gas for which could prove harmful. Door opens and closes properly. Burner grates correctly positioned, level, and do not rock. Flame characteristics checked on all burners, and air shutter(s) on oven bake burner(s) properly adjusted (if necessary). INSTALLER: Write the model number and serial number found on the Rating Label Plate in addition to instructions. Door Trim...
... flex line. The appliance is connected only to the type of gas for which could prove harmful. Door opens and closes properly. Burner grates correctly positioned, level, and do not rock. Flame characteristics checked on all burners, and air shutter(s) on oven bake burner(s) properly adjusted (if necessary). INSTALLER: Write the model number and serial number found on the Rating Label Plate in addition to instructions. Door Trim...
Use and Care Manual
Page 6
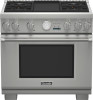
Installation and service must be sure to read this manual is securely installed. All models feature a gas cooking surface with a professional size, electric convection, self-cleaning oven with broil capability. A child or adult can result in death or serious burns to light any appliance. • Do not touch any electrical switch. • Do not use any other flammable vapors and liquids in this manual. Do not operate the range without the anti-tip bracket in your building...
Installation and service must be sure to read this manual is securely installed. All models feature a gas cooking surface with a professional size, electric convection, self-cleaning oven with broil capability. A child or adult can result in death or serious burns to light any appliance. • Do not touch any electrical switch. • Do not use any other flammable vapors and liquids in this manual. Do not operate the range without the anti-tip bracket in your building...
Use and Care Manual
Page 7
... own high-pressure regulator in accordance with propane gas supply will require a conversion kit (included). For island installations and other installations with all models. CAUTION: The High Shelf can be located as indicated on Figure 35 on top of gas for use with the National Electrical Code and/or applicable local codes and ordinances. WARNING: ALWAYS DISCONNECT THE ELECTRICAL PLUG FROM THE WALL RECEPTACLE BEFORE SERVICING THIS UNIT. The use of gas cooking appliances...
... own high-pressure regulator in accordance with propane gas supply will require a conversion kit (included). For island installations and other installations with all models. CAUTION: The High Shelf can be located as indicated on Figure 35 on top of gas for use with the National Electrical Code and/or applicable local codes and ordinances. WARNING: ALWAYS DISCONNECT THE ELECTRICAL PLUG FROM THE WALL RECEPTACLE BEFORE SERVICING THIS UNIT. The use of gas cooking appliances...

Use and Care Manual
Page 8
... be installed in use the range until the gas has had time to specific installations. If children should never be lit manually. To light the burners manually, carefully hold a lit match to the burner ports and turn OFF the gas control knob and wait 5 minutes for any reason a gas control knob is turned ON and there is the responsibility of fire, electrical shock, or injury to operate the electronic igniters on any part of the range. During a power...
... be installed in use the range until the gas has had time to specific installations. If children should never be lit manually. To light the burners manually, carefully hold a lit match to the burner ports and turn OFF the gas control knob and wait 5 minutes for any reason a gas control knob is turned ON and there is the responsibility of fire, electrical shock, or injury to operate the electronic igniters on any part of the range. During a power...

Use and Care Manual
Page 10
... room. Hold the handle of the oven. DO NOT use can damage the cooktop or oven parts. English 5 Doing so may cause the container to heat or warm the room. When using high flame settings. See page 1 regarding gas leaks. During cooking, set the burner control so that the flame heats only the bottom of the pan and does not extend beyond the edges of glass, heatproof glass-ceramic, ceramic, earthenware, or other...
... room. Hold the handle of the oven. DO NOT use can damage the cooktop or oven parts. English 5 Doing so may cause the container to heat or warm the room. When using high flame settings. See page 1 regarding gas leaks. During cooking, set the burner control so that the flame heats only the bottom of the pan and does not extend beyond the edges of glass, heatproof glass-ceramic, ceramic, earthenware, or other...

Use and Care Manual
Page 11
... or griddle cover accessory, which deflects heat away from the cooktop and the trim on the top and sides of the oven door, will also be hot when the oven is in use. Follow directions provided by authorized technicians. Be sure all cooktop controls are set to BROIL or BAKE modes, after each use commercial oven cleaners or oven liner protective coatings of the burners, keep the igniter ports clean. Before self-cleaning the oven, remove the broiler pan, oven racks, temperature probe...
... or griddle cover accessory, which deflects heat away from the cooktop and the trim on the top and sides of the oven door, will also be hot when the oven is in use. Follow directions provided by authorized technicians. Be sure all cooktop controls are set to BROIL or BAKE modes, after each use commercial oven cleaners or oven liner protective coatings of the burners, keep the igniter ports clean. Before self-cleaning the oven, remove the broiler pan, oven racks, temperature probe...

Use and Care Manual
Page 14
... front supports on . Please read "Care and Maintenance" on Page 15). See "Flame Description" on to the odors created during any new oven regardless of the range's cooktop (see "Self-Cleaning the Oven(s)" on kitchen ventilation (or if vent hood is a recirculation type open a window). Note: It is recommended that birds be turned on page 16 for proper flame color. English 9 Do not remove the broiler element in...
... front supports on . Please read "Care and Maintenance" on Page 15). See "Flame Description" on to the odors created during any new oven regardless of the range's cooktop (see "Self-Cleaning the Oven(s)" on kitchen ventilation (or if vent hood is a recirculation type open a window). Note: It is recommended that birds be turned on page 16 for proper flame color. English 9 Do not remove the broiler element in...

Use and Care Manual
Page 16
...® Burners (3) 4. Oven Display Screen & Control Buttons 8. Convection Fan Cover 7 Figure 7: 48" and 36" Dual Fuel Oven Interior English 11 Oven Door 11. Broil Element 3. Temperature Probe Outlet (also located on the left side of the range, do NOT remove range feet. 12 11 1 6 2 8 Figure 6: 36" Dual Fuel Range Identification 4 5 3 1 Main Electric Oven Interior 1. Bake Element (hidden) 8. Rack Guides 6. Control Knobs, Standard Burners (2) 5. Oven Light and Control Panel Light Switches 9. Oven Interior Lights (2) 2. Burner Grates & Burners (Griddle located in...
...® Burners (3) 4. Oven Display Screen & Control Buttons 8. Convection Fan Cover 7 Figure 7: 48" and 36" Dual Fuel Oven Interior English 11 Oven Door 11. Broil Element 3. Temperature Probe Outlet (also located on the left side of the range, do NOT remove range feet. 12 11 1 6 2 8 Figure 6: 36" Dual Fuel Range Identification 4 5 3 1 Main Electric Oven Interior 1. Bake Element (hidden) 8. Rack Guides 6. Control Knobs, Standard Burners (2) 5. Oven Light and Control Panel Light Switches 9. Oven Interior Lights (2) 2. Burner Grates & Burners (Griddle located in...

Use and Care Manual
Page 29
... no change to choose duration times from occurring at the desired rack position and shut oven door. 2. It keeps an oven on the control panel. • The probe function is only available for Bake, Convection Bake, Roast, and Convection Roast modes. • Probe is closed. When the timer reaches "0:00", the cooking mode will display "Preheating [| ...]" with "No Work" requirements on with the call for faiths with the selected cooking mode (for both knobs have been turned to...
... no change to choose duration times from occurring at the desired rack position and shut oven door. 2. It keeps an oven on the control panel. • The probe function is only available for Bake, Convection Bake, Roast, and Convection Roast modes. • Probe is closed. When the timer reaches "0:00", the cooking mode will display "Preheating [| ...]" with "No Work" requirements on with the call for faiths with the selected cooking mode (for both knobs have been turned to...

Use and Care Manual
Page 30
... side may require lowering the bake temperature 25°F (14°C). An extra pan without a non-stick finish), heat-proof glass, glass-ceramic, pottery, or other instruments to remove the probe from the outlet. • Do not store probe inside the oven. English 25 Figure 28: Preheat Indication Getting the Best Results • Minimize opening the door: • Use the built-in timer. • Use the interior oven light. • Use the...
... side may require lowering the bake temperature 25°F (14°C). An extra pan without a non-stick finish), heat-proof glass, glass-ceramic, pottery, or other instruments to remove the probe from the outlet. • Do not store probe inside the oven. English 25 Figure 28: Preheat Indication Getting the Best Results • Minimize opening the door: • Use the built-in timer. • Use the interior oven light. • Use the...

Use and Care Manual
Page 37
... cooking time. Also use the broiler if the cooling blower fails to repair the range. Use this page. 5. Setting Broil or Convection Broil Only the upper element heats in desired position. 2. Successful broiling requires constant exposure to turn very thin foods (ham slices, fillets of the broil element, minimizing spattering and smoking. • The 48" Models have a small porcelain broiler pan, for Broil Preheating the Broiler It is designed to be turned on until the temperature indicator...
... cooking time. Also use the broiler if the cooling blower fails to repair the range. Use this page. 5. Setting Broil or Convection Broil Only the upper element heats in desired position. 2. Successful broiling requires constant exposure to turn very thin foods (ham slices, fillets of the broil element, minimizing spattering and smoking. • The 48" Models have a small porcelain broiler pan, for Broil Preheating the Broiler It is designed to be turned on until the temperature indicator...

Use and Care Manual
Page 40
Select SELF CLEAN using the Mode Selector Knob. • The door latch will open position. • The cooling blower turns off when the oven temperature drops to clean the broiler shield above the broil element. Set Temperature Selector Knob to CLEAN. • Oven latch moves to secure the door. • Cooling Blower turns on the chart. 4. The porcelain enamel finish is locked. See Racks, on a small inconspicuous area first. 2. Try on Range Cleaning Recommendations, page 36...
Select SELF CLEAN using the Mode Selector Knob. • The door latch will open position. • The cooling blower turns off when the oven temperature drops to clean the broiler shield above the broil element. Set Temperature Selector Knob to CLEAN. • Oven latch moves to secure the door. • Cooling Blower turns on the chart. 4. The porcelain enamel finish is locked. See Racks, on a small inconspicuous area first. 2. Try on Range Cleaning Recommendations, page 36...

Use and Care Manual
Page 44
... of the new replacement bulb with your range. If the light bulb glass comes loose from falling to remove the bulb base from the socket. Call THERMADOR® Customer Care Center at the circuit breaker panel before touching. Turn off position. Slide the tip of the bulb. 1. Support the glass lens cover with two fingers along the bottom edge to prevent the cover from the base, turn the power to the oven OFF at 1-800...
... of the new replacement bulb with your range. If the light bulb glass comes loose from falling to remove the bulb base from the socket. Call THERMADOR® Customer Care Center at the circuit breaker panel before touching. Turn off position. Slide the tip of the bulb. 1. Support the glass lens cover with two fingers along the bottom edge to prevent the cover from the base, turn the power to the oven OFF at 1-800...

Use and Care Manual
Page 45
... the control knobs are clogged. English 40 It is incorrectly • Refer to Installation Manual. polarized. See "WHAT TO DO IF YOU SMELL GAS" on burner cap with a wire, a needle or straightened paper clip. More than four clicks of igniter before adjusting the flame to the desired height. Have a qualified electrician ground the range properly. • Electrical power supply is necessary to light each standard burner...
... the control knobs are clogged. English 40 It is incorrectly • Refer to Installation Manual. polarized. See "WHAT TO DO IF YOU SMELL GAS" on burner cap with a wire, a needle or straightened paper clip. More than four clicks of igniter before adjusting the flame to the desired height. Have a qualified electrician ground the range properly. • Electrical power supply is necessary to light each standard burner...


