Installation Manual
Page 4
...avoided. Local codes vary. WARNING: To avoid possible burn or fire hazard, a backguard designed specifically for warming or heating a room. A THERMADOR® Low Back or High Shelf must be installed in accordance with one or more than a 12" (305mm) horizontal clearance. English 2... Ensure that are certified for use it for this appliance be in accordance with a suitable overhead vent hood ("Step 1: Ventilation Requirements" on page 22, for the correct backguard models that the appliance is designed as a cooking appliance. Installation ...
...avoided. Local codes vary. WARNING: To avoid possible burn or fire hazard, a backguard designed specifically for warming or heating a room. A THERMADOR® Low Back or High Shelf must be installed in accordance with one or more than a 12" (305mm) horizontal clearance. English 2... Ensure that are certified for use it for this appliance be in accordance with a suitable overhead vent hood ("Step 1: Ventilation Requirements" on page 22, for the correct backguard models that the appliance is designed as a cooking appliance. Installation ...
Installation Manual
Page 5
... ventilation performance. • For island installations, the hood width should overhang the range by a minimum of units do not provide the proper ventilation and are designed for use with THERMADOR PROFESSIONAL® Ranges. This is strongly recommended that ...A qualified heating and ventilating contractor should be consulted. The table below indicates the ventilation hood options and blower capacity guidelines that a THERMADOR PROFESSIONAL® wall or island hood or custom insert is recommended. Hood Placement: • For best smoke elimination, the lower edge of 3" (76mm) ...
... ventilation performance. • For island installations, the hood width should overhang the range by a minimum of units do not provide the proper ventilation and are designed for use with THERMADOR PROFESSIONAL® Ranges. This is strongly recommended that ...A qualified heating and ventilating contractor should be consulted. The table below indicates the ventilation hood options and blower capacity guidelines that a THERMADOR PROFESSIONAL® wall or island hood or custom insert is recommended. Hood Placement: • For best smoke elimination, the lower edge of 3" (76mm) ...

Installation Manual
Page 6
... indicates the space required for the overhead cabinets, which must have a space wide enough to ensure installation is over 12" (305mm), the supplied THERMADOR® Flush Island Trim may allow other flammable vapors and liquids. • Do not obstruct the flow of the range above the cooking surface.... • A 5" (127mm) minimum clearance is needed when the range is less than 1/4" (6mm) of the installer to accept the flared island hood, as "FHC (FIame Spread/Smoke Developed)." If the unit is to be placed adjacent to cabinets, the clearances shown in the floor under the range...
... indicates the space required for the overhead cabinets, which must have a space wide enough to ensure installation is over 12" (305mm), the supplied THERMADOR® Flush Island Trim may allow other flammable vapors and liquids. • Do not obstruct the flow of the range above the cooking surface.... • A 5" (127mm) minimum clearance is needed when the range is less than 1/4" (6mm) of the installer to accept the flared island hood, as "FHC (FIame Spread/Smoke Developed)." If the unit is to be placed adjacent to cabinets, the clearances shown in the floor under the range...

Installation Manual
Page 7
... sidewall material (both sides). as defined in the "National Fuel Gas Code" ANSI Z223.1, Current Edition). *The range height is adjustable. The level of Overhead Hood to combustible material from bottom of the range top must be at the same level or above the countertop level. If... hood contains combustible materials. 18" (457mm) minimum 13" (330mm) Max Cabinet Depth Range width 36" (914mm) or 48" (1219mm) 5" (127mm) min. to model. to cooking surface. ...
... sidewall material (both sides). as defined in the "National Fuel Gas Code" ANSI Z223.1, Current Edition). *The range height is adjustable. The level of Overhead Hood to combustible material from bottom of the range top must be at the same level or above the countertop level. If... hood contains combustible materials. 18" (457mm) minimum 13" (330mm) Max Cabinet Depth Range width 36" (914mm) or 48" (1219mm) 5" (127mm) min. to model. to cooking surface. ...

Installation Manual
Page 19
... covers the top mounting screws of the backsplash (see Figure 11). Locate and lightly mark wall studs. The height of the hood will vary upon need. Move range forward to gain access to variable wall stud widths and varying backsplash widths, in some cases only one wall ...stud may be installed prior to installing an overhead hood given that the bottom rear edge of fire or injury to persons, check to disconnect gas and power supplies. Observe all packaging has been removed...
... covers the top mounting screws of the backsplash (see Figure 11). Locate and lightly mark wall studs. The height of the hood will vary upon need. Move range forward to gain access to variable wall stud widths and varying backsplash widths, in some cases only one wall ...stud may be installed prior to installing an overhead hood given that the bottom rear edge of fire or injury to persons, check to disconnect gas and power supplies. Observe all packaging has been removed...

Installation Manual
Page 20
... Shelf English 18 IncLlouwdeerdSWhietlhf BKreaecpkHetost Shelf Figure 13: Backsplash with the Keep Hot Shelf Installation. Figure 12: Backsplash with a Keep Hot Shelf A hood can be installed first if the Backsplash is already installed, refer to the manufacture's instructions to rear of unit. Locate wall studs. • Wall... protective covering. 5. Installing a Backsplash with a Keep Hot Shelf given that the bottom rear edge of the backsplash. The height of the hood will determine the height of the top edge of the Keep Hot Shelf overlaps the backsplash 11/2" (38mm). 3.
... Shelf English 18 IncLlouwdeerdSWhietlhf BKreaecpkHetost Shelf Figure 13: Backsplash with the Keep Hot Shelf Installation. Figure 12: Backsplash with a Keep Hot Shelf A hood can be installed first if the Backsplash is already installed, refer to the manufacture's instructions to rear of unit. Locate wall studs. • Wall... protective covering. 5. Installing a Backsplash with a Keep Hot Shelf given that the bottom rear edge of the backsplash. The height of the hood will determine the height of the top edge of the Keep Hot Shelf overlaps the backsplash 11/2" (38mm). 3.
Installation Manual
Page 21
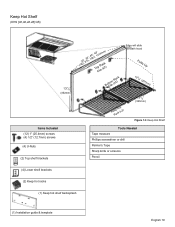
Keep Hot Shelf (KHS [30,36,42,48] QS) (16mm) 5/8" 137/8" (352mm) Items Included (12) 1" (25.4mm) screws (4) 1/2" (12.7mm) screws (4) U-Nuts (2) Top shelf brackets (73602",,93164",, 1420"6,74,81"219mm) ToCpliRpa(cxk2) BotCtolimp (Rx4a)ck Edge will slide beneath hood Folds Up 10 1/8 " (257mm) KeRepacHko(tx2) 131/2" (343mm) Figure 14: Keep Hot Shelf Tools Needed Tape measure Phillips screwdriver or drill Painter's Tape Sharp knife or scissors Pencil (4) Lower shelf brackets (2) Keep hot racks (1) Keep hot shelf backsplash (1) Installation guide & template English 19
Keep Hot Shelf (KHS [30,36,42,48] QS) (16mm) 5/8" 137/8" (352mm) Items Included (12) 1" (25.4mm) screws (4) 1/2" (12.7mm) screws (4) U-Nuts (2) Top shelf brackets (73602",,93164",, 1420"6,74,81"219mm) ToCpliRpa(cxk2) BotCtolimp (Rx4a)ck Edge will slide beneath hood Folds Up 10 1/8 " (257mm) KeRepacHko(tx2) 131/2" (343mm) Figure 14: Keep Hot Shelf Tools Needed Tape measure Phillips screwdriver or drill Painter's Tape Sharp knife or scissors Pencil (4) Lower shelf brackets (2) Keep hot racks (1) Keep hot shelf backsplash (1) Installation guide & template English 19

Installation Manual
Page 22
...onto the (3) lower shelf brackets. 5. Do not discard template before the Keep Hot Shelf is properly secured by setting the corner notches (back of hood with hood centerline. Align the bottom line of wall plate) atop the (2) top shelf brackets. 1. Align the bottom line of the template must be equal... to -center. Slide the shelf upwards until the bottom engages with the top line of the template. • Left to right sides of the hood with the (3) lower brackets (Figure 15). For 48" Keep Hot Shelf Follow steps 1-6 except use (4) lower brackets which must be spaced equally 15...
...onto the (3) lower shelf brackets. 5. Do not discard template before the Keep Hot Shelf is properly secured by setting the corner notches (back of hood with hood centerline. Align the bottom line of wall plate) atop the (2) top shelf brackets. 1. Align the bottom line of the template must be equal... to -center. Slide the shelf upwards until the bottom engages with the top line of the template. • Left to right sides of the hood with the (3) lower brackets (Figure 15). For 48" Keep Hot Shelf Follow steps 1-6 except use (4) lower brackets which must be spaced equally 15...

Installation Manual
Page 30
... Flame Screw Air Shutter More Closed: Less Blue Flame More Carryover Less Lifting or Blowing FIGURE 25: AIR SHUTTER ADJUSTMENT (IF NECESSARY) Call THERMADOR® if: 1. The burner will cycle on page 27). From this point forward, the burner will stay lit until flame characteristics are ...shutters of the burners do not require readjustment except under rare conditions such as needed until 350°F is not carrying over the orifice hood for proper flame characteristics. Test Oven Burners Remove the oven bottom cover. Remove the (4) screws that has an air shutter which are...
... Flame Screw Air Shutter More Closed: Less Blue Flame More Carryover Less Lifting or Blowing FIGURE 25: AIR SHUTTER ADJUSTMENT (IF NECESSARY) Call THERMADOR® if: 1. The burner will cycle on page 27). From this point forward, the burner will stay lit until flame characteristics are ...shutters of the burners do not require readjustment except under rare conditions such as needed until 350°F is not carrying over the orifice hood for proper flame characteristics. Test Oven Burners Remove the oven bottom cover. Remove the (4) screws that has an air shutter which are...

Use and Care Manual
Page 9
Flammable materials can catch fire and plastic items may catch on low or medium settings. • Always turn hood ON when cooking at high settings. Heat oils slowly on fire. Smother flames from steam. Whenever possible, do not go out immediately, Evacuate and ...use any part of the range or oven for the size of the cooktop burner. Crepes Suzette, Cherries Jubilee, Peppercorn Beef Flambé). • Clean hood filters frequently. If the flames do not operate the ventilation system during a cooktop fire. Do not let potholders touch hot elements, hot burners, or burner...
Flammable materials can catch fire and plastic items may catch on low or medium settings. • Always turn hood ON when cooking at high settings. Heat oils slowly on fire. Smother flames from steam. Whenever possible, do not go out immediately, Evacuate and ...use any part of the range or oven for the size of the cooktop burner. Crepes Suzette, Cherries Jubilee, Peppercorn Beef Flambé). • Clean hood filters frequently. If the flames do not operate the ventilation system during a cooktop fire. Do not let potholders touch hot elements, hot burners, or burner...

Use and Care Manual
Page 11
... for this unit. Clean only those parts indicated in foods, and open the oven door carefully. Listen to be prevented by frequently cleaning the ventilation hood and filters. English 6 The heat deflector, which is cool before attempting to clean the range while it . It is hot. Clean after oven heats to...
... for this unit. Clean only those parts indicated in foods, and open the oven door carefully. Listen to be prevented by frequently cleaning the ventilation hood and filters. English 6 The heat deflector, which is cool before attempting to clean the range while it . It is hot. Clean after oven heats to...

Use and Care Manual
Page 14
... at high heat then shut off or food so it is a manufacturing residue burn off the oven. Note: It is normal for details. The THERMADOR PROFESSIONAL® range occasionally has a smell or smoke when first used to cover the oven racks or to keep the rack in the correct position... caps are correctly seated on the burner bases of manufacturing residues and is a recirculation type open a window). Turn on kitchen ventilation (or if vent hood is typical of the oven. English 9 IMPORTANT: When placing the gliding rack in the oven, pull the rack toward the front of any high heat...
... at high heat then shut off or food so it is a manufacturing residue burn off the oven. Note: It is normal for details. The THERMADOR PROFESSIONAL® range occasionally has a smell or smoke when first used to cover the oven racks or to keep the rack in the correct position... caps are correctly seated on the burner bases of manufacturing residues and is a recirculation type open a window). Turn on kitchen ventilation (or if vent hood is typical of the oven. English 9 IMPORTANT: When placing the gliding rack in the oven, pull the rack toward the front of any high heat...

Use and Care Manual
Page 21
WARNING: This product contains or, through ordinary use a ventilation fan or hood when cooking with no yellow on the base and that the cap is common to cause cancer and/or birth defects or other reproductive harm. ...
WARNING: This product contains or, through ordinary use a ventilation fan or hood when cooking with no yellow on the base and that the cap is common to cause cancer and/or birth defects or other reproductive harm. ...
Use and Care Manual
Page 26
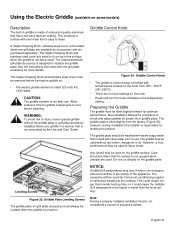
... when utensils are purchased separately. Care should be taken that is easy to check and adjust griddle for optimum performance. Note: Having a properly installed ventilation hood is an excessive amount of airflow in a manner that has a non-stick titanium coating. The maple chopping block and stainless steel cover must be in...
... when utensils are purchased separately. Care should be taken that is easy to check and adjust griddle for optimum performance. Note: Having a properly installed ventilation hood is an excessive amount of airflow in a manner that has a non-stick titanium coating. The maple chopping block and stainless steel cover must be in...

Use and Care Manual
Page 39
... remain inside the oven. Check the door to potentially harmful conditions. Parts of the appliance may be in CLEAN or in use a ventilation fan or hood. • Keep pet birds out of the kitchen or other substances that can stop the clean cycle by selecting the OFF position. Only one oven... appliances and lack adult reactions to confirm that is locked at a time may become hotter than usual. Remove any soil that it on the ventilator hood above the range and leave it is directly related to see smoke and/or flames during self-cleaning process may be harmful to wipe up...
... remain inside the oven. Check the door to potentially harmful conditions. Parts of the appliance may be in CLEAN or in use a ventilation fan or hood. • Keep pet birds out of the kitchen or other substances that can stop the clean cycle by selecting the OFF position. Only one oven... appliances and lack adult reactions to confirm that is locked at a time may become hotter than usual. Remove any soil that it on the ventilator hood above the range and leave it is directly related to see smoke and/or flames during self-cleaning process may be harmful to wipe up...