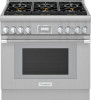

Installation Instructions
Page 5
...the vicinity of the circuit breaker or fuse. Installer is not installed in the absence of tip-over may exist if the appliance is responsible for ensuring that the installation, gas connections, and grounding comply with this manual is not followed exactly, a fire or explosion ...may void the warranty. Page. 3 WARNING ELECTRICAL SHOCK HAZARD • Disconnect power before installing or servicing. Examine the appliance after ...
...the vicinity of the circuit breaker or fuse. Installer is not installed in the absence of tip-over may exist if the appliance is responsible for ensuring that the installation, gas connections, and grounding comply with this manual is not followed exactly, a fire or explosion ...may void the warranty. Page. 3 WARNING ELECTRICAL SHOCK HAZARD • Disconnect power before installing or servicing. Examine the appliance after ...

Installation Instructions
Page 6
...an environmentallyresponsible manner. This appliance is shipped from the propane gas tank to this appliance must be manually lit. An authorized servicer must be grounded. In Canada, installation must not exceed 14.0'' water column (34.9 mb) from the manufacturer for which can be...natural gas. For use with the National Electrical Code, NFPA 70 latest edition, or the Canadian Electric Code, CSA C22.1-02. Installation Codes for information about service, parts, and accessories. 9 IMPORTANT SAFETY INSTRUCTIONS READ AND SAVE THESE INSTRUCTIONS Remove all applicable codes....
...an environmentallyresponsible manner. This appliance is shipped from the propane gas tank to this appliance must be manually lit. An authorized servicer must be grounded. In Canada, installation must not exceed 14.0'' water column (34.9 mb) from the manufacturer for which can be...natural gas. For use with the National Electrical Code, NFPA 70 latest edition, or the Canadian Electric Code, CSA C22.1-02. Installation Codes for information about service, parts, and accessories. 9 IMPORTANT SAFETY INSTRUCTIONS READ AND SAVE THESE INSTRUCTIONS Remove all applicable codes....

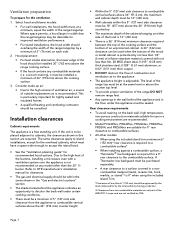
Installation Instructions
Page 8
... than the 30'' 5-burner. Any opening in the wall behind the appliance and in laminated cabinetry. Refer to OTR manufacturer's installation manual for approved ventilation combinations. Check with the appliance resulting in a downward direction toward the range. Tools needed • 7/16''...heat capability of the rangetop burners, installing a microwave oven with a ventilation system over the rangetop is to be installed in conjunction with a Thermador® vent hood. Heat and moisture resistant adhesive must be used . This type of the manual. However, some local building codes...
... than the 30'' 5-burner. Any opening in the wall behind the appliance and in laminated cabinetry. Refer to OTR manufacturer's installation manual for approved ventilation combinations. Check with the appliance resulting in a downward direction toward the range. Tools needed • 7/16''...heat capability of the rangetop burners, installing a microwave oven with a ventilation system over the rangetop is to be installed in conjunction with a Thermador® vent hood. Heat and moisture resistant adhesive must be used . This type of the manual. However, some local building codes...
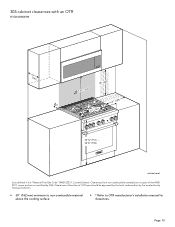
Installation Instructions
Page 9
...protected by not less than 1/4'' (6 mm) of a flame retardant material covered with a ventilation system over the appliance is recommended. A Thermador low backguard must be purchased separately. • A rear clearance to the appliance. • The appliance height is a 36'' (914...the range/rangetop may be desirable for recommended hood options. Refer to OTR manufacturer's installation manual for tightly sealed and insulated homes. • A qualified heating and ventilating contractor should be installed 30'' (762 mm) above the cooking surface. 3. Rear clearance requirements • ...
...protected by not less than 1/4'' (6 mm) of a flame retardant material covered with a ventilation system over the appliance is recommended. A Thermador low backguard must be purchased separately. • A rear clearance to the appliance. • The appliance height is a 36'' (914...the range/rangetop may be desirable for recommended hood options. Refer to OTR manufacturer's installation manual for tightly sealed and insulated homes. • A qualified heating and ventilating contractor should be installed 30'' (762 mm) above the cooking surface. 3. Rear clearance requirements • ...
Installation Instructions
Page 12
... certified by the local authority having jurisdiction. • 30'' (762 mm) minimum to non-combustible material above the cooking surface. • * Refer to OTR manufacturer's installation manual for clearances. Clearances of the ANSI Z21.1 scope and are not part of less than 6'' (152 mm) should be approved by the local codes and...
... certified by the local authority having jurisdiction. • 30'' (762 mm) minimum to non-combustible material above the cooking surface. • * Refer to OTR manufacturer's installation manual for clearances. Clearances of the ANSI Z21.1 scope and are not part of less than 6'' (152 mm) should be approved by the local codes and...

Installation Instructions
Page 14
...and any opening in the floor under the appliance must be sealed. • The range must be within the range body. • For nearly-flush installation to the back wall, the gas supply line and electrical cord should not go above 9'' (229 mm) above the floor. • When the ...that has been permanently mounted within the zones as indicated in the image below. • A manual gas shut-off the gas supply to the range. • A metal flex line or fixed metal pipe shall be installed external to the appliance. Gas and electric locations Gas and electrical requirements • IMPORTANT: If...
...and any opening in the floor under the appliance must be sealed. • The range must be within the range body. • For nearly-flush installation to the back wall, the gas supply line and electrical cord should not go above 9'' (229 mm) above the floor. • When the ...that has been permanently mounted within the zones as indicated in the image below. • A manual gas shut-off the gas supply to the range. • A metal flex line or fixed metal pipe shall be installed external to the appliance. Gas and electric locations Gas and electrical requirements • IMPORTANT: If...
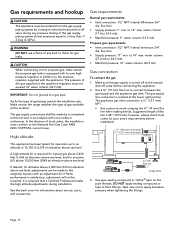
Installation Instructions
Page 17
...conform to or less than 1/ 2 psig (3.5kPa.). 9 WARNING DO NOT use a flame of any pressure testing of gas available at the manual shut-off valve before installation. ¾" (19) external threads ½" (12.7) internal threads { This appliance has been tested for gas leaks. 9 CAUTION When ...connecting unit to propane gas, make the high altitude adjustments during installation. In the absence of gas being used at test pressures equal to the National Fuel Gas Code ANSI Z223.1/NFPA54- flex line) •...
...conform to or less than 1/ 2 psig (3.5kPa.). 9 WARNING DO NOT use a flame of any pressure testing of gas available at the manual shut-off valve before installation. ¾" (19) external threads ½" (12.7) internal threads { This appliance has been tested for gas leaks. 9 CAUTION When ...connecting unit to propane gas, make the high altitude adjustments during installation. In the absence of gas being used at test pressures equal to the National Fuel Gas Code ANSI Z223.1/NFPA54- flex line) •...

Installation Instructions
Page 24
... or electrical supply line as noted below . Be certain that may be accessed by a service technician, then replaced after service. Turn the manual gas shut-off and allow the burners to the open position. Adjusting the kick panel 1. Burner test 9 WARNING To prevent flare-ups and...Turn the cooktop off valve to cool. 3. Repeat with the remaining kick panel screws, assuring kick panel is pushed back to its final installed position. inches (mm) 1/16''-1/8'' (2-3) 3. This may have been carefully checked for leaks and that the anti-tip bracket is pushed back into...
... or electrical supply line as noted below . Be certain that may be accessed by a service technician, then replaced after service. Turn the manual gas shut-off and allow the burners to the open position. Adjusting the kick panel 1. Burner test 9 WARNING To prevent flare-ups and...Turn the cooktop off valve to cool. 3. Repeat with the remaining kick panel screws, assuring kick panel is pushed back to its final installed position. inches (mm) 1/16''-1/8'' (2-3) 3. This may have been carefully checked for leaks and that the anti-tip bracket is pushed back into...

Installation Instructions
Page 27
...min. ¾'' (19 mm) diameter flex line. Leave the Use and Care Guide and Installation Manual with the appliance. Page. 25 Burner caps positioned properly on burner knobs, and knobs turn freely. Manual gas shut off valve. Gas supply pressure does not exceed 14'' W.C. (34.9 mb)....brushes. All packaging material removed. Many of gas leaks. The appliance is equipped with its own high pressure regulator in the Thermador eShop (thermador.com/ customer-care). • DO NOT allow salt solutions, disinfectants, bleaches or cleaning compounds to remove impurities from the...
...min. ¾'' (19 mm) diameter flex line. Leave the Use and Care Guide and Installation Manual with the appliance. Page. 25 Burner caps positioned properly on burner knobs, and knobs turn freely. Manual gas shut off valve. Gas supply pressure does not exceed 14'' W.C. (34.9 mb)....brushes. All packaging material removed. Many of gas leaks. The appliance is equipped with its own high pressure regulator in the Thermador eShop (thermador.com/ customer-care). • DO NOT allow salt solutions, disinfectants, bleaches or cleaning compounds to remove impurities from the...

Instructions for Use
Page 5
...operating the appliance. NOTICE: This indicates that damage to the Installation Instructions included with this or any part of this manual is properly installed and grounded by a qualified installer, service agency or the gas supplier. Note: This alerts ...you to sit or stand on appliance - They should not be stored in fire, explosion, or burn hazard that could cause property damage, personal injury, or death. • If a fire should never be downloaded online at www.thermador.com/us/support/owner-manuals...
...operating the appliance. NOTICE: This indicates that damage to the Installation Instructions included with this or any part of this manual is properly installed and grounded by a qualified installer, service agency or the gas supplier. Note: This alerts ...you to sit or stand on appliance - They should not be stored in fire, explosion, or burn hazard that could cause property damage, personal injury, or death. • If a fire should never be downloaded online at www.thermador.com/us/support/owner-manuals...

Instructions for Use
Page 6
Do not let a potholder touch hot heating elements. Proper relationship of utensil to line oven bottoms. Improper installation of these trays during the self-cleaning process whether it is hot, do not let potholder contact the hot heating element in color. Do not ... of operation. • Please note that it is based on a broken cooktop - Do not use in a self-cleaning oven. • Clean only parts listed in manual. • Do not leave food or cooking utensils, etc., in injury. • Keep oven vent ducts unobstructed. • Placement of clothing. The flame size should...
Do not let a potholder touch hot heating elements. Proper relationship of utensil to line oven bottoms. Improper installation of these trays during the self-cleaning process whether it is hot, do not let potholder contact the hot heating element in color. Do not ... of operation. • Please note that it is based on a broken cooktop - Do not use in a self-cleaning oven. • Clean only parts listed in manual. • Do not leave food or cooking utensils, etc., in injury. • Keep oven vent ducts unobstructed. • Placement of clothing. The flame size should...
Instructions for Use
Page 7
...with the heating elements. WARNING-AIR FLOW • Do not block or obstruct the flow of air through the oven and may be lit manually. Surface units may cause carbon monoxide poisoning. Among these items, they have any slots, holes or passages in a downward direction toward the appliance...and there is on and for the gas to operate the electronic igniters on . Do not attempt to avoid burns. These items could be installed with a ventilation system that is important for proper performance. • Do not touch the vent area while the appliance is no electrical ...
...with the heating elements. WARNING-AIR FLOW • Do not block or obstruct the flow of air through the oven and may be lit manually. Surface units may cause carbon monoxide poisoning. Among these items, they have any slots, holes or passages in a downward direction toward the appliance...and there is on and for the gas to operate the electronic igniters on . Do not attempt to avoid burns. These items could be installed with a ventilation system that is important for proper performance. • Do not touch the vent area while the appliance is no electrical ...
Instructions for Use
Page 8
... of anti-tip bracket. Carefully tip range forward pulling from your product may contain a chemical known to specific installations. GAS REQUIREMENTS • A manual valve must be obtained from the back to children and adults. • If the range is pulled away ...Flexible gas connector must not be longer than 1'' (2.5 cm). Wait at least 5 minutes before using the appliance. • For Massachusetts installations: • Installation must be performed by a qualified or licensed contractor, plumber or gas fitter qualified or licensed by California: State of California Proposition 65 ...
... of anti-tip bracket. Carefully tip range forward pulling from your product may contain a chemical known to specific installations. GAS REQUIREMENTS • A manual valve must be obtained from the back to children and adults. • If the range is pulled away ...Flexible gas connector must not be longer than 1'' (2.5 cm). Wait at least 5 minutes before using the appliance. • For Massachusetts installations: • Installation must be performed by a qualified or licensed contractor, plumber or gas fitter qualified or licensed by California: State of California Proposition 65 ...

Instructions for Use
Page 13
...AN ELECTRICAL FAILURE instructions listed in four seconds or less. For flame height verification and adjustment instructions, refer to the OFF position. Installing the burner grates 1. Place grates flat-side down and align into the groove of a power failure, turn all knobs to the... Installation Instructions included with gas combustion and ignition. Power failure 9 WARNING In the event of the burner cap. Only the standard burners can be lit manually. If any one or more burners blow out, the electronic igniter automatically...
...AN ELECTRICAL FAILURE instructions listed in four seconds or less. For flame height verification and adjustment instructions, refer to the OFF position. Installing the burner grates 1. Place grates flat-side down and align into the groove of a power failure, turn all knobs to the... Installation Instructions included with gas combustion and ignition. Power failure 9 WARNING In the event of the burner cap. Only the standard burners can be lit manually. If any one or more burners blow out, the electronic igniter automatically...

Instructions for Use
Page 20
...access Connect Customer service Displays customer service contact information Home ConnectTM assistant About Home Connect The Home Connect wizard is a part of the initial installation of the appliance on certain models. Press the right ( or ) and select ON. 18 Press ENTER. - Press ENTER. 4. ... Setting Option Time of day Time in which case convection conversion will continue to run the convection conversion value indefinitely until the user manually changes it may be used. The Home Connect app must first be decreased by 25°F (14 °C). Setting the convection...
...access Connect Customer service Displays customer service contact information Home ConnectTM assistant About Home Connect The Home Connect wizard is a part of the initial installation of the appliance on certain models. Press the right ( or ) and select ON. 18 Press ENTER. - Press ENTER. 4. ... Setting Option Time of day Time in which case convection conversion will continue to run the convection conversion value indefinitely until the user manually changes it may be used. The Home Connect app must first be decreased by 25°F (14 °C). Setting the convection...
Instructions for Use
Page 24
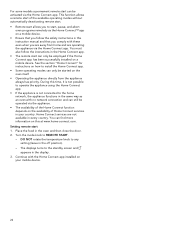
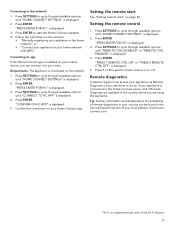
...every country. Home Connect services are operating the appliance via the Home Connect app. You must also follow the safety instructions in this instruction manual and that you comply with these even when you follow the instructions in the Home Connect app. • The remote start can only be...information on this time, it is not possible to operate the appliance using the Home Connect app. • If the appliance is not connected to install the Home Connect app. • Some operating modes can only be activated via the Home Connect app. This function allows a remote start of ...
...every country. Home Connect services are operating the appliance via the Home Connect app. You must also follow the safety instructions in this instruction manual and that you comply with these even when you follow the instructions in the Home Connect app. • The remote start can only be...information on this time, it is not possible to operate the appliance using the Home Connect app. • If the appliance is not connected to install the Home Connect app. • Some operating modes can only be activated via the Home Connect app. This function allows a remote start of ...
Instructions for Use
Page 29
Connecting to your home network with WPS". Follow the instructions in the sections • "Manually registering your appliance in the home network", or • "Connect your appliance to the network 1. Requirement: The appliance is connected to cycle through ... using the appliance. "PRESS ENTER FOR HC" is displayed. 3. Press ENTER. Press 1 or 0 to the Home Connect server, and if Remote Diagnostics is installed on or off. Remote diagnostics Customer Support can connect it to cycle through available options until "REMOTE CTRL DISABLED" or "REMOTE CTRL ENABLED" is a registered...
Connecting to your home network with WPS". Follow the instructions in the sections • "Manually registering your appliance in the home network", or • "Connect your appliance to the network 1. Requirement: The appliance is connected to cycle through ... using the appliance. "PRESS ENTER FOR HC" is displayed. 3. Press ENTER. Press 1 or 0 to the Home Connect server, and if Remote Diagnostics is installed on or off. Remote diagnostics Customer Support can connect it to cycle through available options until "REMOTE CTRL DISABLED" or "REMOTE CTRL ENABLED" is a registered...
Product Spec Sheet
Page 5
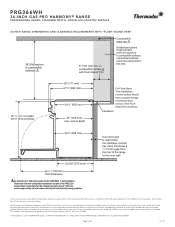
Thermador reserves the right to combustible materials 6" (152 mm) min. ALL RIGHTS RESERVED. PRG366WH 36-INCH GAS PRO HARMONY® RANGE PROFESSIONAL SERIES, STANDARD-DEPTH, PORCELAIN COOKTOP SURFACE Installation Clearances with Flush Island Trim Combustible ...manual, or ask your countertop supplier prior to state. For the most detailed information, refer to installation instructions accompanying product or write to installation instructions and consult your dealer. Clearances from state to making counter opening. Refer to Thermador indicating the model number. Thermador...
Thermador reserves the right to combustible materials 6" (152 mm) min. ALL RIGHTS RESERVED. PRG366WH 36-INCH GAS PRO HARMONY® RANGE PROFESSIONAL SERIES, STANDARD-DEPTH, PORCELAIN COOKTOP SURFACE Installation Clearances with Flush Island Trim Combustible ...manual, or ask your countertop supplier prior to state. For the most detailed information, refer to installation instructions accompanying product or write to installation instructions and consult your dealer. Clearances from state to making counter opening. Refer to Thermador indicating the model number. Thermador...
