Design Guide - Gas Cooktops
Page 4
... 36-inch. 30-inch models are two sizes of gas used at the right rear of rough-in addition to choose from natural gas to create a convenient cooking center. Verify the type of gas being used by the factory to instructions furnished with propane. Install a manual gas shutoff valve near the appliance. COOKTOPS - Thermador Masterpiece Gas Cooktops may be installed above a Thermador Single Built-in this design guide provides key features, product dimensions, cutouts and installation specifications. Installation, electrical and gas connections...
... 36-inch. 30-inch models are two sizes of gas used at the right rear of rough-in addition to choose from natural gas to create a convenient cooking center. Verify the type of gas being used by the factory to instructions furnished with propane. Install a manual gas shutoff valve near the appliance. COOKTOPS - Thermador Masterpiece Gas Cooktops may be installed above a Thermador Single Built-in this design guide provides key features, product dimensions, cutouts and installation specifications. Installation, electrical and gas connections...

Design Guide - Gas Cooktops
Page 5
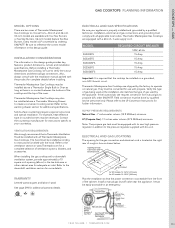
powerful 16,000 BTU burner DeSIGN - knobs feature a safety "push to glide smoothly across the cooktop - Unique shape of Gas Burners product Width product Depth Cutout Width Cutout Height Cutout Depth Minimum Distance from Counter Front Minimum Distance from Rear Wall Left Front Burner Right Front Burner Left Rear Burner Right Rear Burner Total Natural Gas Connection Rating Total Lp Gas Connection Rating Electrical Supply Required Circuit Breaker power Cord Shipping Weight (lbs.) 4 31" 21 1/4" 28 15/16" 3 13/16" 19...
powerful 16,000 BTU burner DeSIGN - knobs feature a safety "push to glide smoothly across the cooktop - Unique shape of Gas Burners product Width product Depth Cutout Width Cutout Height Cutout Depth Minimum Distance from Counter Front Minimum Distance from Rear Wall Left Front Burner Right Front Burner Left Rear Burner Right Rear Burner Total Natural Gas Connection Rating Total Lp Gas Connection Rating Electrical Supply Required Circuit Breaker power Cord Shipping Weight (lbs.) 4 31" 21 1/4" 28 15/16" 3 13/16" 19...

Design Guide - Gas Cooktops
Page 6
... that the power cord, gas shut-off valve and gas pressure regulator are installed with a minimum distance of the oven. For example, heat reflective tape or rounded corners may be necessary. If the location/job site requires conversion from back wall.) NOTE: All measurements given have to your countertop. When the surface is 24" (61cm) rather than No. 28 MSG sheet metal 0.015 inch (0.38mm) stainless steel, 0.024 inch (0.6mm) aluminum or copper...
... that the power cord, gas shut-off valve and gas pressure regulator are installed with a minimum distance of the oven. For example, heat reflective tape or rounded corners may be necessary. If the location/job site requires conversion from back wall.) NOTE: All measurements given have to your countertop. When the surface is 24" (61cm) rather than No. 28 MSG sheet metal 0.015 inch (0.38mm) stainless steel, 0.024 inch (0.6mm) aluminum or copper...

Design Guide - Gas Cooktops
Page 7
... with the suite of Gas Burners product Width product Depth Cutout Width Cutout Height Cutout Depth Minimum Distance from Counter Front Minimum Distance from Rear Wall Left Front Burner Right Front Burner Left Rear Burner Right Rear Burner Center Burner Total Natural Gas Connection Rating Total Lp Gas Connection Rating Electrical Supply Required Circuit Breaker power Cord Shipping Weight (lbs.) *According to glide smoothly across the cooktop DeSIGN - Single point ignition - Continuous grates allow pots and pans to AHAM Standards SGS305FS...
... with the suite of Gas Burners product Width product Depth Cutout Width Cutout Height Cutout Depth Minimum Distance from Counter Front Minimum Distance from Rear Wall Left Front Burner Right Front Burner Left Rear Burner Right Rear Burner Center Burner Total Natural Gas Connection Rating Total Lp Gas Connection Rating Electrical Supply Required Circuit Breaker power Cord Shipping Weight (lbs.) *According to glide smoothly across the cooktop DeSIGN - Single point ignition - Continuous grates allow pots and pans to AHAM Standards SGS305FS...

Design Guide - Gas Cooktops
Page 8
... the power cord, gas shut-off valve and gas pressure regulator are shipped by qualified service personnel only. Contact the countertop manufacturer for additional specifications. Verify the type of gas being used , make them heat resistant. Above Counter - 30" (76 cm) min. The built-in Oven as long as a Floor protector and Wall Shield covered with propane. Refer to the warming drawer section for instructions speci...
... the power cord, gas shut-off valve and gas pressure regulator are shipped by qualified service personnel only. Contact the countertop manufacturer for additional specifications. Verify the type of gas being used , make them heat resistant. Above Counter - 30" (76 cm) min. The built-in Oven as long as a Floor protector and Wall Shield covered with propane. Refer to the warming drawer section for instructions speci...

Design Guide - Gas Cooktops
Page 9
... Burner Total Natural Gas Connection Rating Total Lp Gas Connection Rating Electrical Supply Required Circuit Breaker power Cord Shipping Weight (lbs.) *According to 16" wok. 118 GrIDDLe PLATe SGRIDDLEF Anti-stick, cast iron aluminum design, promotes even heat distribution LP CONverSION KIT SNLpkITF High-grade, quality die cast metal knobs - powerful 18,000 BTU Center Burner - Exclusive 200 BTU ExtraLow® burners for perfect simmering - Exclusive, patented Star® Burner provides superior performance - Sleek control panel features glass and stainless steel...
... Burner Total Natural Gas Connection Rating Total Lp Gas Connection Rating Electrical Supply Required Circuit Breaker power Cord Shipping Weight (lbs.) *According to 16" wok. 118 GrIDDLe PLATe SGRIDDLEF Anti-stick, cast iron aluminum design, promotes even heat distribution LP CONverSION KIT SNLpkITF High-grade, quality die cast metal knobs - powerful 18,000 BTU Center Burner - Exclusive 200 BTU ExtraLow® burners for perfect simmering - Exclusive, patented Star® Burner provides superior performance - Sleek control panel features glass and stainless steel...

Design Guide - Gas Cooktops
Page 10
... reduce the risk of ignition of nearby combustible materials, install the countertop with this gas cooktop. If the location/job site requires conversion from the front of the unit so that the power cord, gas shut-off valve and gas pressure regulator are installed with propane. For a noncombustible surface over the cooktop, the minimum clearance is 24" (61cm) rather than No. 28 MSG sheet metal 0.015 inch (0.38mm) stainless steel, 0.024 inch (0.6mm) aluminum or copper, it...
... reduce the risk of ignition of nearby combustible materials, install the countertop with this gas cooktop. If the location/job site requires conversion from the front of the unit so that the power cord, gas shut-off valve and gas pressure regulator are installed with propane. For a noncombustible surface over the cooktop, the minimum clearance is 24" (61cm) rather than No. 28 MSG sheet metal 0.015 inch (0.38mm) stainless steel, 0.024 inch (0.6mm) aluminum or copper, it...

User Manual
Page 3
... block appliance air vents. • For proper lighting and performance of burners, keep igniters clean and dry. • IMPORTANT SAFETY NOTICE: The California Safe Drinking Water and Toxic Enforcement Act requires the Governor of California to publish a list of substances known to the state to cause cancer, birth defects or other reproductive harm, and requires businesses to warn customers of...
... block appliance air vents. • For proper lighting and performance of burners, keep igniters clean and dry. • IMPORTANT SAFETY NOTICE: The California Safe Drinking Water and Toxic Enforcement Act requires the Governor of California to publish a list of substances known to the state to cause cancer, birth defects or other reproductive harm, and requires businesses to warn customers of...
User Manual
Page 4
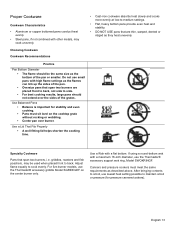
... filter. b) Always turn hood ON when cooking at high settings. Grease should not be hot even though they are dark in color. Always use cookware appropriate for the size of the surface element. • In the event that personal clothing or hair catches fire, drop and roll immediately to extinguish flames. • Smother flames from fans or forced air vents do not blow over or near the burners...
... filter. b) Always turn hood ON when cooking at high settings. Grease should not be hot even though they are dark in color. Always use cookware appropriate for the size of the surface element. • In the event that personal clothing or hair catches fire, drop and roll immediately to extinguish flames. • Smother flames from fans or forced air vents do not blow over or near the burners...
User Manual
Page 5
... the service panel and lock the panel to heating element or burner will damage the appliance and could be properly installed and grounded by a qualified technician. WARNING: To avoid electrical shock hazard, before servicing the cooktop, switch power off the burner and allow the cooktop to Installation Instructions for details. • This appliance is in injury. • Do not operate this appliance if it is equipped with a clean...
... the service panel and lock the panel to heating element or burner will damage the appliance and could be properly installed and grounded by a qualified technician. WARNING: To avoid electrical shock hazard, before servicing the cooktop, switch power off the burner and allow the cooktop to Installation Instructions for details. • This appliance is in injury. • Do not operate this appliance if it is equipped with a clean...
User Manual
Page 12
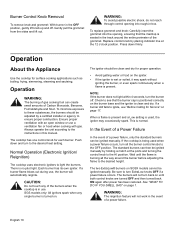
... control knob for surface cooking applications such as boiling, frying, simmering, steaming and sauteing. Check to the HI position. When a flame is present and a Low setting is used when a power failure occurs, turn ExtraLow knobs OFF if a power failure occurs. The standard burners can then be ignited manually. Be sure to the desired heat setting. English 10 Burner Control Knob Removal To remove knob and grommet: With burner in the track around the burner before adjusting...
... control knob for surface cooking applications such as boiling, frying, simmering, steaming and sauteing. Check to the HI position. When a flame is present and a Low setting is used when a power failure occurs, turn ExtraLow knobs OFF if a power failure occurs. The standard burners can then be ignited manually. Be sure to the desired heat setting. English 10 Burner Control Knob Removal To remove knob and grommet: With burner in the track around the burner before adjusting...
User Manual
Page 15
.... Adjust flame equally to cook evenly. Do not use lowest heat setting possible to maintain a boil or pressure (for stability and even cooking. • Pans must meet the same requirements as the flames can lick up the sides of the grates. For five-burner models, use the Thermador® accessory support wok ring, Model SWOKRINGF. If using a round-bottom wok with a maximum 16-inch diameter, use the Thermador® accessory griddle Model SGRIDDLEF on the cooktop grate without...
.... Adjust flame equally to cook evenly. Do not use lowest heat setting possible to maintain a boil or pressure (for stability and even cooking. • Pans must meet the same requirements as the flames can lick up the sides of the grates. For five-burner models, use the Thermador® accessory support wok ring, Model SWOKRINGF. If using a round-bottom wok with a maximum 16-inch diameter, use the Thermador® accessory griddle Model SGRIDDLEF on the cooktop grate without...
User Manual
Page 19
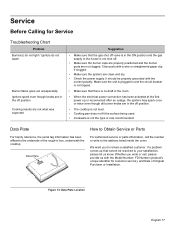
... let us with the Model Number, FD Number (product's unique identifier for Service Troubleshooting Chart Problem Burner(s) do not light / Ignitors do not spark Burner flame goes out unexpectedly Ignitors spark even though knobs are in the off position Cooking results are not what was expected Suggestion • Make sure that there is no draft in the room. • When the electrical power connection has been activated at the...
... let us with the Model Number, FD Number (product's unique identifier for Service Troubleshooting Chart Problem Burner(s) do not light / Ignitors do not spark Burner flame goes out unexpectedly Ignitors spark even though knobs are in the off position Cooking results are not what was expected Suggestion • Make sure that there is no draft in the room. • When the electrical power connection has been activated at the...
Installation Instructions
Page 2
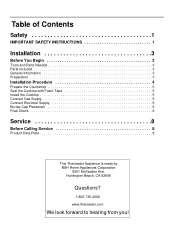
... Questions? 1-800-735-4328 www.thermador.com We look forward to hearing from you! Table of Contents Safety 1 IMPORTANT SAFETY INSTRUCTIONS 1 Installation 3 Before You Begin 3 Tools and Parts Needed 3 Parts Included 3 General Information 3 Preparation 3 Installation Procedure 4 Prepare the Countertop 5 Seal the Cooktop with Foam Tape 5 Install the Cooktop 5 Connect Gas Supply 5 Connect Electrical Supply 6 Burner Cap Placement 6 Final Check 8 Service 8 Before Calling Service 8 Product Data Plate 8 This Thermador Appliance is made by BSH Home...
... Questions? 1-800-735-4328 www.thermador.com We look forward to hearing from you! Table of Contents Safety 1 IMPORTANT SAFETY INSTRUCTIONS 1 Installation 3 Before You Begin 3 Tools and Parts Needed 3 Parts Included 3 General Information 3 Preparation 3 Installation Procedure 4 Prepare the Countertop 5 Seal the Cooktop with Foam Tape 5 Install the Cooktop 5 Connect Gas Supply 5 Connect Electrical Supply 6 Burner Cap Placement 6 Final Check 8 Service 8 Before Calling Service 8 Product Data Plate 8 This Thermador Appliance is made by BSH Home...
Installation Instructions
Page 3
... to the instructions in the vicinity of the gas supply piping system at test pressures equal to light any appliance. • Do not touch any electrical switch. • Do not use combustible materials, gasoline or other flammable vapors and liquids in this unit must be performed by a qualified technician. Propane Gas Installation • The propane gas tank must do not remove panels, wire covers or screws...
... to the instructions in the vicinity of the gas supply piping system at test pressures equal to light any appliance. • Do not touch any electrical switch. • Do not use combustible materials, gasoline or other flammable vapors and liquids in this unit must be performed by a qualified technician. Propane Gas Installation • The propane gas tank must do not remove panels, wire covers or screws...

Installation Instructions
Page 4
... cooktop are in an electrical cord, be avoided. High Altitude Installation Contact service for use . • Before installing, turn power OFF at least two people or proper equipment to whether the wall receptacle is properly installed and grounded by installing a hood that projects horizontally a minimum of 5 inches beyond the bottom of the cabinet. • Verify that the cooktop be in accordance with a cord and plug, do not cut or remove...
... cooktop are in an electrical cord, be avoided. High Altitude Installation Contact service for use . • Before installing, turn power OFF at least two people or proper equipment to whether the wall receptacle is properly installed and grounded by installing a hood that projects horizontally a minimum of 5 inches beyond the bottom of the cabinet. • Verify that the cooktop be in accordance with a cord and plug, do not cut or remove...
Installation Instructions
Page 5
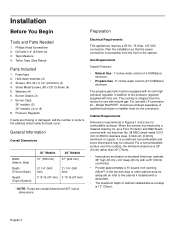
... the surface is protected by a material listed by UL as a Floor Protector and Wall Shield covered with not less than 30" (76cm). • Instructions are for use with LP conversion kit - English 3 Drill with this unit. Hold down brackets (4) 3. Washers (4) 6. Burner Grates (3) 7. Electrical Requirements This appliances requires a 60 Hz, 15 Amp, 120 VAC connection. The propane gas tank must do the conversion. Foam tape 2. Sheet Metal Screws, #8 x 3/8" (9.5mm) (4) 5. Burner Caps 36" models: (5) 30" models: (4) or (5) 8. General Information Overall Dimensions...
... the surface is protected by a material listed by UL as a Floor Protector and Wall Shield covered with not less than 30" (76cm). • Instructions are for use with LP conversion kit - English 3 Drill with this unit. Hold down brackets (4) 3. Washers (4) 6. Burner Grates (3) 7. Electrical Requirements This appliances requires a 60 Hz, 15 Amp, 120 VAC connection. The propane gas tank must do the conversion. Foam tape 2. Sheet Metal Screws, #8 x 3/8" (9.5mm) (4) 5. Burner Caps 36" models: (5) 30" models: (4) or (5) 8. General Information Overall Dimensions...
Installation Instructions
Page 6
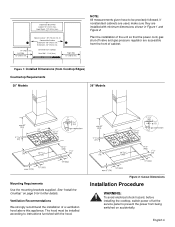
... from Cooktop Edges) Countertop Requirements 30" Models 36" Models Mounting Requirements Use the mounting brackets supplied. Hood Depth - 24" (61cm) max. NOTE: All measurements given have to Combustible Surface SGS(X)30 - 30" (76cm) min. If nonstandard cabinets are used, make sure they are accessible from being switched on page 5 for further details. Figure 2: Cutout Dimensions Installation Procedure WARNING: To avoid electrical shock hazard, before installing the cooktop, switch power off valve and gas pressure regulator are installed with the hood...
... from Cooktop Edges) Countertop Requirements 30" Models 36" Models Mounting Requirements Use the mounting brackets supplied. Hood Depth - 24" (61cm) max. NOTE: All measurements given have to Combustible Surface SGS(X)30 - 30" (76cm) min. If nonstandard cabinets are used, make sure they are accessible from being switched on page 5 for further details. Figure 2: Cutout Dimensions Installation Procedure WARNING: To avoid electrical shock hazard, before installing the cooktop, switch power off valve and gas pressure regulator are installed with the hood...
Installation Instructions
Page 7
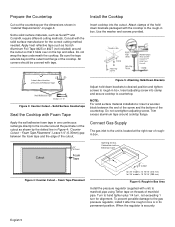
... the cooktop to countertop. Insert adjusting screw into the cutout. Insert cooktop into clamp and secure cooktop to the rough-in box. Apply the self adhesive foam tape in one continuous rectangle directly to the unit is securely English 5 Connect Gas Supply The gas inlet to the counter around cooktop flange. Trim excess aluminum tape around the perimeter of the countertop. Prepare the Countertop Install the Cooktop Cut out the countertop per the dimensions shown in "Cabinet Requirements...
... the cooktop to countertop. Insert adjusting screw into the cutout. Insert cooktop into clamp and secure cooktop to the rough-in box. Apply the self adhesive foam tape in one continuous rectangle directly to the unit is securely English 5 Connect Gas Supply The gas inlet to the counter around cooktop flange. Trim excess aluminum tape around the perimeter of the countertop. Prepare the Countertop Install the Cooktop Cut out the countertop per the dimensions shown in "Cabinet Requirements...
Installation Instructions
Page 8
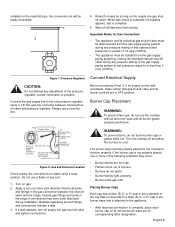
... to propane. Wipe off valve and tighten connections. Do not use a flame of any adjustment of the pressure regulator, except conversion to a letter (B, D, or F) cast in excess of burners. • Burners do not touch burner caps or grates while hot. English 6 Before connecting 5-foot (1.5 m) supply cord to wall receptacle, make certain that is attached to function properly. WARNING: To prevent burns, do not ignite. • Burner flames light unevenly. • Burner emits gas...
... to propane. Wipe off valve and tighten connections. Do not use a flame of any adjustment of the pressure regulator, except conversion to a letter (B, D, or F) cast in excess of burners. • Burners do not touch burner caps or grates while hot. English 6 Before connecting 5-foot (1.5 m) supply cord to wall receptacle, make certain that is attached to function properly. WARNING: To prevent burns, do not ignite. • Burner flames light unevenly. • Burner emits gas...


