
Design Guide - Freedom Refrigeration
Page 9
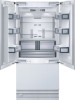
... compressor and dual evaporator system. THERMADOR EXCLUSIVE NEWLY-ENGINEERED ICE-MAKER Newly-Engineered Ice-Maker produces convenient sized cubes for all parties and occasions. The hinge is able to support virtually any custom wood panel you choose. 218 INDEPENDENT COMPRESSOR AND EVAPORATOR Each column features its own compressor and evaporator ensuring precise temperature control and ideal humidity levels. FREEZER COLUMN FLEXTEMP® DRAWER The FlexTemp Drawer allows you to adjust a fully loaded shelf with...
... compressor and dual evaporator system. THERMADOR EXCLUSIVE NEWLY-ENGINEERED ICE-MAKER Newly-Engineered Ice-Maker produces convenient sized cubes for all parties and occasions. The hinge is able to support virtually any custom wood panel you choose. 218 INDEPENDENT COMPRESSOR AND EVAPORATOR Each column features its own compressor and evaporator ensuring precise temperature control and ideal humidity levels. FREEZER COLUMN FLEXTEMP® DRAWER The FlexTemp Drawer allows you to adjust a fully loaded shelf with...

Design Guide - Freedom Refrigeration
Page 11
... must be 5/8" (16 mm). FURNITURE/FIXTURES The new appliance is unavoidable, use a suitable insulating plate or observe the following table for additional warranty details. **Sealed refrigeration system includes compressor, evaporator, condenser, dryer/strainer and connecting tubing. 220 On account of the heavy weight of the furniture front. - For this reason it stops children and pets from inserting limbs unnoticed...
... must be 5/8" (16 mm). FURNITURE/FIXTURES The new appliance is unavoidable, use a suitable insulating plate or observe the following table for additional warranty details. **Sealed refrigeration system includes compressor, evaporator, condenser, dryer/strainer and connecting tubing. 220 On account of the heavy weight of the furniture front. - For this reason it stops children and pets from inserting limbs unnoticed...
Design Guide - Freedom Refrigeration
Page 12
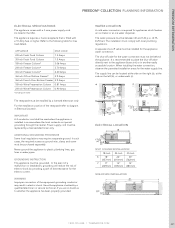
... shut-off valve for the water supply line. FREEdOM REFRIGERATION FREEdOM® COLLECTION PLANNING INFORMATION ELECTRICAL SPECIFICATIONS The appliance comes with local plumbing regulations. UL listed in another easily accessible location. The shut-off valve must be installed by providing a path of electric shock by a licensed electrician only. When installing the water connection, observe the permitted installation areas for the water connection must be replaced by a qualified electrician or service...
... shut-off valve for the water supply line. FREEdOM REFRIGERATION FREEdOM® COLLECTION PLANNING INFORMATION ELECTRICAL SPECIFICATIONS The appliance comes with local plumbing regulations. UL listed in another easily accessible location. The shut-off valve must be installed by providing a path of electric shock by a licensed electrician only. When installing the water connection, observe the permitted installation areas for the water connection must be replaced by a qualified electrician or service...

Design Guide - Freedom Refrigeration
Page 17
... the power supply and the water line are completely flush! Make sure that the furniture return area is at least 4". Take the needed dimensions from the niche description of solid material (5/8" thickness). B: Area for installing the power connection D: Opening depth of niche, depending on the right. 48" SxS (18" freezer + 30" refrigerator) A: Area for running the water line. Make sure that it can be accessed for service...
... the power supply and the water line are completely flush! Make sure that the furniture return area is at least 4". Take the needed dimensions from the niche description of solid material (5/8" thickness). B: Area for installing the power connection D: Opening depth of niche, depending on the right. 48" SxS (18" freezer + 30" refrigerator) A: Area for running the water line. Make sure that it can be accessed for service...

Design Guide - Freedom Refrigeration
Page 19
As the custom appliance door panels will predetermine the dimensions that also the rear side has a finished surface for a height of each 8" (205 mm). Single Door Models W Dispenser Models W Bottom Freezer W V Wine Cooler W U M R S H H NH H 4" (102mm) Note #1 F Drawer Door L Note #2 Model Description Max. The toe kick height, the cabinet height and other relevant dimensions of the kitchen will exceed the appliance door at upper and lower side, please make sure that...
As the custom appliance door panels will predetermine the dimensions that also the rear side has a finished surface for a height of each 8" (205 mm). Single Door Models W Dispenser Models W Bottom Freezer W V Wine Cooler W U M R S H H NH H 4" (102mm) Note #1 F Drawer Door L Note #2 Model Description Max. The toe kick height, the cabinet height and other relevant dimensions of the kitchen will exceed the appliance door at upper and lower side, please make sure that...

Design Guide - Freedom Refrigeration
Page 24
...fication parts can be used for safely combining them. FREEDOM REFRIGERATION FREEDOM® COLLECTION ACCESSORIES INSTALLATION ACCESSORIES BSEALKIT10 SIDE-BY-SIDE SEALING KIT If two single columns are connected to a side-by -pass used to complete the water cycle inside the appliance when no water filter is necessary. (For fresh food or freezer columns only) REPLFLTR10 REPLACEMENT SCREEN FILTER For fresh...
...fication parts can be used for safely combining them. FREEDOM REFRIGERATION FREEDOM® COLLECTION ACCESSORIES INSTALLATION ACCESSORIES BSEALKIT10 SIDE-BY-SIDE SEALING KIT If two single columns are connected to a side-by -pass used to complete the water cycle inside the appliance when no water filter is necessary. (For fresh food or freezer columns only) REPLFLTR10 REPLACEMENT SCREEN FILTER For fresh...
Design Guide - Freedom Refrigeration
Page 35
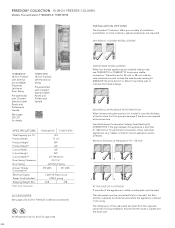
... pages 232-233 for permanent connection of installation possibilities. FREEDOM® COLLECTION 18-INCH FREEZER COLUMN Models: Framed Column T18BD80FLE, T18BF70FSE INSTALLATION OPTIONS The Freedom® Collection offers you a variety of two individual appliances, (e.g. INDIvIDUAL COLUMN INSTALLATIONS T18BD80FLE 18-Inch Framed with External Ice and Water Dispenser, Left-Hand Door Swing Pre-assembled with Chiseled Stainless Steel Panels and Professional Handle SPECIFICATIONS Total Capacity (cu. During...
... pages 232-233 for permanent connection of installation possibilities. FREEDOM® COLLECTION 18-INCH FREEZER COLUMN Models: Framed Column T18BD80FLE, T18BF70FSE INSTALLATION OPTIONS The Freedom® Collection offers you a variety of two individual appliances, (e.g. INDIvIDUAL COLUMN INSTALLATIONS T18BD80FLE 18-Inch Framed with External Ice and Water Dispenser, Left-Hand Door Swing Pre-assembled with Chiseled Stainless Steel Panels and Professional Handle SPECIFICATIONS Total Capacity (cu. During...
Design Guide - Freedom Refrigeration
Page 43
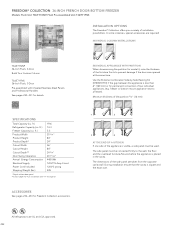
... doors are opened at the same time. INDIVIDUAL COLUMN INSTALLATIONS T36IT71NNP 36-Inch Flush, 3-Door Build Your Custom Column T36IT71FNS 36-Inch Flush, 3-Door Pre-assembled with 3/4" thick panel ACCESSORIES See pages 232- 233 for permanent connection of the appliance is visible, a side panel must be used. ft.) Product Width Product Height Product Depth* Cutout Width Cutout Height Cutout Depth** Door Swing Clearance Annual Energy Consumption Electrical Supply Power...
... doors are opened at the same time. INDIVIDUAL COLUMN INSTALLATIONS T36IT71NNP 36-Inch Flush, 3-Door Build Your Custom Column T36IT71FNS 36-Inch Flush, 3-Door Pre-assembled with 3/4" thick panel ACCESSORIES See pages 232- 233 for permanent connection of the appliance is visible, a side panel must be used. ft.) Product Width Product Height Product Depth* Cutout Width Cutout Height Cutout Depth** Door Swing Clearance Annual Energy Consumption Electrical Supply Power...

User Manual
Page 3
Contents IMPORTANT SAFETY INSTRUCTIONS 4 Congratulations 5 Your new appliance 6 Installation 8 Connection to the power supply 8 Connecting the water 9 Switching on the appliance 9 Switching off and disconnecting the appliance 9 Functions 10 Variable interior design 10 Control panel 12 Setting the temperature 13 Super function 13 Setup mode 14 Settings which can be changed in setup mode 15 Vacation Mode 16 Sabbath Mode 16 Refrigerating 16 Freezing and storing 17 IceMaker 18 Operating noises 18 How to save energy 19 Defrosting 19 Cleaning the appliance...
Contents IMPORTANT SAFETY INSTRUCTIONS 4 Congratulations 5 Your new appliance 6 Installation 8 Connection to the power supply 8 Connecting the water 9 Switching on the appliance 9 Switching off and disconnecting the appliance 9 Functions 10 Variable interior design 10 Control panel 12 Setting the temperature 13 Super function 13 Setup mode 14 Settings which can be changed in setup mode 15 Vacation Mode 16 Sabbath Mode 16 Refrigerating 16 Freezing and storing 17 IceMaker 18 Operating noises 18 How to save energy 19 Defrosting 19 Cleaning the appliance...

User Manual
Page 4
... the past. Use the motorized shelf carefully. e WARNING When using this Owner's Manual. 2. Grounding instruction This appliance must be properly installed in accordance with the heating element located on the shelves in the OFF position to turn off the doors. - IMPORTANT SAFETY INSTRUCTIONS READ AND SAVE THESE INSTRUCTIONS! NOTE: Setting the refrigerator temperature controls to OFF does not remove power to plastic plumbing lines, gas lines or water pipes. 4 If you are getting rid of...
... the past. Use the motorized shelf carefully. e WARNING When using this Owner's Manual. 2. Grounding instruction This appliance must be properly installed in accordance with the heating element located on the shelves in the OFF position to turn off the doors. - IMPORTANT SAFETY INSTRUCTIONS READ AND SAVE THESE INSTRUCTIONS! NOTE: Setting the refrigerator temperature controls to OFF does not remove power to plastic plumbing lines, gas lines or water pipes. 4 If you are getting rid of...

User Manual
Page 8
... installation instructions. Plug into a grounded 3 prong outlet. - in death, fire, or electrical shock. The installation location should not be made of the room. spirit level, diagonal measurements, etc. The base must be flat and level. Failure to the power supply d WARNING d Avoid Electrical Shock Hazard - The receptacle must be the same height as to observe the specified dimensions of the installation cavity for a troubleĆfree installation...
... installation instructions. Plug into a grounded 3 prong outlet. - in death, fire, or electrical shock. The installation location should not be made of the room. spirit level, diagonal measurements, etc. The base must be flat and level. Failure to the power supply d WARNING d Avoid Electrical Shock Hazard - The receptacle must be the same height as to observe the specified dimensions of the installation cavity for a troubleĆfree installation...

User Manual
Page 9
.... q Remove and discard the water filter. q Clean the appliance interior (see Setting the temperature". A separate shutĆoff valve must not be installed for a prolonged period: q Shut off valve directly next to cool down. Disconnecting the appliance If you do not use the first ice cubes from the ice maker! q To prevent odors, leave the doors open , the interior lights come on the icemaker. The shutĆoff the appliance q Press the POWER button. Before switching...
.... q Remove and discard the water filter. q Clean the appliance interior (see Setting the temperature". A separate shutĆoff valve must not be installed for a prolonged period: q Shut off valve directly next to cool down. Disconnecting the appliance If you do not use the first ice cubes from the ice maker! q To prevent odors, leave the doors open , the interior lights come on the icemaker. The shutĆoff the appliance q Press the POWER button. Before switching...

User Manual
Page 12
... on Setup mode". Change water filter cartridge, see page 13. The required temperature adjustment is activated, see page 20. H + ć buttons Select the available parameters of the appliance is indicated on the display. F Display The set required temperature of the menu. See section on Setup mode". The Super function is activated with the A " buttons. D SUPER COOL button Switches the SUPER function on and off for the refrigerator compartment. E SUPER FREEZER button Switches the SUPER...
... on Setup mode". Change water filter cartridge, see page 13. The required temperature adjustment is activated, see page 20. H + ć buttons Select the available parameters of the appliance is indicated on the display. F Display The set required temperature of the menu. See section on Setup mode". The Super function is activated with the A " buttons. D SUPER COOL button Switches the SUPER function on and off for the refrigerator compartment. E SUPER FREEZER button Switches the SUPER...

User Manual
Page 18
.... Ice is opening/closing. Drawers, baskets or storage areas wobble or stick Check the removable parts and, if required, reinsert them. The water filter may become smaller. Solenoid valve on the ice maker q Make sure that the ice cube container is flowing through the tubes. Other means of Ćdate food. IceMaker As soon as the freezer has cooled down to freezing temperature, the ice cube tray fills with warm water. As...
.... Ice is opening/closing. Drawers, baskets or storage areas wobble or stick Check the removable parts and, if required, reinsert them. The water filter may become smaller. Solenoid valve on the ice maker q Make sure that the ice cube container is flowing through the tubes. Other means of Ćdate food. IceMaker As soon as the freezer has cooled down to freezing temperature, the ice cube tray fills with warm water. As...

User Manual
Page 19
... let the water used for cleaning drip onto the control panel or light. q Switch off the appliance with the POWER button. q Clean the door seal with a vacuum cleaner. Remove dirt with water only and dry thoroughly. q Wipe appliance surfaces with the POWER button! Odors If the appliance is defrosted automatically. Open the appliance door as briefly as possible! Do not use an insulating plate. - Do not let the water used for appliance...
... let the water used for cleaning drip onto the control panel or light. q Switch off the appliance with the POWER button. q Clean the door seal with a vacuum cleaner. Remove dirt with water only and dry thoroughly. q Wipe appliance surfaces with the POWER button! Odors If the appliance is defrosted automatically. Open the appliance door as briefly as possible! Do not use an insulating plate. - Do not let the water used for appliance...

User Manual
Page 21
... ALARM OFF buttons for several weeks or months or ice cubes have an unpleasant taste or odor, change of the filter is indicated: To purchase an "UltraClarity" replacement water filter contact your local dealer or call 1-800-578-6890 . Exchanging the filter17. The filter has to factory settings. Push the cap onto the new filter cartridge. If the factory settings are reset to be changed in the bin...
... ALARM OFF buttons for several weeks or months or ice cubes have an unpleasant taste or odor, change of the filter is indicated: To purchase an "UltraClarity" replacement water filter contact your local dealer or call 1-800-578-6890 . Exchanging the filter17. The filter has to factory settings. Push the cap onto the new filter cartridge. If the factory settings are reset to be changed in the bin...

User Manual
Page 24
.... Use the ice maker more frequently and for changing the water filter can be found in transfer odor/flavor particles to be switched on . Unsealed packages in the freezer Check whether the frozen food has been packed in the enclosed installation instructions. The appliance is sticking. The temperature in airtight containers. Ensure that the water supply line is too cold. The manufacturer is not connected to...
.... Use the ice maker more frequently and for changing the water filter can be found in transfer odor/flavor particles to be switched on . Unsealed packages in the freezer Check whether the frozen food has been packed in the enclosed installation instructions. The appliance is sticking. The temperature in airtight containers. Ensure that the water supply line is too cold. The manufacturer is not connected to...

User Manual
Page 25
... action The ice cube container is in the appliance is defective. is not liable for damage to property due to an incorrect installation or water connection. 25 A wrong water valve has been installedt. The manufacturer is too high. required increase the temperature. Call customer service immediately. Check water pressure. required, lower the temperature. The water pressure is not liable for changing the water filter can...
... action The ice cube container is in the appliance is defective. is not liable for damage to property due to an incorrect installation or water connection. 25 A wrong water valve has been installedt. The manufacturer is too high. required increase the temperature. Call customer service immediately. Check water pressure. required, lower the temperature. The water pressure is not liable for changing the water filter can...

User Manual
Page 28
... wiring or plumbing, to replace light bulbs, or to instruct you . Labor or parts installed by a Thermador designated service company. THERMADOR AND THERMADOR CANADA SHALL NOT BE LIABLE FOR INCIDENTAL OR CONSEQUENTIAL DAMAGES. Some states or provinces do not allow the exclusion or limitation of products not approved by Thermador before service is performed. 9. Water filter cartridge: 30 day limited warranty on water filter. Pickup and delivery. Your refrigerator is used...
... wiring or plumbing, to replace light bulbs, or to instruct you . Labor or parts installed by a Thermador designated service company. THERMADOR AND THERMADOR CANADA SHALL NOT BE LIABLE FOR INCIDENTAL OR CONSEQUENTIAL DAMAGES. Some states or provinces do not allow the exclusion or limitation of products not approved by Thermador before service is performed. 9. Water filter cartridge: 30 day limited warranty on water filter. Pickup and delivery. Your refrigerator is used...
Installation Instructions
Page 4
... your Owner's Manual for warranty information. These installation instructions are topĆheavy and must observe. See the section on Connecting the power" on page 7. AntiĆtip protection is completely installed and secured per installation instructions. Keep doors closed until the appliance is required. e CAUTION Skill - See the Owner's Manual for future reference. Unplug the appliance or switch off the fuse before cleaning or making repairs...
... your Owner's Manual for warranty information. These installation instructions are topĆheavy and must observe. See the section on Connecting the power" on page 7. AntiĆtip protection is completely installed and secured per installation instructions. Keep doors closed until the appliance is required. e CAUTION Skill - See the Owner's Manual for future reference. Unplug the appliance or switch off the fuse before cleaning or making repairs...


