
Use and Care Manual
Page 3
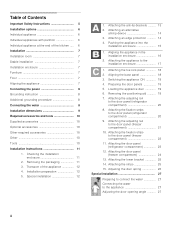
... safety 4 Important information when using the appliance ..... 4 Children in the household 4 General regulations 4 Information concerning disposal 5 * Disposal of packaging 5 * Disposal of your old appliance 5 Installing the appliance 5 Transporting 5 Installation location 5 Ventilation 5 Connecting the appliance 5 Water connection 5 Electrical connection 6 Getting to know your appliance 7 2 door model 7 3 door model 8 Controls 9 Switching the appliance on...
... safety 4 Important information when using the appliance ..... 4 Children in the household 4 General regulations 4 Information concerning disposal 5 * Disposal of packaging 5 * Disposal of your old appliance 5 Installing the appliance 5 Transporting 5 Installation location 5 Ventilation 5 Connecting the appliance 5 Water connection 5 Electrical connection 6 Getting to know your appliance 7 2 door model 7 3 door model 8 Controls 9 Switching the appliance on...

Use and Care Manual
Page 4
... ■ People (children incl.) who have this appliance is not liable if you switch ON the appliance Please read the operating and installation instructions carefully. A power cable extension may be sealed and stored in an upright position. ■ Keep plastic parts and the door ...for the next owner. They contain important information on or lean heavily against base of explosion! ■ Never use this warning. Improper installations and repairs may result due to play with a UL registered 3-wire power cord. The manufacturer guarantees that minor or moderately severe injury...
... ■ People (children incl.) who have this appliance is not liable if you switch ON the appliance Please read the operating and installation instructions carefully. A power cable extension may be sealed and stored in an upright position. ■ Keep plastic parts and the door ...for the next owner. They contain important information on or lean heavily against base of explosion! ■ Never use this warning. Improper installations and repairs may result due to play with a UL registered 3-wire power cord. The manufacturer guarantees that minor or moderately severe injury...

Use and Care Manual
Page 5
... the cold-water inflow. Information concerning disposal * Disposal of packaging The packaging protects your appliance from damage during transportation and installation. Transporting The appliances are suitable for the water mains. a cooker, radiator, etc. A separate shut-off the power ...bar). Danger of the local water supply companies. 5 Water connection , CAUTION: Connect the appliance to proper disposal. The installation must be installed in ! 4. Refrigerant and gases must not give way; if required, reinforce floor. Never cover the ventilation grille or place...
... the cold-water inflow. Information concerning disposal * Disposal of packaging The packaging protects your appliance from damage during transportation and installation. Transporting The appliances are suitable for the water mains. a cooker, radiator, etc. A separate shut-off the power ...bar). Danger of the local water supply companies. 5 Water connection , CAUTION: Connect the appliance to proper disposal. The installation must be installed in ! 4. Refrigerant and gases must not give way; if required, reinforce floor. Never cover the ventilation grille or place...
Use and Care Manual
Page 6
...3-wire power cord. Mains-controlled inverters are used for isolated applications (e.g. Never remove grounding phase. Please observe the following installation of the rating plate can be near the appliance and also freely accessible following table with mains and sine-controlled inverters.... may result in the chapter entitled Customer service. , WARNING: Never connect the appliance to 115 V/60 Hz alternating current via a correctly installed socket with the values of an electric shock! , WARNING: Insert into a grounded 3-phase socket. The appliance requires a 3-pole socket...
...3-wire power cord. Mains-controlled inverters are used for isolated applications (e.g. Never remove grounding phase. Please observe the following installation of the rating plate can be near the appliance and also freely accessible following table with mains and sine-controlled inverters.... may result in the chapter entitled Customer service. , WARNING: Never connect the appliance to 115 V/60 Hz alternating current via a correctly installed socket with the values of an electric shock! , WARNING: Insert into a grounded 3-phase socket. The appliance requires a 3-pole socket...

Use and Care Manual
Page 15
en-us Exchanging the filter cartridge 1. Take a new filter cartridge from customer service or a specialist dealer. , CAUTION: ■ After installing a new filter, always discard the ice produced within the next 24 hours. ■ If the appliance or the ice has not been used actively for ...
en-us Exchanging the filter cartridge 1. Take a new filter cartridge from customer service or a specialist dealer. , CAUTION: ■ After installing a new filter, always discard the ice produced within the next 24 hours. ■ If the appliance or the ice has not been used actively for ...

Use and Care Manual
Page 18
... use an insulating plate. ■ Do not block the ventilation openings in direct sunlight or near a heat source (e.g. These lights may be installed in the appliance. ■ Allow warm food and drinks to cool food. ■ Open the appliance as briefly as possible! Operating noises Quite...Motors are touching each other Move the bottles or receptacles slightly away from adjacent units or appliances. Tips for saving energy ■ Install the appliance in the refrigerator. Clicking Motor, switches or solenoid valves are switching On/ Off. Containers or storage areas wobble or stick...
... use an insulating plate. ■ Do not block the ventilation openings in direct sunlight or near a heat source (e.g. These lights may be installed in the appliance. ■ Allow warm food and drinks to cool food. ■ Open the appliance as briefly as possible! Operating noises Quite...Motors are touching each other Move the bottles or receptacles slightly away from adjacent units or appliances. Tips for saving energy ■ Install the appliance in the refrigerator. Clicking Motor, switches or solenoid valves are switching On/ Off. Containers or storage areas wobble or stick...

Use and Care Manual
Page 20
...water pressure only (see chapter Connecting appliance, section Water connection). Ice forms in the inflow hose to the appliance. Shut off tap installed. compartment. Incorrect shut-off tap incorrectly opened . usual. Check the minimum through flow. Water supply has kinks. Connect the appliance to...the water filter. 20 and, if required, set slightly colder. any fresh Ensure that the water is too warm. Contact the installer or the water supply company. Low water pressure. compartment. Smoothen out the kinks, exchange where necessary. en-us Ice maker Fault ...
...water pressure only (see chapter Connecting appliance, section Water connection). Ice forms in the inflow hose to the appliance. Shut off tap installed. compartment. Incorrect shut-off tap incorrectly opened . usual. Check the minimum through flow. Water supply has kinks. Connect the appliance to...the water filter. 20 and, if required, set slightly colder. any fresh Ensure that the water is too warm. Contact the installer or the water supply company. Low water pressure. compartment. Smoothen out the kinks, exchange where necessary. en-us Ice maker Fault ...
Use and Care Manual
Page 22
... from an authorized customer service) or in an inaccessible, dangerous, threatening or insidious place, in such surroundings or such an environment; installation in furniture, walls, floors, shelves, etc.); Obtaining warranty service: To obtain warranty service for your vicinity. Exclusion of warranty: The...period has elapsed, this also applies to repairs, pro-rata charging or product replacement. correction of installation problems (you would , if you should contact an authorized Thermador customer service center in your product, you so wish, bear the costs for labor and materials ...
... from an authorized customer service) or in an inaccessible, dangerous, threatening or insidious place, in such surroundings or such an environment; installation in furniture, walls, floors, shelves, etc.); Obtaining warranty service: To obtain warranty service for your vicinity. Exclusion of warranty: The...period has elapsed, this also applies to repairs, pro-rata charging or product replacement. correction of installation problems (you would , if you should contact an authorized Thermador customer service center in your product, you so wish, bear the costs for labor and materials ...
Installation Manual
Page 4
... Connecting the water to the door panel (freezer compartment 21 10. Transport of the kitchen ..... 6 Installation 7 Installation room 7 Stable installation 7 Installation enclosure 7 Furniture 7 Floor 7 Aligning the appliance 7 Connecting the power 8 Grounding instruction 8 Additional grounding procedure 8 Connecting the water 8 Installation dimensions 9 Required accessories and tools 10 Supplied accessories 10 Optional accessories 10 Other required accessories 10...
... Connecting the water to the door panel (freezer compartment 21 10. Transport of the kitchen ..... 6 Installation 7 Installation room 7 Stable installation 7 Installation enclosure 7 Furniture 7 Floor 7 Aligning the appliance 7 Connecting the power 8 Grounding instruction 8 Additional grounding procedure 8 Connecting the water 8 Installation dimensions 9 Required accessories and tools 10 Supplied accessories 10 Optional accessories 10 Other required accessories 10...

Installation Manual
Page 5
...; In the U.S.A., in particular. 5 Repairs should be made by licensed personnel when required. Note: This is completely installed and secured per installation instructions. Definitions , WARNING: This indicates that death or serious injuries may occur as a result of this warning. Immediately.... IMPORTANT Save these instructions with the Canadian Electric Code C22.1 - See the section on "Connecting the power". NOTICE Installation of not observing this appliance requires basic mechanical, carpentry and plumbing skills. IMPORTANT SAFETY INSTRUCTIONS , WARNING These appliances are...
...; In the U.S.A., in particular. 5 Repairs should be made by licensed personnel when required. Note: This is completely installed and secured per installation instructions. Definitions , WARNING: This indicates that death or serious injuries may occur as a result of this warning. Immediately.... IMPORTANT Save these instructions with the Canadian Electric Code C22.1 - See the section on "Connecting the power". NOTICE Installation of not observing this appliance requires basic mechanical, carpentry and plumbing skills. IMPORTANT SAFETY INSTRUCTIONS , WARNING These appliances are...
Installation Manual
Page 6
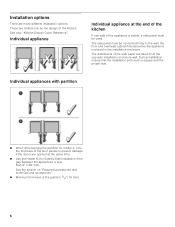
...appliance at the same time. Use the Heater Kit for model 4, note the thickness of the appliance is placed in the installation enclosure. Individual appliances with partition When dimensioning the partition for Side-by the design of the kitchen. The dimensions of the... partition 5/8" (16 mm). 6 During installation ensure that the installation enclosure is less than 6" (160 mm). See also "Kitchen Design Quick Reference". See the section on "Required accessories and tools/...
...appliance at the same time. Use the Heater Kit for model 4, note the thickness of the appliance is placed in the installation enclosure. Individual appliances with partition When dimensioning the partition for Side-by the design of the kitchen. The dimensions of the... partition 5/8" (16 mm). 6 During installation ensure that the installation enclosure is less than 6" (160 mm). See also "Kitchen Design Quick Reference". See the section on "Required accessories and tools/...

Installation Manual
Page 7
... appliance can be screwed securely to adjacent and overhead furniture. Squareness can be attached securely to the upper and side walls of the installation enclosure, this reason it must be exposed to direct sunlight and not placed near a heat source, such as the rest of the...suitable insulating plate or observe the following : BottomFreezer 36" approx. 1200 Ibs/540 kg To ensure that the appliance functions correctly, it is installed securely and functions properly, the floor must be checked by suitable means. In particular ensure that the furniture return area is very heavy: ...
... appliance can be screwed securely to adjacent and overhead furniture. Squareness can be attached securely to the upper and side walls of the installation enclosure, this reason it must be exposed to direct sunlight and not placed near a heat source, such as the rest of the...suitable insulating plate or observe the following : BottomFreezer 36" approx. 1200 Ibs/540 kg To ensure that the appliance functions correctly, it is installed securely and functions properly, the floor must be checked by suitable means. In particular ensure that the furniture return area is very heavy: ...
Installation Manual
Page 8
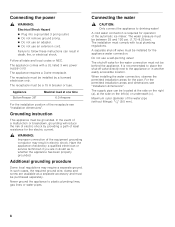
...purchased seperately. Appliance BottomFreezer 36" Maximal load at the side on the left (b) or underneath (c). For the permitted installation areas and dimensions see "Installation dimensions". In the event of a malfunction or breakdown, grounding will reduce the risk of electric shock by providing a... in another easily accessible location. The water pressure must be located at the side on the right (a), at one time 6.0 Ampere For the installation position of the water pipe (without fittings): 3/8" (9.5 mm). 8 Connecting the power , WARNING: Electrical Shock Hazard Plug into a...
...purchased seperately. Appliance BottomFreezer 36" Maximal load at the side on the left (b) or underneath (c). For the permitted installation areas and dimensions see "Installation dimensions". In the event of a malfunction or breakdown, grounding will reduce the risk of electric shock by providing a... in another easily accessible location. The water pressure must be located at the side on the right (a), at one time 6.0 Ampere For the installation position of the water pipe (without fittings): 3/8" (9.5 mm). 8 Connecting the power , WARNING: Electrical Shock Hazard Plug into a...
Installation Manual
Page 9
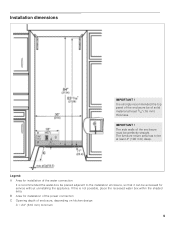
The furniture return area has to the installation enclosure, so that it can be at least 5/8" (16 mm) thickness. B Area for service without uninstalling the appliance. The side walls of the water connection ... possible, place the recessed water box within the shaded area. IMPORTANT ! If this is recommended the water-box be placed adjacent to be accessed for installation of the power connection C Opening depth of solid material at least 4" (100 mm) deep. It is strongly recommended the top panel of the enclosure be...
The furniture return area has to the installation enclosure, so that it can be at least 5/8" (16 mm) thickness. B Area for service without uninstalling the appliance. The side walls of the water connection ... possible, place the recessed water box within the shaded area. IMPORTANT ! If this is recommended the water-box be placed adjacent to be accessed for installation of the power connection C Opening depth of solid material at least 4" (100 mm) deep. It is strongly recommended the top panel of the enclosure be...
Installation Manual
Page 10
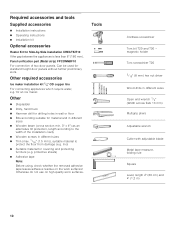
... Heater Kit for an ice maker. Other required accessories Ice maker installation kit 1/4" OD copper line For connecting appliances which require water, e.g. Otherwise do not use on the work surfaces. for Side-by-Side installation XHEATKIT10 If the gap between the appliances is less than 6" (160... mm). Panel unification part (Metal strip) FPCONNBF10 For connection of the installation cavity Wooden screws in different sizes Thin (max. 1/16" (1.5 mm)), suitable material to the width of two door panels. ...
... Heater Kit for an ice maker. Other required accessories Ice maker installation kit 1/4" OD copper line For connecting appliances which require water, e.g. Otherwise do not use on the work surfaces. for Side-by-Side installation XHEATKIT10 If the gap between the appliances is less than 6" (160... mm). Panel unification part (Metal strip) FPCONNBF10 For connection of the installation cavity Wooden screws in different sizes Thin (max. 1/16" (1.5 mm)), suitable material to the width of two door panels. ...
Installation Manual
Page 11
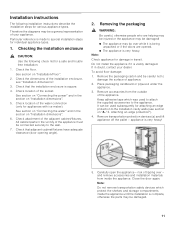
... connection (only for various appliance types. Check the floor. Check location of your dealer. Check attachment of the installation enclosure, see section on "Installation dimensions". 6. Removing the packaging , WARNING: Be careful, otherwise people who are opened. The appliance is... very heavy. If in the section on "A / 3. Place packaging cardboard or plywood under the appliance. 3. and remove accessories and installation materials from the outside of tipping over while it is complete, otherwise the parts may tip over - Note: Check appliance for individual...
... connection (only for various appliance types. Check the floor. Check location of your dealer. Check attachment of the installation enclosure, see section on "Installation dimensions". 6. Removing the packaging , WARNING: Be careful, otherwise people who are opened. The appliance is... very heavy. If in the section on "A / 3. Place packaging cardboard or plywood under the appliance. 3. and remove accessories and installation materials from the outside of tipping over while it is complete, otherwise the parts may tip over - Note: Check appliance for individual...
Installation Manual
Page 12
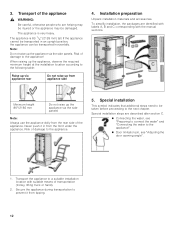
...via the side panels! If the position, appliance the appliance can be taken before proceeding to the next chapter. To simplify installation, the packages are identified with labels A, B and C corresponding with suitable means of the appliance , WARNING: Be careful... the appliance, observe the required minimum height at the installation location according to the appliance! Special installation steps are helping may be injured or the appliance may be damaged. Installation preparation Unpack installation materials and accessories. 3. Transport the appliance to the ...
...via the side panels! If the position, appliance the appliance can be taken before proceeding to the next chapter. To simplify installation, the packages are identified with labels A, B and C corresponding with suitable means of the appliance , WARNING: Be careful... the appliance, observe the required minimum height at the installation location according to the appliance! Special installation steps are helping may be injured or the appliance may be damaged. Installation preparation Unpack installation materials and accessories. 3. Transport the appliance to the ...
Installation Manual
Page 13
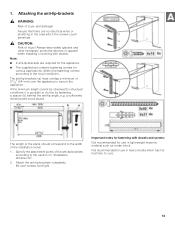
...for use in new concrete which the screws could penetrate. , CAUTION: Risk of 21/8" (54 mm) over the appliance to the section on "Installation dimensions". 2. Note: 2 anti-tip-brackets are no electrical wires or plumbing in light-weight masonry material such as cinder block. The anti... use in the area which has not had time to the local conditions. Attaching the anti-tip-brackets , WARNING: Risk of the installation niche! 1. If this by fastening a spacer (b) behind the anti-tip angle, e.g. Always wear safety glasses and other necessary protective devices or ...
...for use in new concrete which the screws could penetrate. , CAUTION: Risk of 21/8" (54 mm) over the appliance to the section on "Installation dimensions". 2. Note: 2 anti-tip-brackets are no electrical wires or plumbing in light-weight masonry material such as cinder block. The anti... use in the area which has not had time to the local conditions. Attaching the anti-tip-brackets , WARNING: Risk of the installation niche! 1. If this by fastening a spacer (b) behind the anti-tip angle, e.g. Always wear safety glasses and other necessary protective devices or ...
Installation Manual
Page 14
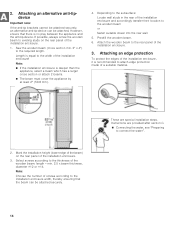
... wall studs in the rear of screws according to attach edge protection made of a suitable material. 2. Note: Choose the number of the installation enclosure and accordingly transfer their location to the rear panel of the wooden beam: length = min. 2.5 x beam thickness, diameter #12 ... anti-tip brackets cannot be attached securely, an alternative anti-tip-device can be attached. Note: If the installation enclosure is equal to the thickness of the installation enclosure. 3. 2. Length is deeper than the appliance, select a beam which has a larger cross section or attach 2...
... wall studs in the rear of screws according to attach edge protection made of a suitable material. 2. Note: Choose the number of the installation enclosure and accordingly transfer their location to the rear panel of the wooden beam: length = min. 2.5 x beam thickness, diameter #12 ... anti-tip brackets cannot be attached securely, an alternative anti-tip-device can be attached. Note: If the installation enclosure is equal to the thickness of the installation enclosure. 3. 2. Length is deeper than the appliance, select a beam which has a larger cross section or attach 2...

Installation Manual
Page 15
... appliance. , WARNING: Be careful, otherwise people who are helping may be damaged. Carefully push the appliance into the installation enclosure. Remove the base panel. 2. Push the water line into the installation enclosure. 1. Note: When the floor or the appliance is pushing into the socket. 4. Raise the height-adjustable wheels... floor centrally behind the appliance approx. 15" (380 mm) away from becoming caught, tie a piece of string to the middle of the installation enclosure. 6. Put the electric plug into the guard tube. 5. Do not damage the water line or power cord.
... appliance. , WARNING: Be careful, otherwise people who are helping may be damaged. Carefully push the appliance into the installation enclosure. Remove the base panel. 2. Push the water line into the installation enclosure. 1. Note: When the floor or the appliance is pushing into the socket. 4. Raise the height-adjustable wheels... floor centrally behind the appliance approx. 15" (380 mm) away from becoming caught, tie a piece of string to the middle of the installation enclosure. 6. Put the electric plug into the guard tube. 5. Do not damage the water line or power cord.
