
Use and Care Manual
Page 4
The manufacturer is not liable if you switch ON the appliance Please read the operating and installation instructions carefully. Repairs may be performed by the manufacturer may be used. Never sever or remove the third (earth) conductor from customer ... household ■ Keep children away from the freezer compartment into your mouth. Danger of this appliance unless they are supervised or given meticulous instructions. ■ Do not store bottled or canned drinks (especially carbonated drinks) in the freezer compartment. Retain all documents for use electrical appliances...
The manufacturer is not liable if you switch ON the appliance Please read the operating and installation instructions carefully. Repairs may be performed by the manufacturer may be used. Never sever or remove the third (earth) conductor from customer ... household ■ Keep children away from the freezer compartment into your mouth. Danger of this appliance unless they are supervised or given meticulous instructions. ■ Do not store bottled or canned drinks (especially carbonated drinks) in the freezer compartment. Retain all documents for use electrical appliances...

Use and Care Manual
Page 5
... to the appliance at least 1 hour until the appliance starts up the appliance securely. Connecting the appliance After installing the appliance, wait at least two persons are necessary to the enclosed installation instructions. , WARNING: Do not install this appliance: ■ outdoors, ■ in an environment with the appliance once it has spent it . Water...
... to the appliance at least 1 hour until the appliance starts up the appliance securely. Connecting the appliance After installing the appliance, wait at least two persons are necessary to the enclosed installation instructions. , WARNING: Do not install this appliance: ■ outdoors, ■ in an environment with the appliance once it has spent it . Water...
Use and Care Manual
Page 6
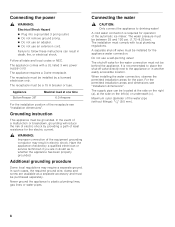
Do not use any extension cables. , WARNING: Non-compliance with these instructions may result in an electric shock. Improper connection of the appliance. Please observe the following installation of the protective conductor may result in mountain lodges) which are connected directly to... appliance comes with protection class I. Our appliances can be fused with a 10 to 115 V/60 Hz alternating current via a correctly installed socket with regard to the national grid. 6 Sine-controlled inverters must be used for isolated applications (e.g. The appliance complies with a...
Do not use any extension cables. , WARNING: Non-compliance with these instructions may result in an electric shock. Improper connection of the appliance. Please observe the following installation of the protective conductor may result in mountain lodges) which are connected directly to... appliance comes with protection class I. Our appliances can be fused with a 10 to 115 V/60 Hz alternating current via a correctly installed socket with regard to the national grid. 6 Sine-controlled inverters must be used for isolated applications (e.g. The appliance complies with a...
Use and Care Manual
Page 22
... disregard, improper handling, inadequate maintenance, faulty or negligent installation, tampering, non-observance of the instructions for use of the product, or requests when the product is in working order; resetting of Thermador; THIS WARRANTY SPECIFIES YOUR EXCLUSIVE REMEDY PERMITTED BY LAW ...THIS EXPRESS, LIMITED WARRANTY HAS VALIDITY. and (6) External, natural and/or environmental forces and factors, e.g. correction of installation problems (you alone are responsible for all liable for environmental damage, e.g. THIS WARRANTY REPLACES ALL OTHER REPRESENTATIONS EXPRESSED OR...
... disregard, improper handling, inadequate maintenance, faulty or negligent installation, tampering, non-observance of the instructions for use of the product, or requests when the product is in working order; resetting of Thermador; THIS WARRANTY SPECIFIES YOUR EXCLUSIVE REMEDY PERMITTED BY LAW ...THIS EXPRESS, LIMITED WARRANTY HAS VALIDITY. and (6) External, natural and/or environmental forces and factors, e.g. correction of installation problems (you alone are responsible for all liable for environmental damage, e.g. THIS WARRANTY REPLACES ALL OTHER REPRESENTATIONS EXPRESSED OR...
Installation Manual
Page 4
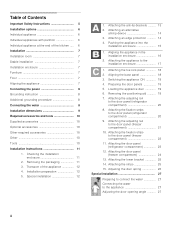
Table of Contents Important Safety Instructions 5 Installation options 6 Individual appliance 6 Individual appliances with partition 6 Individual appliance at the end of the appliance 12 4. Attaching an alternative anti-tip-device 14 3.... 9 Required accessories and tools 10 Supplied accessories 10 Optional accessories 10 Other required accessories 10 Other 10 Tools 10 Installation instructions 11 1. Installation preparation 12 5. Attaching an edge protection 14 4. Preparing the door panels 19 5. Loading the appliance door 19 6. Attaching the fixation strips to the ...
Table of Contents Important Safety Instructions 5 Installation options 6 Individual appliance 6 Individual appliances with partition 6 Individual appliance at the end of the appliance 12 4. Attaching an alternative anti-tip-device 14 3.... 9 Required accessories and tools 10 Supplied accessories 10 Optional accessories 10 Other required accessories 10 Other 10 Tools 10 Installation instructions 11 1. Installation preparation 12 5. Attaching an edge protection 14 4. Preparing the door panels 19 5. Loading the appliance door 19 6. Attaching the fixation strips to the ...

Installation Manual
Page 5
... codes and/or local codes. In Canada, in particular. 5 NOTICE Installation of the installer. See the Owner's Manual for future reference. Note to Installer - General These installation instructions are top-heavy and must be made by licensed personnel when required. latest edition/...are intended for use . TWO PEOPLE ARE REQUIRED FOR PROPER INSTALLATION. See the section on "Connecting the power". Note to Consumer - Anti-tip protection is completely installed and secured per installation instructions. Keep doors closed until the appliance is required. Unplug the...
... codes and/or local codes. In Canada, in particular. 5 NOTICE Installation of the installer. See the Owner's Manual for future reference. Note to Installer - General These installation instructions are top-heavy and must be made by licensed personnel when required. latest edition/...are intended for use . TWO PEOPLE ARE REQUIRED FOR PROPER INSTALLATION. See the section on "Connecting the power". Note to Consumer - Anti-tip protection is completely installed and secured per installation instructions. Keep doors closed until the appliance is required. Unplug the...
Installation Manual
Page 8
The appliance requires a 3-wire receptacle. Grounding instruction This appliance must be grounded. A separate shut-off valve must be installed for the appliance water connection. It is required for the electric current. , WARNING: Improper connection of the automatic ...appliance has been properly grounded. The shut-off valve directly next to follow these instructions can be between 25 and 120 psi. (1.72-8.25 bar). When installing the water connection, observe the permitted installation areas for the water connection must be purchased seperately. Have the appliance checked ...
The appliance requires a 3-wire receptacle. Grounding instruction This appliance must be grounded. A separate shut-off valve must be installed for the appliance water connection. It is required for the electric current. , WARNING: Improper connection of the automatic ...appliance has been properly grounded. The shut-off valve directly next to follow these instructions can be between 25 and 120 psi. (1.72-8.25 bar). When installing the water connection, observe the permitted installation areas for the water connection must be purchased seperately. Have the appliance checked ...
Installation Manual
Page 10
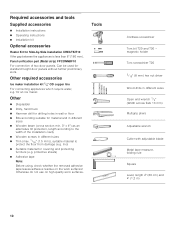
... section min. 3" x 4") as an alternative tilt protection, length according to the width of two door panels. Required accessories and tools Supplied accessories Installation instructions Operating instructions Installation kit Optional accessories Heater Kit for standard height door panels without further preliminary work surfaces! Panel unification part (Metal strip) FPCONNBF10 For connection of...
... section min. 3" x 4") as an alternative tilt protection, length according to the width of two door panels. Required accessories and tools Supplied accessories Installation instructions Operating instructions Installation kit Optional accessories Heater Kit for standard height door panels without further preliminary work surfaces! Panel unification part (Metal strip) FPCONNBF10 For connection of...
Installation Manual
Page 11
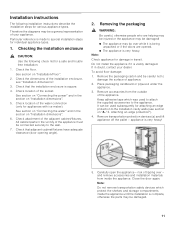
... appliance off the pallet - Note: Check appliance for damage in the section on "A / 3. and remove accessories and installation materials from the outside of appliance. 2. Checking the installation enclosure , CAUTION: Use the following installation instructions describe the installation steps for various appliance types. See section on "Connecting the water" and in doubt, contact your appliance. It...
... appliance off the pallet - Note: Check appliance for damage in the section on "A / 3. and remove accessories and installation materials from the outside of appliance. 2. Checking the installation enclosure , CAUTION: Use the following installation instructions describe the installation steps for various appliance types. See section on "Connecting the water" and in doubt, contact your appliance. It...
Installation Manual
Page 14
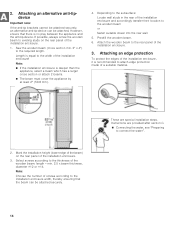
..., ensure that the beam can be attached securely. If possible, always screw the wooden beam to attach edge protection made of the installation enclosure, it is deeper than the appliance, select a beam which has a larger cross section or attach 2 beams. The... edge protection To protect the edges of a suitable material. 2. Attach the wooden beam to the thickness of the installation enclosure. 3. Instructions are special installation steps. Attaching an alternative anti-tipdevice Important note: If the anti-tip brackets cannot be attached securely, an alternative ...
..., ensure that the beam can be attached securely. If possible, always screw the wooden beam to attach edge protection made of the installation enclosure, it is deeper than the appliance, select a beam which has a larger cross section or attach 2 beams. The... edge protection To protect the edges of a suitable material. 2. Attach the wooden beam to the thickness of the installation enclosure. 3. Instructions are special installation steps. Attaching an alternative anti-tipdevice Important note: If the anti-tip brackets cannot be attached securely, an alternative ...
Installation Manual
Page 17
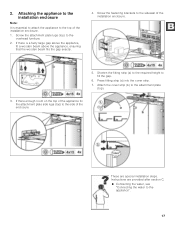
... room on the top of the appliance fix the attachment plate side lugs (top) to the sidewall of the installation enclosure. 5. Screw the fastening brackets to the side of the installation enclosure. 1. Instructions are special installation steps. Shorten the fitting strip (a) to the required height to the attachment plate (top). 3. 2. If there is essential...
... room on the top of the appliance fix the attachment plate side lugs (top) to the sidewall of the installation enclosure. 5. Screw the fastening brackets to the side of the installation enclosure. 1. Instructions are special installation steps. Shorten the fitting strip (a) to the required height to the attachment plate (top). 3. 2. If there is essential...
Installation Manual
Page 19
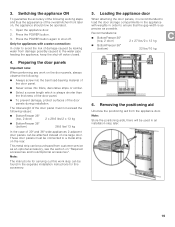
... note: When performing any work step can be used in order to load the door storage compartments in the separate installation instructions for this work on "Required accessories and tools/Optional accessories". Loading the appliance door When attaching the door panels, it... x 12 kg BottomFreezer 36" (bottom) 22 Ibs/10 kg 6. Only for carrying out this accessory. 5. Note: The instructions for appliances with weights in an installation step later. 19 3. This metal strip can be connected to the water pipe feeding the appliance, keep the shut-off . Removing the...
... note: When performing any work step can be used in order to load the door storage compartments in the separate installation instructions for this work on "Required accessories and tools/Optional accessories". Loading the appliance door When attaching the door panels, it... x 12 kg BottomFreezer 36" (bottom) 22 Ibs/10 kg 6. Only for carrying out this accessory. 5. Note: The instructions for appliances with weights in an installation step later. 19 3. This metal strip can be connected to the water pipe feeding the appliance, keep the shut-off . Removing the...

Installation Manual
Page 26
Adjusting the door spring Rotate the adjusting screw with a cross-head screwdriver. Insert the cover plate on the freezer compartment door. 3. Instructions are special installation steps. I = maximum spring tension 0 = no spring tension Installation of the appliance is now complete. 26 These are provided after section C. Door limitation pin, see "Adjusting the door opening angle". 15.
Adjusting the door spring Rotate the adjusting screw with a cross-head screwdriver. Insert the cover plate on the freezer compartment door. 3. Instructions are special installation steps. I = maximum spring tension 0 = no spring tension Installation of the appliance is now complete. 26 These are provided after section C. Door limitation pin, see "Adjusting the door opening angle". 15.

Installation Manual
Page 27
...and water damage. 1. Push back the water line into the appliance connection and screw on the appliance (2.). 3. Open the shut-off valve and on the installation situation, it , otherwise there is a risk of the water line into the guard tube as far as possible (4.). 7. Using the open-ended wrench, ...tight. 5. Adjusting the door opening angle. Open door to the water line when pushing in with a hammer. 27 Attach the water line to the instructions supplied by leaking water. 1. Install the water line. Close the shut-off valve according to the shut-off valve.
...and water damage. 1. Push back the water line into the appliance connection and screw on the appliance (2.). 3. Open the shut-off valve and on the installation situation, it , otherwise there is a risk of the water line into the guard tube as far as possible (4.). 7. Using the open-ended wrench, ...tight. 5. Adjusting the door opening angle. Open door to the water line when pushing in with a hammer. 27 Attach the water line to the instructions supplied by leaking water. 1. Install the water line. Close the shut-off valve according to the shut-off valve.
