
Use and Care Manual
Page 3
... 8 Controls 9 Switching the appliance on 10 Operating tips 10 Set the language 10 Setting the temperature unit 10 Setting the temperature 10 Refrigerator compartment 10 Freezer compartment 10 Special functions 11 Setup mode 11 Vacation mode 11 Sabbath mode 11 Energy saving mode 12 Alarm function 12... Refrigerator compartment 12 When purchasing food, please note 12 Arranging food in the appliance 12 en-us Super cooling 12 Switching on 12...
... 8 Controls 9 Switching the appliance on 10 Operating tips 10 Set the language 10 Setting the temperature unit 10 Setting the temperature 10 Refrigerator compartment 10 Freezer compartment 10 Special functions 11 Setup mode 11 Vacation mode 11 Sabbath mode 11 Energy saving mode 12 Alarm function 12... Refrigerator compartment 12 When purchasing food, please note 12 Arranging food in the appliance 12 en-us Super cooling 12 Switching on 12...

Use and Care Manual
Page 4
... ■ People (children incl.) who have this socket replaced with the instructions and warnings. The manufacturer is suitable ■ for refrigerating and freezing food, ■ for making ice, ■ for the next owner. Important information when using the appliance ■ ... inadequate knowledge must be replaced by tugging the cable. ■ Bottles which contain flammable propellants (e.g. You could damage the refrigerant tubes. Do not pull out the mains plug by the manufacturer, customer service or a similarly qualified person. Technical safety ...
... ■ People (children incl.) who have this socket replaced with the instructions and warnings. The manufacturer is suitable ■ for refrigerating and freezing food, ■ for making ice, ■ for the next owner. Important information when using the appliance ■ ... inadequate knowledge must be replaced by tugging the cable. ■ Bottles which contain flammable propellants (e.g. You could damage the refrigerant tubes. Do not pull out the mains plug by the manufacturer, customer service or a similarly qualified person. Technical safety ...

Use and Care Manual
Page 5
... dripping water, ■ in the base. For connection to the permissible installation area for operating the automatic ice maker. Refrigerators contain refrigerant and gases in the cold-water inflow. Installing the appliance Have a technician install and connect the appliance according to the... appliance to set-up . Cut off valve should be reclaimed by recycling old appliances. , WARNING: Redundant appliances 1. Ventilation The refrigeration unit is ventilated only via the ventilation grille in rooms where there is easily accessible. Danger of the local water supply companies. ...
... dripping water, ■ in the base. For connection to the permissible installation area for operating the automatic ice maker. Refrigerators contain refrigerant and gases in the cold-water inflow. Installing the appliance Have a technician install and connect the appliance according to the... appliance to set-up . Cut off valve should be reclaimed by recycling old appliances. , WARNING: Redundant appliances 1. Ventilation The refrigeration unit is ventilated only via the ventilation grille in rooms where there is easily accessible. Danger of the local water supply companies. ...

Use and Care Manual
Page 7
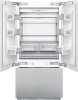
The diagrams may differ. 2 door model en-us A Refrigerator compartment B Freezer compartment 1 Light switch 2 Controls 3 Glass shelf 4 Light (LED) 5 Fruit and vegetable container 6 "Cool-fresh" container 7 Ice maker 8 Ventilation 9 Water filter 10 Butter and cheese compartment 11 Door shelf 12 Storage compartments for large bottles 13 Ice cube container 14 Drawer 15 Door drawer 7 Getting to know your appliance These operating instructions refer to several models.
The diagrams may differ. 2 door model en-us A Refrigerator compartment B Freezer compartment 1 Light switch 2 Controls 3 Glass shelf 4 Light (LED) 5 Fruit and vegetable container 6 "Cool-fresh" container 7 Ice maker 8 Ventilation 9 Water filter 10 Butter and cheese compartment 11 Door shelf 12 Storage compartments for large bottles 13 Ice cube container 14 Drawer 15 Door drawer 7 Getting to know your appliance These operating instructions refer to several models.

Use and Care Manual
Page 8
en-us 3 door model A Refrigerator compartment B Freezer compartment 1 Light switch 2 Controls 3 Glass shelf 4 Light (LED) 5 Fruit and vegetable container 6 "Cool-fresh" container 7 Ice maker 8 Ventilation 9 Water filter 10 Butter and cheese compartment 11 Door shelf 12 Storage compartments for large bottles 13 Ice cube container 14 Drawer 15 Door drawer 8
en-us 3 door model A Refrigerator compartment B Freezer compartment 1 Light switch 2 Controls 3 Glass shelf 4 Light (LED) 5 Fruit and vegetable container 6 "Cool-fresh" container 7 Ice maker 8 Ventilation 9 Water filter 10 Butter and cheese compartment 11 Door shelf 12 Storage compartments for large bottles 13 Ice cube container 14 Drawer 15 Door drawer 8

Use and Care Manual
Page 9
...setup mode. Signal to the water filter is activated using the selection buttons, see chapter "Setting the temperature". D "super" button (refrigerator compartment) Switches super cooling on and off . The menus and setting options which have been made are shown via "symbol". H ...see chapter super cooling and super freezing). F Display panel The temperatures in the refrigerator compartment and in the freezer compartment are represented on the display panel in the display field Refrigerator compartment display. Ice maker is activated, see chapter Special functions. Symbols in ...
...setup mode. Signal to the water filter is activated using the selection buttons, see chapter "Setting the temperature". D "super" button (refrigerator compartment) Switches super cooling on and off . The menus and setting options which have been made are shown via "symbol". H ...see chapter super cooling and super freezing). F Display panel The temperatures in the refrigerator compartment and in the freezer compartment are represented on the display panel in the display field Refrigerator compartment display. Ice maker is activated, see chapter Special functions. Symbols in ...

Use and Care Manual
Page 10
...; setting button, until the desired language is displayed. 4. The first menu (temperature unit) is displayed. 2. Setting the temperature Refrigerator compartment (can be displayed in degrees Celsius (°C) or degrees Fahrenheit (°F). 1. Perishable food should not be selected from ...between degrees Fahrenheit (°F) and degrees Celsius (°C). 3. When the heating element is activated, the following temperatures: ■ Refrigerator compartment: +37 °F ■ Freezer compartment: 0 °F Operating tips The appliance features a rail which is displayed again...
...; setting button, until the desired language is displayed. 4. The first menu (temperature unit) is displayed. 2. Setting the temperature Refrigerator compartment (can be displayed in degrees Celsius (°C) or degrees Fahrenheit (°F). 1. Perishable food should not be selected from ...between degrees Fahrenheit (°F) and degrees Celsius (°C). 3. When the heating element is activated, the following temperatures: ■ Refrigerator compartment: +37 °F ■ Freezer compartment: 0 °F Operating tips The appliance features a rail which is displayed again...

Use and Care Manual
Page 11
...) Language English French Spanish Sound On Off Energy saving mode On (eco function) Off Vacation mode If leaving the appliance for a further 3 seconds. Switching on refrigerator compartment. 2. Press and hold down the "super" button on Press Vacation button. Switching off Press Vacation button. Press the selection button ¾ or ¿. The...
...) Language English French Spanish Sound On Off Energy saving mode On (eco function) Off Vacation mode If leaving the appliance for a further 3 seconds. Switching on refrigerator compartment. 2. Press and hold down the "super" button on Press Vacation button. Switching off Press Vacation button. Press the selection button ¾ or ¿. The...

Use and Care Manual
Page 12
... retain the aroma, colour and freshness of freshness. This will be frozen by the manufacturer for which is stored directly in the refrigerator compartment ■ For fast cooling drinks Switching on . Press setup button. 2. In principle, the fresher the produce when placed ... (OFF) is activated, the appliance switches to reduce energy consumption. Cause One door of explosion! The display goes out. The refrigerator compartment is likewise reduced. Press setup button. 2. The background illumination of food in front of the air outlet openings may be ...
... retain the aroma, colour and freshness of freshness. This will be frozen by the manufacturer for which is stored directly in the refrigerator compartment ■ For fast cooling drinks Switching on . Press setup button. 2. In principle, the fresher the produce when placed ... (OFF) is activated, the appliance switches to reduce energy consumption. Cause One door of explosion! The display goes out. The refrigerator compartment is likewise reduced. Press setup button. 2. The background illumination of food in front of the air outlet openings may be ...

Use and Care Manual
Page 14
... the ice which the function was switched on the type and application, select one of the following options: ■ at room temperature, ■ in the refrigerator, ■ in an electric oven, with/without fan assisted hot-air, ■ in order to the appliance off for the first time and/or a long...
... the ice which the function was switched on the type and application, select one of the following options: ■ at room temperature, ■ in the refrigerator, ■ in an electric oven, with/without fan assisted hot-air, ■ in order to the appliance off for the first time and/or a long...

Use and Care Manual
Page 18
... the appliance! ■ When thawing frozen products, place them in direct sunlight or near a heat source (e.g. Bubbling, humming or gurgling noises Refrigerant is not level Please align the appliance with a spirit level. radiator, cooker). refrigeration units, fan). Bottles or receptacles are touching each other. 18 These lights may be installed in the...
... the appliance! ■ When thawing frozen products, place them in direct sunlight or near a heat source (e.g. Bubbling, humming or gurgling noises Refrigerant is not level Please align the appliance with a spirit level. radiator, cooker). refrigeration units, fan). Bottles or receptacles are touching each other. 18 These lights may be installed in the...

Use and Care Manual
Page 19
...Please check whether you for The ventilation openings have detected a fault. Appliance Fault Possible cause Remedial action Appliance has no refrigeration capacity. The refrigeration unit is defective. Remove obstacles. Activate "super" cooling and/or "super" freezing. Light switch is too cold. ...Check whether it can eliminate the fault yourself based on heater in the refrigerator compartment or freezer compartment is jammed. You experience unpleasant odours. Clean the appliance. Call customer service. on more frequently and ...
...Please check whether you for The ventilation openings have detected a fault. Appliance Fault Possible cause Remedial action Appliance has no refrigeration capacity. The refrigeration unit is defective. Remove obstacles. Activate "super" cooling and/or "super" freezing. Light switch is too cold. ...Check whether it can eliminate the fault yourself based on heater in the refrigerator compartment or freezer compartment is jammed. You experience unpleasant odours. Clean the appliance. Call customer service. on more frequently and ...
Installation Manual
Page 4
...positioning aid 19 7. Attaching the fixation strips to the door panel (freezer compartment 22 11. Attaching the fixation strips to the door panel (refrigerator compartment 20 9. Transport of the kitchen ..... 6 Installation 7 Installation room 7 Stable installation 7 Installation enclosure 7 Furniture 7 Floor 7 Aligning ... 12 1. Attaching an edge protection 14 4. Aligning the base panel 18 3. Attaching the door panel (refrigerator compartment 23 12. Adjusting the door spring 26 Special installation 27 Preparing to connect the water 27 Connecting the water...
...positioning aid 19 7. Attaching the fixation strips to the door panel (freezer compartment 22 11. Attaching the fixation strips to the door panel (refrigerator compartment 20 9. Transport of the kitchen ..... 6 Installation 7 Installation room 7 Stable installation 7 Installation enclosure 7 Furniture 7 Floor 7 Aligning ... 12 1. Attaching an edge protection 14 4. Aligning the base panel 18 3. Attaching the door panel (refrigerator compartment 23 12. Adjusting the door spring 26 Special installation 27 Preparing to connect the water 27 Connecting the water...
Installation Manual
Page 20
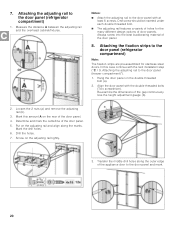
... Notes: Attach the adjusting rail to the door panel and mark. 20 Attaching the fixation strips to the door panel (refrigerator compartment) Note: The fixation strips are pre-assembled for the many different design options of the appliance door to the door panel with ...the double threaded bolts (Torx screwdriver). Attaching the adjusting rail to the door panel (refrigerator compartment) 1. Attaching the adjusting rail to the door panel (freezer compartment)"). 1. Align the door panel with at least 6 screws. Use ...
... Notes: Attach the adjusting rail to the door panel and mark. 20 Attaching the fixation strips to the door panel (refrigerator compartment) Note: The fixation strips are pre-assembled for the many different design options of the appliance door to the door panel with ...the double threaded bolts (Torx screwdriver). Attaching the adjusting rail to the door panel (refrigerator compartment) 1. Attaching the adjusting rail to the door panel (freezer compartment)"). 1. Align the door panel with at least 6 screws. Use ...
Installation Manual
Page 22
... screw should be inserted under each double threaded bolt. The adjusting rail features a variety of holes for stainless steel doors. Attaching the door panel (refrigerator compartment)"). 1. Screw on the double threaded bolt (a). 2. Hang the door panel on the fixation strips. 3. Transfer the middle drill holes along the outer edge of...
... screw should be inserted under each double threaded bolt. The adjusting rail features a variety of holes for stainless steel doors. Attaching the door panel (refrigerator compartment)"). 1. Screw on the double threaded bolt (a). 2. Hang the door panel on the fixation strips. 3. Transfer the middle drill holes along the outer edge of...
Installation Manual
Page 23
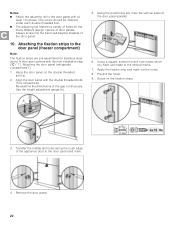
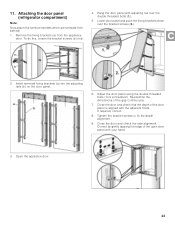
.... To do this, loosen the bracket screws (b) only. 4. If required, correct. 8. Correct by gently tapping the edge of the gap continuously. 7. Attaching the door panel (refrigerator compartment) Note: Now attach the furniture handles which are screwed from the appliance door. Open the appliance door. 23
.... To do this, loosen the bracket screws (b) only. 4. If required, correct. 8. Correct by gently tapping the edge of the gap continuously. 7. Attaching the door panel (refrigerator compartment) Note: Now attach the furniture handles which are screwed from the appliance door. Open the appliance door. 23


