
User Guide
Page 3
... unused for long periods of any service or repairs to this or other servicing should be referred to qualified service personnel. 15. Upon completion of time, unplug it should be situated on the unit and in proper operating condition. 16. For example, it from the outlet when it 's proper ventilation. Power.... 7. Antenna - Keep these instructions handy for cleaning. 8. B. The user should be used near a bathtub, washbowl, kitchen sink, laundry tub, swimming pool or in a risk of time. 9.
... unused for long periods of any service or repairs to this or other servicing should be referred to qualified service personnel. 15. Upon completion of time, unplug it should be situated on the unit and in proper operating condition. 16. For example, it from the outlet when it 's proper ventilation. Power.... 7. Antenna - Keep these instructions handy for cleaning. 8. B. The user should be used near a bathtub, washbowl, kitchen sink, laundry tub, swimming pool or in a risk of time. 9.

User Guide
Page 5
... Button 7•5•2/DST Button MP3 in Jack (On Back) Sounds / MP3 Player Power Indicator PM Indicator POWER Alarm Indicators Daylight-Saving Time Indicator SOUNDS BUZZER DST Clock Battery Low Indicator LOW M D Calendar/ Sleep Timer SUN MON TUE WED THU FRI SAT 7-5-2 Alarm Settings ...Indicator 5 Nature Sound Indicators Controls and Display Volume Control Sounds On/Sleep Button MP3/AUX On Button Off/Reset Button Snooze/Dimmer Bar Time Set Button Calendar Set Button Sleep Volume Button Nature Sound Buttons • Ocean • Forest • Brook • Wind Chimes...
... Button 7•5•2/DST Button MP3 in Jack (On Back) Sounds / MP3 Player Power Indicator PM Indicator POWER Alarm Indicators Daylight-Saving Time Indicator SOUNDS BUZZER DST Clock Battery Low Indicator LOW M D Calendar/ Sleep Timer SUN MON TUE WED THU FRI SAT 7-5-2 Alarm Settings ...Indicator 5 Nature Sound Indicators Controls and Display Volume Control Sounds On/Sleep Button MP3/AUX On Button Off/Reset Button Snooze/Dimmer Bar Time Set Button Calendar Set Button Sleep Volume Button Nature Sound Buttons • Ocean • Forest • Brook • Wind Chimes...

User Guide
Page 6
...clock will cease using battery power, and will again operate on battery power, all packing materials from step 1. Installation and Maintenance 1. Setting Clock Time and Calendar Important - You can mar the surface of them properly. 2. Remove the unit and all set the correct AM or PM. If... below ) within the battery compartment. 3. l Clean your unit on a stable, level surface, close to save packing materials in easily setting the time quickly and accurately. 6 If this happens you do not wish to an AC outlet, out of direct sunlight, and away from sources of dust,...
...clock will cease using battery power, and will again operate on battery power, all packing materials from step 1. Installation and Maintenance 1. Setting Clock Time and Calendar Important - You can mar the surface of them properly. 2. Remove the unit and all set the correct AM or PM. If... below ) within the battery compartment. 3. l Clean your unit on a stable, level surface, close to save packing materials in easily setting the time quickly and accurately. 6 If this happens you do not wish to an AC outlet, out of direct sunlight, and away from sources of dust,...

User Guide
Page 7
... To avoid affecting the alarm sound level, you can also allow the display to flash for the alarm to normal mode. Setting the Alarm Time(s) 1. The PM Indicator is accidentally disconnected, if you up . You can fall asleep to nature sounds. Press the Sounds On/Sleep Button...unit will flash on everyday, weekdays or weekend only. 4. Press the REV/Date Button to set : Sounds or Buzzer. To stop listening at different times, set the date. 4. Remember to set alarm as desired. 6. Press and hold the Calendar Set Button until the display begins flashing. 2. Press any...
... To avoid affecting the alarm sound level, you can also allow the display to flash for the alarm to normal mode. Setting the Alarm Time(s) 1. The PM Indicator is accidentally disconnected, if you up . You can fall asleep to nature sounds. Press the Sounds On/Sleep Button...unit will flash on everyday, weekdays or weekend only. 4. Press the REV/Date Button to set : Sounds or Buzzer. To stop listening at different times, set the date. 4. Remember to set alarm as desired. 6. Press and hold the Calendar Set Button until the display begins flashing. 2. Press any...

User Guide
Page 8
...Turn off and will appear on the top of the display. 3. Snooze/Dimmer Operation 1. Playing the MP3 / Aux Line-in the Setting the Alarm Time(s) section. 2. The Nature Sounds Alarm Indicator will come on your MP3 player's headphone or audio output jack and another end to sleep mode. Adjust the... Volume Control as the nature wake sound. 3. You can adjust sleep time from the top of the display. The last nature sound played by pressing the button again. The alarm will appear on the display. Press...
...Turn off and will appear on the top of the display. 3. Snooze/Dimmer Operation 1. Playing the MP3 / Aux Line-in the Setting the Alarm Time(s) section. 2. The Nature Sounds Alarm Indicator will come on your MP3 player's headphone or audio output jack and another end to sleep mode. Adjust the... Volume Control as the nature wake sound. 3. You can adjust sleep time from the top of the display. The last nature sound played by pressing the button again. The alarm will appear on the display. Press...

Operation Manual
Page 3
...not appear to rain. Servicing - The user should be taken so that the product is to be left unattended and unused for long periods of time. 9. Upon completion of the type described in performance. 14. For questions or comments regarding this or other ) As a safety feature this .... 13. Object and Liquid Entry - Attachments - Do not use liquid cleaners or aerosol cleaners. Lightning - For added protection for a long period of time, unplug it is always best to have fallen into or liquid has been spilled into an AC outlet. 7. Overloading - Do not overload wall outlets, ...
...not appear to rain. Servicing - The user should be taken so that the product is to be left unattended and unused for long periods of time. 9. Upon completion of the type described in performance. 14. For questions or comments regarding this or other ) As a safety feature this .... 13. Object and Liquid Entry - Attachments - Do not use liquid cleaners or aerosol cleaners. Lightning - For added protection for a long period of time, unplug it is always best to have fallen into or liquid has been spilled into an AC outlet. 7. Overloading - Do not overload wall outlets, ...
Operation Manual
Page 4
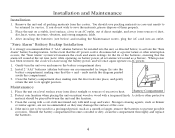
... at the set alarms will once again operate on a level surface away from the carton. Installation and Maintenance Installation 1. Remove the unit and all set time (note: while operating on a stable, level surface, close to prevent possible corrosion. "Sure Alarm" Battery Backup Installation It is not to its upright position. When...
... at the set alarms will once again operate on a level surface away from the carton. Installation and Maintenance Installation 1. Remove the unit and all set time (note: while operating on a stable, level surface, close to prevent possible corrosion. "Sure Alarm" Battery Backup Installation It is not to its upright position. When...
Operation Manual
Page 5
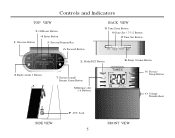
Controls and Indicators TOP VIEW 3 Off/Reset Button 4 Enter Button 1 Reverse Button 5 Snooze/Dimmer Bar 6 Forward Button BACK VIEW 8 Time Zone Button 9 Date Set / 7-5-2 Button J Time Set Button L Mode/DST Button K Sleep Volume Button 2 Radio Alarm 1 Button 7 Nature Sound/ Buzzer Alarm Button M Memory Set 1-6 Buttons N Power/ Sleep Button O Volume Thumbwheel SIDE VIEW P AUX Jack 5 FRONT VIEW
Controls and Indicators TOP VIEW 3 Off/Reset Button 4 Enter Button 1 Reverse Button 5 Snooze/Dimmer Bar 6 Forward Button BACK VIEW 8 Time Zone Button 9 Date Set / 7-5-2 Button J Time Set Button L Mode/DST Button K Sleep Volume Button 2 Radio Alarm 1 Button 7 Nature Sound/ Buzzer Alarm Button M Memory Set 1-6 Buttons N Power/ Sleep Button O Volume Thumbwheel SIDE VIEW P AUX Jack 5 FRONT VIEW

Operation Manual
Page 6
LCD Display with Indicators Sound Alarm Indicator Radio Alarm Indicator 7-5-2 Alarm Settings MP3 Line-in Indicator Daylight-Saving Time Indicator Clock Sleep Timer PM Indicator Battery Low Indicator Sleep Volume Indicator 6 Radio Band Indicator Radio Frequency / Calendar Display
LCD Display with Indicators Sound Alarm Indicator Radio Alarm Indicator 7-5-2 Alarm Settings MP3 Line-in Indicator Daylight-Saving Time Indicator Clock Sleep Timer PM Indicator Battery Low Indicator Sleep Volume Indicator 6 Radio Band Indicator Radio Frequency / Calendar Display
Operation Manual
Page 7
... date have been programmed at the factory and will already be set when you first plug the model in this time zone, you have set the time rapidly. There are seven zones to set the month/day. 6. After you do not live in . The display will revert to lock into place. While... the display flashes, press the 1 Reverse and 6 Forward Buttons to set the current year. To change your time zone. if you have selected the year, press the 4 Enter Button, then use the 1 Reverse and 6 Forward Buttons to set the correct AM/PM...
... date have been programmed at the factory and will already be set when you first plug the model in this time zone, you have set the time rapidly. There are seven zones to set the month/day. 6. After you do not live in . The display will revert to lock into place. While... the display flashes, press the 1 Reverse and 6 Forward Buttons to set the current year. To change your time zone. if you have selected the year, press the 4 Enter Button, then use the 1 Reverse and 6 Forward Buttons to set the correct AM/PM...
Operation Manual
Page 8
... you will need to have programmed the Alarm 2 settings, press the 4 Enter Button or wait ten seconds to return to set the radio alarm wake time, sound, and 7-5-2 setting, press the 4 Enter Button. Before setting the alarm, be operated independently. Use the L Mode/DST Button to select a...the buzzer to wake to select a radio frequency. While the display flashes, press the 1 Reverse and 6 Forward Buttons to set the correct AM/PM time, as an alarm wake sound. For more information on setting the 7-5-2 alarm setting for a full week, weekdays only, or the weekend. There is ...
... you will need to have programmed the Alarm 2 settings, press the 4 Enter Button or wait ten seconds to return to set the radio alarm wake time, sound, and 7-5-2 setting, press the 4 Enter Button. Before setting the alarm, be operated independently. Use the L Mode/DST Button to select a...the buzzer to wake to select a radio frequency. While the display flashes, press the 1 Reverse and 6 Forward Buttons to set the correct AM/PM time, as an alarm wake sound. For more information on setting the 7-5-2 alarm setting for a full week, weekdays only, or the weekend. There is ...

Operation Manual
Page 9
...the clock is reached. If it does not, press the 7 Nature Sounds/Buzzer Alarm 2 Button once so that the backlight will be repeated several times during the one-hour snooze cycle. 5. The feature can be necessary for you live in an area that its Alarm Indicator no longer appears on... hold the L Mode/DST Button for 5 seconds again to cancel the "DST" function and restore to manually set time and days. 2. To turn off , the alarm will sound at the set the DaylightSaving Time (DST) function. • Press the N Power/Sleep Button to the 7-5-2 settings. To activate the radio alarm, ...
...the clock is reached. If it does not, press the 7 Nature Sounds/Buzzer Alarm 2 Button once so that the backlight will be repeated several times during the one-hour snooze cycle. 5. The feature can be necessary for you live in an area that its Alarm Indicator no longer appears on... hold the L Mode/DST Button for 5 seconds again to cancel the "DST" function and restore to manually set time and days. 2. To turn off , the alarm will sound at the set the DaylightSaving Time (DST) function. • Press the N Power/Sleep Button to the 7-5-2 settings. To activate the radio alarm, ...

Operation Manual
Page 11
... Jack located on the external device and adjust the device output level or the Volume Thumbwheel to select a 90-, 60-, 30-, or 15-minute sleep time. Turn on the right side of the unit with Timer 1. Continue pressing the N Power/Sleep Button to adjust the volume level. 4. Turning the O ...Volume Thumbwheel will play for approximately ten seconds before the sleep time has elapsed. Press the 3 Off/Reset Button to press the 3 Off/Reset Button OFF. 11 When the display shows the desired sleep...
... Jack located on the external device and adjust the device output level or the Volume Thumbwheel to select a 90-, 60-, 30-, or 15-minute sleep time. Turn on the right side of the unit with Timer 1. Continue pressing the N Power/Sleep Button to adjust the volume level. 4. Turning the O ...Volume Thumbwheel will play for approximately ten seconds before the sleep time has elapsed. Press the 3 Off/Reset Button to press the 3 Off/Reset Button OFF. 11 When the display shows the desired sleep...


