
User Guide
Page 3
... cause TV or radio interference even when it . 1 Table of Contents FCC Information ...1 A Consumer Guide to Product Safety...2 Installation and Maintenance...3 Getting Started ...3 Installation Install Clock Backup Battery Controls and Indicators...4 Display with Indicators...5 Setting Up ...6 Using the Alarms ...6 Listening to the condition that this device does not cause harmful interference.
... cause TV or radio interference even when it . 1 Table of Contents FCC Information ...1 A Consumer Guide to Product Safety...2 Installation and Maintenance...3 Getting Started ...3 Installation Install Clock Backup Battery Controls and Indicators...4 Display with Indicators...5 Setting Up ...6 Using the Alarms ...6 Listening to the condition that this device does not cause harmful interference.

User Guide
Page 5
... accidentally disconnected, the display backlight will not remain lit, but current time and alarm time settings will be lost during battery replacement. 2. Install Clock Backup Battery The T-312 uses 2 AAA batteries to replace the backup batteries. ...Insert 2 AAA batteries, checking that the polarity (+ and - Note: Make sure you must reset the time and alarm settings. ᕡ ᕣ If the Battery Low Icon located on the bottom of direct sunlight or excessive heat....sure the AC power is time to provide continuous alarm operation and clock settings in suitable light environment. 3.
... accidentally disconnected, the display backlight will not remain lit, but current time and alarm time settings will be lost during battery replacement. 2. Install Clock Backup Battery The T-312 uses 2 AAA batteries to replace the backup batteries. ...Insert 2 AAA batteries, checking that the polarity (+ and - Note: Make sure you must reset the time and alarm settings. ᕡ ᕣ If the Battery Low Icon located on the bottom of direct sunlight or excessive heat....sure the AC power is time to provide continuous alarm operation and clock settings in suitable light environment. 3.
User Guide
Page 8
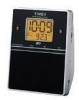
... setting to accept the current setting and set the correct AM or PM time. 2. Press and hold the ᕤ Alarm-1 or Alarm-2 Button for a few seconds will subtract one hour. 2. Press the > Button until the current year is displayed.... ᕦ > Button to confirm year setting after adjustment. Press the ¸ 7-5-2 Button to disarm the alarm. Press the ᕤ Alarm Button again or wait for a few seconds will advance the time one of the unit for a few seconds...not Daylight Saving Time (DST) is now armed, indicated by the numbered alarm clock icon. Setting Time and Calendar 1.
... setting to accept the current setting and set the correct AM or PM time. 2. Press and hold the ᕤ Alarm-1 or Alarm-2 Button for a few seconds will subtract one hour. 2. Press the > Button until the current year is displayed.... ᕦ > Button to confirm year setting after adjustment. Press the ¸ 7-5-2 Button to disarm the alarm. Press the ᕤ Alarm Button again or wait for a few seconds will advance the time one of the unit for a few seconds...not Daylight Saving Time (DST) is now armed, indicated by the numbered alarm clock icon. Setting Time and Calendar 1.


