

User Manual
Page 1
Para instruccionese en Espanol, llame al 1-800-888-4491. Model T439 MP3/CD Line-In dual alarm clock radio For additional information, online registration, and exclusive special offers visit our website: www.timexaudio.com For questions or comments regarding this or other products, please call our toll-free number 1-800-888-4491.
Para instruccionese en Espanol, llame al 1-800-888-4491. Model T439 MP3/CD Line-In dual alarm clock radio For additional information, online registration, and exclusive special offers visit our website: www.timexaudio.com For questions or comments regarding this or other products, please call our toll-free number 1-800-888-4491.
User Manual
Page 2
... is intended to alert the user of the presence of important operating and maintenance (servicing) instructions in an equilateral triangle is not responsible for any radio or TV interference cause by unauthorized modifications to operate the equipment. 2 The lightning flash with part 15 of electric shock. WARNING... this device does not cause harmful interference. Note: The manufacturer is intended to alert the user of the presence of uninsulated "dangerous voltage" within the product's enclosure that may be of sufficient magnitude to the condition that this equipment. CAUTION RISK ...
... is intended to alert the user of the presence of important operating and maintenance (servicing) instructions in an equilateral triangle is not responsible for any radio or TV interference cause by unauthorized modifications to operate the equipment. 2 The lightning flash with part 15 of electric shock. WARNING... this device does not cause harmful interference. Note: The manufacturer is intended to alert the user of the presence of uninsulated "dangerous voltage" within the product's enclosure that may be of sufficient magnitude to the condition that this equipment. CAUTION RISK ...
User Manual
Page 3
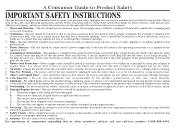
... wall outlet before installation and use attachments not recommended by forcing the plug into an AC outlet. 7. Cleaning - Do not use . The power supply cord or plug has been damaged. The unit has been exposed to operate normally or exhibits a marked change in proper operating condition. 16. The unit does not appear to rain. Servicing - Antenna - A Consumer Guide to Product Safety IMPORTANT SAFETY INSTRUCTIONS This unit...
... wall outlet before installation and use attachments not recommended by forcing the plug into an AC outlet. 7. Cleaning - Do not use . The power supply cord or plug has been damaged. The unit has been exposed to operate normally or exhibits a marked change in proper operating condition. 16. The unit does not appear to rain. Servicing - Antenna - A Consumer Guide to Product Safety IMPORTANT SAFETY INSTRUCTIONS This unit...

User Manual
Page 4
... occurs, the "Sure Alarm" system will maintain clock and alarm settings for service. Remove the unit and all set alarms will sound at the set time (note: while operating on , making sure the door locks into the unit, as a buzzer). If you do not wish to save packing materials in case unit needs to run the backup. Put the battery compartment door back on battery power, all packing materials...
... occurs, the "Sure Alarm" system will maintain clock and alarm settings for service. Remove the unit and all set alarms will sound at the set time (note: while operating on , making sure the door locks into the unit, as a buzzer). If you do not wish to save packing materials in case unit needs to run the backup. Put the battery compartment door back on battery power, all packing materials...

User Manual
Page 5
Controls and Buttons Off/Alarm Reset Button 6 Color Select Button 5 Radio Alarm Button 4 Time Set Button 3 Date Set Button 2 Reverse > (Month) Button CD/MP3/AUX Radio Tuning Thumbwheel P N Radio/Aux Band Switch O Volume Thumbwheel 5 CD/MP3/AUX Jack
Controls and Buttons Off/Alarm Reset Button 6 Color Select Button 5 Radio Alarm Button 4 Time Set Button 3 Date Set Button 2 Reverse > (Month) Button CD/MP3/AUX Radio Tuning Thumbwheel P N Radio/Aux Band Switch O Volume Thumbwheel 5 CD/MP3/AUX Jack

User Manual
Page 6
LCD Display With Indicators Radio Power Indicator Radio Alarm Indicator Buzzer Alarm Indicator Battery Low Indicator PM Indicator Sleep Volume Indicator Calendar/ Sleep Timer POWER PM SLEEP M D RADIO BUZZER DST SUN MON TUE WED THU FRI SAT Daylight Savings Time Indicator Clock Calendar Day/ 7-5-2 Alarm Settings 6
LCD Display With Indicators Radio Power Indicator Radio Alarm Indicator Buzzer Alarm Indicator Battery Low Indicator PM Indicator Sleep Volume Indicator Calendar/ Sleep Timer POWER PM SLEEP M D RADIO BUZZER DST SUN MON TUE WED THU FRI SAT Daylight Savings Time Indicator Clock Calendar Day/ 7-5-2 Alarm Settings 6
User Manual
Page 7
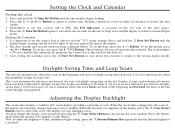
.... Setting the Clock and Calendar Setting the clock 1. To set the year, press the L 7-5-2 Button. (These buttons will be necessary for the date set the correct date in the display. 2. To set the date, press the 1 > Button. Daylight-Saving Time and Leap Years This unit will stop changing colors. This clock automatically advances one hour at the start of October. Adjusting the Display Backlight This clock radio features a "rainbow-like" clock display, providing a spectrum of the time digits. 4. The display will automatically adjust the clock...
.... Setting the Clock and Calendar Setting the clock 1. To set the year, press the L 7-5-2 Button. (These buttons will be necessary for the date set the correct date in the display. 2. To set the date, press the 1 > Button. Daylight-Saving Time and Leap Years This unit will stop changing colors. This clock automatically advances one hour at the start of October. Adjusting the Display Backlight This clock radio features a "rainbow-like" clock display, providing a spectrum of the time digits. 4. The display will automatically adjust the clock...

User Manual
Page 8
... setting the clock to wake to select a radio station. 2. The Radio Power Indicator will enter the sleep mode. Note: If the 8 Radio On/Sleep Button is located inside the cabinet. Antenna Information and Adjustment FM - The AM bar antenna is pressed more information about this affects the alarm volume. 5. Connect your MP3, Discman or other device into the AUX Jack which located on or keep pressing the button for the programmed sleep time and then shut...
... setting the clock to wake to select a radio station. 2. The Radio Power Indicator will enter the sleep mode. Note: If the 8 Radio On/Sleep Button is located inside the cabinet. Antenna Information and Adjustment FM - The AM bar antenna is pressed more information about this affects the alarm volume. 5. Connect your MP3, Discman or other device into the AUX Jack which located on or keep pressing the button for the programmed sleep time and then shut...

User Manual
Page 9
... before stopping. Note: The 7-5-2 setting lets you have set the correct day and date as to show the radio alarm setting. 2. To use the snooze feature, press the 7 Snooze/Dimmer Button when alarm sounds. Be sure that the radio alarm is still flashing, press the L 7-5-2 Button repeatedly until your desired alarm days are shown on the display. Hold either button for instructions on the bottom of display. Turning Off the Alarms 1. See the Listening and Sleeping to the Radio for...
... before stopping. Note: The 7-5-2 setting lets you have set the correct day and date as to show the radio alarm setting. 2. To use the snooze feature, press the 7 Snooze/Dimmer Button when alarm sounds. Be sure that the radio alarm is still flashing, press the L 7-5-2 Button repeatedly until your desired alarm days are shown on the display. Hold either button for instructions on the bottom of display. Turning Off the Alarms 1. See the Listening and Sleeping to the Radio for...

User Manual
Page 10
... box. 2. Limited 90-Day Warranty Information Timex Audio Products, a division of SDI Technologies Inc. (hereafter referred to as exhausted or defective batteries are also limited to 90 days, and SDI Technologies will repair or, at its return to the owner. This decision is still required: 1. Should service be required by excessive heat; (iii) damage to tape cassettes (if applicable); (iv...
... box. 2. Limited 90-Day Warranty Information Timex Audio Products, a division of SDI Technologies Inc. (hereafter referred to as exhausted or defective batteries are also limited to 90 days, and SDI Technologies will repair or, at its return to the owner. This decision is still required: 1. Should service be required by excessive heat; (iii) damage to tape cassettes (if applicable); (iv...


