User Manual
Page 1
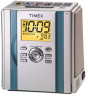
Para instruccionese en Espanol, llame al 1-800-888-4491. Model T626 Stereo CD Clock Radio with Auto-Set Digital Tuning For additional information, online registration, and exclusive special offers visit our website: www.timexaudio.com For questions or comments regarding this or other products, please call our toll-free number 1-800-888-4491.
Para instruccionese en Espanol, llame al 1-800-888-4491. Model T626 Stereo CD Clock Radio with Auto-Set Digital Tuning For additional information, online registration, and exclusive special offers visit our website: www.timexaudio.com For questions or comments regarding this or other products, please call our toll-free number 1-800-888-4491.

User Manual
Page 2
... et pousser jusqu au fond. The lightning flash with arrowhead in an equilateral triangle is intended to constitute a risk of important operating and maintenance (servicing) instructions in the literature accompanying the appliance. Note: The manufacturer is not responsible for any radio or TV interference cause by unauthorized modifications to operate the equipment. CAUTION RISK OF ELECTRIC...
... et pousser jusqu au fond. The lightning flash with arrowhead in an equilateral triangle is intended to constitute a risk of important operating and maintenance (servicing) instructions in the literature accompanying the appliance. Note: The manufacturer is not responsible for any radio or TV interference cause by unauthorized modifications to operate the equipment. CAUTION RISK OF ELECTRIC...

User Manual
Page 3
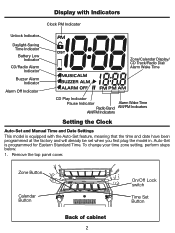
In Button Ƽ CD Play/Pause Button Radio Preset Button Snooze/Dimmer Bar ᕡ ¸ Open CD Door Button Radio Band Button ᕢ Reverse/Tuning Button ᕣ Volume Up Button ᕤ Volume Down Button ᕥ Aux Input Plug 1 µ Power Button ᕩ Forward/Tuning Button ᕨ Alarm Set Button ᕧ Alarm Reset Button Courtesy AC Outlet ᕦ Enter Button Controls and Indicators Time Set Button Ƹ On/Off Lock Switch ¹ ƹ Calendar Button ƺ Zone Button Top of cabinet ƻ MP-3/AUX Line-
In Button Ƽ CD Play/Pause Button Radio Preset Button Snooze/Dimmer Bar ᕡ ¸ Open CD Door Button Radio Band Button ᕢ Reverse/Tuning Button ᕣ Volume Up Button ᕤ Volume Down Button ᕥ Aux Input Plug 1 µ Power Button ᕩ Forward/Tuning Button ᕨ Alarm Set Button ᕧ Alarm Reset Button Courtesy AC Outlet ᕦ Enter Button Controls and Indicators Time Set Button Ƹ On/Off Lock Switch ¹ ƹ Calendar Button ƺ Zone Button Top of cabinet ƻ MP-3/AUX Line-
User Manual
Page 4
... you first plug the model in. Zone Button Calendar Button Back of cabinet 2 On/Off Lock switch Time Set Button Display with Indicators Clock PM Indicator Unlock Indicator Daylight-Saving Time Indicator Battery Low Indicator CD/Radio Alarm Indicator Buzzer Alarm Indicator Alarm Off Indicator Zone/Calendar Display/ CD Track/Radio Dial/ Alarm Wake Time CD Play Indicator Pause Indicator Alarm Wake Time Radio Band AM/PM Indicators AM/FM Indicators Setting the Clock Auto-Set and Manual Time and Date Settings This model is programmed for Eastern Standard Time. Remove the...
... you first plug the model in. Zone Button Calendar Button Back of cabinet 2 On/Off Lock switch Time Set Button Display with Indicators Clock PM Indicator Unlock Indicator Daylight-Saving Time Indicator Battery Low Indicator CD/Radio Alarm Indicator Buzzer Alarm Indicator Alarm Off Indicator Zone/Calendar Display/ CD Track/Radio Dial/ Alarm Wake Time CD Play Indicator Pause Indicator Alarm Wake Time Radio Band AM/PM Indicators AM/FM Indicators Setting the Clock Auto-Set and Manual Time and Date Settings This model is programmed for Eastern Standard Time. Remove the...
User Manual
Page 5
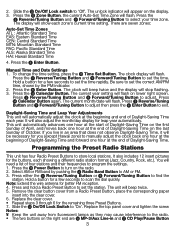
...; MP-3/Aux Line-in an area that does not observe Daylight-Saving Time, it will beep twice. 5. Manual Time and Date Settings 1. Be sure to find the station. Daylight-Saving Time and Leap Year Adjustments This unit will stop flashing. 3. You will also adjust the month/day display for the buttons, each showing a different radio station format (Jazz, Country, Rock, etc.). Press the ᕣ Reverse/Tuning Button and ¾ Forward/Tuning Button to program the settings...
...; MP-3/Aux Line-in an area that does not observe Daylight-Saving Time, it will beep twice. 5. Manual Time and Date Settings 1. Be sure to find the station. Daylight-Saving Time and Leap Year Adjustments This unit will stop flashing. 3. You will also adjust the month/day display for the buttons, each showing a different radio station format (Jazz, Country, Rock, etc.). Press the ᕣ Reverse/Tuning Button and ¾ Forward/Tuning Button to program the settings...

User Manual
Page 6
Changing the Preset Button Inserts This unit includes three sets of 12 Preset Button Paper Inserts, each clear button cover. ᕣ BUTTON INSERT ᕣ Place the paper insert into the clear cover ᕤ CLEAR BUTTON COVER WITH INSERT FRAME ᕤ Replace the clear ...instructions to insert the inserts to On. ² Replace the top panel with paper insert on the top of black button. ᕥ Slide ¹ On/Off Lock Switch to match the programmed stations. ᕡ Remove the top panel cover. ᕡ ᕢ CLEAR BUTTON COVER ᕢ Remove each showing a different radio station...
Changing the Preset Button Inserts This unit includes three sets of 12 Preset Button Paper Inserts, each clear button cover. ᕣ BUTTON INSERT ᕣ Place the paper insert into the clear cover ᕤ CLEAR BUTTON COVER WITH INSERT FRAME ᕤ Replace the clear ...instructions to insert the inserts to On. ² Replace the top panel with paper insert on the top of black button. ᕥ Slide ¹ On/Off Lock Switch to match the programmed stations. ᕡ Remove the top panel cover. ᕡ ᕢ CLEAR BUTTON COVER ᕢ Remove each showing a different radio station...
User Manual
Page 7
... will sound at the set time. 6. Press the CD Play/Pause Button again to advance the time quickly. 3. When the alarm sounds, press the ᕡ Snooze / Dimmer Bar for a few seconds to continue play before the CD has ended, press the µ Power Button. 5 If you do not want the alarm to turn on again the next day, press the ᕧ Alarm Reset Button again to shut off the alarm. The wake time on...
... will sound at the set time. 6. Press the CD Play/Pause Button again to advance the time quickly. 3. When the alarm sounds, press the ᕡ Snooze / Dimmer Bar for a few seconds to continue play before the CD has ended, press the µ Power Button. 5 If you do not want the alarm to turn on again the next day, press the ᕧ Alarm Reset Button again to shut off the alarm. The wake time on...

User Manual
Page 8
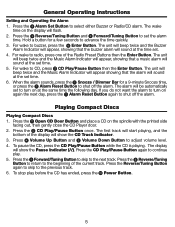
... bright settings. Playing the Radio 1. Playing the MP-3 / Aux Line-in Plug. 2. Press Power Button to Off to AM or FM. 3. This is reached. If this occurs, the device should be unplugged from the radio. 4. Connect your convenience. Adjusting the Display Backlight This alarm clock radio features an adjustable display backlight, with radio reception. Note: • Extend the wire antenna for your CD / MP-3 Player or other devices using the MP-3 / Aux Line-in 1. Press one of the Radio Preset Buttons...
... bright settings. Playing the Radio 1. Playing the MP-3 / Aux Line-in Plug. 2. Press Power Button to Off to AM or FM. 3. This is reached. If this occurs, the device should be unplugged from the radio. 4. Connect your convenience. Adjusting the Display Backlight This alarm clock radio features an adjustable display backlight, with radio reception. Note: • Extend the wire antenna for your CD / MP-3 Player or other devices using the MP-3 / Aux Line-in 1. Press one of the Radio Preset Buttons...

User Manual
Page 9
...owners of the product subsequent to the original purchaser. Enclose a check or money order payable to the order of SDI Technologies, for service, please first replace the batteries (if applicable) with fresh ones, as SDI Technologies), warrants this product to be free from defects in workmanship and materials, under normal use and conditions, for a period of 90 days... may not apply to you.) This warranty gives you specific legal rights, and you may also have other products, please call our toll-free number 1-800-888-4491. Timex Audio Products Division 1330 Goodyear Blvd El Paso, TX 79936-6420...
...owners of the product subsequent to the original purchaser. Enclose a check or money order payable to the order of SDI Technologies, for service, please first replace the batteries (if applicable) with fresh ones, as SDI Technologies), warrants this product to be free from defects in workmanship and materials, under normal use and conditions, for a period of 90 days... may not apply to you.) This warranty gives you specific legal rights, and you may also have other products, please call our toll-free number 1-800-888-4491. Timex Audio Products Division 1330 Goodyear Blvd El Paso, TX 79936-6420...

User Manual
Page 10
... Alarm" Battery Backup Installation The Battery Low Indicator flashes when there is restored, the clock will cease using battery power, and will maintain clock and alarm settings for a prolonged period, such as a buzzer). Use a Phillips screwdriver to be installed into the battery ᕅ ᕃ compartment, making sure that the alarm will sound at the set alarms will lose the clock settings. 3. Remove the unit and all set time (Note: while operating on a natural wood and lacquered finish. When power...
... Alarm" Battery Backup Installation The Battery Low Indicator flashes when there is restored, the clock will cease using battery power, and will maintain clock and alarm settings for a prolonged period, such as a buzzer). Use a Phillips screwdriver to be installed into the battery ᕅ ᕃ compartment, making sure that the alarm will sound at the set alarms will lose the clock settings. 3. Remove the unit and all set time (Note: while operating on a natural wood and lacquered finish. When power...

User Manual
Page 11
... the instructions and service manuals. 1. Ventilation - Non-Use Periods - Attachments - Water and Moisture - Power Sources - If you are not spilled into the power outlet only one blade wider than the other appliances (including amplifiers) that objects do not fall and liquids are unable to lightning and power-line surges. 12. Do not defeat the safety purpose of time. 9. The power cord...
... the instructions and service manuals. 1. Ventilation - Non-Use Periods - Attachments - Water and Moisture - Power Sources - If you are not spilled into the power outlet only one blade wider than the other appliances (including amplifiers) that objects do not fall and liquids are unable to lightning and power-line surges. 12. Do not defeat the safety purpose of time. 9. The power cord...

User Manual
Page 12
... B digital device as it should be referred to rain. Antenna - Do not connect to service the unit beyond that may not cause harmful interference, and (2) this device, because of any service or repairs to this product, ask the service telchnician to perform safety checks to service this device must accept any interference received, including interference that described in the user's operating instructions...
... B digital device as it should be referred to rain. Antenna - Do not connect to service the unit beyond that may not cause harmful interference, and (2) this device, because of any service or repairs to this product, ask the service telchnician to perform safety checks to service this device must accept any interference received, including interference that described in the user's operating instructions...


