

Owners Manual
Page 2
... weight of this apparatus must be of sufficient magnitude to constitute a risk of your LCD TV, please read and understand all cords and cables connected to persons. Tune Into Safety • One size does NOT fit all instructions supplied by curious children. Follow the manufacturer's recommendations for the safe installation and use a UL Listed wall bracket appropriate for installation. If you decide to wall mount this television...
... weight of this apparatus must be of sufficient magnitude to constitute a risk of your LCD TV, please read and understand all cords and cables connected to persons. Tune Into Safety • One size does NOT fit all instructions supplied by curious children. Follow the manufacturer's recommendations for the safe installation and use a UL Listed wall bracket appropriate for installation. If you decide to wall mount this television...

Owners Manual
Page 4
... overload wall outlets and extension cords. 31) Always operate this product, never place or store the TV in a position where your TV from lightning and power surges, always unplug the power cord and disconnect the antenna from mains power. Avoid contact with , such as possible) 4" min. Gently wipe the display panel surface (the TV screen) using the on or roll over the power cord...
... overload wall outlets and extension cords. 31) Always operate this product, never place or store the TV in a position where your TV from lightning and power surges, always unplug the power cord and disconnect the antenna from mains power. Avoid contact with , such as possible) 4" min. Gently wipe the display panel surface (the TV screen) using the on or roll over the power cord...

Owners Manual
Page 5
..., contact your LCD TV on the LCD screen. To Display your LCD TV using a Wall Bracket: If you need to service the TV yourself. When selecting a location for installation. 2) Unplug and remove any cables and/or other hazards. If you decide to wall mount your area, or ask a qualified service technician to environmental considerations. If these sounds become frequent or continuous, unplug the power cord and contact a Toshiba Authorized Service Center. 41...
..., contact your LCD TV on the LCD screen. To Display your LCD TV using a Wall Bracket: If you need to service the TV yourself. When selecting a location for installation. 2) Unplug and remove any cables and/or other hazards. If you decide to wall mount your area, or ask a qualified service technician to environmental considerations. If these sounds become frequent or continuous, unplug the power cord and contact a Toshiba Authorized Service Center. 41...

Owners Manual
Page 8
... Initial Setup 24 Selecting the menu language 24 TOSHIBA Logo LED 24 Configuring the antenna input source for the ANT/CABLE terminal 24 Programming channels into the TV's channel memory............25 Programming channels automatically 25 Setting channel skip 25 Labeling channels 26 Setting the HDMI® audio mode 27 Viewing the digital signal meter 27 Setting the time zone 27 Viewing the system status 28 Chapter 6: Using the TV's features 29 Selecting the video input source to view 29 Labeling the video input sources...
... Initial Setup 24 Selecting the menu language 24 TOSHIBA Logo LED 24 Configuring the antenna input source for the ANT/CABLE terminal 24 Programming channels into the TV's channel memory............25 Programming channels automatically 25 Setting channel skip 25 Labeling channels 26 Setting the HDMI® audio mode 27 Viewing the digital signal meter 27 Setting the time zone 27 Viewing the system status 28 Chapter 6: Using the TV's features 29 Selecting the video input source to view 29 Labeling the video input sources...

Owners Manual
Page 12
... audio inputs) for a complete connection. 7無 ColorStream® HD - Antenna input that supports analog (NTSC) and digital (ATSC) off-air antenna signals and analog and digital Cable TV (QAM) signals. 5無 Digital Audio OUT - HDMI connection is necessary to receive 1080p signals. 3無 PC/HDMI-1 (AUDIO) IN - separate audio cables are required for connecting devices with component video output, such as a Toshiba DVD player with HDMI-1 analog audio input terminals, and their use when connecting a personal computer. 2無 HDMI® IN - TV back 1 2 3 Power Cord...
... audio inputs) for a complete connection. 7無 ColorStream® HD - Antenna input that supports analog (NTSC) and digital (ATSC) off-air antenna signals and analog and digital Cable TV (QAM) signals. 5無 Digital Audio OUT - HDMI connection is necessary to receive 1080p signals. 3無 PC/HDMI-1 (AUDIO) IN - separate audio cables are required for connecting devices with component video output, such as a Toshiba DVD player with HDMI-1 analog audio input terminals, and their use when connecting a personal computer. 2無 HDMI® IN - TV back 1 2 3 Power Cord...

Owners Manual
Page 13
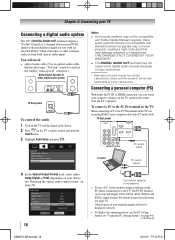
.... Component video cables (red/green/blue) Optical audio cable Optical audio cable is for connecting receivers with Dolby Digital or PCM (pulse-code modulation) optical audio input to use with video devices with analog audio and composite video output. About the connection illustrations You can be sure of connector types required by your devices and the length of each device's owner's manual. The connection illustrations in several different configurations. Component video cables come in sets of three, and are for use : yellow for video, red for...
.... Component video cables (red/green/blue) Optical audio cable Optical audio cable is for connecting receivers with Dolby Digital or PCM (pulse-code modulation) optical audio input to use with video devices with analog audio and composite video output. About the connection illustrations You can be sure of connector types required by your devices and the length of each device's owner's manual. The connection illustrations in several different configurations. Component video cables come in sets of three, and are for use : yellow for video, red for...

Owners Manual
Page 16
... uncompressed digital video with HDMI or DVI output). compliant[1] consumer electronic devices (such as a set-top box or DVD player with high-bandwidth digital content protection, which is recommended that you will need a Category 2 cable. Conventional HDMI/DVI cable may not operate properly with the HDMI Logo ( ). −− To display an 1080i/60Hz signal format, you follow these procedures: •• When turning on your electronic components, turn off the HDMI...
... uncompressed digital video with HDMI or DVI output). compliant[1] consumer electronic devices (such as a set-top box or DVD player with high-bandwidth digital content protection, which is recommended that you will need a Category 2 cable. Conventional HDMI/DVI cable may not operate properly with the HDMI Logo ( ). −− To display an 1080i/60Hz signal format, you follow these procedures: •• When turning on your electronic components, turn off the HDMI...
Owners Manual
Page 18
... the optical audio output format" on the TV and hear the sound from Dolby Laboratories. For detailed signal specifications ( page 57). Other formats or non-standard signals will need: • optical audio cable (Use an optical audio cable that has the larger "TosLink" connector and not the smaller "mini-optical" connector.) Dolby Digital decoder or other external audio system with optical audio input. Dolby, and the double-D symbol are not compatible with Dolby Digital bitstream signals. Connecting...
... the optical audio output format" on the TV and hear the sound from Dolby Laboratories. For detailed signal specifications ( page 57). Other formats or non-standard signals will need: • optical audio cable (Use an optical audio cable that has the larger "TosLink" connector and not the smaller "mini-optical" connector.) Dolby Digital decoder or other external audio system with optical audio input. Dolby, and the double-D symbol are not compatible with Dolby Digital bitstream signals. Connecting...

Owners Manual
Page 22
...(illustrated below and on the remote control or TV control panel. Icon Picture Sound Preferences Locks Setup Item Mode Picture Settings Noise Reduction Game Mode Theater Settings Digital Audio Selector Audio Settings Advanced Audio Settings Audio Setup CC Selector Base CC Mode Digital CC Settings Input Labeling Channel Labeling Menu Language Channel Browser Setup REGZA-LINK Player Control Enable Rating Blocking Edit Rating Limits Input Lock Control Panel Lock GameTimer New PIN Code Installation REGZA-LINK Setup Sleep Timer PC Settings Logo LED Media Player Option Sports / Standard...
...(illustrated below and on the remote control or TV control panel. Icon Picture Sound Preferences Locks Setup Item Mode Picture Settings Noise Reduction Game Mode Theater Settings Digital Audio Selector Audio Settings Advanced Audio Settings Audio Setup CC Selector Base CC Mode Digital CC Settings Input Labeling Channel Labeling Menu Language Channel Browser Setup REGZA-LINK Player Control Enable Rating Blocking Edit Rating Limits Input Lock Control Panel Lock GameTimer New PIN Code Installation REGZA-LINK Setup Sleep Timer PC Settings Logo LED Media Player Option Sports / Standard...

Owners Manual
Page 25
... previously programmed into the TV's channel memory. ANT/CABLE Antenna Scanning channels, please wait ... 52% Number of Channels Found - 73 Scanning Digital Channels Found Channel - 118 Abort The TV will appear in the channel memory. To program channels automatically: 1無 Configure the antenna input source, if you have not already done so ( page 24). 2無 Press and open the Setup menu. 3無 Highlight Installation and press . 4無 (A new set of channels will...
... previously programmed into the TV's channel memory. ANT/CABLE Antenna Scanning channels, please wait ... 52% Number of Channels Found - 73 Scanning Digital Channels Found Channel - 118 Abort The TV will appear in the channel memory. To program channels automatically: 1無 Configure the antenna input source, if you have not already done so ( page 24). 2無 Press and open the Setup menu. 3無 Highlight Installation and press . 4無 (A new set of channels will...
Owners Manual
Page 27
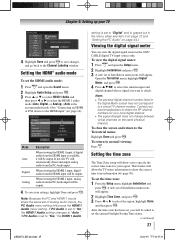
... antenna input and digital channel whose signal you will appear. Open the Terrestrial menu, highlight Signal Meter, and press . 4無 Press pqtu to the HDMI input" ( page 16). To close the screen and return to normal viewing: Press . Mode Auto Digital Analog Description When viewing the HDMI 1 input, if digital audio from the PC Audio input. Note: Because the PC and HDMI-1 inputs share the same set of Installation menu icons will be output. This feature will be output...
... antenna input and digital channel whose signal you will appear. Open the Terrestrial menu, highlight Signal Meter, and press . 4無 Press pqtu to the HDMI input" ( page 16). To close the screen and return to normal viewing: Press . Mode Auto Digital Analog Description When viewing the HDMI 1 input, if digital audio from the PC Audio input. Note: Because the PC and HDMI-1 inputs share the same set of Installation menu icons will be output. This feature will be output...

Owners Manual
Page 38
... the audio track chosen by changing the background color, opacity, text size, type, edge, and color. To use the CC Selector to temporarily override the default analog caption mode (set the volume to 0. w/o Serif, Casual, Cursive, Small Capitals Caption Text Edge Auto, None, Raised, Depressed, Uniform, Left Drop Shadow, Right Drop shadow Caption Text Color Auto, Black, White, Red, Green, Blue, Yellow, Magenta, Cyan Text Foreground Auto, Transparent, Opacity Translucent, Flashing, Solid Background Color Auto, Black, White, Red, Green, Blue...
... the audio track chosen by changing the background color, opacity, text size, type, edge, and color. To use the CC Selector to temporarily override the default analog caption mode (set the volume to 0. w/o Serif, Casual, Cursive, Small Capitals Caption Text Edge Auto, None, Raised, Depressed, Uniform, Left Drop Shadow, Right Drop shadow Caption Text Color Auto, Black, White, Red, Green, Blue, Yellow, Magenta, Cyan Text Foreground Auto, Transparent, Opacity Translucent, Flashing, Solid Background Color Auto, Black, White, Red, Green, Blue...

Owners Manual
Page 40
... PIN code is displayed, press four times within five seconds. Note: ••This item will be grayed out for NTSC signals, Video, ColorStream, and PC inputs. ••The Dolby Digital Dynamic Range Control will be set to Optical Output Format (PCM mode). Entering the PIN code 1無 Press and highlight the Locks menu icon. 2無 Press , which displays the PIN code entry screen. • The Lock System screen...
... PIN code is displayed, press four times within five seconds. Note: ••This item will be grayed out for NTSC signals, Video, ColorStream, and PC inputs. ••The Dolby Digital Dynamic Range Control will be set to Optical Output Format (PCM mode). Entering the PIN code 1無 Press and highlight the Locks menu icon. 2無 Press , which displays the PIN code entry screen. • The Lock System screen...

Owners Manual
Page 44
... to output or mute the sound from center.* Auto Adjust Highlight this feature will be no pc input signal, this item then press to get an optimum adjustment automatically. ** The default settings may vary depending on the screen. To adjust the PC settings: 1無 Repeatedly press to select PC input mode ( "Selecting the video input source to view" page 29). 2無 Press and open the Sound menu. 2無 Highlight Audio Setup...
... to output or mute the sound from center.* Auto Adjust Highlight this feature will be no pc input signal, this item then press to get an optimum adjustment automatically. ** The default settings may vary depending on the screen. To adjust the PC settings: 1無 Repeatedly press to select PC input mode ( "Selecting the video input source to view" page 29). 2無 Press and open the Sound menu. 2無 Highlight Audio Setup...
Owners Manual
Page 49
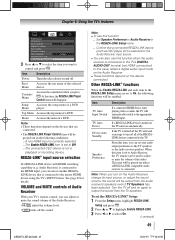
..., select a digital audio input mode on the Audio Receiver. ••These functions depend on again to the TV's DIGITAL AUDIO OUT terminal (not HDMI connection). Top Menu Accesses the top menu of a DVD. Note: ••To use this item is connected. Device Auto Standby If the TV is connected to output the sound from the audio receiver's speakers even if TV Speakers has been selected. To set to Audio Receiver, the TV remote can also use this item...
..., select a digital audio input mode on the Audio Receiver. ••These functions depend on again to the TV's DIGITAL AUDIO OUT terminal (not HDMI connection). Top Menu Accesses the top menu of a DVD. Note: ••To use this item is connected. Device Auto Standby If the TV is connected to output the sound from the audio receiver's speakers even if TV Speakers has been selected. To set to Audio Receiver, the TV remote can also use this item...
Owners Manual
Page 50
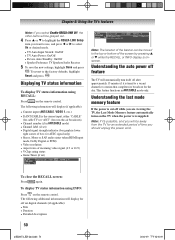
... HDMI input mode, Dolby Digital or PCM) • Video resolution • Aspect ratio of incoming video signal (4:3 or 16:9) • V-Chip rating status • Game Timer (if set ) • Digital signal strength indicator (bar graph in lower right corner of the screen by pressing or while the RECALL or INFO display is onscreen. This feature functions in ANT/CABLE mode) • Channel label (if set ) Note: The location of...
... HDMI input mode, Dolby Digital or PCM) • Video resolution • Aspect ratio of incoming video signal (4:3 or 16:9) • V-Chip rating status • Game Timer (if set ) • Digital signal strength indicator (bar graph in lower right corner of the screen by pressing or while the RECALL or INFO display is onscreen. This feature functions in ANT/CABLE mode) • Channel label (if set ) Note: The location of...

Owners Manual
Page 54
... remote control or TV and select a valid video input source ( page 29). Poor color or no device is set to Off ( page 37). Picture and sound are out of the Text modes (T1, T2, T3, or T4). You may have broadcast difficulties. If you cannot view signals from external devices connected to VIDEO 1, VIDEO 2, ColorStream® HDMI 1, HDMI 2, HDMI 3, HDMI 4, PC or from channels 3 or 4, make sure the Input Lock is set...
... remote control or TV and select a valid video input source ( page 29). Poor color or no device is set to Off ( page 37). Picture and sound are out of the Text modes (T1, T2, T3, or T4). You may have broadcast difficulties. If you cannot view signals from external devices connected to VIDEO 1, VIDEO 2, ColorStream® HDMI 1, HDMI 2, HDMI 3, HDMI 4, PC or from channels 3 or 4, make sure the Input Lock is set...

Owners Manual
Page 55
... the power cord, then plug and turn off your PIN code: While the PIN code entering screen is not available, a black rectangle may appear. b) when the signal reception is nonstandard ( page 37). Try another channel. •• The sound may be cleared ( page 40). Chapter 8: Troubleshooting Sound problems •• Check the antenna/cable connections ( Chapter 2). •• The station may have changed settings of the USB...
... the power cord, then plug and turn off your PIN code: While the PIN code entering screen is not available, a black rectangle may appear. b) when the signal reception is nonstandard ( page 37). Try another channel. •• The sound may be cleared ( page 40). Chapter 8: Troubleshooting Sound problems •• Check the antenna/cable connections ( Chapter 2). •• The station may have changed settings of the USB...

Owners Manual
Page 58
... LCD Television and connected equipment; Labor service charges for set installation, setup, adjustment of customer controls, and installation or repair of antenna, satellite or cable systems are not covered by TACP; THESE LIMITED WARRANTIES EXTEND TO THE ORIGINAL CONSUMER PURCHASER OR ANY PERSON RECEIVING THIS LCD TELEVISION AS A GIFT FROM THE ORIGINAL CONSUMER PURCHASER AND TO NO OTHER PURCHASER OR TRANSFEREE. Chapter 9: Appendix Limited United States Warranty for LCD Televisions Toshiba...
... LCD Television and connected equipment; Labor service charges for set installation, setup, adjustment of customer controls, and installation or repair of antenna, satellite or cable systems are not covered by TACP; THESE LIMITED WARRANTIES EXTEND TO THE ORIGINAL CONSUMER PURCHASER OR ANY PERSON RECEIVING THIS LCD TELEVISION AS A GIFT FROM THE ORIGINAL CONSUMER PURCHASER AND TO NO OTHER PURCHASER OR TRANSFEREE. Chapter 9: Appendix Limited United States Warranty for LCD Televisions Toshiba...

Owners Manual
Page 59
..., AND USED IN CANADA, ARE NOT COVERED BY THESE WARRANTIES. Your Responsibility Read the owner's manual thoroughly before operating this Television and connected equipment; Service, repairs or replacement made necessary by TCL to complete the product registration does not diminish your LCD Television online at http://support.toshiba.ca/warranty/. d. f. THESE LIMITED WARRANTIES EXTEND TO THE ORIGINAL CONSUMER PURCHASER OR ANY PERSON RECEIVING THIS TOSHIBA BRAND FLAT PANEL TELEVISION (the "TELEVISION(S)" or "Television(s)") AS...
..., AND USED IN CANADA, ARE NOT COVERED BY THESE WARRANTIES. Your Responsibility Read the owner's manual thoroughly before operating this Television and connected equipment; Service, repairs or replacement made necessary by TCL to complete the product registration does not diminish your LCD Television online at http://support.toshiba.ca/warranty/. d. f. THESE LIMITED WARRANTIES EXTEND TO THE ORIGINAL CONSUMER PURCHASER OR ANY PERSON RECEIVING THIS TOSHIBA BRAND FLAT PANEL TELEVISION (the "TELEVISION(S)" or "Television(s)") AS...


