

Owner's Manual - English
Page 2
... Use Your Flat Panel Display Congratulations on page 3. NO USER-SERVICEABLE PARTS INSIDE. The lightning flash with furniture and television sets. • Don't place flat panel displays on the proper stands or installed according to wall mount this television. As you for the size and weight of this television, always use of your new LCD TV. Follow the manufacturer's recommendations for the safe installation and use a UL Listed wall bracket appropriate for the size and weight of this television for installation. However, flat panel displays...
... Use Your Flat Panel Display Congratulations on page 3. NO USER-SERVICEABLE PARTS INSIDE. The lightning flash with furniture and television sets. • Don't place flat panel displays on the proper stands or installed according to wall mount this television. As you for the size and weight of this television, always use of your new LCD TV. Follow the manufacturer's recommendations for the safe installation and use a UL Listed wall bracket appropriate for the size and weight of this television for installation. However, flat panel displays...

Owner's Manual - English
Page 3
...; ALWAYS turn off the TV and unplug the power cord to avoid possible electric shock or fire. • NEVER allow your body to a wall stud, pillar, or other outlet unless the blades can be placed on an unstable cart, stand, or table. Installation, Care, and Service Installation Follow these instructions. 3) Heed all warnings. 4) Follow all instructions. 5) Do not use this product at plugs...
...; ALWAYS turn off the TV and unplug the power cord to avoid possible electric shock or fire. • NEVER allow your body to a wall stud, pillar, or other outlet unless the blades can be placed on an unstable cart, stand, or table. Installation, Care, and Service Installation Follow these instructions. 3) Heed all warnings. 4) Follow all instructions. 5) Do not use this product at plugs...

Owner's Manual - English
Page 4
... the TV where the power cord is subject to wear or abuse. 28) Never overload wall outlets and extension cords. 29) Always operate this product can accidentally touch overhead power lines. Antenna lead-in item 33 on the LCD screen. Care For better performance and safer operation of your TOSHIBA TV, follow the instructions in wire Ground clamp Antenna discharge unit (NEC Section...
... the TV where the power cord is subject to wear or abuse. 28) Never overload wall outlets and extension cords. 29) Always operate this product can accidentally touch overhead power lines. Antenna lead-in item 33 on the LCD screen. Care For better performance and safer operation of your TOSHIBA TV, follow the instructions in wire Ground clamp Antenna discharge unit (NEC Section...

Owner's Manual - English
Page 5
... a sturdy, level, stable surface that can support the weight of the pedestal stand. 3) Once you decide to wall mount your LCD TV using a Wall Bracket: If you have removed all four screws holding the pedestal stand in place, remove the pedestal stand from the hook(s) on the included Pedestal Stand: Observe the following safety precautions: 1) Read and Follow the pedestal assembly instructions included with the pedestal. Make sure...
... a sturdy, level, stable surface that can support the weight of the pedestal stand. 3) Once you decide to wall mount your LCD TV using a Wall Bracket: If you have removed all four screws holding the pedestal stand in place, remove the pedestal stand from the hook(s) on the included Pedestal Stand: Observe the following safety precautions: 1) Read and Follow the pedestal assembly instructions included with the pedestal. Make sure...

Owner's Manual - English
Page 7
... the menu language 28 TOSHIBA Logo LED 28 Configuring the antenna input source for the ANT/CABLE terminal 28 Programming channels into the TV's channel memory ........29 Programming channels automatically 29 Manually adding and deleting channels in the channel memory 29 Labeling channels 30 Setting the HDMI™ audio mode 31 Viewing the digital signal meter 32 Setting the time zone 32 Viewing the system status 32 Chapter 6: Using the TV's features 33 Selecting the video input source to view 33...
... the menu language 28 TOSHIBA Logo LED 28 Configuring the antenna input source for the ANT/CABLE terminal 28 Programming channels into the TV's channel memory ........29 Programming channels automatically 29 Manually adding and deleting channels in the channel memory 29 Labeling channels 30 Setting the HDMI™ audio mode 31 Viewing the digital signal meter 32 Setting the time zone 32 Viewing the system status 32 Chapter 6: Using the TV's features 33 Selecting the video input source to view 33...

Owner's Manual - English
Page 10
... control panel for 5 or more seconds to turn off . Press to reset the TV. 6 ARROWS STWX - These buttons adjust the volume level. 11 INPUT - Point the remote control toward this manual for updating the television's firmware. 5 POWER - The side panel A/V connections are viewing (ANT/CABLE, VIDEO 1, VIDEO 2, ColorStream HD1, ColorStream HD2, HDMI 1, HDMI 2, HDMI 3, PC). 10 When a menu is on -screen, these buttons function as up/down/left/right menu navigation buttons. 7 MENU (ENTER) - When no menu is on -screen, these buttons change the source...
... control panel for 5 or more seconds to turn off . Press to reset the TV. 6 ARROWS STWX - These buttons adjust the volume level. 11 INPUT - Point the remote control toward this manual for updating the television's firmware. 5 POWER - The side panel A/V connections are viewing (ANT/CABLE, VIDEO 1, VIDEO 2, ColorStream HD1, ColorStream HD2, HDMI 1, HDMI 2, HDMI 3, PC). 10 When a menu is on -screen, these buttons function as up/down/left/right menu navigation buttons. 7 MENU (ENTER) - When no menu is on -screen, these buttons change the source...
Owner's Manual - English
Page 11
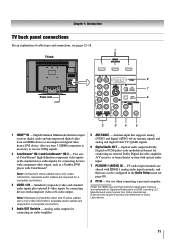
... receives digital audio and uncompressed digital video from an HDMI device or uncompressed digital video from Dolby Laboratories. Optical audio output in the Audio Setup menu ( page 48). 8 PC IN - PC audio input terminals are shared with optical audio input. 7 PC/HDMI-1 (AUDIO) IN - Two sets of ColorStream® high-definition component video inputs (with standard stereo audio inputs) for a complete connection. 3 VIDEO-1 IN - separate audio cables are required for connecting devices with component video output, such as a Toshiba DVD player with composite video or S-video output...
... receives digital audio and uncompressed digital video from an HDMI device or uncompressed digital video from Dolby Laboratories. Optical audio output in the Audio Setup menu ( page 48). 8 PC IN - PC audio input terminals are shared with optical audio input. 7 PC/HDMI-1 (AUDIO) IN - Two sets of ColorStream® high-definition component video inputs (with standard stereo audio inputs) for a complete connection. 3 VIDEO-1 IN - separate audio cables are required for connecting devices with component video output, such as a Toshiba DVD player with composite video or S-video output...

Owner's Manual - English
Page 12
...) video or S-video cable. Chapter 2: Connecting your TV Overview of cable types HDMI™ cable (with component video output. (ColorStream® is Toshiba's brand of component video.) These cables are typically color-coded red, green, and blue. Coaxial (F-type) cable Coaxial (F-type) cable is used for connecting your antenna, cable TV service, and/or cable converter box to the ANT/ CABLE input on connecting and using your specific devices, refer to your TV in sets of three and are for a complete connection. Standard A/V cables (red/white/yellow) Standard A/V cables (composite video...
...) video or S-video cable. Chapter 2: Connecting your TV Overview of cable types HDMI™ cable (with component video output. (ColorStream® is Toshiba's brand of component video.) These cables are typically color-coded red, green, and blue. Coaxial (F-type) cable Coaxial (F-type) cable is used for connecting your antenna, cable TV service, and/or cable converter box to the ANT/ CABLE input on connecting and using your specific devices, refer to your TV in sets of three and are for a complete connection. Standard A/V cables (red/white/yellow) Standard A/V cables (composite video...

Owner's Manual - English
Page 13
... antenna or Cable signal: Select the ANT/CABLE video input source on the TV. The unauthorized recording, use, distribution, or revision of television programs, videotapes, DVDs, and other materials is set to). To program the TV remote control to operate other countries, and may not be able to use the remote control to program or access certain features on the TV.* To view basic and premium Cable channels: Turn OFF the VCR. Select the ANT/CABLE video input source...
... antenna or Cable signal: Select the ANT/CABLE video input source on the TV. The unauthorized recording, use, distribution, or revision of television programs, videotapes, DVDs, and other materials is set to). To program the TV remote control to operate other countries, and may not be able to use the remote control to program or access certain features on the TV.* To view basic and premium Cable channels: Turn OFF the VCR. Select the ANT/CABLE video input source...

Owner's Manual - English
Page 17
... on your TV Connecting a digital audio system The TV's DIGITAL AUDIO OUT terminal outputs a Dolby®* Digital or 2-channel down-mixed PCM (pulse-code modulation) signal for use external speakers with standard optical out signals may To control the audio: 1 Turn on the TV and the stereo amplifier. 2 Set up a optimum volume level of the stereo amplifier. Audio Setup PC Audio HDMI 1 Audio MTS Language Optical Output Format Dolby Digital Dynamic Range Control Reset No Auto Stereo English Dolby Digital Compressed Done Note...
... on your TV Connecting a digital audio system The TV's DIGITAL AUDIO OUT terminal outputs a Dolby®* Digital or 2-channel down-mixed PCM (pulse-code modulation) signal for use external speakers with standard optical out signals may To control the audio: 1 Turn on the TV and the stereo amplifier. 2 Set up a optimum volume level of the stereo amplifier. Audio Setup PC Audio HDMI 1 Audio MTS Language Optical Output Format Dolby Digital Dynamic Range Control Reset No Auto Stereo English Dolby Digital Compressed Done Note...

Owner's Manual - English
Page 18
... models cannot be able to this TV. • An adapter is not needed for mini D-sub 15-pin connector Pin No. Separate analog cables are playing the DVD-Video, some scenes may be skipped or you may be displayed correctly. • To display the optimum picture, use a PC, set the monitor output resolution on the PC before connecting it to DVI adapter cable and analog audio cables. Signal name Pin No. TV back panel...
... models cannot be able to this TV. • An adapter is not needed for mini D-sub 15-pin connector Pin No. Separate analog cables are playing the DVD-Video, some scenes may be skipped or you may be displayed correctly. • To display the optimum picture, use a PC, set the monitor output resolution on the PC before connecting it to DVI adapter cable and analog audio cables. Signal name Pin No. TV back panel...

Owner's Manual - English
Page 26
... on the next page provide a quick overview of your TV's menu system. Icon Video Audio Preferences Locks Setup Item Mode Picture Settings Noise Reduction Game Mode Theater Settings Digital Audio Selector Audio Settings Advanced Audio Settings Audio Setup CC Selector Base CC Mode Digital CC Settings Input Labeling Channel Labeling Menu Language Channel Browser Setup REGZA-LINK Player Control Enable Rating Blocking Edit Rating Limits Channels Block Input Lock Control Panel Lock GameTimer New PIN Code Installation REGZA-LINK Setup Sleep Timer PC Settings Logo LED Option p Sports/Standard/Movie...
... on the next page provide a quick overview of your TV's menu system. Icon Video Audio Preferences Locks Setup Item Mode Picture Settings Noise Reduction Game Mode Theater Settings Digital Audio Selector Audio Settings Advanced Audio Settings Audio Setup CC Selector Base CC Mode Digital CC Settings Input Labeling Channel Labeling Menu Language Channel Browser Setup REGZA-LINK Player Control Enable Rating Blocking Edit Rating Limits Channels Block Input Lock Control Panel Lock GameTimer New PIN Code Installation REGZA-LINK Setup Sleep Timer PC Settings Logo LED Option p Sports/Standard/Movie...

Owner's Manual - English
Page 27
... a menu is receiving. Note: • The menu background may sometimes appear black, depending on the signal the TV is open, use the buttons on the remote control or TV control panel, open the menu system. Icon Terrestrial System Status Item Input Configuration Channel Program Channel Add/Delete Channel Tuning Mode Time Zone Signal Meter System Information Option p [Opens the Input Configuration menu] p [Start] p [Scans for new channels on ANT/CABLE] p [Opens the Channel Add/Delete menu] p Standard/Auto/Digital...
... a menu is receiving. Note: • The menu background may sometimes appear black, depending on the signal the TV is open, use the buttons on the remote control or TV control panel, open the menu system. Icon Terrestrial System Status Item Input Configuration Channel Program Channel Add/Delete Channel Tuning Mode Time Zone Signal Meter System Information Option p [Opens the Input Configuration menu] p [Start] p [Scans for new channels on ANT/CABLE] p [Opens the Channel Add/Delete menu] p Standard/Auto/Digital...

Owner's Manual - English
Page 31
... PC Audio is set the HDMI audio mode: 1 Press and open the Audio menu. 2 Highlight Audio Setup and press . 3 Press S or T to select HDMI 1 Audio and then press W or X to select the HDMI 1 audio mode (Auto, Digital, or Analog). (Auto is grayed out in the banner, Channel Add/Delete, Channels Block, and Channel Browser™. Audio Setup PC Audio HDMI 1 Audio MTS Language Optical Output Format Dolby Digital Dynamic Range Control Reset No Auto Stereo English Dolby Digital Compressed Done Mode Auto Digital Analog Description When viewing the HDMI 1 input, if digital audio...
... PC Audio is set the HDMI audio mode: 1 Press and open the Audio menu. 2 Highlight Audio Setup and press . 3 Press S or T to select HDMI 1 Audio and then press W or X to select the HDMI 1 audio mode (Auto, Digital, or Analog). (Auto is grayed out in the banner, Channel Add/Delete, Channels Block, and Channel Browser™. Audio Setup PC Audio HDMI 1 Audio MTS Language Optical Output Format Dolby Digital Dynamic Range Control Reset No Auto Stereo English Dolby Digital Compressed Done Mode Auto Digital Analog Description When viewing the HDMI 1 input, if digital audio...

Owner's Manual - English
Page 48
... open the Setup menu. 2 Highlight Sleep Timer and press . 3 Press the Number buttons to enter the length of time in the menu. (Also see item 7 on page 11 and "Setting the HDMI™ Audio mode" on -screen when there is set to "No," the HDMI 1 Audio setting changes to "Auto." REGZA-LINK® playback device (DVD player, etc.) control With your PC when connecting using the PC IN terminal and an analog RGB cable. ( page 18...
... open the Setup menu. 2 Highlight Sleep Timer and press . 3 Press the Number buttons to enter the length of time in the menu. (Also see item 7 on page 11 and "Setting the HDMI™ Audio mode" on -screen when there is set to "No," the HDMI 1 Audio setting changes to "Auto." REGZA-LINK® playback device (DVD player, etc.) control With your PC when connecting using the PC IN terminal and an analog RGB cable. ( page 18...

Owner's Manual - English
Page 49
... playing video or audio, the TV will be grayed out unless a REGZA-LINK compatible audio receiver is turned on, the TV turns on automatically. REGZA-LINK® input source selection If a REGZA-LINK device with HDMI switching capability (e.g. Device Auto Standby If the TV is not a playback or recording device. Accesses the top menu of a DVD. Audio Receiver) is connected to the HDMI input, you can adjust or mute the sound volume of Audio Receiver With your audio output...
... playing video or audio, the TV will be grayed out unless a REGZA-LINK compatible audio receiver is turned on, the TV turns on automatically. REGZA-LINK® input source selection If a REGZA-LINK device with HDMI switching capability (e.g. Device Auto Standby If the TV is not a playback or recording device. Accesses the top menu of a DVD. Audio Receiver) is connected to the HDMI input, you can adjust or mute the sound volume of Audio Receiver With your audio output...

Owner's Manual - English
Page 54
... watching an analog channel (off the TV, please unplug the power cords few seconds then replug to Stereo mode ( page 42). • If you are using a ColorStream or HDMI video connection instead. Set the MTS feature to a particular input on -screen • The closed caption feature to reduce the effect of the Text modes (T1, T2, T3, or T4). Picture problems General picture problems • Check the antenna/cable connections ( Chapter 2). •...
... watching an analog channel (off the TV, please unplug the power cords few seconds then replug to Stereo mode ( page 42). • If you are using a ColorStream or HDMI video connection instead. Set the MTS feature to a particular input on -screen • The closed caption feature to reduce the effect of the Text modes (T1, T2, T3, or T4). Picture problems General picture problems • Check the antenna/cable connections ( Chapter 2). •...

Owner's Manual - English
Page 58
... manner whatsoever. or Puerto Rico. (4) Labor service charges for set installation, setup, adjustment of customer controls, and installation or repair of antenna systems are not covered by an Authorized TACP Service Station. (3) The warranties from TACP are effective only if this LCD Television must be commenced to the rental firm, whichever comes first. Reception problems caused 58 by TACP; SOME STATES OF...
... manner whatsoever. or Puerto Rico. (4) Labor service charges for set installation, setup, adjustment of customer controls, and installation or repair of antenna systems are not covered by an Authorized TACP Service Station. (3) The warranties from TACP are effective only if this LCD Television must be commenced to the rental firm, whichever comes first. Reception problems caused 58 by TACP; SOME STATES OF...

Owner's Manual - English
Page 60
...SALE DISPLAY, ETC.). YOU MUST READ AND FOLLOW ALL SET-UP AND USAGE INSTRUCTIONS IN THE APPLICABLE USER GUIDES AND/OR MANUALS. THIS WARRANTY WILL NOT COVER ANY SERVICE THAT IS REQUIRED, IN PART OR IN WHOLE, AS A RESULT OF ANY FAILURE TO FOLLOW THE SET-UP AND USAGE INSTRUCTIONS. Critical Applications The Television you ...60 participate in respect of that you further agree to form part of any Dispute. IF THE TELEVISION FAILS TO WORK AS WARRANTED ABOVE, YOUR SOLE AND EXCLUSIVE REMEDY SHALL BE REPAIR OR REPLACEMENT OF THE DEFECTIVE PART. To the extent not precluded by law, you agree ...
...SALE DISPLAY, ETC.). YOU MUST READ AND FOLLOW ALL SET-UP AND USAGE INSTRUCTIONS IN THE APPLICABLE USER GUIDES AND/OR MANUALS. THIS WARRANTY WILL NOT COVER ANY SERVICE THAT IS REQUIRED, IN PART OR IN WHOLE, AS A RESULT OF ANY FAILURE TO FOLLOW THE SET-UP AND USAGE INSTRUCTIONS. Critical Applications The Television you ...60 participate in respect of that you further agree to form part of any Dispute. IF THE TELEVISION FAILS TO WORK AS WARRANTED ABOVE, YOUR SOLE AND EXCLUSIVE REMEDY SHALL BE REPAIR OR REPLACEMENT OF THE DEFECTIVE PART. To the extent not precluded by law, you agree ...

Brochure
Page 2
...notice. Cabinet Screen Size (measured diagonally) LCD PANEL: Resolution Dynamic Backlight Control Response Time VIDEO: Video Processor Video Scan Rate Cinema Mode 24fps1 TheaterWide® Modes Color Temperature Control Native ModeTM AUDIO: Speaker System Sound Enhancement Mute/Half Mute CONVENIENCE: Built-in TV Tuning Auto Aspect Control Sleep Timer HDMITM-CEC2 Gaming Mode Channel BrowserTM Channel Labeling Input Labeling Logo Light On/Off ENERGY STAR® 3.0 Compliant JACK PACK: HDMITM v1.3 Digital Inputs ColorStream® Component Video Inputs Front A/V / Rear A/V / Rear S-Video High Res...
...notice. Cabinet Screen Size (measured diagonally) LCD PANEL: Resolution Dynamic Backlight Control Response Time VIDEO: Video Processor Video Scan Rate Cinema Mode 24fps1 TheaterWide® Modes Color Temperature Control Native ModeTM AUDIO: Speaker System Sound Enhancement Mute/Half Mute CONVENIENCE: Built-in TV Tuning Auto Aspect Control Sleep Timer HDMITM-CEC2 Gaming Mode Channel BrowserTM Channel Labeling Input Labeling Logo Light On/Off ENERGY STAR® 3.0 Compliant JACK PACK: HDMITM v1.3 Digital Inputs ColorStream® Component Video Inputs Front A/V / Rear A/V / Rear S-Video High Res...


