

User Guide
Page 2
... Stand:" on page 6 NOTE TO CATV INSTALLERS This is intended to alert the user to Article 820-40 of the U.S. This document will help you for purchasing this television. Before operating your LED TV, carefully read this television, always use a mounting bracket that may be securely attached to wall mount this manual completely. NO USER-SERVICEABLE PARTS INSIDE. NEC, which provides guidelines for the size and weight of this Toshiba LED...
... Stand:" on page 6 NOTE TO CATV INSTALLERS This is intended to alert the user to Article 820-40 of the U.S. This document will help you for purchasing this television. Before operating your LED TV, carefully read this television, always use a mounting bracket that may be securely attached to wall mount this manual completely. NO USER-SERVICEABLE PARTS INSIDE. NEC, which provides guidelines for the size and weight of this Toshiba LED...
User Guide
Page 4
... type plug has two blades and a third grounding prong. The LCD panel inside a wall or similar enclosed area. 22) Never modify this apparatus near any heat sources such as it can be easily unplugged in contact with any small parts included on an unstable cart, stand, or table. Installation, Care, and Service Installation Follow these instructions. 3) Heed all warnings. 4) Follow all servicing to operate this...
... type plug has two blades and a third grounding prong. The LCD panel inside a wall or similar enclosed area. 22) Never modify this apparatus near any heat sources such as it can be easily unplugged in contact with any small parts included on an unstable cart, stand, or table. Installation, Care, and Service Installation Follow these instructions. 3) Heed all warnings. 4) Follow all servicing to operate this...
User Guide
Page 6
... your LED TV To Display your LED TV, always use the screws supplied or recommended by an independent laboratory (such as the weight of the panel. Never strike the screen with a sharp or heavy object. 44) • The LCD screen of this manual to a Toshiba Authorized Service Provider. 46) If you need to the TV. 4) Always use a wall bracket Listed by the wall mount manufacturer. 5) Follow the instructions provided with the pedestal. A hard...
... your LED TV To Display your LED TV, always use the screws supplied or recommended by an independent laboratory (such as the weight of the panel. Never strike the screen with a sharp or heavy object. 44) • The LCD screen of this manual to a Toshiba Authorized Service Provider. 46) If you need to the TV. 4) Always use a wall bracket Listed by the wall mount manufacturer. 5) Follow the instructions provided with the pedestal. A hard...

User Guide
Page 7
... stand. 3) Once you have removed the screws holding the pedestal stand in the diagram below.This will not occur in a residential installation. This device and its antenna(s) must accept any interference received, including interference that to which can support the weight of the TV to a wall stud, pillar, or other antenna or transmitter. Operation is subject to radio or television reception, which the receiver is : Toshiba...
... stand. 3) Once you have removed the screws holding the pedestal stand in the diagram below.This will not occur in a residential installation. This device and its antenna(s) must accept any interference received, including interference that to which can support the weight of the TV to a wall stud, pillar, or other antenna or transmitter. Operation is subject to radio or television reception, which the receiver is : Toshiba...
User Guide
Page 11
... menu layout 37 Navigating the menu system 39 Chapter 5: Setting up your TV 40 Initial Setup 40 Installation setup selection 41 Storing channels in memory (optional 42 Auto Tuning 42 Manual Tuning 44 Setting channel skip 44 Setting the AV input mode 45 Setting the time zone 45 Viewing the system status 46 Resetting Factory Defaults 46 Chapter 6: Setting up your TV 47 Selecting the video input source 47 Labeling the video input sources 49 Tuning channels using the Channel...
... menu layout 37 Navigating the menu system 39 Chapter 5: Setting up your TV 40 Initial Setup 40 Installation setup selection 41 Storing channels in memory (optional 42 Auto Tuning 42 Manual Tuning 44 Setting channel skip 44 Setting the AV input mode 45 Setting the time zone 45 Viewing the system status 46 Resetting Factory Defaults 46 Chapter 6: Setting up your TV 47 Selecting the video input source 47 Labeling the video input sources 49 Tuning channels using the Channel...
User Guide
Page 12
... Scrolling the TheaterWide® picture (TheaterWide 2 and 3 only 60 Using the Auto Aspect feature 60 Using the 4:3 Stretch 61 Using the FREEZE feature 61 Adjusting the picture 62 Selecting the picture mode 62 Adjusting the picture quality 63 Using closed captions 64 Base closed captions 64 Digital CC settings 65 Adjusting the audio 66 Muting the sound 66 Using the Digital Audio Selection 67 Selecting stereo/SAP broadcasts 67 Adjusting the audio quality 68 Audyssey® technologies...
... Scrolling the TheaterWide® picture (TheaterWide 2 and 3 only 60 Using the Auto Aspect feature 60 Using the 4:3 Stretch 61 Using the FREEZE feature 61 Adjusting the picture 62 Selecting the picture mode 62 Adjusting the picture quality 63 Using closed captions 64 Base closed captions 64 Digital CC settings 65 Adjusting the audio 66 Muting the sound 66 Using the Digital Audio Selection 67 Selecting stereo/SAP broadcasts 67 Adjusting the audio quality 68 Audyssey® technologies...

User Guide
Page 14
... Dynamic Contrast 93 Cinema Mode 93 Noise Reduction 94 Chapter 8: Troubleshooting 95 General troubleshooting 95 Picture problems 96 Sound problems 97 Remote control problems 98 Channel tuning problems 98 Closed caption problems 99 Rating blocking problems 99 No HDMITM CEC operation 99 HDMITM problems 100 Media Player problems 100 If the problem persists after trying the solutions....100 Appendix A: Specifications 101 Television system 101 Channel coverage 101 Power source 102 Power maximum current 102 Power consumption 102 Audio power 102 Speaker type 102
... Dynamic Contrast 93 Cinema Mode 93 Noise Reduction 94 Chapter 8: Troubleshooting 95 General troubleshooting 95 Picture problems 96 Sound problems 97 Remote control problems 98 Channel tuning problems 98 Closed caption problems 99 Rating blocking problems 99 No HDMITM CEC operation 99 HDMITM problems 100 Media Player problems 100 If the problem persists after trying the solutions....100 Appendix A: Specifications 101 Television system 101 Channel coverage 101 Power source 102 Power maximum current 102 Power consumption 102 Audio power 102 Speaker type 102

User Guide
Page 17
...-resolution component video input and shared composite video input, see "Connecting a Blu-ray™ / DVD player, satellite receiver with 1080p input support. 17 Introduction Features Features The following are just a few of the many exciting features of each video frame and automatically adjusts backlight intensity based on the content to create higher dynamic contrast, for a separate digital converter set-top box (in most cases) v 1920 x 1080 output resolution v Two HDMITM -Digital...
...-resolution component video input and shared composite video input, see "Connecting a Blu-ray™ / DVD player, satellite receiver with 1080p input support. 17 Introduction Features Features The following are just a few of the many exciting features of each video frame and automatically adjusts backlight intensity based on the content to create higher dynamic contrast, for a separate digital converter set-top box (in most cases) v 1920 x 1080 output resolution v Two HDMITM -Digital...

User Guide
Page 18
... TV control panel or remote control to turn the TV off or on, unplug the power cords for a few seconds and then plug them in the power cords for a quick overview of navigating the TV's menu system. 10 Program channels into the TV's channel memory, see "Auto Tuning" on page 42 11 For details on using its many exciting features. 1 Carefully read the important safety, installation, care, and service...
... TV control panel or remote control to turn the TV off or on, unplug the power cords for a few seconds and then plug them in the power cords for a quick overview of navigating the TV's menu system. 10 Program channels into the TV's channel memory, see "Auto Tuning" on page 42 11 For details on using its many exciting features. 1 Carefully read the important safety, installation, care, and service...
User Guide
Page 20
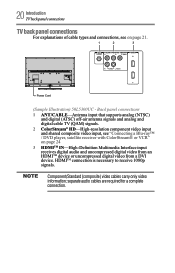
... of cable types and connections, see "Connecting a Blu-ray™ / DVD player, satellite receiver with ColorStream® or VCR" on page 21. 1 2 3 Power Cord (Sample Illustration) 50L5300UC - Back panel connections 1 ANT/CABLE-Antenna input that supports analog (NTSC) and digital (ATSC) off-air antenna signals and analog and digital cable TV (QAM) signals. 2 ColorStream® HD-High-resolution component video input and shared composite video input, see on page 24 3 HDMITM IN-High-Definition Multimedia Interface input receives digital audio and uncompressed digital video from...
... of cable types and connections, see "Connecting a Blu-ray™ / DVD player, satellite receiver with ColorStream® or VCR" on page 21. 1 2 3 Power Cord (Sample Illustration) 50L5300UC - Back panel connections 1 ANT/CABLE-Antenna input that supports analog (NTSC) and digital (ATSC) off-air antenna signals and analog and digital cable TV (QAM) signals. 2 ColorStream® HD-High-resolution component video input and shared composite video input, see on page 24 3 HDMITM IN-High-Definition Multimedia Interface input receives digital audio and uncompressed digital video from...
User Guide
Page 24
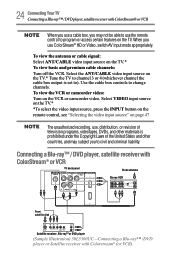
... of television programs, videotapes, DVDs, and other countries, and may not be able to use the remote control to change channels. Use the cable box controls to program or access certain features on the TV. To view the VCR or camcorder video: Turn on the TV.* To view basic and premium cable channels: Turn off the VCR. Select VIDEO input source on the TV.* *To select the video input source, press the INPUT button on the remote control, see "Selecting the video input source...
... of television programs, videotapes, DVDs, and other countries, and may not be able to use the remote control to change channels. Use the cable box controls to program or access certain features on the TV. To view the VCR or camcorder video: Turn on the TV.* To view basic and premium cable channels: Turn off the VCR. Select VIDEO input source on the TV.* *To select the video input source, press the INPUT button on the remote control, see "Selecting the video input source...
User Guide
Page 25
... terminal using the component video connections: Turn on the satellite receiver. To view antenna or Cable channels: Select the ANT/CABLE video input source on the TV.* To view the DVD player: Turn on the VCR. Select the COLORSTREAM HD Video input source on page 26 When you want to watch. Tune the VCR to the channel to determine the best output signal available. Tune the VCR to the channel you use ColorStream® HD or Video, switch AV input mode...
... terminal using the component video connections: Turn on the satellite receiver. To view antenna or Cable channels: Select the ANT/CABLE video input source on the TV.* To view the DVD player: Turn on the VCR. Select the COLORSTREAM HD Video input source on page 26 When you want to watch. Tune the VCR to the channel to determine the best output signal available. Tune the VCR to the channel you use ColorStream® HD or Video, switch AV input mode...
User Guide
Page 35
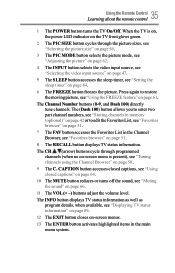
... (+ -) buttons adjust the volume level. The CH / (arrow) buttons cycle through programmed channels (when no on-screen menu is on, the power LED indicator on the TV front glows green. 2 The PIC SIZE button cycles through the picture sizes, see "Selecting the picture size" on page 56. 3 The PIC MODE button selects the picture mode, see "Adjusting the picture" on page 62. 4 The INPUT button selects the video input source, see "Selecting the video input source" on page 47. 5 The SLEEP button accesses the sleep timer...
... (+ -) buttons adjust the volume level. The CH / (arrow) buttons cycle through programmed channels (when no on-screen menu is on, the power LED indicator on the TV front glows green. 2 The PIC SIZE button cycles through the picture sizes, see "Selecting the picture size" on page 56. 3 The PIC MODE button selects the picture mode, see "Adjusting the picture" on page 62. 4 The INPUT button selects the video input source, see "Selecting the video input source" on page 47. 5 The SLEEP button accesses the sleep timer...
User Guide
Page 38
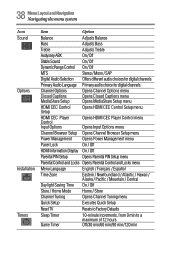
... Channel Browser Setup menu Power Management Opens Power Management menu Panel Lock On / Off HDMI Information Display On / Off Parental PIN Setup Opens Parental PIN Setup menu Parental Control and Locks Opens Parental Control and Locks menu Menu Language English / Français / Español Time Zone Eastern / Newfoundland / Atlantic / Hawaii / Alaska / Pacific / Mountain / Central Daylight Saving Time On / Off Store / Home Mode Home / Store Channel Tuning Opens Channel Tuning menu Quick Setup Executes Quick Setup Reset TV Resets to Factory Defaults Sleep Timer Game Timer...
... Channel Browser Setup menu Power Management Opens Power Management menu Panel Lock On / Off HDMI Information Display On / Off Parental PIN Setup Opens Parental PIN Setup menu Parental Control and Locks Opens Parental Control and Locks menu Menu Language English / Français / Español Time Zone Eastern / Newfoundland / Atlantic / Hawaii / Alaska / Pacific / Mountain / Central Daylight Saving Time On / Off Store / Home Mode Home / Store Channel Tuning Opens Channel Tuning menu Quick Setup Executes Quick Setup Reset TV Resets to Factory Defaults Sleep Timer Game Timer...
User Guide
Page 40
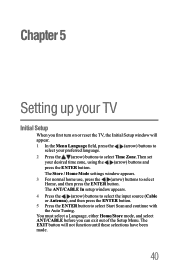
...) buttons to select the input source (Cable or Antenna), and then press the ENTER button. 5 Press the ENTER button to select Home, and then press the ENTER button. Chapter 5 Setting up your TV Initial Setup When you can exit out of the Setup Menu. The Store / Home Mode settings window appears. 3 For normal home use, press the / (arrow) buttons to select Start Scan and continue with the Auto...
...) buttons to select the input source (Cable or Antenna), and then press the ENTER button. 5 Press the ENTER button to select Home, and then press the ENTER button. Chapter 5 Setting up your TV Initial Setup When you can exit out of the Setup Menu. The Store / Home Mode settings window appears. 3 For normal home use, press the / (arrow) buttons to select Start Scan and continue with the Auto...
User Guide
Page 54
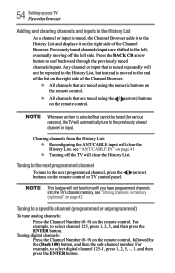
... to a specific channel (programmed or unprogrammed) To tune analog channels: Press the Channel Number (0-9) on the remote control, followed by the (Dash 100) button, and then the sub-channel number. Press the BACK CB arrow button to select digital channel 125-1, press 1, 2, 5, -, 1, and then press the ENTER button. 54 SettingupyourTV Favorites browser Adding and clearing channels and inputs in the History List As a channel or input is tuned, the Channel Browser adds...
... to a specific channel (programmed or unprogrammed) To tune analog channels: Press the Channel Number (0-9) on the remote control, followed by the (Dash 100) button, and then the sub-channel number. Press the BACK CB arrow button to select digital channel 125-1, press 1, 2, 5, -, 1, and then press the ENTER button. 54 SettingupyourTV Favorites browser Adding and clearing channels and inputs in the History List As a channel or input is tuned, the Channel Browser adds...
User Guide
Page 75
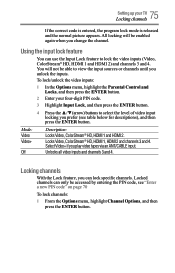
To lock/unlock the video inputs: 1 In the Options menu, highlight the Parental Control and Locks, and then press the ENTER button. 2 Enter your TV Locking channels If the correct code is entered, the program lock mode is released and the normal picture appears. Unlocks all video inputs and channels 3 and 4. Using the input lock feature You can use the Input Lock feature to select the level of video input locking you change the channel. Locks Video, ColorStream® HD, HDMI 1, HDMI 2 and channels 3 and 4. Select Video+ if...
To lock/unlock the video inputs: 1 In the Options menu, highlight the Parental Control and Locks, and then press the ENTER button. 2 Enter your TV Locking channels If the correct code is entered, the program lock mode is released and the normal picture appears. Unlocks all video inputs and channels 3 and 4. Using the input lock feature You can use the Input Lock feature to select the level of video input locking you change the channel. Locks Video, ColorStream® HD, HDMI 1, HDMI 2 and channels 3 and 4. Select Video+ if...
User Guide
Page 87
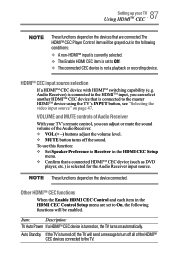
... the Enable HDMI CEC Control and each item in the HDMI CEC Setup menu. Item: Description: TV Auto Power If a HDMITM CEC device is turned off the sound. Auto Standby If the TV is turned on, the TV turns on the device connected. v VOL (+ -) buttons adjust the volume level. HDMITM CEC input source selection If a HDMITM CEC device with HDMITM switching capability (e.g. These functions depend on automatically. Audio Receiver) is connected to the...
... the Enable HDMI CEC Control and each item in the HDMI CEC Setup menu. Item: Description: TV Auto Power If a HDMITM CEC device is turned off the sound. Auto Standby If the TV is turned on, the TV turns on the device connected. v VOL (+ -) buttons adjust the volume level. HDMITM CEC input source selection If a HDMITM CEC device with HDMITM switching capability (e.g. These functions depend on automatically. Audio Receiver) is connected to the...

User Guide
Page 95
... TV. Chapter 8 Troubleshooting General troubleshooting Before calling a service technician, review this Troubleshooting section or the recommended solution has not worked, use the Reset Factory Defaults procedure, see "Using closed captions" on page 64. Other problems. If your TV's problem is set to troubleshoot any problem, first unplug the TV from the AC wall outlet and plug it back in this chapter or visit the Toshiba technical support Web site at support.toshiba.com for...
... TV. Chapter 8 Troubleshooting General troubleshooting Before calling a service technician, review this Troubleshooting section or the recommended solution has not worked, use the Reset Factory Defaults procedure, see "Using closed captions" on page 64. Other problems. If your TV's problem is set to troubleshoot any problem, first unplug the TV from the AC wall outlet and plug it back in this chapter or visit the Toshiba technical support Web site at support.toshiba.com for...

User Guide
Page 96
... page 47. Picture size changes by plugging another channel. Cannot select external video sources or channels 3 or 4. Picture problems General picture problems. Check the antenna/cable connections, see "Connecting Your TV" on page 75. Ensure the power cord is displaying a Demo pop-up screen, reset the setting to Home. 96 Troubleshooting Picture problems Onscreen Demo Pop-up If your TV is plugged in the remote control, see "Using the input lock feature" on page 21. Replace the batteries in properly, and then press the POWER button. The...
... page 47. Picture size changes by plugging another channel. Cannot select external video sources or channels 3 or 4. Picture problems General picture problems. Check the antenna/cable connections, see "Connecting Your TV" on page 75. Ensure the power cord is displaying a Demo pop-up screen, reset the setting to Home. 96 Troubleshooting Picture problems Onscreen Demo Pop-up If your TV is plugged in the remote control, see "Using the input lock feature" on page 21. Replace the batteries in properly, and then press the POWER button. The...


