
User Guide
Page 13
... time 30 Turning on the power 30 Setting up your device 31 Setting up your Wi-Fi® connection 32 Setting the date and time 33 Make it Google 33 Setting up Wi-Fi® and Bluetooth® connections 37 Registering your Toshiba device 39 Backing up your data 39 Backing up data using TOSHIBA File Manager 39 Backing up data using your Google™ Account 39 Restoring your data using your Google™ Account 40 Navigation and features 40 Home screen 42 Touch screen...
... time 30 Turning on the power 30 Setting up your device 31 Setting up your Wi-Fi® connection 32 Setting the date and time 33 Make it Google 33 Setting up Wi-Fi® and Bluetooth® connections 37 Registering your Toshiba device 39 Backing up your data 39 Backing up data using TOSHIBA File Manager 39 Backing up data using your Google™ Account 39 Restoring your data using your Google™ Account 40 Navigation and features 40 Home screen 42 Touch screen...
User Guide
Page 14
...the device 59 Chapter 2: Settings 60 Customizing your device's settings 60 Apps and Settings menus 60 Wireless and networks settings 66 Sound settings 67 Display settings 68 Location services settings 70 Security settings 71 Apps settings 73 Accounts & sync settings 74 Backup & reset settings 74 Storage settings 75 Language & input settings 76 Accessibility settings 77 Date & time settings 77 About tablet 78 Chapter 3: Working with Apps 80 Downloading Toshiba Apps 80 TOSHIBA Media Player 80 Apps 81 Downloading from Google Play Store 81 Preinstalled Apps on your tablet 82
...the device 59 Chapter 2: Settings 60 Customizing your device's settings 60 Apps and Settings menus 60 Wireless and networks settings 66 Sound settings 67 Display settings 68 Location services settings 70 Security settings 71 Apps settings 73 Accounts & sync settings 74 Backup & reset settings 74 Storage settings 75 Language & input settings 76 Accessibility settings 77 Date & time settings 77 About tablet 78 Chapter 3: Working with Apps 80 Downloading Toshiba Apps 80 TOSHIBA Media Player 80 Apps 81 Downloading from Google Play Store 81 Preinstalled Apps on your tablet 82
User Guide
Page 15
...Using external devices 89 Using a docking station 90 Connecting your tablet to a docking station ......90 Chapter 5: Utilities 92 TOSHIBA Service Station 92 Check for application updates 94 Downloading updates 94 Installing updates 95 Downloading and installing System updates.....95 TOSHIBA File Manager Utility 95 File browsing screen 97 Operation of files/folders 97 TOSHIBA Adaptive display 99 Chapter 6: If Something Goes Wrong 100 Problems when you turn on the device 100 The operating system is not working 101 Internet problems 101 Power and the batteries 102 Display problems...
...Using external devices 89 Using a docking station 90 Connecting your tablet to a docking station ......90 Chapter 5: Utilities 92 TOSHIBA Service Station 92 Check for application updates 94 Downloading updates 94 Installing updates 95 Downloading and installing System updates.....95 TOSHIBA File Manager Utility 95 File browsing screen 97 Operation of files/folders 97 TOSHIBA Adaptive display 99 Chapter 6: If Something Goes Wrong 100 Problems when you turn on the device 100 The operating system is not working 101 Internet problems 101 Power and the batteries 102 Display problems...

User Guide
Page 32
... , enter the key or password (if required), and then touch Connect. 32 Getting Started Using the device for the first time The first time you want to connect to change your language, the "Wi-Fi setup screen" appears and displays all the available Wi-Fi® networks. (Sample Image) Wi-Fi setup screen Touch the name of the network you power on the Welcome screen. Choose from the list of language options and then touch Start. Setting...
... , enter the key or password (if required), and then touch Connect. 32 Getting Started Using the device for the first time The first time you want to connect to change your language, the "Wi-Fi setup screen" appears and displays all the available Wi-Fi® networks. (Sample Image) Wi-Fi setup screen Touch the name of the network you power on the Welcome screen. Choose from the list of language options and then touch Start. Setting...
User Guide
Page 35
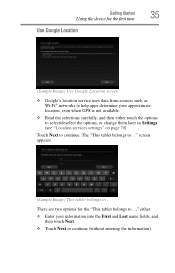
... options for the first time Use Google Location (Sample Image) Use Google Location screen ❖ Google's location service uses data from sources such as Wi-Fi® networks to help apps determine your information into the First and Last name fields, and then touch Next. ❖ Touch Next to continue (without entering the information). Getting Started 35 Using the device for the "This tablet belongs to...," either: ❖ Enter your approximate location, even when GPS...
... options for the first time Use Google Location (Sample Image) Use Google Location screen ❖ Google's location service uses data from sources such as Wi-Fi® networks to help apps determine your information into the First and Last name fields, and then touch Next. ❖ Touch Next to continue (without entering the information). Getting Started 35 Using the device for the "This tablet belongs to...," either: ❖ Enter your approximate location, even when GPS...

User Guide
Page 37
... have previously disabled it. (Sample Image) Lock screen 2 Touch and hold the Lock ( ) icon and drag it to enter the appropriate credentials. Getting Started 37 Using the device for and displays all available Wi-Fi® networks. 2 Touch the Wi-Fi® network you want to connect to try a different network. The device scans for the first time Waking the tablet If the screen times-out: 1 Press the Power button. The Wireless & networks ( ) icon...
... have previously disabled it. (Sample Image) Lock screen 2 Touch and hold the Lock ( ) icon and drag it to enter the appropriate credentials. Getting Started 37 Using the device for and displays all available Wi-Fi® networks. 2 Touch the Wi-Fi® network you want to connect to try a different network. The device scans for the first time Waking the tablet If the screen times-out: 1 Press the Power button. The Wireless & networks ( ) icon...
User Guide
Page 47
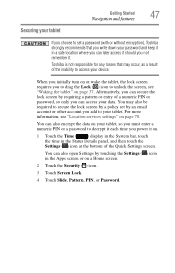
... each time you to drag the Lock ( ) icon to unlock the screen, see "Location services settings" on a Home screen. 2 Touch the Security ( ) icon. 3 Touch Screen Lock. 4 Touch Slide, Pattern, PIN, or Password. Toshiba is not responsible for any losses that may also be required to secure the lock screen by a policy set a password (with or without encryption), Toshiba strongly recommends that you write down your password and keep it in a safe location where you can later access it...
... each time you to drag the Lock ( ) icon to unlock the screen, see "Location services settings" on a Home screen. 2 Touch the Security ( ) icon. 3 Touch Screen Lock. 4 Touch Slide, Pattern, PIN, or Password. Toshiba is not responsible for any losses that may also be required to secure the lock screen by a policy set a password (with or without encryption), Toshiba strongly recommends that you write down your password and keep it in a safe location where you can later access it...
User Guide
Page 50
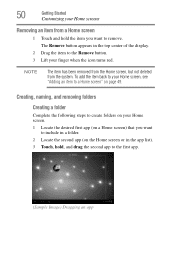
... Started Customizing your Home screens Removing an item from the system. To add the item back to remove. The Remove button appears in the app list). 3 Touch, hold the item you want to include in a folder. 2 Locate the second app (on the Home screen or in the top center of the display. 2 Drag the item to the Remove button. 3 Lift your Home screen, see "Adding an item to a Home screen" on a Home screen...
... Started Customizing your Home screens Removing an item from the system. To add the item back to remove. The Remove button appears in the app list). 3 Touch, hold the item you want to include in a folder. 2 Locate the second app (on the Home screen or in the top center of the display. 2 Drag the item to the Remove button. 3 Lift your Home screen, see "Adding an item to a Home screen" on a Home screen...
User Guide
Page 63
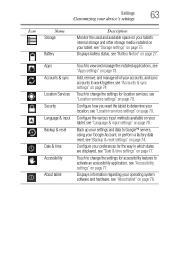
... accounts to view and manage the installed applications, see "Apps settings" on page 74. Back up your settings and data to activate an accessibility application, see "Accessibility settings" on page 75. Displays information regarding your operating system software and hardware, see "About tablet" on page 74. Touch to change the settings for location services, see "Battery Notice" on page 76. Settings 63 Customizing your device's settings Icon Name Storage Battery Description Monitor the used and available space on your tablet's internal storage...
... accounts to view and manage the installed applications, see "Apps settings" on page 74. Back up your settings and data to activate an accessibility application, see "Accessibility settings" on page 75. Displays information regarding your operating system software and hardware, see "About tablet" on page 74. Touch to change the settings for location services, see "Battery Notice" on page 76. Settings 63 Customizing your device's settings Icon Name Storage Battery Description Monitor the used and available space on your tablet's internal storage...

User Guide
Page 65
... also be locked/unlocked by using the screen rotation lock/unlock switch. Display brightness Touch to change . Settings 65 Customizing your device's settings The Quick Settings menu displays below the Status Details menu, replacing the list of current notifications. (Sample Image) Quick Settings menu screen 2 Touch the Settings ( ) icon to open the Settings menu, and then select the setting you wish to turn ON/OFF Airplane mode, see "Apps and Settings menus" on page 60. Icon Name Airplane mode Description Touch to change , see "Wireless and networks settings" on...
... also be locked/unlocked by using the screen rotation lock/unlock switch. Display brightness Touch to change . Settings 65 Customizing your device's settings The Quick Settings menu displays below the Status Details menu, replacing the list of current notifications. (Sample Image) Quick Settings menu screen 2 Touch the Settings ( ) icon to open the Settings menu, and then select the setting you wish to turn ON/OFF Airplane mode, see "Apps and Settings menus" on page 60. Icon Name Airplane mode Description Touch to change , see "Wireless and networks settings" on...
User Guide
Page 66
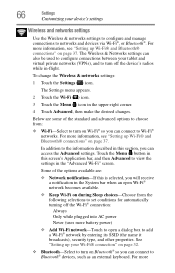
...-If this is selected, you can connect to Bluetooth® devices, such as an external keyboard. Touch the Menu ( ) button in this section, you will receive a notification in the System bar when an open a dialog box to add a Wi-Fi® network by entering its SSID (the name it broadcasts), security type, and other properties. To change the Wireless & networks settings: 1 Touch the Settings ( ) icon. Some of the standard and...
...-If this is selected, you can connect to Bluetooth® devices, such as an external keyboard. Touch the Menu ( ) button in this section, you will receive a notification in the System bar when an open a dialog box to add a Wi-Fi® network by entering its SSID (the name it broadcasts), security type, and other properties. To change the Wireless & networks settings: 1 Touch the Settings ( ) icon. Some of the standard and...
User Guide
Page 74
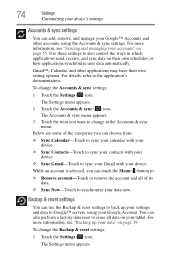
... a factory data reset to erase all of its data. ❖ Sync Now-Touch to Google™ servers, using the Accounts & sync settings. For details, refer to remove the account and all data on page 39. 74 Settings Customizing your device's settings Accounts & sync settings You can add, remove, and manage your data now. Below are some of the categories you can touch the Menu ( ) button to: ❖ Remove account-Touch to the application's documentation. The Settings menu appears...
... a factory data reset to erase all of its data. ❖ Sync Now-Touch to Google™ servers, using the Accounts & sync settings. For details, refer to remove the account and all data on page 39. 74 Settings Customizing your device's settings Accounts & sync settings You can add, remove, and manage your data now. Below are some of the categories you can touch the Menu ( ) button to: ❖ Remove account-Touch to the application's documentation. The Settings menu appears...
User Guide
Page 75
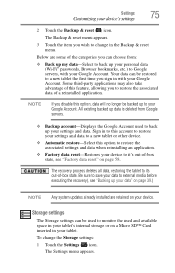
... your data to change the Storage settings: 1 Touch the Settings ( ) icon. The Settings menu appears. The Backup & reset menu appears. 3 Touch the item you wish to external media before executing the recovery), see "Factory data reset" on a Micro SD™ Card inserted in the Backup & reset menu. Below are retained on page 39.) NOTE Any system updates already installed are some of a reinstalled application. Storage settings The Storage settings can be used to monitor the used to your device. NOTE...
... your data to change the Storage settings: 1 Touch the Settings ( ) icon. The Settings menu appears. The Backup & reset menu appears. 3 Touch the item you wish to external media before executing the recovery), see "Factory data reset" on a Micro SD™ Card inserted in the Backup & reset menu. Below are retained on page 39.) NOTE Any system updates already installed are some of a reinstalled application. Storage settings The Storage settings can be used to monitor the used to your device. NOTE...
User Guide
Page 78
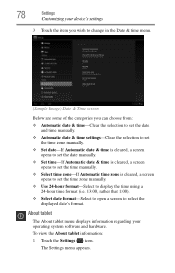
...About tablet menu displays information regarding your device's settings 3 Touch the item you wish to change in the Date & time menu. (Sample Image) Date & Time screen Below are some of the categories you can choose from: ❖ Automatic date & time-Clear the selection to set the date and time manually. ❖ Automatic date & time settings-Clear the selection to set the time zone manually. ❖ Set date-If Automatic date & time is cleared, a screen opens to set the date manually. ❖ Set time-If Automatic date & time is cleared, a screen opens to set the time manually. ❖...
...About tablet menu displays information regarding your device's settings 3 Touch the item you wish to change in the Date & time menu. (Sample Image) Date & Time screen Below are some of the categories you can choose from: ❖ Automatic date & time-Clear the selection to set the date and time manually. ❖ Automatic date & time settings-Clear the selection to set the time zone manually. ❖ Set date-If Automatic date & time is cleared, a screen opens to set the date manually. ❖ Set time-If Automatic date & time is cleared, a screen opens to set the time manually. ❖...
User Guide
Page 80
... that allows users to the Internet. TOSHIBA Media Player The TOSHIBA Media Player is a multimedia player that all audio/video files will play correctly. 80 NOTE To download apps, you must be connected to experience outstanding multimedia viewing enjoyment. Chapter 3 Working with Apps Downloading Toshiba Apps You can download Toshiba apps from the Toshiba App Place™ by touching the App PlaceTM icon. For detailed information regarding supported file formats, see the detailed specifications for your device at tabletsupport.toshiba.com. The TOSHIBA Media Player supports a number of...
... that allows users to the Internet. TOSHIBA Media Player The TOSHIBA Media Player is a multimedia player that all audio/video files will play correctly. 80 NOTE To download apps, you must be connected to experience outstanding multimedia viewing enjoyment. Chapter 3 Working with Apps Downloading Toshiba Apps You can download Toshiba apps from the Toshiba App Place™ by touching the App PlaceTM icon. For detailed information regarding supported file formats, see the detailed specifications for your device at tabletsupport.toshiba.com. The TOSHIBA Media Player supports a number of...
User Guide
Page 95
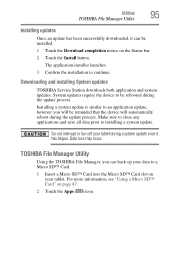
... 87. 2 Touch the Apps ( ) icon. Make sure to close any applications and save all data prior to continue. Do not interrupt or turn off your tablet during the update process. Data loss may occur. Downloading and installing System updates TOSHIBA Service Station downloads both application and system updates. For more information, see "Using a Micro SD™ Card" on the Status bar. 2 Touch the Install button. System updates require the device to a Micro...
... 87. 2 Touch the Apps ( ) icon. Make sure to close any applications and save all data prior to continue. Do not interrupt or turn off your tablet during the update process. Data loss may occur. Downloading and installing System updates TOSHIBA Service Station downloads both application and system updates. For more information, see "Using a Micro SD™ Card" on the Status bar. 2 Touch the Install button. System updates require the device to a Micro...
User Guide
Page 101
... from the normal routine ❖ Screens and apps take a long time to the way the operating system responds, you can surf the Internet. If Something Goes Wrong The operating system is not working 101 The operating system is not working correctly. If this still does not resolve the issue, use the About tablet setting to check for your access can be down for temporary repair.
... from the normal routine ❖ Screens and apps take a long time to the way the operating system responds, you can surf the Internet. If Something Goes Wrong The operating system is not working 101 The operating system is not working correctly. If this still does not resolve the issue, use the About tablet setting to check for your access can be down for temporary repair.
User Guide
Page 119
... wireless & networks 66 button power 31 buttons power button 24 screen rotation lock/unlock switch 24 volume control 24 C camera back camera 23 front camera 23 cameras using 87 caring for your device 59 charging the battery 27 cleaning the device 59 connecting power source 26 power/docking connector cord 26 USB/AC adaptor 25 USB/AC adaptor cord to power/ docking connector 26 Creating Folders 50 customize device settings 60 D data backing up 21, 39 restoring 40 date & time settings 77 date & time settings automatic date & time 78 Select date format 78 select time zone 78 set date...
... wireless & networks 66 button power 31 buttons power button 24 screen rotation lock/unlock switch 24 volume control 24 C camera back camera 23 front camera 23 cameras using 87 caring for your device 59 charging the battery 27 cleaning the device 59 connecting power source 26 power/docking connector cord 26 USB/AC adaptor 25 USB/AC adaptor cord to power/ docking connector 26 Creating Folders 50 customize device settings 60 D data backing up 21, 39 restoring 40 date & time settings 77 date & time settings automatic date & time 78 Select date format 78 select time zone 78 set date...
User Guide
Page 121
... P ports docking connector 25 external devices 89 headphone 24 Micro USB 24 Micro USB port 89 microphone Line-In 24 SD™ Card 24 power connecting cable to USB/AC adaptor 26 cord/cable connectors 107 power/docking connector cord 26 turning on 30 power button 24, 31 power light LEDs 26 power light 25 precautions safety 20 preinstalled apps 82 privacy settings automatic restore 75 back up my data 75 backup account 75 factory data reset 75 settings 74 Q Quick Settings menu settings 64 R recording sounds 87 recovery factory data reset 58...
... P ports docking connector 25 external devices 89 headphone 24 Micro USB 24 Micro USB port 89 microphone Line-In 24 SD™ Card 24 power connecting cable to USB/AC adaptor 26 cord/cable connectors 107 power/docking connector cord 26 turning on 30 power button 24, 31 power light LEDs 26 power light 25 precautions safety 20 preinstalled apps 82 privacy settings automatic restore 75 back up my data 75 backup account 75 factory data reset 75 settings 74 Q Quick Settings menu settings 64 R recording sounds 87 recovery factory data reset 58...
User Guide
Page 122
... set time date & time settings 78 setting up USB/AC adaptor 25 Settings using Quick Settings 64 settings about tablet 78 accounts & sync 74 applications 73 customize device settings 60 date & time 77 device administrators 72 icon 60 language & input 76 location & security 70 menu 60 open 60 privacy settings 74 Quick Settings menu 64 screen 68 sound 67 storage 75 wireless & networks 66 settings menu settings 60 setup Bluetooth® 37 date and time 33 language 31 Make it Google™, sign in 33 Wi-Fi® 37 Wi-Fi® connection...
... set time date & time settings 78 setting up USB/AC adaptor 25 Settings using Quick Settings 64 settings about tablet 78 accounts & sync 74 applications 73 customize device settings 60 date & time 77 device administrators 72 icon 60 language & input 76 location & security 70 menu 60 open 60 privacy settings 74 Quick Settings menu 64 screen 68 sound 67 storage 75 wireless & networks 66 settings menu settings 60 setup Bluetooth® 37 date and time 33 language 31 Make it Google™, sign in 33 Wi-Fi® 37 Wi-Fi® connection...


