
Quick Start Guide
Page 1
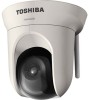
... Adobe Reader is needed to the Toshiba website (http://www.toshiba.com). If you do not have this application, download it from the Adobe Systems Incorporated website. IK-WB16A IK-WB16A-W Refer to the user's manual (PDF file) contained in the CD-ROM for settings, operations and other information. NETWORK CAMERA Model: IK-WB16A / IK-WB16A-W Quick Start Guide and Important Safeguards...
... Adobe Reader is needed to the Toshiba website (http://www.toshiba.com). If you do not have this application, download it from the Adobe Systems Incorporated website. IK-WB16A IK-WB16A-W Refer to the user's manual (PDF file) contained in the CD-ROM for settings, operations and other information. NETWORK CAMERA Model: IK-WB16A / IK-WB16A-W Quick Start Guide and Important Safeguards...

Quick Start Guide
Page 3
...appearing in a convenient place for purchasing the IK-WB16A/IK-WB16A-W Network Camera. Windows 7®: Microsoft® Windows 7® Professional operating system l The formal name of Windows® is a trademark of Adobe Systems Incorporated. Before you start using the camera, read this quick start guide may vary ...Trademarks l The term "OS" is used in the United States and other countries. NOTE l The performance of the network camera may be trademarks or registered trademarks of Microsoft® Corporation in this manual to indicate operating systems compatible with this quick...
...appearing in a convenient place for purchasing the IK-WB16A/IK-WB16A-W Network Camera. Windows 7®: Microsoft® Windows 7® Professional operating system l The formal name of Windows® is a trademark of Adobe Systems Incorporated. Before you start using the camera, read this quick start guide may vary ...Trademarks l The term "OS" is used in the United States and other countries. NOTE l The performance of the network camera may be trademarks or registered trademarks of Microsoft® Corporation in this manual to indicate operating systems compatible with this quick...

Quick Start Guide
Page 4
Table of Contents Introduction Introduction 2 Terms and Trademarks 3 Table of Contents 4 IMPORTANT SAFEGUARDS 5 NOTES ON USE AND INSTALLATION 10 Setting the Network Camera Environment 12 Items needed for network camera monitoring 12 Quick Start Guide Contents 13 Physical Description 14 Hardware Installation 15 Network Deployment 18 General Connection (without PoE 18 Power over Ethernet (PoE) (IK-WB16A only 19 Assigning IP Address 20 Retrieving Images 21 Configure the Wireless Connection (IK-WB16A-W only 22 4
Table of Contents Introduction Introduction 2 Terms and Trademarks 3 Table of Contents 4 IMPORTANT SAFEGUARDS 5 NOTES ON USE AND INSTALLATION 10 Setting the Network Camera Environment 12 Items needed for network camera monitoring 12 Quick Start Guide Contents 13 Physical Description 14 Hardware Installation 15 Network Deployment 18 General Connection (without PoE 18 Power over Ethernet (PoE) (IK-WB16A only 19 Assigning IP Address 20 Retrieving Images 21 Configure the Wireless Connection (IK-WB16A-W only 22 4
Quick Start Guide
Page 12
... computer for viewing monitored images is the tool to discover the IP address of a camera. Setting the Network Camera Environment Items needed for network camera monitoring l Administrator's personal computer The personal computer that allows setting, operating, monitoring and other functions with the network camera is called the "user's personal computer" in this application from the CD-ROM...
... computer for viewing monitored images is the tool to discover the IP address of a camera. Setting the Network Camera Environment Items needed for network camera monitoring l Administrator's personal computer The personal computer that allows setting, operating, monitoring and other functions with the network camera is called the "user's personal computer" in this application from the CD-ROM...

Quick Start Guide
Page 13
... Antenna (IK-WB16A-W only) l Screws / LAN cable and RJ45 Female/Female Coupler l Ceiling Mount Brackets / Alignment sticker IK-WB16A / IK-WB16A-W Alignment Sticker Drill hole Drill hole Drill hole (Drill hole) A B l Quick Start Guide and Important Safeguards NETWORK CAMERA Model: IK-WB16A / IK-WB16A-W Quick ...application Adobe Reader is needed to the Toshiba website (http://www.toshiba.com/tai/products/ prod_biz.jsp). l CD-ROM IK-WB16A Content: User's Manual Quick Installation Guide Installation Wizard 13 l Warranty Card IK-WB16A IK-WB16A-W Refer to the user's manual (PDF...
... Antenna (IK-WB16A-W only) l Screws / LAN cable and RJ45 Female/Female Coupler l Ceiling Mount Brackets / Alignment sticker IK-WB16A / IK-WB16A-W Alignment Sticker Drill hole Drill hole Drill hole (Drill hole) A B l Quick Start Guide and Important Safeguards NETWORK CAMERA Model: IK-WB16A / IK-WB16A-W Quick ...application Adobe Reader is needed to the Toshiba website (http://www.toshiba.com/tai/products/ prod_biz.jsp). l CD-ROM IK-WB16A Content: User's Manual Quick Installation Guide Installation Wizard 13 l Warranty Card IK-WB16A IK-WB16A-W Refer to the user's manual (PDF...

Quick Start Guide
Page 15
... secure it with a small screw. 6. Attach the supplied alignment sticker to the appropriate position.(IK-WB16A-W only). Slide the Network Camera into the ceiling; Attach the back cover and fasten with three screws. Adjust the antenna to the ceiling. Attach ceiling mount bracket A...2 3 B 4 5 7 6 15 Secure ceiling mount bracket A and B with two small screws. 2. Hardware Installation l Ceiling mount with supplied bracket 1. Drill a hole in the ceiling to the camera. 4. And drill three pilot holes into ceiling mount bracket B. 5. then hammer the plastic anchors into the holes. 3.
... secure it with a small screw. 6. Attach the supplied alignment sticker to the appropriate position.(IK-WB16A-W only). Slide the Network Camera into the ceiling; Attach the back cover and fasten with three screws. Adjust the antenna to the ceiling. Attach ceiling mount bracket A...2 3 B 4 5 7 6 15 Secure ceiling mount bracket A and B with two small screws. 2. Hardware Installation l Ceiling mount with supplied bracket 1. Drill a hole in the ceiling to the camera. 4. And drill three pilot holes into ceiling mount bracket B. 5. then hammer the plastic anchors into the holes. 3.

Quick Start Guide
Page 17
Lead the cables through the hole, and connect the cable to the appropriate position. (IK-WB16A-W only) 2 3 1 6 5 17 Adjust the antenna to the camera. hammer the plastic anchors into the wall; Drill four pilot holes into the holes. 3. Attach the back cover and fasten with four screws. 4. Fasten JK-WM16 to feed the cables. 2. l Wall Mount with two screws. 6. Secure Network Camera with JK-WM16 (JK-WM16 is not included.) 1. Drill a hole in the wall to the wall with two screws. 5.
Lead the cables through the hole, and connect the cable to the appropriate position. (IK-WB16A-W only) 2 3 1 6 5 17 Adjust the antenna to the camera. hammer the plastic anchors into the wall; Drill four pilot holes into the holes. 3. Attach the back cover and fasten with four screws. 4. Fasten JK-WM16 to feed the cables. 2. l Wall Mount with two screws. 6. Secure Network Camera with JK-WM16 (JK-WM16 is not included.) 1. Drill a hole in the wall to the wall with two screws. 5.
Quick Start Guide
Page 18
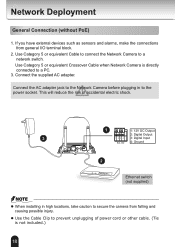
...5 LINK RECEIVE PARTITION Ethernet switch (not supplied) NOTE l When installing in to a network switch. Connect the supplied AC adapter. Network Deployment General Connection (without PoE) 1. Use Category 5 or equivalent Cable to connect the Network Camera to the power socket. If you have external devices such as sensors and alarms, make... the connections from falling and causing possible injury. Use Category 5 or equivalent Crossover Cable when Network Camera is not included.) 18 This will reduce the risk of power cord or other cable. (Tie is directly connected to secure...
...5 LINK RECEIVE PARTITION Ethernet switch (not supplied) NOTE l When installing in to a network switch. Connect the supplied AC adapter. Network Deployment General Connection (without PoE) 1. Use Category 5 or equivalent Cable to connect the Network Camera to the power socket. If you have external devices such as sensors and alarms, make... the connections from falling and causing possible injury. Use Category 5 or equivalent Crossover Cable when Network Camera is not included.) 18 This will reduce the risk of power cord or other cable. (Tie is directly connected to secure...

Quick Start Guide
Page 19
... supplied) l When using a PoE switch The Network Camera is not used. 4321 WPS/RESET microSD PoE power injector (not supplied) POWER COLLISION 1 2 3 4 5 LINK RECEIVE PARTITION Non-PoE switch (not supplied) 19 Power over Ethernet (PoE) (IK-WB16A only) l When using a non-PoE switch Use... a PoE power injector to connect between the Network Camera and a non-PoE switch. See the following illustration to connect the...
... supplied) l When using a PoE switch The Network Camera is not used. 4321 WPS/RESET microSD PoE power injector (not supplied) POWER COLLISION 1 2 3 4 5 LINK RECEIVE PARTITION Non-PoE switch (not supplied) 19 Power over Ethernet (PoE) (IK-WB16A only) l When using a non-PoE switch Use... a PoE power injector to connect between the Network Camera and a non-PoE switch. See the following illustration to connect the...

Quick Start Guide
Page 20
... 3. S/N: B1010XXXX MAC:0002D1714270 00-02-D1-71-42-70 169.254.0.99 IK-WB16A 0002D1714270 NOTE l If "Installation Wizard" does not perform normally or the camera can search the location of the Network Camera even though DHCP is analyzed, please click on the network. l Installation Wizard can not be found during the search even though the...
... 3. S/N: B1010XXXX MAC:0002D1714270 00-02-D1-71-42-70 169.254.0.99 IK-WB16A 0002D1714270 NOTE l If "Installation Wizard" does not perform normally or the camera can search the location of the Network Camera even though DHCP is analyzed, please click on the network. l Installation Wizard can not be found during the search even though the...

Quick Start Guide
Page 21
Retrieve live video through Internet Explorer®. 2010/09/01 10:33:11 For more information on camera configuration, please refer to the Network Camera from the network. 2. Retrieving Images 1. Access to user's manual on the CD-ROM. 21
Retrieve live video through Internet Explorer®. 2010/09/01 10:33:11 For more information on camera configuration, please refer to the Network Camera from the network. 2. Retrieving Images 1. Access to user's manual on the CD-ROM. 21

Quick Start Guide
Page 22
... power cable to IK-WB16A-W's Configuration > Wireless. 3. The Network Camera now operates in your AP. 4. SSID, abbreviated from the Network Camera. 7. The Network Camera will reboot. 0100c5 6. Click Save. ADSL/Cable/Switch 4321 WPS/RESET microSD AP POWER COLLISION 1 2 3 4 5 LINK RECEIVE PARTITION NOTE 1. Wireless networking has many security issues. It's very important that you want the IK-WB16A-W to the wireless...
... power cable to IK-WB16A-W's Configuration > Wireless. 3. The Network Camera now operates in your AP. 4. SSID, abbreviated from the Network Camera. 7. The Network Camera will reboot. 0100c5 6. Click Save. ADSL/Cable/Switch 4321 WPS/RESET microSD AP POWER COLLISION 1 2 3 4 5 LINK RECEIVE PARTITION NOTE 1. Wireless networking has many security issues. It's very important that you want the IK-WB16A-W to the wireless...
