
Service Manual
Page 1
When repairing these green product(s), use the part(s) described in this manual and lead-free solder (*2). For (*1) and (*2), see the next page. FILE NO. 400-200603GR SERVICE MANUAL Series DIGITAL AUDIO PLAYER MES60V, MES30V (US/CA) The above models are classified as green products (*1). This Service Manual describes replacement parts for the green products. DOCUMENT CREATED IN JAJPuAnN.,, 2JU00N6E, 2006
When repairing these green product(s), use the part(s) described in this manual and lead-free solder (*2). For (*1) and (*2), see the next page. FILE NO. 400-200603GR SERVICE MANUAL Series DIGITAL AUDIO PLAYER MES60V, MES30V (US/CA) The above models are classified as green products (*1). This Service Manual describes replacement parts for the green products. DOCUMENT CREATED IN JAJPuAnN.,, 2JU00N6E, 2006

Service Manual
Page 2
... WEEE & RoHS Directives that define standards for recycling and reuse of Waste Electrical and Electronic Equipment and for instructions. 1-866-583-7353. Contact Toshiba Customer Solutions for the Restriction of the use products, parts and materials that have low environmental impacts. Lead-free solder must be used in manufacture must also be used in the servicing and repair of heat required...
... WEEE & RoHS Directives that define standards for recycling and reuse of Waste Electrical and Electronic Equipment and for instructions. 1-866-583-7353. Contact Toshiba Customer Solutions for the Restriction of the use products, parts and materials that have low environmental impacts. Lead-free solder must be used in manufacture must also be used in the servicing and repair of heat required...
Service Manual
Page 3
... insulation transformer and/or wear protective gloves when power is as they were. Children in circuit diagrams or parts lists, use replacement parts with a gap from the on the user side. • After repair work by neglecting the following instructions or due to avoid electric shock. • Use specified spare parts of the product. Be sure to buildings, household goods, properties, livestock...
... insulation transformer and/or wear protective gloves when power is as they were. Children in circuit diagrams or parts lists, use replacement parts with a gap from the on the user side. • After repair work by neglecting the following instructions or due to avoid electric shock. • Use specified spare parts of the product. Be sure to buildings, household goods, properties, livestock...
Service Manual
Page 5
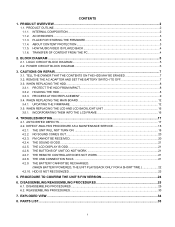
... TIME 22 4.2.10. PARTS LIST...35 1 CONTENTS 1. HOW MUSIC/VIDEO IS PLAYED BACK 4 1.1.6. POWER CIRCUIT BLOCK DIAGRAM...6 3. TROUBLESHOOTING...17 4.1. NO SOUND COMES OUT...20 4.2.3. THE LCD DISPLAY IS ODD...21 4.2.6. HOLDING THE HDD...8 3.3.3. THE SOUND IS ODD...21 4.2.5. DISASSEMBLING/REASSEMBLING PROCEDURES 25 6.1. REMOVE THE AC ADAPTOR AND SET THE BATTERY SWITCH TO OFF 7 3.3. THE USB CONNECTION FAILS...21 4.2.9. PLACE FOR STORING THE FIRMWARE 3 1.1.4. DEFECT ANALYSIS PROCEDURE AS A MAINTENANCE SERVICE 18...
... TIME 22 4.2.10. PARTS LIST...35 1 CONTENTS 1. HOW MUSIC/VIDEO IS PLAYED BACK 4 1.1.6. POWER CIRCUIT BLOCK DIAGRAM...6 3. TROUBLESHOOTING...17 4.1. NO SOUND COMES OUT...20 4.2.3. THE LCD DISPLAY IS ODD...21 4.2.6. HOLDING THE HDD...8 3.3.3. THE SOUND IS ODD...21 4.2.5. DISASSEMBLING/REASSEMBLING PROCEDURES 25 6.1. REMOVE THE AC ADAPTOR AND SET THE BATTERY SWITCH TO OFF 7 3.3. THE USB CONNECTION FAILS...21 4.2.9. PLACE FOR STORING THE FIRMWARE 3 1.1.4. DEFECT ANALYSIS PROCEDURE AS A MAINTENANCE SERVICE 18...
Service Manual
Page 6
... the HDD of firmware is stored in the flash ROM on the front, 6 pieces at sides) • Cabinet parts The HDD is partitioned into two partitions. Contents such as follows. • By adopting the push-type button, the operability is enhanced. • PMC (Portable Media Center) is adopted. 1.1. Product Overview [TOSHIBA HDD audio player gigabeat S series] is the portable audio player in HDD is...
... the HDD of firmware is stored in the flash ROM on the front, 6 pieces at sides) • Cabinet parts The HDD is partitioned into two partitions. Contents such as follows. • By adopting the push-type button, the operability is enhanced. • PMC (Portable Media Center) is adopted. 1.1. Product Overview [TOSHIBA HDD audio player gigabeat S series] is the portable audio player in HDD is...
Service Manual
Page 7
... is stored in the flash ROM on the main board and on the Explorer. 1.1.4. Using the Windows standard application Windows Media Player 10, transfer (copy) the music data (WMA/MP3/WAV format)/video data (WMV) stored in a PC to be played back. 3 When the content, which varies with destinations.) • USB cable • USB conversion cable • Wired remote controller (Option) • Headphones • Software CD-ROM Owner's Manual 1.1.3. Accessories The product...
... is stored in the flash ROM on the main board and on the Explorer. 1.1.4. Using the Windows standard application Windows Media Player 10, transfer (copy) the music data (WMA/MP3/WAV format)/video data (WMV) stored in a PC to be played back. 3 When the content, which varies with destinations.) • USB cable • USB conversion cable • Wired remote controller (Option) • Headphones • Software CD-ROM Owner's Manual 1.1.3. Accessories The product...

Service Manual
Page 8
However, as a MTP device (MultiMedia Transfer Protocol device). If the data in the SDRAM. In case of video data, the CPU sends the bit map data to the LCD.) The DAC converts the PCM music data to the analog signal, which controls the volume level and equalizer levels, using the Windows Media Player on the PC, the content data is sent from the PC When the unit is played back...
However, as a MTP device (MultiMedia Transfer Protocol device). If the data in the SDRAM. In case of video data, the CPU sends the bit map data to the LCD.) The DAC converts the PCM music data to the analog signal, which controls the volume level and equalizer levels, using the Windows Media Player on the PC, the content data is sent from the PC When the unit is played back...
Service Manual
Page 13
... replaced to the un-formatted HDD, restore the HDD in the factory setting state by transferring the firmware and the supplied data to the HDD in which files to "OFF". 2) Connect the AC adaptor and start up Ottoman.exe and select the scenario file. OTTOMAN_T&D_FW_JP OTTOMAN_T&D_FW_JP.ini OTTOMAN_T&D_FW_US OTTOMAN_T&D_FW_US.ini Start up the unit. 3) Format automatically the HDD and display the menu...
... replaced to the un-formatted HDD, restore the HDD in the factory setting state by transferring the firmware and the supplied data to the HDD in which files to "OFF". 2) Connect the AC adaptor and start up Ottoman.exe and select the scenario file. OTTOMAN_T&D_FW_JP OTTOMAN_T&D_FW_JP.ini OTTOMAN_T&D_FW_US OTTOMAN_T&D_FW_US.ini Start up the unit. 3) Format automatically the HDD and display the menu...

Service Manual
Page 14
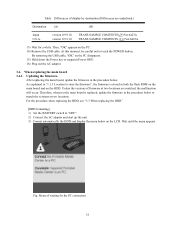
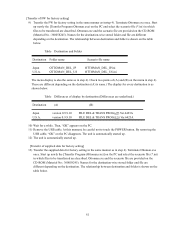
... PC. 6) Remove the USB cable. Table Difference on the CD-ROM (Material No.: 360058245). And start up . [Transfer of (A) and (B) on the PC and select the scenario file (*.ini) in step 4). The relationship between destination and folder is automatically started up newly the [Transfer Program (Ottomam.exe)] on the above menu. Menu display on the PC (T&D Transfer) Check two points of FW for factory setting] 8) Transfer the...
... PC. 6) Remove the USB cable. Table Difference on the CD-ROM (Material No.: 360058245). And start up . [Transfer of (A) and (B) on the PC and select the scenario file (*.ini) in step 4). The relationship between destination and folder is automatically started up newly the [Transfer Program (Ottomam.exe)] on the above menu. Menu display on the PC (T&D Transfer) Check two points of FW for factory setting] 8) Transfer the...

Service Manual
Page 15
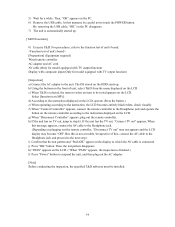
... supplied data for factory setting] 12) Transfer the supplied data for factory setting in the same manner as in which files to touch the POWER button. Then, start up . [Transfer of display by destination (Differences are provided on the menu in step 4). Names for every destination is shown below . OTTOMAN_SAMPLE_JP OTTOMAN_SAMPLE_US OTTOMAN_SAMPLE_JP.ini OTTOMAN_SAMPLE_US.ini The menu display is the same as in step 4). By removing the USB cable, "OK...
... supplied data for factory setting] 12) Transfer the supplied data for factory setting in the same manner as in which files to touch the POWER button. Then, start up . [Transfer of display by destination (Differences are provided on the menu in step 4). Names for every destination is shown below . OTTOMAN_SAMPLE_JP OTTOMAN_SAMPLE_US OTTOMAN_SAMPLE_JP.ini OTTOMAN_SAMPLE_US.ini The menu display is the same as in step 4). By removing the USB cable, "OK...
Service Manual
Page 16
... removing the USB cable, "OK" on the PC. 14) Remove the USB cable. Then, "OK" appears on the PC disappears. 15) Hold down the Power key to suspend (Power OFF). 16) Plug out the AC adaptor. 3.4. Updating the firmware. After replacing the main board, update the firmware in the procedure below to "OFF". 2) Connect the AC adaptor and start up the unit. 3) Format automatically the HDD and display...
... removing the USB cable, "OK" on the PC. 14) Remove the USB cable. Then, "OK" appears on the PC disappears. 15) Hold down the Power key to suspend (Power OFF). 16) Plug out the AC adaptor. 3.4. Updating the firmware. After replacing the main board, update the firmware in the procedure below to "OFF". 2) Connect the AC adaptor and start up the unit. 3) Format automatically the HDD and display...
Service Manual
Page 18
At this moment, be careful not to the function test of unit's board. 5) Wait for a while. By removing the USB cable, "OK" on the PC. 6) Remove the USB cable. For procedures, refer to touch the POWER button. Then, "OK" appears on the PC disappears. 7) The unit is automatically started up. [T&D Execution] 8) Execute T&D.
At this moment, be careful not to the function test of unit's board. 5) Wait for a while. By removing the USB cable, "OK" on the PC. 6) Remove the USB cable. For procedures, refer to touch the POWER button. Then, "OK" appears on the PC disappears. 7) The unit is automatically started up. [T&D Execution] 8) Execute T&D.
Service Manual
Page 19
... USB cable. Names for the destination-wise stored folder and file are described. These are different depending on the destination ((A) is same.) The display for every destination is automatically started up newly the [Transfer Program (Ottoman.exe) on the menu in step 4). Check two points of (A) and (B) on the PC and select the scenario file (*.ini) in which files to touch the POWER button...
... USB cable. Names for the destination-wise stored folder and file are described. These are different depending on the destination ((A) is same.) The display for every destination is automatically started up newly the [Transfer Program (Ottoman.exe) on the menu in step 4). Check two points of (A) and (B) on the PC and select the scenario file (*.ini) in which files to touch the POWER button...
Service Manual
Page 21
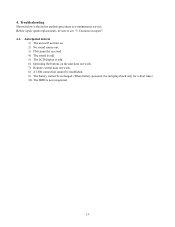
4. Cautions on the unit does not work. 7) Remote control does not work. 8) A USB connection cannot be established. 9) The battery cannot be recharged. (When battery-powered, the unit plays back only for a short time.) 10) The HDD is the defect analysis procedure as a maintenance service. Troubleshooting Shown below is not recognized. 17 Before repair (parts replacement), be received. 4) The sound is odd. 5) The LCD display is odd. 6) Operating the buttons on repair". 4.1. Anticipated defects 1) The unit will not turn on. 2) No sound comes out. 3) FM cannot be sure to see "3.
4. Cautions on the unit does not work. 7) Remote control does not work. 8) A USB connection cannot be established. 9) The battery cannot be recharged. (When battery-powered, the unit plays back only for a short time.) 10) The HDD is the defect analysis procedure as a maintenance service. Troubleshooting Shown below is not recognized. 17 Before repair (parts replacement), be received. 4) The sound is odd. 5) The LCD display is odd. 6) Operating the buttons on repair". 4.1. Anticipated defects 1) The unit will not turn on. 2) No sound comes out. 3) FM cannot be sure to see "3.
Service Manual
Page 22
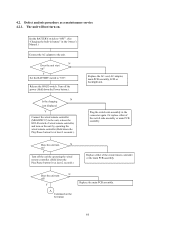
... remote controller. (Hold down the Play/Pause button for at least 2 seconds.) Replace either of wired remote controller, and turn N off the power (Hold down the Play/Pause button for at least 2 seconds.). Replace the AC cord, AC adaptor, main PCB assembly, LCD or backlight unit. Y Set the BATTERY switch to the unit. Defect analysis procedure as a maintenance service 4.2.1. N Does the unit start up? N Is the charging icon displayed Y Connect the...
... remote controller. (Hold down the Play/Pause button for at least 2 seconds.) Replace either of wired remote controller, and turn N off the power (Hold down the Play/Pause button for at least 2 seconds.). Replace the AC cord, AC adaptor, main PCB assembly, LCD or backlight unit. Y Set the BATTERY switch to the unit. Defect analysis procedure as a maintenance service 4.2.1. N Does the unit start up? N Is the charging icon displayed Y Connect the...
Service Manual
Page 24
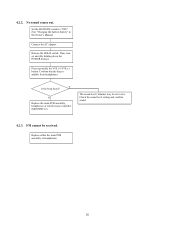
... setting and confirm sound. 4.2.3. No sound comes out. Release the HOLD switch. Connect the AC adaptor. Press repeatedly the VOL(+)/VOL(-) button. Confirm that the beep is audible from headphones. FM cannot be set to "OFF". (See "Charging the built-in battery" in the Owner's Manual. 4.2.2. Then, turn on unit (By holding down the POWER button.). Replace either the main PCB assembly or headphones. 20 Set the BATTERY switch to low. N Replace...
... setting and confirm sound. 4.2.3. No sound comes out. Release the HOLD switch. Connect the AC adaptor. Press repeatedly the VOL(+)/VOL(-) button. Confirm that the beep is audible from headphones. FM cannot be set to "OFF". (See "Charging the built-in battery" in the Owner's Manual. 4.2.2. Then, turn on unit (By holding down the POWER button.). Replace either the main PCB assembly or headphones. 20 Set the BATTERY switch to low. N Replace...
Service Manual
Page 26
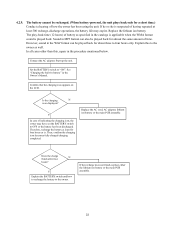
.... Replace the AC cord, AC adaptor, lithium ion battery or the main PCB assembly. However, sound in MP3 format can be recharged. (When battery-powered, the unit plays back only for a short time.) Conduct a hearing of indicating the charging icon, the owner may expire. Start up the unit. The battery cannot be played back for four hours as well. Is the charging N icon displayed? Does the charge...
.... Replace the AC cord, AC adaptor, lithium ion battery or the main PCB assembly. However, sound in MP3 format can be recharged. (When battery-powered, the unit plays back only for a short time.) Conduct a hearing of indicating the charging icon, the owner may expire. Start up the unit. The battery cannot be played back for four hours as well. Is the charging N icon displayed? Does the charge...

Service Manual
Page 27
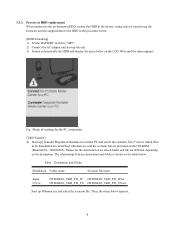
HDD is completed. The repair is not recognized. In case of 5 display Replace either of F/W)". Y Replace the HDD. Turn on the unit. Or re-plug in. Does the unit display an error N message? Fig. 5 display menu Fig. 1 display menu 23 In case of 1 display Without replacing the HDD, implement "3.3.3 Process at HDD replacement (Transfer of the HDD flexible cable or the main PCB assembly. Check the error message. Then, check the message displayed. 4.2.10.
HDD is completed. The repair is not recognized. In case of 5 display Replace either of F/W)". Y Replace the HDD. Turn on the unit. Or re-plug in. Does the unit display an error N message? Fig. 5 display menu Fig. 1 display menu 23 In case of 1 display Without replacing the HDD, implement "3.3.3 Process at HDD replacement (Transfer of the HDD flexible cable or the main PCB assembly. Check the error message. Then, check the message displayed. 4.2.10.
Service Manual
Page 40
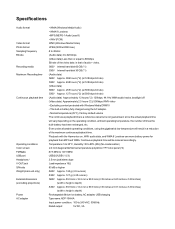
... adapter, USB charging Type name: ADP-15HH A Input power condition: 100 to 240 VAC, 50/60Hz Rated output: 5V DC, 3A Even under allowable operating conditions, using the AC adapter. • Normal temperature (25°C), Factory-default volume The continuous playback time is a reference value but is that of the maximum continuous playback time. Specifications Audio format Video format Photo format Sampling frequency Bit rate Recording media Maximum Recording time Continuous playback time Operating conditions Color screen FM Radio USB...
... adapter, USB charging Type name: ADP-15HH A Input power condition: 100 to 240 VAC, 50/60Hz Rated output: 5V DC, 3A Even under allowable operating conditions, using the AC adapter. • Normal temperature (25°C), Factory-default volume The continuous playback time is a reference value but is that of the maximum continuous playback time. Specifications Audio format Video format Photo format Sampling frequency Bit rate Recording media Maximum Recording time Continuous playback time Operating conditions Color screen FM Radio USB...

Service Manual
Page 42
... PC. 2 Click the "Install Windows Media Player 10" button. To transfer music, video and photo data to work with the gigabeat will transfer information using the gigabeat. If the PC can only transfer at USB 1.1 speeds, then the device will be installed on the PC. 3 Follow the on the PC. Macintosh® computers and OS are not supported. *2: In order for the device to transfer information using USB 2.0, the USB 2.0 protocol must be...
... PC. 2 Click the "Install Windows Media Player 10" button. To transfer music, video and photo data to work with the gigabeat will transfer information using the gigabeat. If the PC can only transfer at USB 1.1 speeds, then the device will be installed on the PC. 3 Follow the on the PC. Macintosh® computers and OS are not supported. *2: In order for the device to transfer information using USB 2.0, the USB 2.0 protocol must be...


