
Users Manual AU/NZ
Page 2
... permission of copyright or author's rights and is a violation of TOSHIBA. TOSHIBA Satellite P500 / Satellite P505 / Satellite P507, Qosmio X505, Qosmio X500, Qosmio G60, Satellite P500D / Satellite P505D / Satellite P507D Series Portable Personal Computer User's Manual First edition August 2009 ... owner. However, succeeding computers and manuals are accurate for the TOSHIBA Satellite P500 / Satellite P505 / Satellite P507, Qosmio X505, Qosmio X500, Qosmio G60, Satellite P500D / Satellite P505D / Satellite P507D Series Portable Personal Computer at coffee shops or hotels for accuracy...
... permission of copyright or author's rights and is a violation of TOSHIBA. TOSHIBA Satellite P500 / Satellite P505 / Satellite P507, Qosmio X505, Qosmio X500, Qosmio G60, Satellite P500D / Satellite P505D / Satellite P507D Series Portable Personal Computer User's Manual First edition August 2009 ... owner. However, succeeding computers and manuals are accurate for the TOSHIBA Satellite P500 / Satellite P505 / Satellite P507, Qosmio X505, Qosmio X500, Qosmio G60, Satellite P500D / Satellite P505D / Satellite P507D Series Portable Personal Computer at coffee shops or hotels for accuracy...
Users Manual AU/NZ
Page 31
...the Introduction and The Grand Tour chapters to set up your TOSHIBA Satellite P500 / Satellite P505 / Satellite P507, Qosmio X505, Qosmio X500, Qosmio G60, Satellite P500D / Satellite P505D / Satellite P507D Series Series computer. If you how to familiarize yourself ...-performance computing. Manual contents This manual is an overview of the TOSHIBA Satellite P500 / Satellite P505 / Satellite P507, Qosmio X505, Qosmio X500, Qosmio G60, Satellite P500D / Satellite P505D / Satellite P507D Series Series computer. This powerful notebook computer provides excellent expansion capability...
...the Introduction and The Grand Tour chapters to set up your TOSHIBA Satellite P500 / Satellite P505 / Satellite P507, Qosmio X505, Qosmio X500, Qosmio G60, Satellite P500D / Satellite P505D / Satellite P507D Series Series computer. If you how to familiarize yourself ...-performance computing. Manual contents This manual is an overview of the TOSHIBA Satellite P500 / Satellite P505 / Satellite P507, Qosmio X505, Qosmio X500, Qosmio G60, Satellite P500D / Satellite P505D / Satellite P507D Series Series computer. This powerful notebook computer provides excellent expansion capability...

Users Manual AU/NZ
Page 34
Refer to use this manual may not function properly if you have all the following items: ■ TOSHIBA Satellite P500 / Satellite P505 / Satellite P507, Qosmio X505, Qosmio X500, Qosmio G60, Satellite P500D / Satellite P505D / Satellite P507D Series Series Portable Personal Computer ■ Universal AC adaptor and power cord It is necessary to install the battery to Installing the battery... accessories. Equipment checklist Carefully unpack your computer. Save the box and packing materials for future use an operating system that was not pre-installed by TOSHIBA. User's Manual 1-1
Refer to use this manual may not function properly if you have all the following items: ■ TOSHIBA Satellite P500 / Satellite P505 / Satellite P507, Qosmio X505, Qosmio X500, Qosmio G60, Satellite P500D / Satellite P505D / Satellite P507D Series Series Portable Personal Computer ■ Universal AC adaptor and power cord It is necessary to install the battery to Installing the battery... accessories. Equipment checklist Carefully unpack your computer. Save the box and packing materials for future use an operating system that was not pre-installed by TOSHIBA. User's Manual 1-1

Users Manual AU/NZ
Page 35
... Utility ■ Online Manual Other software may be preinstalled dependant on the model purchased. User's Manual 1-2 Documentation ■ TOSHIBA Satellite P500 / Satellite P505 / Satellite P507, Qosmio X505, Qosmio X500, Qosmio G60, Satellite P500D / Satellite P505D / Satellite P507D Series Series Personal Computer User Information Guide ■ International Limited Warranty (ILW) Instruction (This instruction is preinstalled: ■ Windows® 7 ■...
... Utility ■ Online Manual Other software may be preinstalled dependant on the model purchased. User's Manual 1-2 Documentation ■ TOSHIBA Satellite P500 / Satellite P505 / Satellite P507, Qosmio X505, Qosmio X500, Qosmio G60, Satellite P500D / Satellite P505D / Satellite P507D Series Series Personal Computer User Information Guide ■ International Limited Warranty (ILW) Instruction (This instruction is preinstalled: ■ Windows® 7 ■...

Users Manual AU/NZ
Page 62
... the display open * Provided with the display open . Fingerprint Sensor* 8. Position the display at a comfortable viewing angle. 12 3 4 9 18 19 16 17 TOSHIBA 5 6 10 11 12 13 14 15 Satellite 7 8 1. Built-in microphone* 4. Power Button* 12. Next Button* 19. eco Button* 13. Mute Button* 17. Volume Up Button* The front of the...
... the display open * Provided with the display open . Fingerprint Sensor* 8. Position the display at a comfortable viewing angle. 12 3 4 9 18 19 16 17 TOSHIBA 5 6 10 11 12 13 14 15 Satellite 7 8 1. Built-in microphone* 4. Power Button* 12. Next Button* 19. eco Button* 13. Mute Button* 17. Volume Up Button* The front of the...

Users Manual AU/NZ
Page 74
... which use an infrared remote controller are used near to your computer. ■ When a low battery condition is present. Infrared Receiver Window 2. The Grand Tour TOSHIBA 30˚ Satellite 30˚ 1 15˚ 5M 2 1.
... which use an infrared remote controller are used near to your computer. ■ When a low battery condition is present. Infrared Receiver Window 2. The Grand Tour TOSHIBA 30˚ Satellite 30˚ 1 15˚ 5M 2 1.

Users Manual AU/NZ
Page 77
... remote controller gently to release it forward to the stopper then push it . 2. Set the front side upward and insert the slim size remote controller. 1 Satellite 1. The Grand Tour Slim size remote controller 1. Stopper 2. Close the battery cover. Press gently until it out from the slot. Placing the slim size remote...
... remote controller gently to release it forward to the stopper then push it . 2. Set the front side upward and insert the slim size remote controller. 1 Satellite 1. The Grand Tour Slim size remote controller 1. Stopper 2. Close the battery cover. Press gently until it out from the slot. Placing the slim size remote...
Users Manual AU/NZ
Page 82
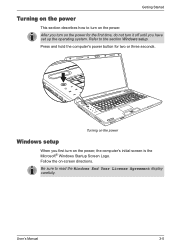
... button for the first time, do not turn on the power, the computer's initial screen is the Microsoft® Windows Startup Screen Logo. User's Manual 3-5 TOSHIBA TOSHIBA Satellite Satellite Turning on the power Windows setup When you have set up the operating system. Be sure to the section Windows setup.
... button for the first time, do not turn on the power, the computer's initial screen is the Microsoft® Windows Startup Screen Logo. User's Manual 3-5 TOSHIBA TOSHIBA Satellite Satellite Turning on the power Windows setup When you have set up the operating system. Be sure to the section Windows setup.

Users Manual AU/NZ
Page 90
TouchPad 2. Using the TouchPad To use the TouchPad, simply touch and move your computer. It also provides tips on caring for your finger tip across it in the direction you want the on basic operations including using the TouchPad, optical media drives, sound system, modem, the wireless LAN and LAN. Chapter 4 Operating Basics Operating Basics This chapter gives information on -screen pointer to go. 1 TOSHIBA Satellite 2 1. TouchPad control buttons TouchPad and TouchPad control buttons User's Manual 4-1
TouchPad 2. Using the TouchPad To use the TouchPad, simply touch and move your computer. It also provides tips on caring for your finger tip across it in the direction you want the on basic operations including using the TouchPad, optical media drives, sound system, modem, the wireless LAN and LAN. Chapter 4 Operating Basics Operating Basics This chapter gives information on -screen pointer to go. 1 TOSHIBA Satellite 2 1. TouchPad control buttons TouchPad and TouchPad control buttons User's Manual 4-1
Users Manual AU/NZ
Page 101
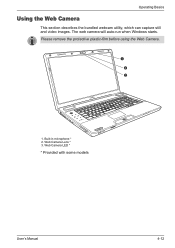
Web Camera Lens * 3. The web camera will auto-run when Windows starts. Operating Basics Using the Web Camera This section describes the bundled webcam utility, which can capture still and video images. Please remove the protective plastic-film before using the Web Camera. 1 2 3 TOSHIBA Satellite 1. Web Camera LED * * Provided with some models User's Manual 4-12 Built-in microphone * 2.
Web Camera Lens * 3. The web camera will auto-run when Windows starts. Operating Basics Using the Web Camera This section describes the bundled webcam utility, which can capture still and video images. Please remove the protective plastic-film before using the Web Camera. 1 2 3 TOSHIBA Satellite 1. Web Camera LED * * Provided with some models User's Manual 4-12 Built-in microphone * 2.
Users Manual AU/NZ
Page 107
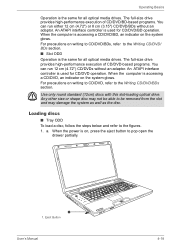
.../DVD, refer to pop open the drawer partially. An ATAPI interface controller is used for CD/DVD/BD operation. For precautions on the system glows. TOSHIBA Satellite 1 1.
.../DVD, refer to pop open the drawer partially. An ATAPI interface controller is used for CD/DVD/BD operation. For precautions on the system glows. TOSHIBA Satellite 1 1.
Users Manual AU/NZ
Page 108
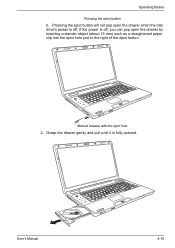
Grasp the drawer gently and pull until it is off . Operating Basics Pressing the eject button b. User's Manual TOSHIBA Satellite 4-19 TOSHIBA Satellite Manual release with the eject hole 2. If the power is fully opened. Pressing the eject button will not pop open the drawer when the disc drive's power is off , you can pop open the drawer by inserting a slender object (about 15 mm) such as a straightened paper clip into the eject hole just to the right of the eject button.
Grasp the drawer gently and pull until it is off . Operating Basics Pressing the eject button b. User's Manual TOSHIBA Satellite 4-19 TOSHIBA Satellite Manual release with the eject hole 2. If the power is fully opened. Pressing the eject button will not pop open the drawer when the disc drive's power is off , you can pop open the drawer by inserting a slender object (about 15 mm) such as a straightened paper clip into the eject hole just to the right of the eject button.

Users Manual AU/NZ
Page 109
.... User's Manual 4-20 Press gently until you will extend slightly over the disc tray. Pulling the drawer open fully when you place it . Operating Basics TOSHIBA Satellite Inserting a disc When the drawer is seated, make sure it lies flat, as shown in the figure above. ■ Do not touch the laser lens...
.... User's Manual 4-20 Press gently until you will extend slightly over the disc tray. Pulling the drawer open fully when you place it . Operating Basics TOSHIBA Satellite Inserting a disc When the drawer is seated, make sure it lies flat, as shown in the figure above. ■ Do not touch the laser lens...

Users Manual AU/NZ
Page 110
User's Manual TOSHIBA Satellite Inserting a disc 4-21 When the computer's power is on, insert CD/DVD into the ODD directly. Operating Basics TOSHIBA Satellite Closing the disc drawer ■ Slot ODD To load CD/DVD's, follow the steps as listed below and refer to following figures. 1.
User's Manual TOSHIBA Satellite Inserting a disc 4-21 When the computer's power is on, insert CD/DVD into the ODD directly. Operating Basics TOSHIBA Satellite Closing the disc drawer ■ Slot ODD To load CD/DVD's, follow the steps as listed below and refer to following figures. 1.

Users Manual AU/NZ
Page 111
... can hold it. The disc extends slightly over the sides of the drawer so you open the drawer partially press the eject button. User's Manual TOSHIBA Satellite Removing a disc 4-22 Wait for it . 1. If the disc is spinning when you open the drawer, wait for the optical media drive indicator to stop...
... can hold it. The disc extends slightly over the sides of the drawer so you open the drawer partially press the eject button. User's Manual TOSHIBA Satellite Removing a disc 4-22 Wait for it . 1. If the disc is spinning when you open the drawer, wait for the optical media drive indicator to stop...

Users Manual AU/NZ
Page 134
... jack and pull out the connector. 2. Cleaning the computer To help ensure long, trouble-free operation, keep the computer free of cleaner on the display. TOSHIBA Satellite Connecting the LAN cable 3. You can use care with water) cloth. Spray a small amount of dust and use glass cleaner on a soft, clean cloth and...
... jack and pull out the connector. 2. Cleaning the computer To help ensure long, trouble-free operation, keep the computer free of cleaner on the display. TOSHIBA Satellite Connecting the LAN cable 3. You can use care with water) cloth. Spray a small amount of dust and use glass cleaner on a soft, clean cloth and...

Users Manual AU/NZ
Page 161
... the computer's power is equipped with an ExpressCard expansion slot that can accommodate two standard module formats: anExpressCard/34 module and an ExpressCard/54 module. TOSHIBA 1 Satellite 1. To install an ExpressCard, follow the steps below. 1. An ExpressCard module is a small, modular add-in Windows to make sure it is appropriate for your...
... the computer's power is equipped with an ExpressCard expansion slot that can accommodate two standard module formats: anExpressCard/34 module and an ExpressCard/54 module. TOSHIBA 1 Satellite 1. To install an ExpressCard, follow the steps below. 1. An ExpressCard module is a small, modular add-in Windows to make sure it is appropriate for your...
Users Manual AU/NZ
Page 162
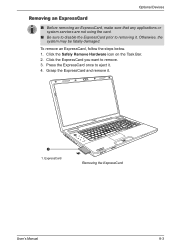
... disable the ExpressCard prior to eject it. 4. Press the ExpressCard once to removing it . Otherwise, the system may be fatally damaged. TOSHIBA 1 1. Click the ExpressCard you want to remove. 3. ExpressCard Satellite Removing the ExpressCard User's Manual 8-3 Click the Safely Remove Hardware icon on the Task Bar. 2. To remove an ExpressCard, follow the...
... disable the ExpressCard prior to eject it. 4. Press the ExpressCard once to removing it . Otherwise, the system may be fatally damaged. TOSHIBA 1 1. Click the ExpressCard you want to remove. 3. ExpressCard Satellite Removing the ExpressCard User's Manual 8-3 Click the Safely Remove Hardware icon on the Task Bar. 2. To remove an ExpressCard, follow the...

Users Manual AU/NZ
Page 171
... VGA video modes. When you can be connected to the external monitor port. 3. Connect the monitor cable to the HDMI out port on the computer. Satellite Connecting a HDMI cable 2. Optional Devices External monitor An external analog monitor can be used with an external monitor. Plug one end of the HDMI device...
... VGA video modes. When you can be connected to the external monitor port. 3. Connect the monitor cable to the HDMI out port on the computer. Satellite Connecting a HDMI cable 2. Optional Devices External monitor An external analog monitor can be used with an external monitor. Plug one end of the HDMI device...

Detailed Specs for Satellite P500 PSPGSA-1XE003 AU/NZ; English
Page 1
.../warranty/statements Termsand conditionsapply, please refer to change without prior notice. Satellite P500/1XE PSPGSA-1XE003 Price $2,499.00 RRP AUD (inc. GST) Overview Satellite P500. When you on, protect your data, save power and charge your large-screen TVfor full 1080p HD video and sound. Toshiba recommends Windows 10. Perfect for illustration purposesonly. Pump up the...
.../warranty/statements Termsand conditionsapply, please refer to change without prior notice. Satellite P500/1XE PSPGSA-1XE003 Price $2,499.00 RRP AUD (inc. GST) Overview Satellite P500. When you on, protect your data, save power and charge your large-screen TVfor full 1080p HD video and sound. Toshiba recommends Windows 10. Perfect for illustration purposesonly. Pump up the...


