
User Guide
Page 1
DIGITAL STILL CAMERA PDR-M25 Tested To Comply With FCC Standards FOR HOME OR OFFICE USE FCC Statement This device complies with Part 15 of the equipment) are designed to the equipment. • If these suggestions don't help . - 1 - If this device must accept any ...help , consult your equipment dealer or experienced radio/TV technician for a Class B digital device, pursuant to radio communications. NOTE This equipment has been tested and found to comply with the instructions, may cause undesired operation. This equipment generates, uses and can be determined by turning...
DIGITAL STILL CAMERA PDR-M25 Tested To Comply With FCC Standards FOR HOME OR OFFICE USE FCC Statement This device complies with Part 15 of the equipment) are designed to the equipment. • If these suggestions don't help . - 1 - If this device must accept any ...help , consult your equipment dealer or experienced radio/TV technician for a Class B digital device, pursuant to radio communications. NOTE This equipment has been tested and found to comply with the instructions, may cause undesired operation. This equipment generates, uses and can be determined by turning...

User Guide
Page 4
... Power ON 32 Turning the Power OFF 32 ■ LCD Monitor Display 33 In Photography Mode 33 In Playback Mode 35 ■ How to Hold Your Camera 36 ■ How to Press the Shutter Button 37 ■ About the Viewfinder Lamp 39 ■ Photography (Auto Photography 40 Using the Viewfinder 40 Using the LCD Monitor 41 ■ Setting the Image Size and Quality 43 ■ Zoom...
... Power ON 32 Turning the Power OFF 32 ■ LCD Monitor Display 33 In Photography Mode 33 In Playback Mode 35 ■ How to Hold Your Camera 36 ■ How to Press the Shutter Button 37 ■ About the Viewfinder Lamp 39 ■ Photography (Auto Photography 40 Using the Viewfinder 40 Using the LCD Monitor 41 ■ Setting the Image Size and Quality 43 ■ Zoom...

User Guide
Page 5
... Settings (SET-UP mode 80 LANGUAGE 81 SOUND 81 TIME 82 AUTO-OFF 82 TV 83 IMAGE No 83 DEFAULT 84 ■ Adjusting the LCD Monitor Brightness 85 ■ Taking and Playing Back Photographs on a TV 86 ■ Transferring Images to a PC 88 ■ Installing the USB driver 89 ■ Separately Sold Accessories 91 ■ Connecting to Other Devices 92 Additional Information ■ Specifications...
... Settings (SET-UP mode 80 LANGUAGE 81 SOUND 81 TIME 82 AUTO-OFF 82 TV 83 IMAGE No 83 DEFAULT 84 ■ Adjusting the LCD Monitor Brightness 85 ■ Taking and Playing Back Photographs on a TV 86 ■ Transferring Images to a PC 88 ■ Installing the USB driver 89 ■ Separately Sold Accessories 91 ■ Connecting to Other Devices 92 Additional Information ■ Specifications...

User Guide
Page 7
... the inability to use this unit. • Toshiba Corporation accepts no liability whatsoever for any damages arising from not having followed the descriptions in this Instruction Manual. • Toshiba Corporation accepts no liability whatsoever for any damages arising from malfunctions arising from the camera, immediately turn OFF the power and remove the batteries and AC adapter. Should you ever...
... the inability to use this unit. • Toshiba Corporation accepts no liability whatsoever for any damages arising from not having followed the descriptions in this Instruction Manual. • Toshiba Corporation accepts no liability whatsoever for any damages arising from malfunctions arising from the camera, immediately turn OFF the power and remove the batteries and AC adapter. Should you ever...

User Guide
Page 16
...) Protecting Images (P.75) Changing PDR-M25 camera Settings (P.80) Taking and Playing Back Photographs on a TV (P.86) Transferring Images to your photographed images You can also do this. Let's get ready to use the PDR-M25 (P.17 - 35) Let's learn about basic operation. Setting the Image Size and Quality (P.43) Manually setting the PDR-M25 (P.54) Changing the Preset Conditions (P.57) Playing back your particular requirements, location and...
...) Protecting Images (P.75) Changing PDR-M25 camera Settings (P.80) Taking and Playing Back Photographs on a TV (P.86) Transferring Images to your photographed images You can also do this. Let's get ready to use the PDR-M25 (P.17 - 35) Let's learn about basic operation. Setting the Image Size and Quality (P.43) Manually setting the PDR-M25 (P.54) Changing the Preset Conditions (P.57) Playing back your particular requirements, location and...

User Guide
Page 25
If this happens, set them again when using the camera. (➲ Page 82) Playing Back/ Erasing Images Other Applications Additional Information - 25 - Getting Ready Basic Photography Installing the Batteries (continued) Battery Wear When the power is ON, the remaining battery power is connected. [HALF] Half battery power or less [LITTLE] Little battery power left [EMPTY] No battery power left. LCD Monitor Status Display...
If this happens, set them again when using the camera. (➲ Page 82) Playing Back/ Erasing Images Other Applications Additional Information - 25 - Getting Ready Basic Photography Installing the Batteries (continued) Battery Wear When the power is ON, the remaining battery power is connected. [HALF] Half battery power or less [LITTLE] Little battery power left [EMPTY] No battery power left. LCD Monitor Status Display...

User Guide
Page 27
... exposed to excessive shocks. Even if the camera's power is turned OFF, the images saved on SmartMedia™ • Recorded data may be repeatedly read and written. Getting Ready Basic Photography Playing Back/ Erasing Images About SmartMedia™ "SmartMedia™" is a storage medium for saving images that Toshiba Corporation accepts no responsibility whatsoever for use of other SmartMedia™ could damage...
... exposed to excessive shocks. Even if the camera's power is turned OFF, the images saved on SmartMedia™ • Recorded data may be repeatedly read and written. Getting Ready Basic Photography Playing Back/ Erasing Images About SmartMedia™ "SmartMedia™" is a storage medium for saving images that Toshiba Corporation accepts no responsibility whatsoever for use of other SmartMedia™ could damage...
User Guide
Page 41
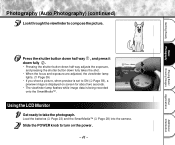
... the exposure, and pressing the shutter button down fully takes the shot. • When the focus and exposure are adjusted, the viewfinder lamp lights. (➲ Page 39) • If you shoot a picture, when preview is set to turn on screen for about two seconds. • The viewfinder lamp flashes while image data is displayed on the power. - 41 - Additional Information
... the exposure, and pressing the shutter button down fully takes the shot. • When the focus and exposure are adjusted, the viewfinder lamp lights. (➲ Page 39) • If you shoot a picture, when preview is set to turn on screen for about two seconds. • The viewfinder lamp flashes while image data is displayed on the power. - 41 - Additional Information
User Guide
Page 43
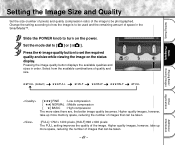
... viewing the image on the power. Higher quality images, however, take up more space, reducing the number of images that can be taken. [FULL] 1792 x 1200 pixels, [HALF] 896 x 600 pixels The FULL setting improves the quality of the image. Change the setting according to how the image is to [ ] or [ ]. Set the mode dial to be photographed. Getting Ready Basic Photography Setting the Image Size...
... viewing the image on the power. Higher quality images, however, take up more space, reducing the number of images that can be taken. [FULL] 1792 x 1200 pixels, [HALF] 896 x 600 pixels The FULL setting improves the quality of the image. Change the setting according to how the image is to [ ] or [ ]. Set the mode dial to be photographed. Getting Ready Basic Photography Setting the Image Size...
User Guide
Page 47
..., press the button until off or the Auto Power OFF function is activated. • Only the [ ] Suppressed Flash and [ ] Forced Flash modes can be set for flash photography. • The settings are canceled when you remove or insert the batteries or disconnect or connect the AC adapter. - 47 - Take the photograph while viewing the LCD monitor. Getting Ready Basic Photography Set the mode dial to...
..., press the button until off or the Auto Power OFF function is activated. • Only the [ ] Suppressed Flash and [ ] Forced Flash modes can be set for flash photography. • The settings are canceled when you remove or insert the batteries or disconnect or connect the AC adapter. - 47 - Take the photograph while viewing the LCD monitor. Getting Ready Basic Photography Set the mode dial to...
User Guide
Page 49
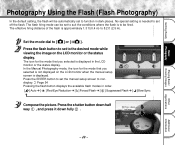
... display. The effective firing distance of the flash is to be fired. Playing Back/ Erasing Images Other Applications Additional Information - 49 - Getting Ready Basic Photography Photography Using the Flash (Flash Photography) In the default setting, the flash will be automatically set to the desired mode while viewing the image on the LCD monitor when the manual setup screen is needed to set to suit the conditions where the...
... display. The effective firing distance of the flash is to be fired. Playing Back/ Erasing Images Other Applications Additional Information - 49 - Getting Ready Basic Photography Photography Using the Flash (Flash Photography) In the default setting, the flash will be automatically set to the desired mode while viewing the image on the LCD monitor when the manual setup screen is needed to set to suit the conditions where the...
User Guide
Page 50
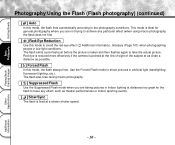
... The flash emits a pre-flash just before the picture is fired at distances too great for the flash to have any effect, such as possible. [ ] Forced Flash In this mode, the flash fires automatically according to shoot pictures in artificial light (backlighting, fluorescent lighting, etc.). Getting Ready Basic Photography Playing Back/ Erasing Images Photography Using the Flash (Flash photography) (continued) [ ] Auto In this mode, the flash always...
... The flash emits a pre-flash just before the picture is fired at distances too great for the flash to have any effect, such as possible. [ ] Forced Flash In this mode, the flash fires automatically according to shoot pictures in artificial light (backlighting, fluorescent lighting, etc.). Getting Ready Basic Photography Playing Back/ Erasing Images Photography Using the Flash (Flash photography) (continued) [ ] Auto In this mode, the flash always...
User Guide
Page 52
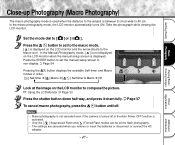
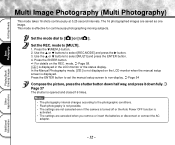
... ENTER button. 4. Set the REC. Use the or buttons to non-display. ➲ Page 54 Compose the picture, press the shutter button down half way, and press it down fully. ➲ Page 37 The shutter is opened and closed 16 times. mode, ➲ Page 58. [ ] is activated. • The settings are saved as one image. This mode is displayed. In the Manual Photography mode, [ ] is...
... ENTER button. 4. Set the REC. Use the or buttons to non-display. ➲ Page 54 Compose the picture, press the shutter button down half way, and press it down fully. ➲ Page 37 The shutter is opened and closed 16 times. mode, ➲ Page 58. [ ] is activated. • The settings are saved as one image. This mode is displayed. In the Manual Photography mode, [ ] is...
User Guide
Page 53
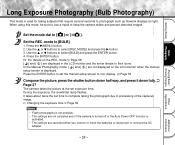
... the set exposure time. Set the REC. Press the (MENU) button. 2. Press the ENTER button. ☞ For details on the LCD monitor when the manual setup screen is activated. • The settings are canceled when you remove or insert the batteries or disconnect or connect the AC adapter. When using this mode, be sure to use a tripod to keep the camera stable and prevent distorted images. Playing...
... the set exposure time. Set the REC. Press the (MENU) button. 2. Press the ENTER button. ☞ For details on the LCD monitor when the manual setup screen is activated. • The settings are canceled when you remove or insert the batteries or disconnect or connect the AC adapter. When using this mode, be sure to use a tripod to keep the camera stable and prevent distorted images. Playing...

User Guide
Page 55
... the manual setup screen displayed. Memo • Photography is ready to take photographs. [AUTO] : Automatic adjustment (default) [ ] : Photography outdoors [ ] : Photography in cool white fluorescent light [ ] : Photography in standard fluorescent light [ ] : Photography in incandescent light Playing Back/ Erasing Images Other Applications Additional Information - 55 - This setting does not function when the flash is used to set the white balance when taking photographs under specific lighting conditions...
... the manual setup screen displayed. Memo • Photography is ready to take photographs. [AUTO] : Automatic adjustment (default) [ ] : Photography outdoors [ ] : Photography in cool white fluorescent light [ ] : Photography in standard fluorescent light [ ] : Photography in incandescent light Playing Back/ Erasing Images Other Applications Additional Information - 55 - This setting does not function when the flash is used to set the white balance when taking photographs under specific lighting conditions...

User Guide
Page 57
... when you remove or insert the batteries or disconnect or connect the AC adapter. Press the (MENU) button. The image before the photograph is taken is activated. The settings (except the LCD monitor brightness) are not canceled even if the camera is turned OFF or the Auto Power OFF function is displayed on the LCD monitor when selecting [LCD]. ☞ REC.
... when you remove or insert the batteries or disconnect or connect the AC adapter. Press the (MENU) button. The image before the photograph is taken is activated. The settings (except the LCD monitor brightness) are not canceled even if the camera is turned OFF or the Auto Power OFF function is displayed on the LCD monitor when selecting [LCD]. ☞ REC.
User Guide
Page 80
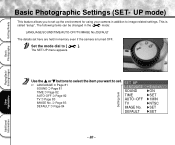
... changed in the mode: LANGUAGE/SOUND/TIME/AUTO-OFF/TV/IMAGE No./DEFAULT The details set here are held in addition to image-related settings. DEFAULT English ON SET 1MIN NTSC SET SET - 80 - Additional Information Getting Ready Basic Photographic Settings (SET-UP mode) This feature allows you want to set. Set the mode dial to set up the environment for using your camera in memory even if the camera is called "setup". The SET...
... changed in the mode: LANGUAGE/SOUND/TIME/AUTO-OFF/TV/IMAGE No./DEFAULT The details set here are held in addition to image-related settings. DEFAULT English ON SET 1MIN NTSC SET SET - 80 - Additional Information Getting Ready Basic Photographic Settings (SET-UP mode) This feature allows you want to set. Set the mode dial to set up the environment for using your camera in memory even if the camera is called "setup". The SET...
User Guide
Page 85
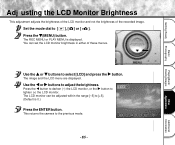
... (-) the LCD monitor, or the button to [+5]. (Default is displayed. Press the (MENU) button. The REC MENU or PLAY MENU is 0.) LCD Press the ENTER button. The image and the LCD menu are displayed. The LCD monitor can set the LCD monitor brightness in either of the recorded image. o - 85 - Use the or buttons to the previous mode. This returns the camera to adjust the...
... (-) the LCD monitor, or the button to [+5]. (Default is displayed. Press the (MENU) button. The REC MENU or PLAY MENU is 0.) LCD Press the ENTER button. The image and the LCD menu are displayed. The LCD monitor can set the LCD monitor brightness in either of the recorded image. o - 85 - Use the or buttons to the previous mode. This returns the camera to adjust the...

User Guide
Page 88
... Software Manual and the User's Guides for your camera to a PC using the PC card adapter (sold separately) or floppy disk adapter (sold separately). (➲ Page 92) To transfer images to a PC using the packaged CD-ROM and cable set. Other Applications Additional Information Using SmartMedia™ on a PC • Format the SmartMedia™ only on SmartMedia™ can transfer images photographed on your PC. Images recorded...
... Software Manual and the User's Guides for your camera to a PC using the PC card adapter (sold separately) or floppy disk adapter (sold separately). (➲ Page 92) To transfer images to a PC using the packaged CD-ROM and cable set. Other Applications Additional Information Using SmartMedia™ on a PC • Format the SmartMedia™ only on SmartMedia™ can transfer images photographed on your PC. Images recorded...

User Guide
Page 89
...". Follow the on the CD-ROM is complete, restart the computer. - 89 - Getting Ready Basic Photography Playing Back/ Erasing Images Installing the USB Driver For Windows 98 Only Install this software package into the CD drive. The USB driver provided on -screen instructions to continue the setup. Other Applications Additional Information The screen for use in Windows 2000/ME is used. Installing the USB driver for selecting the display language appears...
...". Follow the on the CD-ROM is complete, restart the computer. - 89 - Getting Ready Basic Photography Playing Back/ Erasing Images Installing the USB Driver For Windows 98 Only Install this software package into the CD drive. The USB driver provided on -screen instructions to continue the setup. Other Applications Additional Information The screen for use in Windows 2000/ME is used. Installing the USB driver for selecting the display language appears...


