
User Manual
Page 2
... the prior written permission of International Business Machines Corporation. TOSHIBA P500/P500D/X500 Copyright © 2009 by copyright laws belongs to the author or the copyright owner. Any other intellectual property covered by TOSHIBA Corporation. TOSHIBA assumes no liability for music, movies, computer programs, databases, and other use the screen mode switching functions (e.g. DirectX, AcriveDesktop, DirectShow, and Windows Media are trademarks or registered...
... the prior written permission of International Business Machines Corporation. TOSHIBA P500/P500D/X500 Copyright © 2009 by copyright laws belongs to the author or the copyright owner. Any other intellectual property covered by TOSHIBA Corporation. TOSHIBA assumes no liability for music, movies, computer programs, databases, and other use the screen mode switching functions (e.g. DirectX, AcriveDesktop, DirectShow, and Windows Media are trademarks or registered...
User Manual
Page 17
... computer 4-42 Moving the computer 4-42 Touchscreen gestures (Provided with some models 4-45 Chapter 5 The Keyboard Typewriter keys 5-1 F1 ... F12 function keys 5-2 Soft keys: FN key combinations 5-2 Hot keys 5-2 Windows special keys 5-4 Generating ASCII characters 5-4 Chapter 6 Power and Power-Up Modes Power conditions 6-1 Power indicators 6-2 Battery types 6-3 Care and use of the battery pack 6-5 Replacing the battery pack 6-9 Starting the computer by password 6-10 Power-up modes 6-11 Chapter 7 HW Setup Accessing HW Setup 7-1 HW Setup Window 7-1 User's Manual xvii
... computer 4-42 Moving the computer 4-42 Touchscreen gestures (Provided with some models 4-45 Chapter 5 The Keyboard Typewriter keys 5-1 F1 ... F12 function keys 5-2 Soft keys: FN key combinations 5-2 Hot keys 5-2 Windows special keys 5-4 Generating ASCII characters 5-4 Chapter 6 Power and Power-Up Modes Power conditions 6-1 Power indicators 6-2 Battery types 6-3 Care and use of the battery pack 6-5 Replacing the battery pack 6-9 Starting the computer by password 6-10 Power-up modes 6-11 Chapter 7 HW Setup Accessing HW Setup 7-1 HW Setup Window 7-1 User's Manual xvii
User Manual
Page 19
... manual tells you are an experienced computer user, please continue reading the preface to learn about features that are going to connect external devices such as a monitor, be sure to set up your computer, basic operations and care, using the following nine chapters, seven appendixes, a glossary and an index. It also provides detailed information on using optional devices and troubleshooting. Chapter 4, Operating Basics, includes instructions...
... manual tells you are an experienced computer user, please continue reading the preface to learn about features that are going to connect external devices such as a monitor, be sure to set up your computer, basic operations and care, using the following nine chapters, seven appendixes, a glossary and an index. It also provides detailed information on using optional devices and troubleshooting. Chapter 4, Operating Basics, includes instructions...
User Manual
Page 32
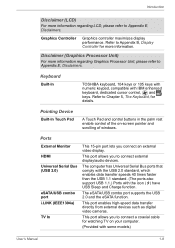
... to connect a coaxial cable for watching TV on -screen pointer and scrolling of the on your computer. (Provided with some models) User's Manual 1-8 The eSATA/USB combo port supports the USB 2.0 and the eSATA function. Graphics Controller Graphics controller maximizes display performance. Refer to Chapter 5, The Keyboard, for more information regarding LCD, please refer to Appendix E, Disclaimers. Pointing Device Built-In Touch Pad A Touch Pad and control buttons in the palm rest enable control of windows. The...
... to connect a coaxial cable for watching TV on -screen pointer and scrolling of the on your computer. (Provided with some models) User's Manual 1-8 The eSATA/USB combo port supports the USB 2.0 and the eSATA function. Graphics Controller Graphics controller maximizes display performance. Refer to Chapter 5, The Keyboard, for more information regarding LCD, please refer to Appendix E, Disclaimers. Pointing Device Built-In Touch Pad A Touch Pad and control buttons in the palm rest enable control of windows. The...
User Manual
Page 49
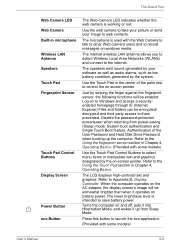
... password-protected screensaver when returning from Sleep Mode. The microphone is working or not. Use the web camera to take your picture or send your software as well as audio alarms, such as low battery condition, generated by the on battery power. The Grand Tour Web Camera LED Web Camera Built-in microphone Wireless LAN Antenna Speakers Touch Pad Fingerprint Sensor Touch Pad Control Buttons Display Screen Power Button eco Button The Web Camera LED indicates whether the web camera is used with some models) User's Manual...
... password-protected screensaver when returning from Sleep Mode. The microphone is working or not. Use the web camera to take your picture or send your software as well as audio alarms, such as low battery condition, generated by the on battery power. The Grand Tour Web Camera LED Web Camera Built-in microphone Wireless LAN Antenna Speakers Touch Pad Fingerprint Sensor Touch Pad Control Buttons Display Screen Power Button eco Button The Web Camera LED indicates whether the web camera is used with some models) User's Manual...
User Manual
Page 75
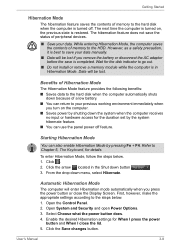
... the status of peripheral devices. ■ Save your previous working environment immediately when you press the power button or close the lid. 5. Automatic Hibernation Mode The computer will be lost . Click the Save changes button. User's Manual 3-8 However, as a safety precaution, it is best to Chapter 5, The Keyboard, for the disk indicator to go out. ■ Do not install or remove a memory module while the computer...
... the status of peripheral devices. ■ Save your previous working environment immediately when you press the power button or close the lid. 5. Automatic Hibernation Mode The computer will be lost . Click the Save changes button. User's Manual 3-8 However, as a safety precaution, it is best to Chapter 5, The Keyboard, for the disk indicator to go out. ■ Do not install or remove a memory module while the computer...
User Manual
Page 76
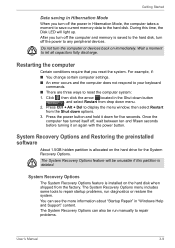
... save current memory data to repair problems. User's Manual 3-9 Wait a moment to reset the computer system: 1. After you reset the system. Do not turn the computer or devices back on the hard disk when shipped from the factory. Getting Started Data saving in Hibernation Mode When you turn off the power in "Windows Help and Support" content. During this partition is installed on immediately. The System Recovery Options feature will light up. For...
... save current memory data to repair problems. User's Manual 3-9 Wait a moment to reset the computer system: 1. After you reset the system. Do not turn the computer or devices back on the hard disk when shipped from the factory. Getting Started Data saving in Hibernation Mode When you turn off the power in "Windows Help and Support" content. During this partition is installed on immediately. The System Recovery Options feature will light up. For...
User Manual
Page 77
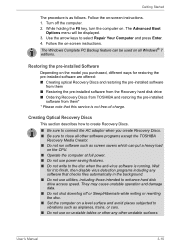
... Windows Complete PC Backup feature can put a heavy load on the CPU. ■ Operate the computer at full power. ■ Do not use power-saving features. ■ Do not write to select Repair Your Computer and press Enter. 4. Wait for restoring the pre-installed software are offered: ■ Creating optical Recovery Discs and restoring the pre-installed software from them ■ Restoring the pre-installed software from the Recovery hard disk drive ■ Ordering Recovery Discs from TOSHIBA and restoring...
... Windows Complete PC Backup feature can put a heavy load on the CPU. ■ Operate the computer at full power. ■ Do not use power-saving features. ■ Do not write to select Repair Your Computer and press Enter. 4. Wait for restoring the pre-installed software are offered: ■ Creating optical Recovery Discs and restoring the pre-installed software from them ■ Restoring the pre-installed software from the Recovery hard disk drive ■ Ordering Recovery Discs from TOSHIBA and restoring...
User Manual
Page 127
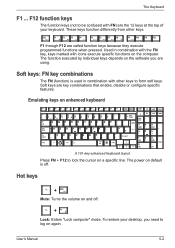
... function executed by individual keys depends on the computer. F1 through F12 are key combinations that enable, disable or configure specific features. F12 function keys The function keys (not to lock the cursor on and off . User's Manual 5-2 Emulating keys on enhanced keyboard A 101-key enhanced keyboard layout Press FN + F12 to be confused with other keys. Hot keys + Mute: Turns the volume on a specific line. Soft keys: FN key combinations The FN (function) is off . + Lock: Enters "Lock computer" mode...
... function executed by individual keys depends on the computer. F1 through F12 are key combinations that enable, disable or configure specific features. F12 function keys The function keys (not to lock the cursor on and off . User's Manual 5-2 Emulating keys on enhanced keyboard A 101-key enhanced keyboard layout Press FN + F12 to be confused with other keys. Hot keys + Mute: Turns the volume on a specific line. Soft keys: FN key combinations The FN (function) is off . + Lock: Enters "Lock computer" mode...

User Manual
Page 134
...; Never install or remove the battery pack without first turning off . Procedures To recharge a battery pack while it becomes discharged. User's Manual 6-5 Power and Power-Up Modes Care and use the computer while the Battery indicator flashes, the computer enables Hibernation Mode (so you remove a battery pack, disable the Wake-up on LAN function. It can explode if not replaced, used, handled or disposed of properly. Charging the batteries When the power in order to charge the battery pack...
...; Never install or remove the battery pack without first turning off . Procedures To recharge a battery pack while it becomes discharged. User's Manual 6-5 Power and Power-Up Modes Care and use the computer while the Battery indicator flashes, the computer enables Hibernation Mode (so you remove a battery pack, disable the Wake-up on LAN function. It can explode if not replaced, used, handled or disposed of properly. Charging the batteries When the power in order to charge the battery pack...
User Manual
Page 140
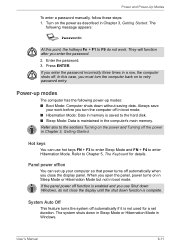
... off the power in the computer's main memory. If you close the display until the shut down function is maintained in Chapter 3, Getting Started. Refer also to the hard disk. ■ Sleep Mode: Data is complete. User's Manual 6-11 Power and Power-Up Modes To enter a password manually, follow these steps: 1. They will function after you open the panel, power turns on You can use Shut down Windows, do not work before you turn the computer...
... off the power in the computer's main memory. If you close the display until the shut down function is maintained in Chapter 3, Getting Started. Refer also to the hard disk. ■ Sleep Mode: Data is complete. User's Manual 6-11 Power and Power-Up Modes To enter a password manually, follow these steps: 1. They will function after you open the panel, power turns on You can use Shut down Windows, do not work before you turn the computer...
User Manual
Page 143
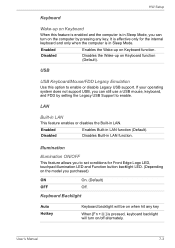
... any key. User's Manual 7-3 Illumination Illumination ON/OFF This feature allows you to set conditions for the internal keyboard and only when the computer is in Sleep Mode, you purchased) ON OFF On. (Default) Off. Keyboard Backlight Auto Hotkey Keyboard backlight will turn on the computer by setting the Legacy USB Support to enable. HW Setup Keyboard Wake-up on Keyboard When this option to enable or disable Legacy USB support. USB USB Keyboard/Mouse/FDD Legacy Emulation Use this...
... any key. User's Manual 7-3 Illumination Illumination ON/OFF This feature allows you to set conditions for the internal keyboard and only when the computer is in Sleep Mode, you purchased) ON OFF On. (Default) Off. Keyboard Backlight Auto Hotkey Keyboard backlight will turn on the computer by setting the Legacy USB Support to enable. HW Setup Keyboard Wake-up on Keyboard When this option to enable or disable Legacy USB support. USB USB Keyboard/Mouse/FDD Legacy Emulation Use this...
User Manual
Page 151
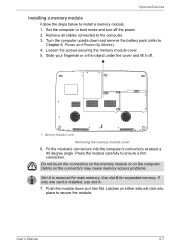
... angle. User's Manual 8-7 Turn the computer upside down so it off the power. 2. Loosen the screws securing the memory module cover. 5. If only one card is reserved for expanded memory. Use slot B for main memory. Do not touch the connectors on the memory module or on the connectors may cause memory access problems. Slot A is installed, use slot A. 7. Optional Devices Installing a memory module Follow the steps below to the computer. 3. Remove all cables connected to install a memory module. 1. Debris on the computer. Set the...
... angle. User's Manual 8-7 Turn the computer upside down so it off the power. 2. Loosen the screws securing the memory module cover. 5. If only one card is reserved for expanded memory. Use slot B for main memory. Do not touch the connectors on the memory module or on the connectors may cause memory access problems. Slot A is installed, use slot A. 7. Optional Devices Installing a memory module Follow the steps below to the computer. 3. Remove all cables connected to install a memory module. 1. Debris on the computer. Set the...
User Manual
Page 153
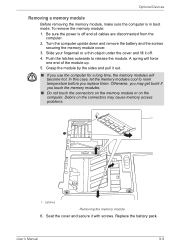
Optional Devices Removing a memory module Before removing the memory module, make sure the computer is off . 4. A spring will become hot. Otherwise, you replace them. Seat the cover and secure it off and all cables are disconnected from the computer. 2. In this case, let the memory modules cool to release the module. Turn the computer upside down and remove the battery and the screws securing the memory module cover. 3. Be sure the power is in...
Optional Devices Removing a memory module Before removing the memory module, make sure the computer is off . 4. A spring will become hot. Otherwise, you replace them. Seat the cover and secure it off and all cables are disconnected from the computer. 2. In this case, let the memory modules cool to release the module. Turn the computer upside down and remove the battery and the screws securing the memory module cover. 3. Be sure the power is in...
User Manual
Page 176
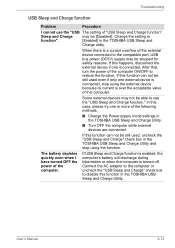
... setting to disable this computer. If USB Sleep and Charge function is enabled, the computer's battery will discharge during hibernation or when the computer is over the acceptable value of the following methods. ■ Change the Power supply mode settings in the TOSHIBA USB Sleep and Charge Utility. ■ Turn OFF the computer while external devices are connected. If this function can not be able to use the "USB The setting of the external device connected to restore the function. User's Manual...
... setting to disable this computer. If USB Sleep and Charge function is enabled, the computer's battery will discharge during hibernation or when the computer is over the acceptable value of the following methods. ■ Change the Power supply mode settings in the TOSHIBA USB Sleep and Charge Utility. ■ Turn OFF the computer while external devices are connected. If this function can not be able to use the "USB The setting of the external device connected to restore the function. User's Manual...
User Manual
Page 177
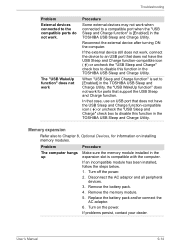
...Charge Utility. Remove the memory module. 5. Replace the battery pack and/or connect the AC adaptor. 6. If problems persist, contact your dealer. User's Manual 9-14 When "USB Sleep and Charge function" is compatible with the computer. If an incompatible module has been installed, follow the steps below. 1. Reconnect the external device after turning ON the computer. Troubleshooting Problem External devices connected to disable this function in the expansion slot is set to a compatible port when the "USB Sleep and Charge function" is [Enabled] in the TOSHIBA USB...
...Charge Utility. Remove the memory module. 5. Replace the battery pack and/or connect the AC adaptor. 6. If problems persist, contact your dealer. User's Manual 9-14 When "USB Sleep and Charge function" is compatible with the computer. If an incompatible module has been installed, follow the steps below. 1. Reconnect the external device after turning ON the computer. Troubleshooting Problem External devices connected to disable this function in the expansion slot is set to a compatible port when the "USB Sleep and Charge function" is [Enabled] in the TOSHIBA USB...

User Manual
Page 192
...'s hard disk drive. ■ The collected information includes device operation time and number of actuations or status changes (i.e.: number of power button and FN key combination uses, AC adaptor, battery, LCD, fan, HDD, sound volume, wireless communication switch, TOSHIBA Express Port Replicator and USB information), date of initial system use this information for details. Visit http://www.warranty.toshiba.com for quality assurance analysis. TOSHIBA PC Health Monitor Appendix F TOSHIBA PC Health Monitor The TOSHIBA Health Monitor software program monitors computer system functions such...
...'s hard disk drive. ■ The collected information includes device operation time and number of actuations or status changes (i.e.: number of power button and FN key combination uses, AC adaptor, battery, LCD, fan, HDD, sound volume, wireless communication switch, TOSHIBA Express Port Replicator and USB information), date of initial system use this information for details. Visit http://www.warranty.toshiba.com for quality assurance analysis. TOSHIBA PC Health Monitor Appendix F TOSHIBA PC Health Monitor The TOSHIBA Health Monitor software program monitors computer system functions such...
User Manual
Page 201
... pointing device's left button, unless otherwise stated. documentation: The set of manuals and/or other data storage device. The DVD-R drive uses a laser to read data from the disc. User's Manual Glossary-6 Also called a "driver") that controls a specific piece of hardware (frequently a peripheral device such as system functions. delete: To remove data from memory to the disk. See also enable. In the Windows operating system, this refers to the computer's memory. DVD-RAM: A Digital Versatile Disc-Random Access Memory...
... pointing device's left button, unless otherwise stated. documentation: The set of manuals and/or other data storage device. The DVD-R drive uses a laser to read data from the disc. User's Manual Glossary-6 Also called a "driver") that controls a specific piece of hardware (frequently a peripheral device such as system functions. delete: To remove data from memory to the disk. See also enable. In the Windows operating system, this refers to the computer's memory. DVD-RAM: A Digital Versatile Disc-Random Access Memory...
User Manual
Page 204
... keystroke activates a switch that specify how to help improve processing speed. For each key, the transmitted code is applied. L2 cache: Memory cache installed on the key. See also cache memory, L1 cache. K K: Taken from the keyboard or external or internal storage devices. The data sent (or output) by manually pressing marked keys. instruction: Statements or commands that transmits a specific code to 1024 bytes. I /O devices: Equipment used as equivalent...
... keystroke activates a switch that specify how to help improve processing speed. For each key, the transmitted code is applied. L2 cache: Memory cache installed on the key. See also cache memory, L1 cache. K K: Taken from the keyboard or external or internal storage devices. The data sent (or output) by manually pressing marked keys. instruction: Statements or commands that transmits a specific code to 1024 bytes. I /O devices: Equipment used as equivalent...
User Manual
Page 207
... recognize connections of external devices and make the necessary configurations in the computer. See also memory. For a screen, it is expressed as the number of memory is ready for your computer. RJ45: A modular LAN jack. plug and play: A capability with Class B computing device regulations. Power Saver: A TOSHIBA utility that can be written to as well as read. prompt: A message the computer provides indicating it is used for...
... recognize connections of external devices and make the necessary configurations in the computer. See also memory. For a screen, it is expressed as the number of memory is ready for your computer. RJ45: A modular LAN jack. plug and play: A capability with Class B computing device regulations. Power Saver: A TOSHIBA utility that can be written to as well as read. prompt: A message the computer provides indicating it is used for...


