

User Manual
Page 28
... and Windows Media are registered trademarks of Toshiba America Information Systems, Inc. Wi-Fi is a registered trademark of PCMCIA. Other trademarks and trade names are those of their respective owners. 28 Trademarks Satellite and ConfigFree are registered trademarks of Microsoft Corporation...Sony Corporation. ExpressCard is a registered trademark of Synaptics, Inc. Memory Stick, Memory Stick PRO, and i.LINK are trademarks of this product may be regulated due to preserving the environment, Toshiba supports various trade-in and recycling programs. Visit www.ToshibaDirect....
... and Windows Media are registered trademarks of Toshiba America Information Systems, Inc. Wi-Fi is a registered trademark of PCMCIA. Other trademarks and trade names are those of their respective owners. 28 Trademarks Satellite and ConfigFree are registered trademarks of Microsoft Corporation...Sony Corporation. ExpressCard is a registered trademark of Synaptics, Inc. Memory Stick, Memory Stick PRO, and i.LINK are trademarks of this product may be regulated due to preserving the environment, Toshiba supports various trade-in and recycling programs. Visit www.ToshibaDirect....

User Manual
Page 30
... first time 50 Opening the display panel 50 Your computer's features and specifications ....51 Turning on the power 51 Adding memory (optional 52 Installing a memory module 53 Removing a memory module 58 Checking total memory 60 Hard Drive Recovery Utilities 61 Creating Recovery DVDs 62 Hard Disk Drive Recovery options 63 Hard Disk Drive Recovery...
... first time 50 Opening the display panel 50 Your computer's features and specifications ....51 Turning on the power 51 Adding memory (optional 52 Installing a memory module 53 Removing a memory module 58 Checking total memory 60 Hard Drive Recovery Utilities 61 Creating Recovery DVDs 62 Hard Disk Drive Recovery options 63 Hard Disk Drive Recovery...

User Manual
Page 33
... password 143 Using a user password 144 Deleting a user password 145 TOSHIBA PC Diagnostic Tool Utility 146 TOSHIBA SD™ Memory Card Format Utility .........147 Mouse Utility 148 TOSHIBA Hardware Setup 149 TOSHIBA Zooming Utility 153 TOSHIBA Button Support 154 CD/DVD Drive Acoustic Silencer 155 TOSHIBA Accessibility 156 Fingerprint Authentication Utility 157 Fingerprint utility limitations 157 Using...
... password 143 Using a user password 144 Deleting a user password 145 TOSHIBA PC Diagnostic Tool Utility 146 TOSHIBA SD™ Memory Card Format Utility .........147 Mouse Utility 148 TOSHIBA Hardware Setup 149 TOSHIBA Zooming Utility 153 TOSHIBA Button Support 154 CD/DVD Drive Acoustic Silencer 155 TOSHIBA Accessibility 156 Fingerprint Authentication Utility 157 Fingerprint utility limitations 157 Using...

User Manual
Page 34
... problems 169 The Windows® operating system can help you 170 Resolving a hardware conflict 170 A plan of action 170 Fixing a problem with Device Manager ...........171 Memory problems 172 Power and the batteries 173 Keyboard problems 174 Display problems 175 Disk drive problems 177 Optical drive problems 178 Sound system problems 179... good computing habits 187 Data and system configuration backup in the Windows® operating system 188 If you need further assistance 192 Before you contact Toshiba 192 Contacting Toshiba 193
... problems 169 The Windows® operating system can help you 170 Resolving a hardware conflict 170 A plan of action 170 Fixing a problem with Device Manager ...........171 Memory problems 172 Power and the batteries 173 Keyboard problems 174 Display problems 175 Disk drive problems 177 Optical drive problems 178 Sound system problems 179... good computing habits 187 Data and system configuration backup in the Windows® operating system 188 If you need further assistance 192 Before you contact Toshiba 192 Contacting Toshiba 193

User Manual
Page 44
... or AC adaptor could cause system failure, computer or AC adaptor damage or a fire, possibly resulting in Sleep mode). See "Connecting to , a mouse, keyboard, printer, memory, and ExpressCards®. NOTE The cooling fan location will vary depending on page 47.
... or AC adaptor could cause system failure, computer or AC adaptor damage or a fire, possibly resulting in Sleep mode). See "Connecting to , a mouse, keyboard, printer, memory, and ExpressCards®. NOTE The cooling fan location will vary depending on page 47.

User Manual
Page 46
... an ExpressCard® (see "Using an ExpressCard®" on page 131) Failure to the Internet. Adding optional external devices NOTE Before adding external devices or memory, Toshiba recommends setting up your computer. If you decide not to register at a later time. 46 Getting Started Registering your computer with...
... an ExpressCard® (see "Using an ExpressCard®" on page 131) Failure to the Internet. Adding optional external devices NOTE Before adding external devices or memory, Toshiba recommends setting up your computer. If you decide not to register at a later time. 46 Getting Started Registering your computer with...

User Manual
Page 52
Your computer comes with your system or visit accessories.toshiba.com. You may want to run most of data. 52 Getting Started Adding memory (optional) 3 Press and release the power button. See "Setting up your software" on /off the power again until the operating system...enough memory to increase the computer's memory if you turn on the computer for the first time, do not turn off light glows white. (Sample Illustration) Turning on the power The preinstalled operating system will load automatically. The on page 45. NOTE Before adding external devices or memory, Toshiba ...
Your computer comes with your system or visit accessories.toshiba.com. You may want to run most of data. 52 Getting Started Adding memory (optional) 3 Press and release the power button. See "Setting up your software" on /off the power again until the operating system...enough memory to increase the computer's memory if you turn on the computer for the first time, do not turn off light glows white. (Sample Illustration) Turning on the power The preinstalled operating system will load automatically. The on page 45. NOTE Before adding external devices or memory, Toshiba ...

User Manual
Page 53
...directions could result in slot A. The surrounding area may be installed in minor bodily injury. The computer has two memory slots-Slot A and Slot B. If you install or remove a memory module, turn off the computer using the Start menu. To avoid damaging the computer's screws, use a small... Phillips screwdriver for this model Slot A is to be installed, it . You will be hot. Before you install or remove a memory module while the computer is in the memory module slots on may damage the computer, the module, or both. If the computer has been running recently, the...
...directions could result in slot A. The surrounding area may be installed in minor bodily injury. The computer has two memory slots-Slot A and Slot B. If you install or remove a memory module, turn off the computer using the Start menu. To avoid damaging the computer's screws, use a small... Phillips screwdriver for this model Slot A is to be installed, it . You will be hot. Before you install or remove a memory module while the computer is in the memory module slots on may damage the computer, the module, or both. If the computer has been running recently, the...

User Manual
Page 54
54 Getting Started Adding memory (optional) If the computer is on page 113. 5 Close the display panel and turn the computer ... arrow next to the lock button in the lower-right corner of computer (Sample Illustration) Locating the memory module slot cover The operating system turns off the computer. 3 Unplug and remove any cables connected to locate the... memory module slot cover. The Shut Down menu appears. For information on removing the main battery, see "Removing...
54 Getting Started Adding memory (optional) If the computer is on page 113. 5 Close the display panel and turn the computer ... arrow next to the lock button in the lower-right corner of computer (Sample Illustration) Locating the memory module slot cover The operating system turns off the computer. 3 Unplug and remove any cables connected to locate the... memory module slot cover. The Shut Down menu appears. For information on removing the main battery, see "Removing...
User Manual
Page 55
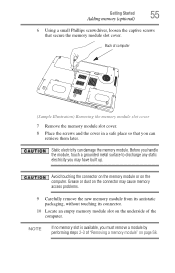
... them later. Grease or dust on the connector may have built up. Avoid touching the connector on the memory module or on the underside of the computer. Back of "Removing a memory module" on page 58. Before you handle the module, touch a grounded metal surface to discharge any static... electricity you must remove a module by performing steps 2-3 of computer (Sample Illustration) Removing the memory module slot cover 7 Remove the memory module slot cover. 8 Place the screws and the cover in a safe place so that secure the...
... them later. Grease or dust on the connector may have built up. Avoid touching the connector on the memory module or on the underside of the computer. Back of "Removing a memory module" on page 58. Before you handle the module, touch a grounded metal surface to discharge any static... electricity you must remove a module by performing steps 2-3 of computer (Sample Illustration) Removing the memory module slot cover 7 Remove the memory module slot cover. 8 Place the screws and the cover in a safe place so that secure the...

User Manual
Page 56
...another, you must be installed in the socket. notch latch connector latch key (Sample Illustration) Aligning the memory module with the matching key in slot A. 11 Pick up the memory module by its sides, avoiding any contact with its connector. Position the module toward the socket, aligning ...the connector's notch with the socket 12 Firmly press the memory module into the memory slot's socket at approximately a 30-degree angle (to be installed, it must remove the top module first before removing/installing the...
...another, you must be installed in the socket. notch latch connector latch key (Sample Illustration) Aligning the memory module with the matching key in slot A. 11 Pick up the memory module by its sides, avoiding any contact with its connector. Position the module toward the socket, aligning ...the connector's notch with the socket 12 Firmly press the memory module into the memory slot's socket at approximately a 30-degree angle (to be installed, it must remove the top module first before removing/installing the...

User Manual
Page 57
Slot B is the bottom slot. latch latch (Sample Illustration) Pressing down on the top edge of the module. The memory module should "snap" into place securely with the corresponding cutouts in the side of the module to be installed, it must be completely inserted into ... be installed in place. If the latches and cutouts do not line up correctly, repeat steps 12-13. If only one memory module is fully inserted into the socket, press downward on the memory module Do not force the memory module into the latches at the sides of computer (Sample Illustration) Inserting the...
Slot B is the bottom slot. latch latch (Sample Illustration) Pressing down on the top edge of the module. The memory module should "snap" into place securely with the corresponding cutouts in the side of the module to be installed, it must be completely inserted into ... be installed in place. If the latches and cutouts do not line up correctly, repeat steps 12-13. If only one memory module is fully inserted into the socket, press downward on the memory module Do not force the memory module into the latches at the sides of computer (Sample Illustration) Inserting the...

User Manual
Page 58
...verify that the computer has recognized it using the screws. 15 Re-insert the main battery. Do not remove the memory module while the computer is in memory will not be lost. In either of the above cases, the Sleep configuration will be saved. You can now ... battery" on and data in Sleep or Hibernation mode. TECHNICAL NOTE: You must have at least one memory module installed for the computer to remove a memory module: 1 Complete steps 1-8 in "Installing a memory module" on . The computer could hang up the computer, verify that the computer has recognized the additional...
...verify that the computer has recognized it using the screws. 15 Re-insert the main battery. Do not remove the memory module while the computer is in memory will not be lost. In either of the above cases, the Sleep configuration will be saved. You can now ... battery" on and data in Sleep or Hibernation mode. TECHNICAL NOTE: You must have at least one memory module installed for the computer to remove a memory module: 1 Complete steps 1-8 in "Installing a memory module" on . The computer could hang up the computer, verify that the computer has recognized the additional...

User Manual
Page 59
... shut down and restart the system, at which time Windows® should boot back up slightly. When Safe Mode is highlighted, then press Enter. The memory module pops up normally. NOTE If your hard drive for errors or defragment the drive. If one of one another, you may appear when you... turn on top of the Safe Mode options is highlighted, it is best to press Enter to scan your system has the memory modules stacked on the power: If "Start Windows® Normally" is suggested, this could be a sign that you must remove the top module first before...
... shut down and restart the system, at which time Windows® should boot back up slightly. When Safe Mode is highlighted, then press Enter. The memory module pops up normally. NOTE If your hard drive for errors or defragment the drive. If one of one another, you may appear when you... turn on top of the Safe Mode options is highlighted, it is best to press Enter to scan your system has the memory modules stacked on the power: If "Start Windows® Normally" is suggested, this could be a sign that you must remove the top module first before...

User Manual
Page 60
...115. 6 Turn the computer right side up. 7 Reconnect the cables. 8 Restart the computer. TECHNICAL NOTE: You must have at least one memory module installed for the computer to a 30-degree angle and slide it using the screws. 5 Re-insert the main battery. 60 Getting Started Adding... memory (optional) 3 Gently lift the memory module to work. Checking total memory When you add or remove a memory module, you can check that the computer has recognized the change. The System window appears. 2...
...115. 6 Turn the computer right side up. 7 Reconnect the cables. 8 Restart the computer. TECHNICAL NOTE: You must have at least one memory module installed for the computer to a 30-degree angle and slide it using the screws. 5 Re-insert the main battery. 60 Getting Started Adding... memory (optional) 3 Gently lift the memory module to work. Checking total memory When you add or remove a memory module, you can check that the computer has recognized the change. The System window appears. 2...

User Manual
Page 61
...® needs your system. Getting Started Hard Drive Recovery Utilities 61 If the computer does not recognize the memory configuration, turn off the computer and remove the memory module slot cover (complete steps 1-8 in "Installing a memory module" on page 53), and then check that you create recovery DVDs before using a writable drive. ❖...
...® needs your system. Getting Started Hard Drive Recovery Utilities 61 If the computer does not recognize the memory configuration, turn off the computer and remove the memory module slot cover (complete steps 1-8 in "Installing a memory module" on page 53), and then check that you create recovery DVDs before using a writable drive. ❖...

User Manual
Page 75
... first time, leave the computer plugged into a power source (even though the computer is a good idea to turn off your computer's internal hardware (such as memory). It is off) to fully charge the main battery. If you are off. If you turn off your computer in -use light are using it...
... first time, leave the computer plugged into a power source (even though the computer is a good idea to turn off your computer's internal hardware (such as memory). It is off) to fully charge the main battery. If you are off. If you turn off your computer in -use light are using it...

User Manual
Page 76
...; When starting up again, the computer returns to the state in which you change your work, system settings, and current state of the desktop to memory, so that when you turn on page 80. Factors to consider when choosing Hibernation: ❖ While in Hibernation mode, the computer uses no main battery...
...; When starting up again, the computer returns to the state in which you change your work, system settings, and current state of the desktop to memory, so that when you turn on page 80. Factors to consider when choosing Hibernation: ❖ While in Hibernation mode, the computer uses no main battery...

User Manual
Page 77
... again, the computer returns to the mode in Sleep mode, the computer uses some main battery power. ❖ Because the state of the computer to memory so that, when you restart the computer, you can continue working from where you left it, including all open documents and programs to save any... or Shut down using Sleep, see "Using and configuring Sleep mode" on page 82. Sleep saves the current state of the system is stored in memory, you left off the computer 77 Sleep mode The Sleep command places the computer into a power-saving mode. Factors to enter Hibernation mode.
... again, the computer returns to the mode in Sleep mode, the computer uses some main battery power. ❖ Because the state of the computer to memory so that, when you restart the computer, you can continue working from where you left it, including all open documents and programs to save any... or Shut down using Sleep, see "Using and configuring Sleep mode" on page 82. Sleep saves the current state of the system is stored in memory, you left off the computer 77 Sleep mode The Sleep command places the computer into a power-saving mode. Factors to enter Hibernation mode.

User Manual
Page 83
... which the computer enters Sleep mode: ❖ Under Put the computer to sleep, select the desired amount of all open programs and files to the memory, turns off the computer 83 2 Click Sleep. You can place the computer into Sleep mode by either pressing the power button or closing the display...
... which the computer enters Sleep mode: ❖ Under Put the computer to sleep, select the desired amount of all open programs and files to the memory, turns off the computer 83 2 Click Sleep. You can place the computer into Sleep mode by either pressing the power button or closing the display...


