
User Guide
Page 18
... size partition 47 Creating recovery media 50 Restoring from recovery media 52 Erasing the Internal Storage Drive 54 Checking the internal storage drive operating status 56 Installing drivers and applications 56 Using the touch pad 57 Adjusting touch pad settings 60 Disabling or enabling the touch pad 61 Scrolling with the touch pad 61 Control buttons 61 Connecting an external device 62 Using external display devices 62 Selecting video cables 62 Connecting an HDMI™-compatible television or display device 63 Connecting an external monitor or projector.....63 Adjusting the...
... size partition 47 Creating recovery media 50 Restoring from recovery media 52 Erasing the Internal Storage Drive 54 Checking the internal storage drive operating status 56 Installing drivers and applications 56 Using the touch pad 57 Adjusting touch pad settings 60 Disabling or enabling the touch pad 61 Scrolling with the touch pad 61 Control buttons 61 Connecting an external device 62 Using external display devices 62 Selecting video cables 62 Connecting an HDMI™-compatible television or display device 63 Connecting an external monitor or projector.....63 Adjusting the...
User Guide
Page 20
... Memory card reader 93 Inserting memory media 93 Removing memory media 94 Chapter 5: Utilities 95 TOSHIBA Assist 96 Connect 97 Secure 98 Protect & Fix 99 Optimize 100 TOSHIBA Application Installer 101 Setting passwords 102 Using an instant password 102 Using a supervisor password 102 Using a user password 104 TOSHIBA Face Recognition Utility 106 TOSHIBA Security Assist 107 TOSHIBA PC Diagnostic Tool Utility 109 Mouse Utility 110 TOSHIBA Hardware Setup 111 TOSHIBA Sleep Utility 113 Starting the TOSHIBA Sleep Utility 113 USB Sleep and Charge 113 Enabling/Disabling USB Sleep...
... Memory card reader 93 Inserting memory media 93 Removing memory media 94 Chapter 5: Utilities 95 TOSHIBA Assist 96 Connect 97 Secure 98 Protect & Fix 99 Optimize 100 TOSHIBA Application Installer 101 Setting passwords 102 Using an instant password 102 Using a supervisor password 102 Using a user password 104 TOSHIBA Face Recognition Utility 106 TOSHIBA Security Assist 107 TOSHIBA PC Diagnostic Tool Utility 109 Mouse Utility 110 TOSHIBA Hardware Setup 111 TOSHIBA Sleep Utility 113 Starting the TOSHIBA Sleep Utility 113 USB Sleep and Charge 113 Enabling/Disabling USB Sleep...

User Guide
Page 25
... at support.toshiba.com. You can: ❖ Read the entire guide from beginning to end. ❖ Skim through and stop when a topic interests you. ❖ Use the table of the information provided herein, product specifications, configurations, prices, system/component/options availability are designed for a product Series. Your particular model may not have all subject to perform tasks in Windows®...
... at support.toshiba.com. You can: ❖ Read the entire guide from beginning to end. ❖ Skim through and stop when a topic interests you. ❖ Use the table of the information provided herein, product specifications, configurations, prices, system/component/options availability are designed for a product Series. Your particular model may not have all subject to perform tasks in Windows®...
User Guide
Page 41
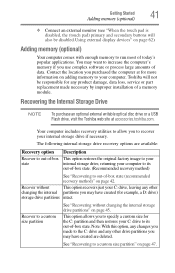
... a custom size for the C: partition and then restores your computer to its out-of-box state. (Recommended recovery method) See "Recovering to its out-of-box state. Getting Started 41 Adding memory (optional) ❖ Connect an external monitor (see "When the touch pad is disabled, the (touch pad) primary and secondary buttons will not be disabled.Using external display devices" on page 45. This option allows you use complex software or process large amounts...
... a custom size for the C: partition and then restores your computer to its out-of-box state. (Recommended recovery method) See "Recovering to its out-of-box state. Getting Started 41 Adding memory (optional) ❖ Connect an external monitor (see "When the touch pad is disabled, the (touch pad) primary and secondary buttons will not be disabled.Using external display devices" on page 45. This option allows you use complex software or process large amounts...
User Guide
Page 62
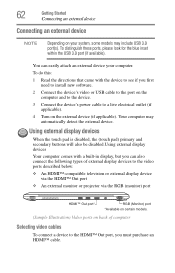
... also connect the following types of external display devices to the video ports described below: ❖ An HDMI™-compatible television or external display device via the HDMI™ Out port ❖ An external monitor or projector via the RGB (monitor) port HDMI™ Out port* RGB (Monitor) port *Available on certain models. (Sample Illustration) Video ports on back of computer Selecting video cables To connect a device to the HDMI™ Out port, you first need to install new software. 2 Connect the device's video or USB cable to the port...
... also connect the following types of external display devices to the video ports described below: ❖ An HDMI™-compatible television or external display device via the HDMI™ Out port ❖ An external monitor or projector via the RGB (monitor) port HDMI™ Out port* RGB (Monitor) port *Available on certain models. (Sample Illustration) Video ports on back of computer Selecting video cables To connect a device to the HDMI™ Out port, you first need to install new software. 2 Connect the device's video or USB cable to the port...
User Guide
Page 63
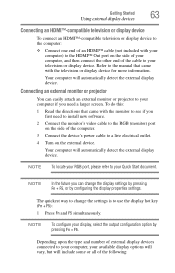
.... NOTE To configure your display, select the output configuration option by configuring the display properties settings. Depending upon the type and number of external display devices connected to your Quick Start document. To do this: 1 Read the directions that came with the monitor to see if you need to install new software. 2 Connect the monitor's video cable to the RGB (monitor) port on the side of the computer. 3 Connect the device's power cable to a live electrical outlet. 4 Turn on the side...
.... NOTE To configure your display, select the output configuration option by configuring the display properties settings. Depending upon the type and number of external display devices connected to your Quick Start document. To do this: 1 Read the directions that came with the monitor to see if you need to install new software. 2 Connect the monitor's video cable to the RGB (monitor) port on the side of the computer. 3 Connect the device's power cable to a live electrical outlet. 4 Turn on the side...
User Guide
Page 68
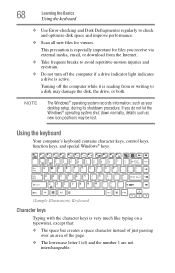
.... Using the keyboard Your computer's keyboard contains character keys, control keys, function keys, and special Windows® keys. (Sample Illustration) Keyboard Character keys Typing with the character keys is active. NOTE The Windows® operating system records information, such as new icon positions may damage the disk, the drive, or both. 68 Learning the Basics Using the keyboard ❖ Use Error-checking and Disk Defragmenter regularly to a disk may be lost. Turning off the computer if a drive indicator light indicates a drive is...
.... Using the keyboard Your computer's keyboard contains character keys, control keys, function keys, and special Windows® keys. (Sample Illustration) Keyboard Character keys Typing with the character keys is active. NOTE The Windows® operating system records information, such as new icon positions may damage the disk, the drive, or both. 68 Learning the Basics Using the keyboard ❖ Use Error-checking and Disk Defragmenter regularly to a disk may be lost. Turning off the computer if a drive indicator light indicates a drive is...

User Guide
Page 105
... OK to remove the user password. The TOSHIBA Assist window appears. 2 On the left side, click the Secure tab. 3 Click the User Password icon. 4 Click Delete. 5 Follow the on-screen instructions to exit. Utilities Setting passwords 3 Click the User Password icon. NOTE This will remove the user password only. In the list that appears above, click on password function and delete the user password: 1 Click the Start button and, in the Search field, type TOSHIBA Assist.
... OK to remove the user password. The TOSHIBA Assist window appears. 2 On the left side, click the Secure tab. 3 Click the User Password icon. 4 Click Delete. 5 Follow the on-screen instructions to exit. Utilities Setting passwords 3 Click the User Password icon. NOTE This will remove the user password only. In the list that appears above, click on password function and delete the user password: 1 Click the Start button and, in the Search field, type TOSHIBA Assist.
User Guide
Page 114
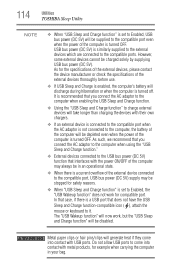
... is a current overflow of the external device connected to the compatible port, USB bus power (DC 5V) supply may always be charged solely by supplying USB bus power (DC 5V). USB bus power (DC 5V) is set to Enabled, USB bus power (DC 5V) will be disabled. 114 Utilities TOSHIBA Sleep Utility NOTE ❖ When "USB Sleep and Charge function" is set to Enabled, the "USB Wakeup function" does not work , but the "USB Sleep and Charge function" will generate heat if they...
... is a current overflow of the external device connected to the compatible port, USB bus power (DC 5V) supply may always be charged solely by supplying USB bus power (DC 5V). USB bus power (DC 5V) is set to Enabled, USB bus power (DC 5V) will be disabled. 114 Utilities TOSHIBA Sleep Utility NOTE ❖ When "USB Sleep and Charge function" is set to Enabled, the "USB Wakeup function" does not work , but the "USB Sleep and Charge function" will generate heat if they...

User Guide
Page 122
... computer's internal storage drive. For more information on the TOSHIBA eco power plan and utility, click the Help button at its best by notifying you wish. The collected information includes device operation time and number of actuations or status changes (e.g.: number of power button and Fn key combination uses, and AC adaptor, battery, LCD, fan, HDD, sound volume, wireless communication switch, docking and USB information), date of the window. 122 Utilities TOSHIBA Service Station The TOSHIBA eco Utility™ window appears...
... computer's internal storage drive. For more information on the TOSHIBA eco power plan and utility, click the Help button at its best by notifying you wish. The collected information includes device operation time and number of actuations or status changes (e.g.: number of power button and Fn key combination uses, and AC adaptor, battery, LCD, fan, HDD, sound volume, wireless communication switch, docking and USB information), date of the window. 122 Utilities TOSHIBA Service Station The TOSHIBA eco Utility™ window appears...
User Guide
Page 124
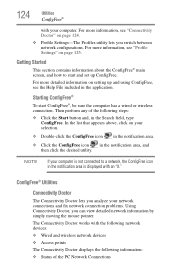
... detailed information on your computer is not connected to start ConfigFree®, be sure the computer has a wired or wireless connection. In the list that appears above, click on setting up ConfigFree. The Connectivity Doctor works with the following network devices: ❖ Wired and wireless network devices ❖ Access points The Connectivity Doctor displays the following steps: ❖ Click the Start button and, in the application. Then perform...
... detailed information on your computer is not connected to start ConfigFree®, be sure the computer has a wired or wireless connection. In the list that appears above, click on setting up ConfigFree. The Connectivity Doctor works with the following network devices: ❖ Wired and wireless network devices ❖ Access points The Connectivity Doctor displays the following steps: ❖ Click the Start button and, in the application. Then perform...
User Guide
Page 125
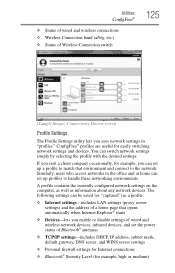
... opens automatically when Internet Explorer® starts ❖ Devices-lets you enable or disable settings of wired and wireless network devices, infrared devices, and set the power status of Wireless Connection switch 125 (Sample Image) Connectivity Doctor screen Profile Settings The Profile Settings utility lets you save network settings in the office and at home can set up a profile to the network. Utilities ConfigFree® ❖ Status of wired and wireless connections ❖ Wireless Connection band (a/b/g, etc.) ❖ Status of Bluetooth...
... opens automatically when Internet Explorer® starts ❖ Devices-lets you enable or disable settings of wired and wireless network devices, infrared devices, and set the power status of Wireless Connection switch 125 (Sample Image) Connectivity Doctor screen Profile Settings The Profile Settings utility lets you save network settings in the office and at home can set up a profile to the network. Utilities ConfigFree® ❖ Status of wired and wireless connections ❖ Wireless Connection band (a/b/g, etc.) ❖ Status of Bluetooth...
User Guide
Page 130
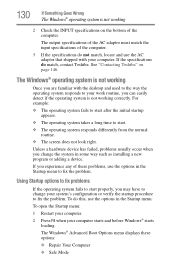
... the operating system responds to fix the problem. Using Startup options to fix problems If the operating system fails to start properly, you change your computer starts and before Windows® starts loading. See "Contacting Toshiba" on the bottom of the computer. 3 If the specifications do not match, locate and use the options in some way such as installing a new program or adding a device. For example: ❖ The operating system fails to start after...
... the operating system responds to fix the problem. Using Startup options to fix problems If the operating system fails to start properly, you change your computer starts and before Windows® starts loading. See "Contacting Toshiba" on the bottom of the computer. 3 If the specifications do not match, locate and use the options in some way such as installing a new program or adding a device. For example: ❖ The operating system fails to start after...
User Guide
Page 135
... brightness controls on the external monitor. ❖ Press Fn and F5 simultaneously to make sure the display priority is not set for an external monitor. Display Auto Off may have registered a password, press any key, type the password and press Enter. If you are some typical display problems and their solutions: The screen is registered, press any key to activate the screen. If you have gone into a working . The keyboard you through the display options...
... brightness controls on the external monitor. ❖ Press Fn and F5 simultaneously to make sure the display priority is not set for an external monitor. Display Auto Off may have registered a password, press any key, type the password and press Enter. If you are some typical display problems and their solutions: The screen is registered, press any key to activate the screen. If you have gone into a working . The keyboard you through the display options...

User Guide
Page 143
... configuration with the Windows® operating system" on page 142). ❖ Have your back up DVD(s) on hand in case you will then be very difficult to the computer. For more help ensure safe and easy installation of new hardware (printers, pointing devices, external hard drives, optical disc drive writers, scanners, etc.) and software (applications like Microsoft® Office and Adobe® Photoshop®, or utility software...
... configuration with the Windows® operating system" on page 142). ❖ Have your back up DVD(s) on hand in case you will then be very difficult to the computer. For more help ensure safe and easy installation of new hardware (printers, pointing devices, external hard drives, optical disc drive writers, scanners, etc.) and software (applications like Microsoft® Office and Adobe® Photoshop®, or utility software...
User Guide
Page 170
... keys that you turn on the computer again, your work , including all open files and programs, when you use to perform a task instead of using this function, if connected with the Fn key can control another while using a pointing device such as the battery save mode. (2) A key or combination of pixels is running and have the operating system automatically recognize the change. K keyboard shortcut-A key or combination of keys that activates a memory...
... keys that you turn on the computer again, your work , including all open files and programs, when you use to perform a task instead of using this function, if connected with the Fn key can control another while using a pointing device such as the battery save mode. (2) A key or combination of pixels is running and have the operating system automatically recognize the change. K keyboard shortcut-A key or combination of keys that activates a memory...

User Guide
Page 177
... power light 36 accessing network 91 adding memory (optional) 41 optional external devices 40 adequate ventilation cooling fan 35 adjusting touch pad settings 58 audio features 91 B backing up files 67, 71 battery battery life 74 care 84, 85 changing 84 charge indicator light 38 charging 39 charging the real-time clock (RTC) 76 conserving power 80 determine remaining power 78 disposal 85 indicator light 78 installation 84 low charge 79 maintaining 85 maximum capacity 74 monitoring power 38, 77 power management 75 power options...
... power light 36 accessing network 91 adding memory (optional) 41 optional external devices 40 adequate ventilation cooling fan 35 adjusting touch pad settings 58 audio features 91 B backing up files 67, 71 battery battery life 74 care 84, 85 changing 84 charge indicator light 38 charging 39 charging the real-time clock (RTC) 76 conserving power 80 determine remaining power 78 disposal 85 indicator light 78 installation 84 low charge 79 maintaining 85 maximum capacity 74 monitoring power 38, 77 power management 75 power options...

User Guide
Page 178
... computer to a network 91 HDMI™-compatible TV or display device 63 monitor 63 power cord/cable 38 power source 37 cooling fan adequate ventilation 35 customize computer settings 64 D data/entire system backup troubleshooting 142 desktop creating new icon 88 exploring the 87 icons 88 recycle bin 88 standard features 88 Windows® operating system 87 Device Manager fixing a problem 132 disabling touch pad 61, 159 display troubleshooting 136 display devices external 62 display output settings 63 display, external adjusting 64 disposal...
... computer to a network 91 HDMI™-compatible TV or display device 63 monitor 63 power cord/cable 38 power source 37 cooling fan adequate ventilation 35 customize computer settings 64 D data/entire system backup troubleshooting 142 desktop creating new icon 88 exploring the 87 icons 88 recycle bin 88 standard features 88 Windows® operating system 87 Device Manager fixing a problem 132 disabling touch pad 61, 159 display troubleshooting 136 display devices external 62 display output settings 63 display, external adjusting 64 disposal...
User Guide
Page 179
... enabling wireless devices 158 display brightness 157 Hibernation mode 155 increase speaker volume 160 keyboard backlight 151 keyboard overlays 160 Lock (Instant security) 152 Output (Display switch) 156 power plan 153 Sleep mode 154 using to set a power plan 82 volume mute 150 zoom 160 zoom in 160 zoom out 160 Hot Key Cards 148 Hot key functions 150 I icon desktop 88 moving to desktop 88 Index 179 recycle bin 88 safety 26 installing battery 84 memory modules 41 internal...
... enabling wireless devices 158 display brightness 157 Hibernation mode 155 increase speaker volume 160 keyboard backlight 151 keyboard overlays 160 Lock (Instant security) 152 Output (Display switch) 156 power plan 153 Sleep mode 154 using to set a power plan 82 volume mute 150 zoom 160 zoom in 160 zoom out 160 Hot Key Cards 148 Hot key functions 150 I icon desktop 88 moving to desktop 88 Index 179 recycle bin 88 safety 26 installing battery 84 memory modules 41 internal...
User Guide
Page 182
... USB Sleep and Charge cannot use 144 USB Wakeup function does not work 145 Windows® operating system not working 130 wireless networking 138 Trusted Platform Module (TPM) 118 U USB Sleep and Charge cannot use 144 USB Wakeup function does not work 145 user password, deleting 105 user password, setting 104 using a microphone 91 computer lock 66 hot key to set a power plan 82 Memory card reader 93 TOSHIBA eco power plan 83 touch pad 57 Web Camera 92 using the keyboard 68 Utilities 95 V video projector adjusting display 64 W warranty standard limited warranty 27 Web Camera using...
... USB Sleep and Charge cannot use 144 USB Wakeup function does not work 145 Windows® operating system not working 130 wireless networking 138 Trusted Platform Module (TPM) 118 U USB Sleep and Charge cannot use 144 USB Wakeup function does not work 145 user password, deleting 105 user password, setting 104 using a microphone 91 computer lock 66 hot key to set a power plan 82 Memory card reader 93 TOSHIBA eco power plan 83 touch pad 57 Web Camera 92 using the keyboard 68 Utilities 95 V video projector adjusting display 64 W warranty standard limited warranty 27 Web Camera using...


