Owners Manual
Page 8
... Mode Setting E2-32 2.9.3 BASIC Expansion Mode E2-34 2.10 Installing the Printer Drivers E2-35 2.10.1 Introduction...E2-35 2.10.2 General Description E2-35 2.10.3 Installing the Printer Driver E2-36 2.10.4 Uninstalling the Printer Driver E2-49 2.10.5 Adding/Deleting a LAN Port E2-50 2.10.6 Cautions ...E2...-52 2.10.7 Using the Printer Driver E2-53 2.11 Print Test ...E2-54 2.12 Position and Print Tone...
... Mode Setting E2-32 2.9.3 BASIC Expansion Mode E2-34 2.10 Installing the Printer Drivers E2-35 2.10.1 Introduction...E2-35 2.10.2 General Description E2-35 2.10.3 Installing the Printer Driver E2-36 2.10.4 Uninstalling the Printer Driver E2-49 2.10.5 Adding/Deleting a LAN Port E2-50 2.10.6 Cautions ...E2...-52 2.10.7 Using the Printer Driver E2-53 2.11 Print Test ...E2-54 2.12 Position and Print Tone...
Owners Manual
Page 11
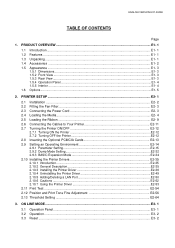
CD-ROM (1 pc.) (P/No.: 7FM1647000) • Bar code print application (Bartender ultra lite) • Windows Driver • Owner's Manual • Specifications (Programming, Key operation, etc.) • Product information (Catalogue) Warranty Disclaimer Sheet (1 sheet) Fan Filter (1 pc.) (P/No. PRODUCT OVERVIEW ENGLISH VERSION ...
CD-ROM (1 pc.) (P/No.: 7FM1647000) • Bar code print application (Bartender ultra lite) • Windows Driver • Owner's Manual • Specifications (Programming, Key operation, etc.) • Product information (Catalogue) Warranty Disclaimer Sheet (1 sheet) Fan Filter (1 pc.) (P/No. PRODUCT OVERVIEW ENGLISH VERSION ...

Owners Manual
Page 15
...the power cord Loading the media Connect a power cord to Your Printer Turning the power ON Setting the operating environment Installing the printer driver Print test Turn on a safe and stable location. Load a label stock or tag stock. 2.3 Connecting the Power Cord 2.4 ...Loading the Media Media sensor position alignment Loading the ribbon Adjust the position of thermal transfer printing, load the ribbon. 2.4 Loading the Media 2.5 Loading the Ribbon Connecting to a host computer Connect the printer to a host computer or...
...the power cord Loading the media Connect a power cord to Your Printer Turning the power ON Setting the operating environment Installing the printer driver Print test Turn on a safe and stable location. Load a label stock or tag stock. 2.3 Connecting the Power Cord 2.4 ...Loading the Media Media sensor position alignment Loading the ribbon Adjust the position of thermal transfer printing, load the ribbon. 2.4 Loading the Media 2.5 Loading the Ribbon Connecting to a host computer Connect the printer to a host computer or...
Owners Manual
Page 49
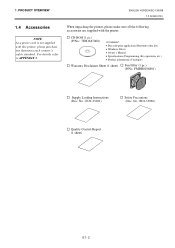
...series. 2.10.2 General Description (1) Features Once you install the TOSHIBA printer driver on your Windows host computer, you can use the TOSHIBA bar code printer, as well as the easy-to install the TOSHIBA printer driver for adding the LAN port, cautions and limitations. 2. You ... a parallel interface cable (printer cable), a USB cable, or a LAN cable to your host computer. (2) System Requirements To install the TOSHIBA printer driver on your host computer, the following system and environment are required: • Operating system: • Hardware: • Interface: Windows 98...
...series. 2.10.2 General Description (1) Features Once you install the TOSHIBA printer driver on your Windows host computer, you can use the TOSHIBA bar code printer, as well as the easy-to install the TOSHIBA printer driver for adding the LAN port, cautions and limitations. 2. You ... a parallel interface cable (printer cable), a USB cable, or a LAN cable to your host computer. (2) System Requirements To install the TOSHIBA printer driver on your host computer, the following system and environment are required: • Operating system: • Hardware: • Interface: Windows 98...

Owners Manual
Page 50
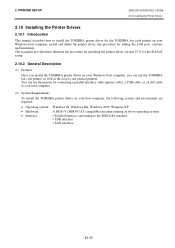
...Windows 2000/XP: Open the printer properties and select the "Ports" tab. Select "Disable bi-directional support for the port. 2. If the previous version of the printer driver has been installed on the interface connected to SPP (default). PRINTER SETUP ENGLISH VERSION EO1-33058 ...on your network, please install the printer driver by performing the installation procedure for the parallel interface, and also perform the following settings are using. Mark off the "Enable bidirectional support" checkbox. 2. After installation of the B-SX4T or B-SX5T series, make sure that...
...Windows 2000/XP: Open the printer properties and select the "Ports" tab. Select "Disable bi-directional support for the port. 2. If the previous version of the printer driver has been installed on the interface connected to SPP (default). PRINTER SETUP ENGLISH VERSION EO1-33058 ...on your network, please install the printer driver by performing the installation procedure for the parallel interface, and also perform the following settings are using. Mark off the "Enable bidirectional support" checkbox. 2. After installation of the B-SX4T or B-SX5T series, make sure that...
Owners Manual
Page 51
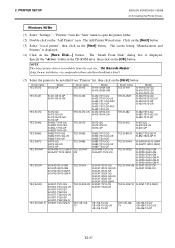
... installed from the "Start" menu to open the printer folder. (2) Double-click on the "Add Printer" icon. Driver name TEC B-372 TEC B-431 TEC B-472 TEC B-492 TEC B-682 TEC B-872 TEC B-SA4T TEC B-SV4 TEC B-SX5 TEC B-SX8T-R Model B-372-QP B-431-GS10-QP B-431-GS10-CN B-472-QQ B-472-QQ-US B-472-GH12-QQ...SX4T-GS10-QQ B-SX4T-GS10-QQ-US B-SX4T-GS10-QP B-SX4T-GS20-QQ B-SX4T-GS20-QQ-US B-SX4T-GS20-QP B-SX4T-GS20-QM-R B-SX5T-TS12-CN B-SX5T-TS22-CN CB-416-T3-QQ CB-416-T3-QQ-US CB-416-T3-QP Driver name TEC B-419 TEC B-452H TEC B-482 TEC B-672 TEC B-852-R TEC B-SA4G TEC B-SP2D TEC B-SX4-CN TEC B-SX6T-R TEC...
... installed from the "Start" menu to open the printer folder. (2) Double-click on the "Add Printer" icon. Driver name TEC B-372 TEC B-431 TEC B-472 TEC B-492 TEC B-682 TEC B-872 TEC B-SA4T TEC B-SV4 TEC B-SX5 TEC B-SX8T-R Model B-372-QP B-431-GS10-QP B-431-GS10-CN B-472-QQ B-472-QQ-US B-472-GH12-QQ...SX4T-GS10-QQ B-SX4T-GS10-QQ-US B-SX4T-GS10-QP B-SX4T-GS20-QQ B-SX4T-GS20-QQ-US B-SX4T-GS20-QP B-SX4T-GS20-QM-R B-SX5T-TS12-CN B-SX5T-TS22-CN CB-416-T3-QQ CB-416-T3-QQ-US CB-416-T3-QP Driver name TEC B-419 TEC B-452H TEC B-482 TEC B-672 TEC B-852-R TEC B-SA4G TEC B-SP2D TEC B-SX4-CN TEC B-SX6T-R TEC...

Owners Manual
Page 52
...from the "Available ports" list, then click on the [Next] button. When installation is completed, the new printer icon is installed. Select "Replace existing driver", then click on the [Next] button. (8) Change the printer name if necessary, and select whether or not you install the printer... driver for the first time, this screen is displayed. If you use the new one, is not displayed. (7) Select the port to select the existing installed printer driver or use the printer as the default printer ("Yes" or "No...
...from the "Available ports" list, then click on the [Next] button. When installation is completed, the new printer icon is installed. Select "Replace existing driver", then click on the [Next] button. (8) Change the printer name if necessary, and select whether or not you install the printer... driver for the first time, this screen is displayed. If you use the new one, is not displayed. (7) Select the port to select the existing installed printer driver or use the printer as the default printer ("Yes" or "No...

Owners Manual
Page 53
...] button. (5) Select the port to open the printer folder. (3) Double-click on the "Add Printer" icon. Driver name TEC B-372 TEC B-431 TEC B-472 TEC B-492 TEC B-682 TEC B-872 TEC B-SA4T TEC B-SV4 TEC B-SX5 TEC B-SX8T-R Model B-372-QP B-431-GS10-QP B-431-GS10-CN B-472-QQ B-472-QQ-US B-472-GH12-...SX4T-GS10-QQ B-SX4T-GS10-QQ-US B-SX4T-GS10-QP B-SX4T-GS20-QQ B-SX4T-GS20-QQ-US B-SX4T-GS20-QP B-SX4T-GS20-QM-R B-SX5T-TS12-CN B-SX5T-TS22-CN CB-416-T3-QQ CB-416-T3-QQ-US CB-416-T3-QP Driver name TEC B-419 TEC B-452H TEC B-482 TEC B-672 TEC B-852-R TEC B-SA4G TEC B-SP2D TEC B-SX4-CN TEC B-SX6T-R TEC...
...] button. (5) Select the port to open the printer folder. (3) Double-click on the "Add Printer" icon. Driver name TEC B-372 TEC B-431 TEC B-472 TEC B-492 TEC B-682 TEC B-872 TEC B-SA4T TEC B-SV4 TEC B-SX5 TEC B-SX8T-R Model B-372-QP B-431-GS10-QP B-431-GS10-CN B-472-QQ B-472-QQ-US B-472-GH12-...SX4T-GS10-QQ B-SX4T-GS10-QQ-US B-SX4T-GS10-QP B-SX4T-GS20-QQ B-SX4T-GS20-QQ-US B-SX4T-GS20-QP B-SX4T-GS20-QM-R B-SX5T-TS12-CN B-SX5T-TS22-CN CB-416-T3-QQ CB-416-T3-QQ-US CB-416-T3-QP Driver name TEC B-419 TEC B-452H TEC B-482 TEC B-672 TEC B-852-R TEC B-SA4G TEC B-SP2D TEC B-SX4-CN TEC B-SX6T-R TEC...

Owners Manual
Page 54
Click on the [Next] button. If you use the printer as the default printer ("Yes" or "No"). Select "Replace existing driver", then click on the [Next] button. (11) Select whether or not the printer will be shared with other network users ("Shared" or "Not shared"). ...installation is completed, the new printer icon is added in the "Printers" folder. E2-40 PRINTER SETUP ENGLISH VERSION EO1-33058 2.10 Installing the Printer Drivers (9) The "Use Existing Driver" screen is not displayed. (10) Change the printer name if necessary, and select whether or not you install the printer...
Click on the [Next] button. If you use the printer as the default printer ("Yes" or "No"). Select "Replace existing driver", then click on the [Next] button. (11) Select whether or not the printer will be shared with other network users ("Shared" or "Not shared"). ...installation is completed, the new printer icon is added in the "Printers" folder. E2-40 PRINTER SETUP ENGLISH VERSION EO1-33058 2.10 Installing the Printer Drivers (9) The "Use Existing Driver" screen is not displayed. (10) Change the printer name if necessary, and select whether or not you install the printer...
Owners Manual
Page 55
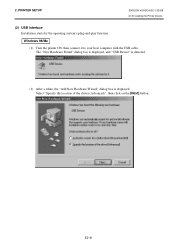
The "New Hardware Found" dialog box is displayed, and "USB Device" is detected. (2) After a while, the "Add New Hardware Wizard" dialog box is displayed. E2-41 2. Windows 98/Me (1) Turn the printer ON, then connect it to your host computer with the USB cable. Select "Specify the location of the driver (Advanced)", then click on the [Next] button. PRINTER SETUP ENGLISH VERSION EO1-33058 2.10 Installing the Printer Drivers (2) USB Interface Installation starts by the operating system's plug-and-play function.
The "New Hardware Found" dialog box is displayed, and "USB Device" is detected. (2) After a while, the "Add New Hardware Wizard" dialog box is displayed. E2-41 2. Windows 98/Me (1) Turn the printer ON, then connect it to your host computer with the USB cable. Select "Specify the location of the driver (Advanced)", then click on the [Next] button. PRINTER SETUP ENGLISH VERSION EO1-33058 2.10 Installing the Printer Drivers (2) USB Interface Installation starts by the operating system's plug-and-play function.
Owners Manual
Page 56
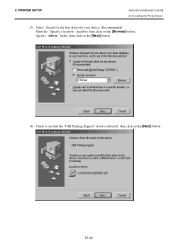
E2-42 Specify "\driver" folder, then click on the [Next] button. (4) Check to see that the "USB Printing Support" driver is detected, then click on the [Browse] button. 2. PRINTER SETUP ENGLISH VERSION EO1-33058 2.10 Installing the Printer Drivers (3) Select "Search for the best driver for your device. (Recommended)". Mark the "Specify a location" checkbox, then click on the [Next] button.
E2-42 Specify "\driver" folder, then click on the [Next] button. (4) Check to see that the "USB Printing Support" driver is detected, then click on the [Browse] button. 2. PRINTER SETUP ENGLISH VERSION EO1-33058 2.10 Installing the Printer Drivers (3) Select "Search for the best driver for your device. (Recommended)". Mark the "Specify a location" checkbox, then click on the [Next] button.

Owners Manual
Page 57
PRINTER SETUP ENGLISH VERSION EO1-33058 2.10 Installing the Printer Drivers (5) When the screen which indicates the USB Printing Support driver has been installed, is displayed, click on the [Next] button. Select "Specify the location of the driver (Advanced)", then click on the [Finish] button. (6) After a while, "TEC B-SA4T" is detected as a new hardware. (7) The "Add New Hardware Wizard" dialog box is displayed. 2. E2-43
PRINTER SETUP ENGLISH VERSION EO1-33058 2.10 Installing the Printer Drivers (5) When the screen which indicates the USB Printing Support driver has been installed, is displayed, click on the [Next] button. Select "Specify the location of the driver (Advanced)", then click on the [Finish] button. (6) After a while, "TEC B-SA4T" is detected as a new hardware. (7) The "Add New Hardware Wizard" dialog box is displayed. 2. E2-43

Owners Manual
Page 58
2. Specify "\driver" folder, then click on the [Next] button. (9) Check to see that the "TEC B-SA4T" driver is detected, then click on the [Browse] button. PRINTER SETUP ENGLISH VERSION EO1-33058 2.10 Installing the Printer Drivers (8) Select "Search for the best driver for your device. (Recommended)". Mark the "Specify a location" checkbox, then click on the [Next] button. E2-44
2. Specify "\driver" folder, then click on the [Next] button. (9) Check to see that the "TEC B-SA4T" driver is detected, then click on the [Browse] button. PRINTER SETUP ENGLISH VERSION EO1-33058 2.10 Installing the Printer Drivers (8) Select "Search for the best driver for your device. (Recommended)". Mark the "Specify a location" checkbox, then click on the [Next] button. E2-44

Owners Manual
Page 59
PRINTER SETUP ENGLISH VERSION EO1-33058 2.10 Installing the Printer Drivers (10) Change the printer name if necessary, and select whether or not you use the printer as the default printer ("Yes" or "No"). Click on the [Finish] button. (11) When the screen, which indicates TEC B-SA4T has been installed, is displayed, click on the [Finish] button. (12) When installation is completed, the new printer icon is added in the "Printers" folder. E2-45 2.
PRINTER SETUP ENGLISH VERSION EO1-33058 2.10 Installing the Printer Drivers (10) Change the printer name if necessary, and select whether or not you use the printer as the default printer ("Yes" or "No"). Click on the [Finish] button. (11) When the screen, which indicates TEC B-SA4T has been installed, is displayed, click on the [Finish] button. (12) When installation is completed, the new printer icon is added in the "Printers" folder. E2-45 2.
Owners Manual
Page 60
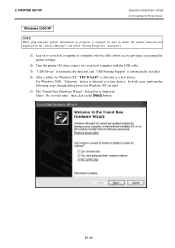
... printer ON, then connect it to your host computer as a new device. In both cases, perform the following steps, though dialog boxes for Windows XP, "TEC B-SA4T" is stopped, be sure to delete the printer detected and displayed on the "Device Manager" tab of the "System Properties" dialog box. (1) Log on... a while, for Windows XP are used. (5) The "Found New Hardware Wizard" dialog box is displayed. PRINTER SETUP ENGLISH VERSION EO1-33058 2.10 Installing the Printer Drivers Windows 2000/XP NOTE: When plug-and-play printer installation in progress is detected as a new device.
... printer ON, then connect it to your host computer as a new device. In both cases, perform the following steps, though dialog boxes for Windows XP, "TEC B-SA4T" is stopped, be sure to delete the printer detected and displayed on the "Device Manager" tab of the "System Properties" dialog box. (1) Log on... a while, for Windows XP are used. (5) The "Found New Hardware Wizard" dialog box is displayed. PRINTER SETUP ENGLISH VERSION EO1-33058 2.10 Installing the Printer Drivers Windows 2000/XP NOTE: When plug-and-play printer installation in progress is detected as a new device.

Owners Manual
Page 61
E2-47 Mark the "Include this location in these locations". 2. PRINTER SETUP ENGLISH VERSION EO1-33058 2.10 Installing the Printer Drivers (6) Select "Install from a list or specific location (Advanced)", then click on the [Next] button. (7) Select "Search for the best driver in the search" checkbox, then click on the [Next] button. Specify the "\driver" folder in the CD-ROM, then click on the [Browse] button.
E2-47 Mark the "Include this location in these locations". 2. PRINTER SETUP ENGLISH VERSION EO1-33058 2.10 Installing the Printer Drivers (6) Select "Install from a list or specific location (Advanced)", then click on the [Next] button. (7) Select "Search for the best driver in the search" checkbox, then click on the [Next] button. Specify the "\driver" folder in the CD-ROM, then click on the [Browse] button.
Owners Manual
Page 62
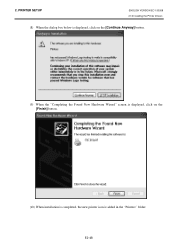
E2-48 PRINTER SETUP ENGLISH VERSION EO1-33058 2.10 Installing the Printer Drivers (8) When the dialog box below is displayed, click on the [Continue Anyway] button. (9) When the "Completing the Found New Hardware Wizard" screen is displayed, click on the [Finish] button. (10) When installation is completed, the new printer icon is added in the "Printers" folder. 2.
E2-48 PRINTER SETUP ENGLISH VERSION EO1-33058 2.10 Installing the Printer Drivers (8) When the dialog box below is displayed, click on the [Continue Anyway] button. (9) When the "Completing the Found New Hardware Wizard" screen is displayed, click on the [Finish] button. (10) When installation is completed, the new printer icon is added in the "Printers" folder. 2.
Owners Manual
Page 63
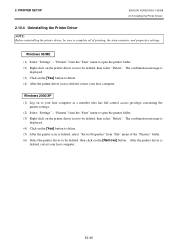
... deleted, then select "Delete". Windows 2000/XP (1) Log on to complete all of the "Printers" folder. (6) Select the printer driver to be deleted, then click on the [Remove] button. Windows 98/ME (1) Select "Settings" - "Printers" from the "Start" menu to open ... host computer. The confirmation message is displayed. (3) Click on the printer driver icon to delete. (4) After the printer driver icon is displayed. (4) Click on the printer driver icon to be deleted, then select "Delete". After the printer driver is deleted, select "Server Properties" from the "Start" menu to open...
... deleted, then select "Delete". Windows 2000/XP (1) Log on to complete all of the "Printers" folder. (6) Select the printer driver to be deleted, then click on the [Remove] button. Windows 98/ME (1) Select "Settings" - "Printers" from the "Start" menu to open ... host computer. The confirmation message is displayed. (3) Click on the printer driver icon to delete. (4) After the printer driver icon is displayed. (4) Click on the printer driver icon to be deleted, then select "Delete". After the printer driver is deleted, select "Server Properties" from the "Start" menu to open...
Owners Manual
Page 64
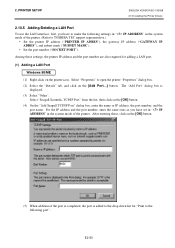
... list, then click on the [Add Port...] button. PRINTER SETUP ENGLISH VERSION EO1-33058 2.10 Installing the Printer Drivers 2.10.5 Adding/Deleting a LAN Port To use the LAN interface, first, you have to TOSHIBA TEC support representative.) • Set the printer IP address ("PRINTER IP ADRES"), the gateway IP address ("GATEWAY IP ADRES...
... list, then click on the [Add Port...] button. PRINTER SETUP ENGLISH VERSION EO1-33058 2.10 Installing the Printer Drivers 2.10.5 Adding/Deleting a LAN Port To use the LAN interface, first, you have to TOSHIBA TEC support representative.) • Set the printer IP address ("PRINTER IP ADRES"), the gateway IP address ("GATEWAY IP ADRES...
Owners Manual
Page 65
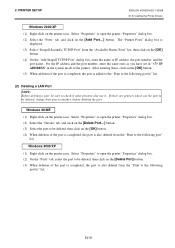
..., be deleted, then click on the printer icon. If there are printers which use it. PRINTER SETUP ENGLISH VERSION EO1-33058 2.10 Installing the Printer Drivers Windows 2000/XP (1) Right-click on the [Delete Port] button. (3) When deletion of the printer.
..., be deleted, then click on the printer icon. If there are printers which use it. PRINTER SETUP ENGLISH VERSION EO1-33058 2.10 Installing the Printer Drivers Windows 2000/XP (1) Right-click on the [Delete Port] button. (3) When deletion of the printer.