Owners Manual
Page 8
... OF CONTENTS Page 1. PRINTER SETUP ...E2- 1 2.1 Installation ...E2- 2 2.2 Fitting the Fan Filter...E2- 3 2.3 Connecting the Power Cord E2- 3 2.4 Loading the Media ...E2- 4 2.5 Loading the Ribbon ...E2- 9 2.6 Connecting the Cables to Your Printer E2-11 2.7 Turning the Printer ON/OFF E2-12 2.7.1 Turning ON the Printer E2-12 2.7.2 Turning OFF the Printer E2-12 2.8 Inserting the Optional PCMCIA Cards E2-13 2.9 Setting an Operating Environment E2-14 2.9.1 Parameter Setting...E2-15 2.9.2 Dump Mode Setting E2...
... OF CONTENTS Page 1. PRINTER SETUP ...E2- 1 2.1 Installation ...E2- 2 2.2 Fitting the Fan Filter...E2- 3 2.3 Connecting the Power Cord E2- 3 2.4 Loading the Media ...E2- 4 2.5 Loading the Ribbon ...E2- 9 2.6 Connecting the Cables to Your Printer E2-11 2.7 Turning the Printer ON/OFF E2-12 2.7.1 Turning ON the Printer E2-12 2.7.2 Turning OFF the Printer E2-12 2.8 Inserting the Optional PCMCIA Cards E2-13 2.9 Setting an Operating Environment E2-14 2.9.1 Parameter Setting...E2-15 2.9.2 Dump Mode Setting E2...
Owners Manual
Page 10
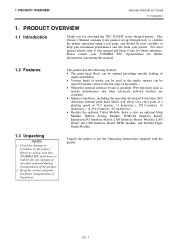
... developed 8 dots/mm (203 dots/inch) thermal print head which will allow very clear print at a printing speed of media can be used as the media sensors can be read carefully to help gain maximum performance and life from the centre to this manual. 1.2 Features 1.3 Unpacking NOTES: 1. However, please note that TOSHIBA TEC shall have no liability for future reference. Check for choosing the TEC B-SX4T series thermal printer. 1.
... developed 8 dots/mm (203 dots/inch) thermal print head which will allow very clear print at a printing speed of media can be used as the media sensors can be read carefully to help gain maximum performance and life from the centre to this manual. 1.2 Features 1.3 Unpacking NOTES: 1. However, please note that TOSHIBA TEC shall have no liability for future reference. Check for choosing the TEC B-SX4T series thermal printer. 1.

Owners Manual
Page 15
...- 1 PRINTER SETUP ENGLISH VERSION EO1-33058 2. PRINTER SETUP 2. If the print start position cannot be detected properly even an automatic threshold setting is used . In case of feed gap sensor or black mark sensor according to the media to the Safety Precautions in this manual, install the printer on the printer power. 2.7 Turning the Printer ON/OFF Set the printer parameters in the system mode. 2.9 Setting an Operating Environment If necessary, install the printer driver...
...- 1 PRINTER SETUP ENGLISH VERSION EO1-33058 2. PRINTER SETUP 2. If the print start position cannot be detected properly even an automatic threshold setting is used . In case of feed gap sensor or black mark sensor according to the media to the Safety Precautions in this manual, install the printer on the printer power. 2.7 Turning the Printer ON/OFF Set the printer parameters in the system mode. 2.9 Setting an Operating Environment If necessary, install the printer driver...

Owners Manual
Page 39
... when high quality printing such as default, but if the broken element affects bar code readability or actual operations, please replace the print head with a proper one. (18) Auto Print Head Check Selection This parameter is to perform an Auto Print Head check. 2. It is recommended that this function should be cleared by pressing the [RESTART] key, but if a communication error occurs or a communication is found, the printer stops, displaying "HEAD ERROR". 2.
... when high quality printing such as default, but if the broken element affects bar code readability or actual operations, please replace the print head with a proper one. (18) Auto Print Head Check Selection This parameter is to perform an Auto Print Head check. 2. It is recommended that this function should be cleared by pressing the [RESTART] key, but if a communication error occurs or a communication is found, the printer stops, displaying "HEAD ERROR". 2.
Owners Manual
Page 41
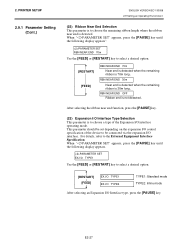
...) Expansion I/O Interface Type Selection This parameter is 30m long. This parameter should be set depending on the expansion I/O control specification of the Expansion I /O interface. E2-27 PRINTER SETUP 2.9.1 Parameter Setting (Cont.) ENGLISH VERSION EO1-33058 2.9 Setting an Operating Environment (22) Ribbon Near End Selection This parameter is to be connected via the expansion I /O interface operating mode. PARAMETER SET EX.I/O TYPE1 Use the [FEED] or [RESTART...
...) Expansion I/O Interface Type Selection This parameter is 30m long. This parameter should be set depending on the expansion I/O control specification of the Expansion I /O interface. E2-27 PRINTER SETUP 2.9.1 Parameter Setting (Cont.) ENGLISH VERSION EO1-33058 2.9 Setting an Operating Environment (22) Ribbon Near End Selection This parameter is to be connected via the expansion I /O interface operating mode. PARAMETER SET EX.I/O TYPE1 Use the [FEED] or [RESTART...

Owners Manual
Page 50
... the printer and the operation system you install this printer". After installation of the printer driver is completed, add the LAN port by referring to Section 2.10.4 Uninstalling the Printer Driver.) To print via your network, please install the printer driver by performing the appropriate procedure. Select "Disable bi-directional support for the port. 2. 2. If the previous version of the B-SX4T or B-SX5T series, make sure that the Centronics interface type is displayed. The "Spool Settings...
... the printer and the operation system you install this printer". After installation of the printer driver is completed, add the LAN port by referring to Section 2.10.4 Uninstalling the Printer Driver.) To print via your network, please install the printer driver by performing the appropriate procedure. Select "Disable bi-directional support for the port. 2. 2. If the previous version of the B-SX4T or B-SX5T series, make sure that the Centronics interface type is displayed. The "Spool Settings...

Owners Manual
Page 53
NOTE: The latest printer driver is displayed. (7) Specify the "\driver" folder in the CD-ROM drive, then click on the [Next] button. The Add Printer Wizard runs. The "Install From Disk" dialog box is available from the web site, "the Barcode Master". (http://www.toshibatec-ris.com/products/barcode/download/index.html) (8) Select the printer to be used for printing from the "Available ports" list, then click...
NOTE: The latest printer driver is displayed. (7) Specify the "\driver" folder in the CD-ROM drive, then click on the [Next] button. The Add Printer Wizard runs. The "Install From Disk" dialog box is available from the web site, "the Barcode Master". (http://www.toshibatec-ris.com/products/barcode/download/index.html) (8) Select the printer to be used for printing from the "Available ports" list, then click...
Owners Manual
Page 63
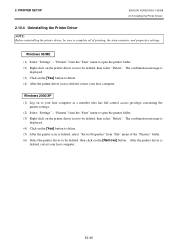
2. PRINTER SETUP ENGLISH VERSION EO1-33058 2.10 Installing the Printer Drivers 2.10.4 Uninstalling the Printer Driver NOTE: Before uninstalling the printer driver, be sure to complete all of the "Printers" folder. (6) Select the printer driver to be deleted, then click on the [Yes] button to delete. (5) After the printer icon is deleted, select "Server Properties" from "File" menu of printing, the status monitor, and properties settings. Windows 2000/XP (1) Log on the...
2. PRINTER SETUP ENGLISH VERSION EO1-33058 2.10 Installing the Printer Drivers 2.10.4 Uninstalling the Printer Driver NOTE: Before uninstalling the printer driver, be sure to complete all of the "Printers" folder. (6) Select the printer driver to be deleted, then click on the [Yes] button to delete. (5) After the printer icon is deleted, select "Server Properties" from "File" menu of printing, the status monitor, and properties settings. Windows 2000/XP (1) Log on the...
Owners Manual
Page 65
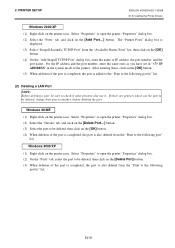
... printer. Select "Properties" to open the printer "Properties" dialog box. (2) Select the "Details" tab, and click on the [Delete Port...] button. (3) Select the port to be sure to check if other printers also use the port to the following port" list. E2-51 For the IP address and the port number, enter the same ones as you have set in " IP ADDRESS" in the system mode of the port...
... printer. Select "Properties" to open the printer "Properties" dialog box. (2) Select the "Details" tab, and click on the [Delete Port...] button. (3) Select the port to be sure to check if other printers also use the port to the following port" list. E2-51 For the IP address and the port number, enter the same ones as you have set in " IP ADDRESS" in the system mode of the port...

Owners Manual
Page 66
... not upgraded properly. (2) Others • If your operating system is Windows 2000 or Windows XP, when plug-and-play printer installation in progress is stopped, be sure to delete the printer detected and displayed on the "Device Manager" tab of the "System Properties" dialog box. • Before uninstalling the printer driver, be sure to complete all of printing, the status monitor, and properties settings...
... not upgraded properly. (2) Others • If your operating system is Windows 2000 or Windows XP, when plug-and-play printer installation in progress is stopped, be sure to delete the printer detected and displayed on the "Device Manager" tab of the "System Properties" dialog box. • Before uninstalling the printer driver, be sure to complete all of printing, the status monitor, and properties settings...
User Manual
Page 14
... cable: 36 pins (3) USB: B plug (Option) (4) LAN: 10 Base-T or 100 Base-TX (Option) This section describes the outline of the printer setup. 1. Load the media. (Refer to Section 2.10.) 11. Perform a test print. (Refer to Section 2.7.) 7. Refer to insert the power cord plug into place as shown in this manual and set up the printer at a proper location. 3. Install the Printer Drivers. (Refer to the Printer Driver Manual...
... cable: 36 pins (3) USB: B plug (Option) (4) LAN: 10 Base-T or 100 Base-TX (Option) This section describes the outline of the printer setup. 1. Load the media. (Refer to Section 2.10.) 11. Perform a test print. (Refer to Section 2.7.) 7. Refer to insert the power cord plug into place as shown in this manual and set up the printer at a proper location. 3. Install the Printer Drivers. (Refer to the Printer Driver Manual...

User Manual
Page 36
.... 1. Clean the cutter blade. The Built-In Rewinder Unit is not installed properly. 4. Take up any slack in the Cutter. 3. Load a new ribbon. Remove the backing paper from another electric appliance. 3. Turn off the printer again, and call a TOSHIBA TEC authorised service representative. The Power Cord is not loaded properly. The media is printed on . E5- 2 Solutions 1. Test with the Print Head. Load the media properly. 2. Solve the error in the Power Cord...
.... 1. Clean the cutter blade. The Built-In Rewinder Unit is not installed properly. 4. Take up any slack in the Cutter. 3. Load a new ribbon. Remove the backing paper from another electric appliance. 3. Turn off the printer again, and call a TOSHIBA TEC authorised service representative. The Power Cord is not loaded properly. The media is printed on . E5- 2 Solutions 1. Test with the Print Head. Load the media properly. 2. Solve the error in the Power Cord...

User Manual
Page 38
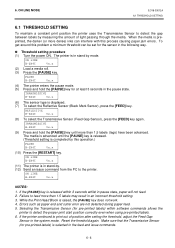
... setting. 3. Load a pre-printed media roll. 3. The sensor type is raised, the [PAUSE] key does not work. 4. Black mark sensor [FEED] key Feed gap sensor 8. 5. A paper end error cannot be adjusted by pressing the [FEED] key. When the media is in stand-by this operation.) 9. Threshold setting procedure 1. To get around this process causing paper jam errors. The printer is pre-printed, the darker (or more dense) inks can interfere with this problem...
... setting. 3. Load a pre-printed media roll. 3. The sensor type is raised, the [PAUSE] key does not work. 4. Black mark sensor [FEED] key Feed gap sensor 8. 5. A paper end error cannot be adjusted by pressing the [FEED] key. When the media is in stand-by this operation.) 9. Threshold setting procedure 1. To get around this process causing paper jam errors. The printer is pre-printed, the darker (or more dense) inks can interfere with this problem...
User Manual
Page 70
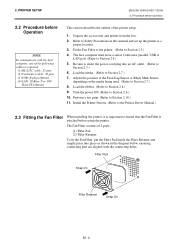
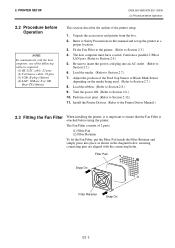
... manual and set up the printer at a proper location. 3. Fit the Fan Filter to the printer. (Refer to Section 2.7.) 7. Turn the power ON. (Refer to Section 2.8.) 9. The Fan Filter consists of the Feed Gap Sensor or Black Mark Sensor depending on the media being used. (Refer to Section 2.4.) 5. Load the ribbon. (Refer to Section 2.6.) 10. The host computer must have a serial, Centronics parallel, USB...
... manual and set up the printer at a proper location. 3. Fit the Fan Filter to the printer. (Refer to Section 2.7.) 7. Turn the power ON. (Refer to Section 2.8.) 9. The Fan Filter consists of the Feed Gap Sensor or Black Mark Sensor depending on the media being used. (Refer to Section 2.4.) 5. Load the ribbon. (Refer to Section 2.6.) 10. The host computer must have a serial, Centronics parallel, USB...

User Manual
Page 90
... a weekly basis. 4.1 Cleaning To maintain the printer performance and print quality, please clean the printer regularly, or whenever the media or ribbon is replaced. 4.1.1 Print Head/Platen/ Sensors CAUTION! 1. Do not touch the Print Head Element with alcohol. Turn off the power and unplug the printer. 2. Be sure to pinch your authorised TOSHIBA TEC service representative. 1. Do not pour water directly onto the printer. Do not use the Print Head Cleaner enclosed...
... a weekly basis. 4.1 Cleaning To maintain the printer performance and print quality, please clean the printer regularly, or whenever the media or ribbon is replaced. 4.1.1 Print Head/Platen/ Sensors CAUTION! 1. Do not touch the Print Head Element with alcohol. Turn off the power and unplug the printer. 2. Be sure to pinch your authorised TOSHIBA TEC service representative. 1. Do not pour water directly onto the printer. Do not use the Print Head Cleaner enclosed...

User Manual
Page 94
... the Power Cord. 2. Turn off and then on. The media is blurred. 1. The print head is not clean. The Print Head is not installed properly. 4. The cutter does not cut. 1. Plug in the message display. (See Section 5.1 for more detail.) 1. 5. The media is not loaded properly. 2. If the problem is jammed in an error condition. If this does not solve the problem, turn off the printer, and call a TOSHIBA TEC authorised service...
... the Power Cord. 2. Turn off and then on. The media is blurred. 1. The print head is not clean. The Print Head is not installed properly. 4. The cutter does not cut. 1. Plug in the message display. (See Section 5.1 for more detail.) 1. 5. The media is not loaded properly. 2. If the problem is jammed in an error condition. If this does not solve the problem, turn off the printer, and call a TOSHIBA TEC authorised service...
User Manual
Page 96
... get around this operation.) 9. Load a pre-printed media roll. 3. Selecting the Transmissive Sensor (for the sensor in the pause state. 6. The printer is in stand by this problem a minimum threshold can interfere with this process causing paper jam errors. Threshold setting procedure 1. 5. Send an issue command from the PC to be fed until more dense) inks can be set for pre-printed labels) within 3 seconds...
... get around this operation.) 9. Load a pre-printed media roll. 3. Selecting the Transmissive Sensor (for the sensor in the pause state. 6. The printer is in stand by this problem a minimum threshold can interfere with this process causing paper jam errors. Threshold setting procedure 1. 5. Send an issue command from the PC to be fed until more dense) inks can be set for pre-printed labels) within 3 seconds...
User Manual
Page 119
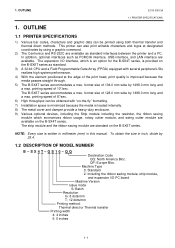
.... To obtain the size in this manual. format size of 8"/sec. 6) High throughput can be obtained with several peripheral LSIs realizes high system performance. 4) With the element positioned at designated coordinates by 25.4. 1.2 DESCRIPTION OF MODEL NUMBER B - format size of 10"/sec. 1. OUTLINE EO10-33013A 1.1 PRINTER SPECIFICATIONS 1. OUTLINE 1.1 PRINTER SPECIFICATIONS 1) Various bar codes, characters and graphic data can be printed using a graphic command. 2) The...
.... To obtain the size in this manual. format size of 8"/sec. 6) High throughput can be obtained with several peripheral LSIs realizes high system performance. 4) With the element positioned at designated coordinates by 25.4. 1.2 DESCRIPTION OF MODEL NUMBER B - format size of 10"/sec. 1. OUTLINE EO10-33013A 1.1 PRINTER SPECIFICATIONS 1. OUTLINE 1.1 PRINTER SPECIFICATIONS 1) Various bar codes, characters and graphic data can be printed using a graphic command. 2) The...
User Manual
Page 246
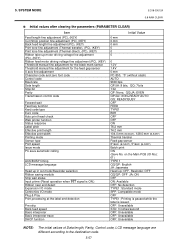
... adjustment (Thermal transfer), (PC), (KEY) Print tone fine adjustment (Thermal direct), (PC), (KEY) Ribbon take-up motor driving voltage fine adjustment (PC), (KEY) Ribbon feed motor driving voltage fine adjustment (PC), (KEY) Threshold manual fine adjustment for the black mark sensor Threshold manual fine adjustment for the feed gap sensor X axis fine adjustment Character code and zero font code Control code Baud rate Data length Stop bit Parity Transmission control code Forward wait Feed key function Kanji code type Euro code Auto print head check Web printer...
... adjustment (Thermal transfer), (PC), (KEY) Print tone fine adjustment (Thermal direct), (PC), (KEY) Ribbon take-up motor driving voltage fine adjustment (PC), (KEY) Ribbon feed motor driving voltage fine adjustment (PC), (KEY) Threshold manual fine adjustment for the black mark sensor Threshold manual fine adjustment for the feed gap sensor X axis fine adjustment Character code and zero font code Control code Baud rate Data length Stop bit Parity Transmission control code Forward wait Feed key function Kanji code type Euro code Auto print head check Web printer...
User Manual
Page 258
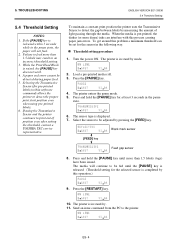
... this process causing paper jam errors. PAUSE B-SX4T Vx.x (4) The printer enters the pause mode. (5) Press and hold the [PAUSE] key until the [PAUSE] key is released. (Threshold setting is completed by . (12) Send an issue command from the PC to feed more than 1.5 labels (tags) have been advanced. ON LINE B-SX4T Vx.x NOTES: 1. Reset the threshold again. ON LINE B-SX4T Vx.x (2) Load a media roll. (3) Press the...
... this process causing paper jam errors. PAUSE B-SX4T Vx.x (4) The printer enters the pause mode. (5) Press and hold the [PAUSE] key until the [PAUSE] key is released. (Threshold setting is completed by . (12) Send an issue command from the PC to feed more than 1.5 labels (tags) have been advanced. ON LINE B-SX4T Vx.x NOTES: 1. Reset the threshold again. ON LINE B-SX4T Vx.x (2) Load a media roll. (3) Press the...


