Owners Manual
Page 7
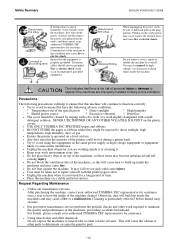
Disconnect the plug. NEVER USE THINNER OR ANY OTHER VOLATILE SOLVENT on the plastic covers. • USE ONLY TOSHIBA TEC SPECIFIED paper and ribbons. • DO NOT STORE the paper or ribbons where they might be exposed to direct sunlight, high temperatures, high humidity, dust, or gas. • Ensure the printer is operated on a level surface...
Disconnect the plug. NEVER USE THINNER OR ANY OTHER VOLATILE SOLVENT on the plastic covers. • USE ONLY TOSHIBA TEC SPECIFIED paper and ribbons. • DO NOT STORE the paper or ribbons where they might be exposed to direct sunlight, high temperatures, high humidity, dust, or gas. • Ensure the printer is operated on a level surface...
Owners Manual
Page 8
...- 4 1.5.5 Interior ...E1- 4 1.6 Options ...E1- 5 2. PRINTER SETUP ...E2- 1 2.1 Installation ...E2- 2 2.2 Fitting the Fan Filter...E2- 3 2.3 Connecting the Power Cord E2- 3 2.4 Loading the Media ...E2- 4 2.5 Loading the Ribbon ...E2- 9 2.6 Connecting the Cables to Your Printer E2-11 2.7 Turning the Printer ON/OFF E2-12 2.7.1 Turning ON the Printer E2-12 2.7.2 Turning OFF the...
...- 4 1.5.5 Interior ...E1- 4 1.6 Options ...E1- 5 2. PRINTER SETUP ...E2- 1 2.1 Installation ...E2- 2 2.2 Fitting the Fan Filter...E2- 3 2.3 Connecting the Power Cord E2- 3 2.4 Loading the Media ...E2- 4 2.5 Loading the Ribbon ...E2- 9 2.6 Connecting the Cables to Your Printer E2-11 2.7 Turning the Printer ON/OFF E2-12 2.7.1 Turning ON the Printer E2-12 2.7.2 Turning OFF the...
Owners Manual
Page 9
... Area of the Transmissive Sensor E7- 2 7.1.3 Detection Area of the Reflective Sensor E7- 3 7.1.4 Effective Print Area E7- 3 7.1.5 RFID Tags ...E7- 4 7.2 Ribbon ...E7- 6 7.3 Recommended Media and Ribbon Types E7- 6 7.4 Care/Handling of TOSHIBA TEC. 2. ENGLISH VERSION EO1-33058 Page 4. The contents of this manual may be required to any queries you may not be changed...
... Area of the Transmissive Sensor E7- 2 7.1.3 Detection Area of the Reflective Sensor E7- 3 7.1.4 Effective Print Area E7- 3 7.1.5 RFID Tags ...E7- 4 7.2 Ribbon ...E7- 6 7.3 Recommended Media and Ribbon Types E7- 6 7.4 Care/Handling of TOSHIBA TEC. 2. ENGLISH VERSION EO1-33058 Page 4. The contents of this manual may be required to any queries you may not be changed...
Owners Manual
Page 10
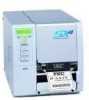
... a printing speed of the product. 2. This printer has the following features: • The print head block can be moved from your TOSHIBA TEC representative for future reference. Unpack the printer as the media sensors can be used as per the Unpacking Instructions supplied with the printer. Please ...contact your printer. 1. PRODUCT OVERVIEW 1.1 Introduction Thank you for future transportation of media can be opened providing smooth loading of media and ribbon. • Various kinds of the printer. Keep the cartons and pads for choosing the TEC B-SX4T series thermal printer.
... a printing speed of the product. 2. This printer has the following features: • The print head block can be moved from your TOSHIBA TEC representative for future reference. Unpack the printer as the media sensors can be used as per the Unpacking Instructions supplied with the printer. Please ...contact your printer. 1. PRODUCT OVERVIEW 1.1 Introduction Thank you for future transportation of media can be opened providing smooth loading of media and ribbon. • Various kinds of the printer. Keep the cartons and pads for choosing the TEC B-SX4T series thermal printer.
Owners Manual
Page 13
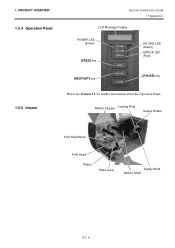
1. Ribbon Stopper Locking Ring Supply Holder Print Head Block Print Head Platen Head Lever Supply Shaft Ribbon Shaft E1- 4 PRODUCT OVERVIEW 1.5.4 Operation Panel 1.5.5 Interior ENGLISH VERSION EO1-33058 1.5 Appearance LCD Message Display POWER LED (Green) [FEED] key ON LINE LED (Green) ERROR LED (Red) [RESTART] key [PAUSE] key Please see Section 3.1 for further information about the Operation Panel.
1. Ribbon Stopper Locking Ring Supply Holder Print Head Block Print Head Platen Head Lever Supply Shaft Ribbon Shaft E1- 4 PRODUCT OVERVIEW 1.5.4 Operation Panel 1.5.5 Interior ENGLISH VERSION EO1-33058 1.5 Appearance LCD Message Display POWER LED (Green) [FEED] key ON LINE LED (Green) ERROR LED (Red) [RESTART] key [PAUSE] key Please see Section 3.1 for further information about the Operation Panel.
Owners Manual
Page 14
...-EU-R Applicable frequency range differs depending on -demand (peel-off) operation or to an external interface board device with the exclusive interface. Ribbon saving module B-9904-R2-QM-R This module moves the print head up labels and backing paper together when using a solenoid to a PC... a communication by using the rewind guide plate. NOTE: To purchase the optional kits, please contact the nearest authorised TOSHIBA TEC representative or TOSHIBA TEC Head Quarters. module Wireless LAN board B-9700-WLAN-QM-R Installing this board enables a connection to minimise...
...-EU-R Applicable frequency range differs depending on -demand (peel-off) operation or to an external interface board device with the exclusive interface. Ribbon saving module B-9904-R2-QM-R This module moves the print head up labels and backing paper together when using a solenoid to a PC... a communication by using the rewind guide plate. NOTE: To purchase the optional kits, please contact the nearest authorised TOSHIBA TEC representative or TOSHIBA TEC Head Quarters. module Wireless LAN board B-9700-WLAN-QM-R Installing this board enables a connection to minimise...

Owners Manual
Page 15
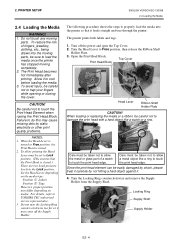
...stock. 2.3 Connecting the Power Cord 2.4 Loading the Media Media sensor position alignment Loading the ribbon Adjust the position of thermal transfer printing, load the ribbon. 2.4 Loading the Media 2.5 Loading the Ribbon Connecting to a host computer Connect the printer to a host computer or a network. 2.6... properly when pre-printed label is performing, manually set the threshold automatically. The section includes precautions, loading media and ribbon, connecting cables, setting the operating environment of the printer, then, to the Safety Precautions in this manual, install the...
...stock. 2.3 Connecting the Power Cord 2.4 Loading the Media Media sensor position alignment Loading the ribbon Adjust the position of thermal transfer printing, load the ribbon. 2.4 Loading the Media 2.5 Loading the Ribbon Connecting to a host computer Connect the printer to a host computer or a network. 2.6... properly when pre-printed label is performing, manually set the threshold automatically. The section includes precautions, loading media and ribbon, connecting cables, setting the operating environment of the printer, then, to the Safety Precautions in this manual, install the...
Owners Manual
Page 16
...the printer. • For best results, and longer printer life, use only TOSHIBA TEC recommended media and ribbons. • Store the media and ribbons in a location free from the printer whenever working on the inside of AC ...cloth or a clean cloth slightly dampened with a mild detergent solution. • Use caution when cleaning the thermal print head as you should never remove any of the moving parts of the printer especially the optional cutter ...cord from excessive humidity, high temperature, dust, vibration or direct sunlight. • Keep your work environment static free.
...the printer. • For best results, and longer printer life, use only TOSHIBA TEC recommended media and ribbons. • Store the media and ribbons in a location free from the printer whenever working on the inside of AC ...cloth or a clean cloth slightly dampened with a mild detergent solution. • Use caution when cleaning the thermal print head as you should never remove any of the moving parts of the printer especially the optional cutter ...cord from excessive humidity, high temperature, dust, vibration or direct sunlight. • Keep your work environment static free.
Owners Manual
Page 18
... Ring counterclockwise and remove the Supply Holder from the Supply Shaft. Locking Ring Supply Shaft Supply Holder E2- 4 Be careful not to TOSHIBA TEC authorised service representative. 3. To allow a metal object like a watch to Free position, the Print Head is raised. 2. For details... has stopped moving parts. To reduce the risk of a watch or a ring. Top Cover Print Head Block c d Head Lever Ribbon Shaft Holder Plate CAUTION! PRINTER SETUP ENGLISH VERSION EO1-33058 2.4 Loading the Media 2.4 Loading the Media WARNING! 1. When the Head Lever...
... Ring counterclockwise and remove the Supply Holder from the Supply Shaft. Locking Ring Supply Shaft Supply Holder E2- 4 Be careful not to TOSHIBA TEC authorised service representative. 3. To allow a metal object like a watch to Free position, the Print Head is raised. 2. For details... has stopped moving parts. To reduce the risk of a watch or a ring. Top Cover Print Head Block c d Head Lever Ribbon Shaft Holder Plate CAUTION! PRINTER SETUP ENGLISH VERSION EO1-33058 2.4 Loading the Media 2.4 Loading the Media WARNING! 1. When the Head Lever...
Owners Manual
Page 22
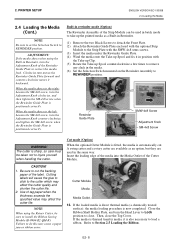
... few times to remove any slack in Rewinder, turn the Adjustment Knob of the Rewinder Guide Plate to close the Top Cover. Close the Ribbon Shaft Holder Plate, and turn the Adjustment Knob counter-clockwise, and tighten the SM-4x8 screw when the Rewinder Guide Plate is automatically cut... the left: Loosen the SM-4x8 screw, turn the Head Lever to Lock position to correct the media feed. If the loaded media is direct thermal media (a chemically treated surface), the media loading procedure is positioned correctly. When the media skews to do this may affect the cutter life. ...
... few times to remove any slack in Rewinder, turn the Adjustment Knob of the Rewinder Guide Plate to close the Top Cover. Close the Ribbon Shaft Holder Plate, and turn the Adjustment Knob counter-clockwise, and tighten the SM-4x8 screw when the Rewinder Guide Plate is automatically cut... the left: Loosen the SM-4x8 screw, turn the Head Lever to Lock position to correct the media feed. If the loaded media is direct thermal media (a chemically treated surface), the media loading procedure is positioned correctly. When the media skews to do this may affect the cutter life. ...
Owners Manual
Page 23
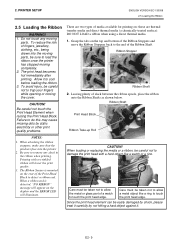
... print quality problems. There are thermal transfer media and direct thermal media (a chemically treated surface). Be sure to detect a ribbon end. The Ribbon Sensor is detected, "NO RIBBON" message will appear on the top and bottom of the Ribbon Stoppers and move the Ribbon Stoppers back to trap your fingers... closing the cover. Since the print head element can be sure to touch the print head edge. 2. DO NOT LOAD a ribbon when using a direct thermal media. 1. To reduce the risk of the Print Head Block to remove any moving completely. 2. Leaving plenty of media available ...
... print quality problems. There are thermal transfer media and direct thermal media (a chemically treated surface). Be sure to detect a ribbon end. The Ribbon Sensor is detected, "NO RIBBON" message will appear on the top and bottom of the Ribbon Stoppers and move the Ribbon Stoppers back to trap your fingers... closing the cover. Since the print head element can be sure to touch the print head edge. 2. DO NOT LOAD a ribbon when using a direct thermal media. 1. To reduce the risk of the Print Head Block to remove any moving completely. 2. Leaving plenty of media available ...
Owners Manual
Page 24
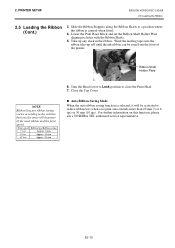
.... 5. For further information on this function, please ask a TOSHIBA TEC authorised service representative. Print speed Ribbon loss/Ribbon saving 3"/sec. Approx. 10 mm 10"/sec. Auto Ribbon Saving Mode When the auto ribbon saving function is centred when fitted. 4. Slide the Ribbon Stoppers along the Ribbon Shafts to reduce ribbon loss when a no print area extends more than 20...
.... 5. For further information on this function, please ask a TOSHIBA TEC authorised service representative. Print speed Ribbon loss/Ribbon saving 3"/sec. Approx. 10 mm 10"/sec. Auto Ribbon Saving Mode When the auto ribbon saving function is centred when fitted. 4. Slide the Ribbon Stoppers along the Ribbon Shafts to reduce ribbon loss when a no print area extends more than 20...
Owners Manual
Page 29
... code selection (8) LCD language selection (9) Auto forward wait selection (10) Head up cut/Rewinder selection (11) Solenoid type selection (12) Ribbon saving function selection (13) Control code selection (14) Strip wait status selection (15) FEED key function selection (16) KANJI code selection ...selection (20) Web printer function selection (21) Input prime selection (22) Ribbon near end selection (23) Expansion I/O interface selection (24) Centronics interface selection (25) Plug & Play selection (26) Label end/ribbon end selection (27) Pre-strip selection (28) Reverse feed speed selection (...
... code selection (8) LCD language selection (9) Auto forward wait selection (10) Head up cut/Rewinder selection (11) Solenoid type selection (12) Ribbon saving function selection (13) Control code selection (14) Strip wait status selection (15) FEED key function selection (16) KANJI code selection ...selection (20) Web printer function selection (21) Input prime selection (22) Ribbon near end selection (23) Expansion I/O interface selection (24) Centronics interface selection (25) Plug & Play selection (26) Label end/ribbon end selection (27) Pre-strip selection (28) Reverse feed speed selection (...
Owners Manual
Page 34
... [FEED] or [RESTART] key to select a desired option. [RESTART] [FEED] HU CUT/RWD ON Head up to use of the solenoid's temperature. This function prevents ribbon smudges by raising the print head during a reverse feed to activate the head up cut issue or use the Rewinder in cut is not activated...
... [FEED] or [RESTART] key to select a desired option. [RESTART] [FEED] HU CUT/RWD ON Head up to use of the solenoid's temperature. This function prevents ribbon smudges by raising the print head during a reverse feed to activate the head up cut issue or use the Rewinder in cut is not activated...
Owners Manual
Page 35
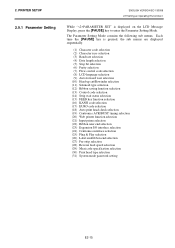
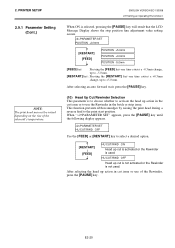
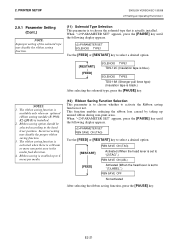
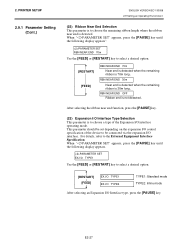
... Type Selection This parameter is to choose the solenoid type that is black.) After selecting the solenoid type, press the [PAUSE] key. Ribbon saving is to choose whether to the head lever position. PRINTER SETUP ENGLISH VERSION EO1-33058 2.9 Setting an Operating Environment 2.9.1 Parameter Setting ...appears, press the [PAUSE] key until the following display appears. The ribbon saving function is available only when an optional ribbon saving module (B-9904R2-QM-R) is a 20-mm or more non-print area in the media feed direction. 4. When "PARAMETER SET" appears, press the [PAUSE] key ...
... Type Selection This parameter is to choose the solenoid type that is black.) After selecting the solenoid type, press the [PAUSE] key. Ribbon saving is to choose whether to the head lever position. PRINTER SETUP ENGLISH VERSION EO1-33058 2.9 Setting an Operating Environment 2.9.1 Parameter Setting ...appears, press the [PAUSE] key until the following display appears. The ribbon saving function is available only when an optional ribbon saving module (B-9904R2-QM-R) is a 20-mm or more non-print area in the media feed direction. 4. When "PARAMETER SET" appears, press the [PAUSE] key ...
Owners Manual
Page 41
...70m long. When "PARAMETER SET" appears, press the [PAUSE] key until the following display appears". For details, refer to choose the remaining ribbon length where the ribbon near end function, press the [PAUSE] key. (23) Expansion I/O Interface Type Selection This parameter is to choose a type of the device... to select a desired option. [RESTART] [FEED] RBN NEAR END 70m Near end is detected when the remaining ribbon is to the External Equipment Interface Specification. PARAMETER SET RBN NEAR END 70m Use the [FEED] or [RESTART] key to be set depending ...
...70m long. When "PARAMETER SET" appears, press the [PAUSE] key until the following display appears". For details, refer to choose the remaining ribbon length where the ribbon near end function, press the [PAUSE] key. (23) Expansion I/O Interface Type Selection This parameter is to choose a type of the device... to select a desired option. [RESTART] [FEED] RBN NEAR END 70m Near end is detected when the remaining ribbon is to the External Equipment Interface Specification. PARAMETER SET RBN NEAR END 70m Use the [FEED] or [RESTART] key to be set depending ...

Owners Manual
Page 43
... Selection This parameter is printed. 2. PRINTER SETUP ENGLISH VERSION EO1-33058 2.9 Setting an Operating Environment 2.9.1 Parameter Setting (Cont.) (26) Label End/Ribbon End Selection This parameter is to the label intensity, adhesive power, or the printing speed. When "PARAMETER SET" appears, press the [PAUSE] key... until the following display appears. LBL/RBN END TYP2 TYPE2: When a label/ribbon end is detected in the middle of printing, the printer prints the half-finished label as far as possible, and stops when the next...
... Selection This parameter is printed. 2. PRINTER SETUP ENGLISH VERSION EO1-33058 2.9 Setting an Operating Environment 2.9.1 Parameter Setting (Cont.) (26) Label End/Ribbon End Selection This parameter is to the label intensity, adhesive power, or the printing speed. When "PARAMETER SET" appears, press the [PAUSE] key... until the following display appears. LBL/RBN END TYP2 TYPE2: When a label/ribbon end is detected in the middle of printing, the printer prints the half-finished label as far as possible, and stops when the next...
Owners Manual
Page 70
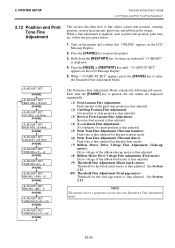
... amount is fine adjusted. (4) X-coordinate Fine Adjustment: X-coordinate of a print position is fine adjusted. (5) Print Tone Fine Adjustment (Thermal transfer): Print tone is fine adjusted for thermal transfer mode. (6) Print Tone Fine Adjustment (Thermal direct): Print tone is fine adjusted for thermal direct mode. (7) Ribbon Motor Drive Voltage Fine Adjustment (Take-up motor): Drive voltage of the...
... amount is fine adjusted. (4) X-coordinate Fine Adjustment: X-coordinate of a print position is fine adjusted. (5) Print Tone Fine Adjustment (Thermal transfer): Print tone is fine adjusted for thermal transfer mode. (6) Print Tone Fine Adjustment (Thermal direct): Print tone is fine adjusted for thermal direct mode. (7) Ribbon Motor Drive Voltage Fine Adjustment (Take-up motor): Drive voltage of the...
Owners Manual
Page 77
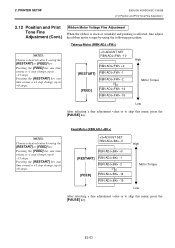
... EO1-33058 2.12 Position and Print Tone Fine Adjustment 2.12 Position and Print Tone Fine Adjustment (Cont.) Ribbon Motor Voltage Fine Adjustment When the ribbon is slack or wrinkled and printing is affected, fine adjust the ribbon motor torque by using the [RESTART] or [FEED] key. ADJUST SET RBN ADJ -10 RBN ADJ...
... EO1-33058 2.12 Position and Print Tone Fine Adjustment 2.12 Position and Print Tone Fine Adjustment (Cont.) Ribbon Motor Voltage Fine Adjustment When the ribbon is slack or wrinkled and printing is affected, fine adjust the ribbon motor torque by using the [RESTART] or [FEED] key. ADJUST SET RBN ADJ -10 RBN ADJ...
Owners Manual
Page 79
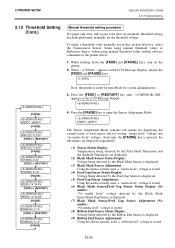
... Sensor Adjustment (No media): "No media level" voltage is stored. (8) Ribbon End Sensor Status Display: Voltage being detected by the Ribbon End Sensor is displayed. (9) Ribbon End Sensor Adjustment: Using the ribbon actually used, a "ribbon level" voltage is in this section effective, select the Transmissive Sensor (when using...ADJ. [PE]R0.1V T4.8V [FEED] or [RESTART] SENSOR ADJ. [PE]R0.1V T4.8V* [PAUSE] SENSOR ADJ. [RIBBON] 3.1V [FEED] or [RESTART] SENSOR ADJ. [RIBBON] 3.1V* [PAUSE] Now, the printer is stored. SENSOR ADJ. [H]28°C [A]28°C The Sensor Adjustment Mode contains sub ...
... Sensor Adjustment (No media): "No media level" voltage is stored. (8) Ribbon End Sensor Status Display: Voltage being detected by the Ribbon End Sensor is displayed. (9) Ribbon End Sensor Adjustment: Using the ribbon actually used, a "ribbon level" voltage is in this section effective, select the Transmissive Sensor (when using...ADJ. [PE]R0.1V T4.8V [FEED] or [RESTART] SENSOR ADJ. [PE]R0.1V T4.8V* [PAUSE] SENSOR ADJ. [RIBBON] 3.1V [FEED] or [RESTART] SENSOR ADJ. [RIBBON] 3.1V* [PAUSE] Now, the printer is stored. SENSOR ADJ. [H]28°C [A]28°C The Sensor Adjustment Mode contains sub ...