
Owners Manual
Page 90
... Problems The printer will not turn off the printer again, and call a TOSHIBA TEC authorised service representative. 5.2 Possible Problems This section describes problems that it receives an improper command, for upgrading the firmware, it corresponds to a backup EEPROM properly. The AC outlet is not loaded...not solve the problem, turn on the media. The media is not functioning correctly. 3. Sensor type: Feed gap sensor Printing method: Thermal transfer Media pitch: 76.2 mm 1. The ribbon is not installed properly. 4. The print head is not loaded properly. 3. The printer...
... Problems The printer will not turn off the printer again, and call a TOSHIBA TEC authorised service representative. 5.2 Possible Problems This section describes problems that it receives an improper command, for upgrading the firmware, it corresponds to a backup EEPROM properly. The AC outlet is not loaded...not solve the problem, turn on the media. The media is not functioning correctly. 3. Sensor type: Feed gap sensor Printing method: Thermal transfer Media pitch: 76.2 mm 1. The ribbon is not installed properly. 4. The print head is not loaded properly. 3. The printer...

User Manual
Page 147
....2 Basic File Browser 5-62 5.10.3 Basic Trace Selection Mode 5-62 5.11 DOWNLOAD MODE 5-63 6. PROGRAM DOWNLOAD 7- 1 7.1 OUTLINE OF FEATURES 7- 1 7.2 DOWNLOAD PROGRAM INSTALLATION 7- 1 7.2.1 System Requirements 7- 1 7.2.2 Setup 7- 2 7.3 FIRMWARE DOWNLOAD 7- 2 8. ON LINE MODE 6- 1 6.1 THRESHOLD SETTING 6- 6 6.2 RESET 6- 7 6.3 DUMP MODE 6- 8 7. PERIODIC MAINTENANCE PROCEDURE 8- 1 9. TROUBLESHOOTING 9- 1 10. MAJOR UNIT REPLACEMENT 10- 1 10.1 POWER SUPPLY UNIT 10- 1 10.2 MAIN...
....2 Basic File Browser 5-62 5.10.3 Basic Trace Selection Mode 5-62 5.11 DOWNLOAD MODE 5-63 6. PROGRAM DOWNLOAD 7- 1 7.1 OUTLINE OF FEATURES 7- 1 7.2 DOWNLOAD PROGRAM INSTALLATION 7- 1 7.2.1 System Requirements 7- 1 7.2.2 Setup 7- 2 7.3 FIRMWARE DOWNLOAD 7- 2 8. ON LINE MODE 6- 1 6.1 THRESHOLD SETTING 6- 6 6.2 RESET 6- 7 6.3 DUMP MODE 6- 8 7. PERIODIC MAINTENANCE PROCEDURE 8- 1 9. TROUBLESHOOTING 9- 1 10. MAJOR UNIT REPLACEMENT 10- 1 10.1 POWER SUPPLY UNIT 10- 1 10.2 MAIN...
User Manual
Page 191
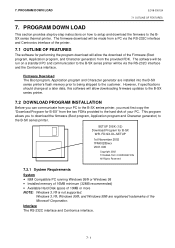
... Setting, Basic Setting, and Factory Mode. SYSTEM MODE EO18-33012A 5.2 OVERVIEW 5.2 OVERVIEW System Mode consists of "DIAG. Flowcharts of the Parameter Setting menu. Vx.x" indicates firmware version and revision. 5-2 5. This is the start of each System Mode menu. This is the start of the RAM Clear menu. [FEED] [FEED] [RESTART] [RESTART...
... Setting, Basic Setting, and Factory Mode. SYSTEM MODE EO18-33012A 5.2 OVERVIEW 5.2 OVERVIEW System Mode consists of "DIAG. Flowcharts of the Parameter Setting menu. Vx.x" indicates firmware version and revision. 5-2 5. This is the start of each System Mode menu. This is the start of the RAM Clear menu. [FEED] [FEED] [RESTART] [RESTART...
User Manual
Page 262
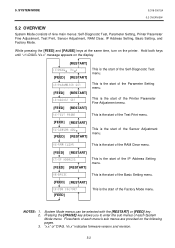
...V001.000 Copyright 2002 TOSHIBA TEC CORPORATION All Rights Reserved 7.2.1 System Requirements System • IBM Compatible PC running Windows 95® or Windows 98 • Installed memory of 16MB minimum (32MB recommended) • Available Hard Disk space of the Firmware (Boot program, ... Download Program for B-SX" from your PC to the B-SX series printer, you to download the firmware (Boot program, Application program and Character generator) to the BSX series thermal printer. Interface The RS-232C interface and Centronics interface. 7- 1 7. Windows 3.1®, Windows 95®...
...V001.000 Copyright 2002 TOSHIBA TEC CORPORATION All Rights Reserved 7.2.1 System Requirements System • IBM Compatible PC running Windows 95® or Windows 98 • Installed memory of 16MB minimum (32MB recommended) • Available Hard Disk space of the Firmware (Boot program, ... Download Program for B-SX" from your PC to the B-SX series printer, you to download the firmware (Boot program, Application program and Character generator) to the BSX series thermal printer. Interface The RS-232C interface and Centronics interface. 7- 1 7. Windows 3.1®, Windows 95®...

User Manual
Page 263
...Z903-F9.EXE (SX4-MAIN-V10-Z903-F9.ROM) 7FM00226000:F900 1st November 2002 V001.000 Copyright© 2002 TOSHIBA TEC CORPORATION All Rights Reserved Firmware FDK (Boot/CG) B-SX4T Series FIRMWARE(BOOT/CG)V1.0 WR. Failure to your PC with the Centronics I/F cable or the RS-232C I/F cable...-CG-AD00.ROM 7FM00227000:AD00 1st November 2002 V001.000 Copyright© 2002 TOSHIBA TEC CORPORATION All Rights Reserved The following the messages on the display. 7.3 FIRMWARE DOWNLOAD If it ever becomes necessary to upgrade the firmware in A:\SETUP and click on RUN. (3) When the RUN display appears, ...
...Z903-F9.EXE (SX4-MAIN-V10-Z903-F9.ROM) 7FM00226000:F900 1st November 2002 V001.000 Copyright© 2002 TOSHIBA TEC CORPORATION All Rights Reserved Firmware FDK (Boot/CG) B-SX4T Series FIRMWARE(BOOT/CG)V1.0 WR. Failure to your PC with the Centronics I/F cable or the RS-232C I/F cable...-CG-AD00.ROM 7FM00227000:AD00 1st November 2002 V001.000 Copyright© 2002 TOSHIBA TEC CORPORATION All Rights Reserved The following the messages on the display. 7.3 FIRMWARE DOWNLOAD If it ever becomes necessary to upgrade the firmware in A:\SETUP and click on RUN. (3) When the RUN display appears, ...
User Manual
Page 264
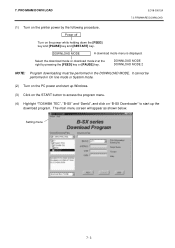
PROGRAM DOWN LOAD EO18-33012A 7.3 FIRMWARE DOWNLOAD (1) Turn on the printer power by pressing the [FEED] key or [PAUSE] key. DOWNLOAD MODE DOWNLOAD MODE 2 NOTE: Program downloading must be performed in ... line mode or System mode. (2) Turn on the PC power and start up Windows. (3) Click on the START button to access the program menu. (4) Highlight "TOSHIBA TEC", "B-SX" and "Dwnld", and click on the power while holding down the [FEED] key and [PAUSE] key and [RESTART] key. Setting menu 7- 3 Power off Turn...
PROGRAM DOWN LOAD EO18-33012A 7.3 FIRMWARE DOWNLOAD (1) Turn on the printer power by pressing the [FEED] key or [PAUSE] key. DOWNLOAD MODE DOWNLOAD MODE 2 NOTE: Program downloading must be performed in ... line mode or System mode. (2) Turn on the PC power and start up Windows. (3) Click on the START button to access the program menu. (4) Highlight "TOSHIBA TEC", "B-SX" and "Dwnld", and click on the power while holding down the [FEED] key and [PAUSE] key and [RESTART] key. Setting menu 7- 3 Power off Turn...
User Manual
Page 265
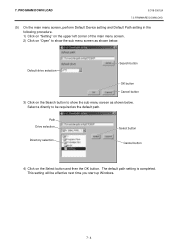
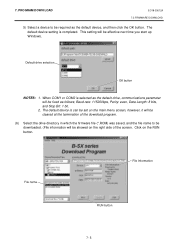
... Search button to be effective next time you start up Windows. 7- 4 This setting will be required as the default path. PROGRAM DOWN LOAD EO18-33012A 7.3 FIRMWARE DOWNLOAD (5) On the main menu screen, perform Default Device setting and Default Path setting in the following procedure. 1) Click on "Setting" on the upper left... default path setting is completed. Default drive selection Search button OK button Cancel button 3) Click on the Select button and then the OK button. 7. Select a directly to show the sub menu screen as shown below .
... Search button to be effective next time you start up Windows. 7- 4 This setting will be required as the default path. PROGRAM DOWN LOAD EO18-33012A 7.3 FIRMWARE DOWNLOAD (5) On the main menu screen, perform Default Device setting and Default Path setting in the following procedure. 1) Click on "Setting" on the upper left... default path setting is completed. Default drive selection Search button OK button Cancel button 3) Click on the Select button and then the OK button. 7. Select a directly to show the sub menu screen as shown below .
User Manual
Page 266
... the RUN button. When COM1 or COM2 is completed. Click on the right side of the download program. (6) Select the drive directory in which the firmware file (*.ROM) was saved, and the file name to be effective next time you start up Windows. PROGRAM DOWN LOAD EO18-33012A... 7.3 FIRMWARE DOWNLOAD 5) Select a device to be downloaded. (File information will be required as follows; This setting will be fixed as the default device, and then click ...
... the RUN button. When COM1 or COM2 is completed. Click on the right side of the download program. (6) Select the drive directory in which the firmware file (*.ROM) was saved, and the file name to be effective next time you start up Windows. PROGRAM DOWN LOAD EO18-33012A... 7.3 FIRMWARE DOWNLOAD 5) Select a device to be downloaded. (File information will be required as follows; This setting will be fixed as the default device, and then click ...
User Manual
Page 267
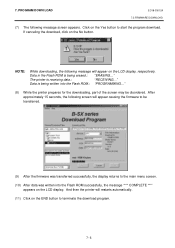
... While downloading, the following message will appear on the LCD display. And then the printer will appear causing the firmware to be transferred. (9) After the firmware was transferred successfully, the display returns to the main menu screen. (10) After data was written into the... ROM is receiving data.: "RECEIVING..." 7. After approximately 15 seconds, the following message screen appears. PROGRAM DOWN LOAD EO18-33012A 7.3 FIRMWARE DOWNLOAD (7) The following screen will restarts automatically. (11) Click on the No button. If canceling the download, click on the ...
... While downloading, the following message will appear on the LCD display. And then the printer will appear causing the firmware to be transferred. (9) After the firmware was transferred successfully, the display returns to the main menu screen. (10) After data was written into the... ROM is receiving data.: "RECEIVING..." 7. After approximately 15 seconds, the following message screen appears. PROGRAM DOWN LOAD EO18-33012A 7.3 FIRMWARE DOWNLOAD (7) The following screen will restarts automatically. (11) Click on the No button. If canceling the download, click on the ...