Owners Manual
Page 14
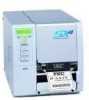
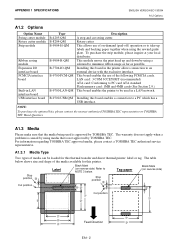
...and write of RFID tags. NOTE: To purchase the optional kits, please contact the nearest authorised TOSHIBA TEC representative or TOSHIBA TEC Head Quarters. B-9704-RFID-U1-EU-R Applicable frequency range differs depending on -demand (peel-...13.56MHz Fanfold paper guide B-4905-FF-QM-R This is a paper guide exclusively used in the printer allows connection to minimise ribbon usage as far as possible. To purchase the strip module, please ...-R2-QM-R This module moves the print head up labels and backing paper together when using a solenoid to an external interface board device with the exclusive interface...
...and write of RFID tags. NOTE: To purchase the optional kits, please contact the nearest authorised TOSHIBA TEC representative or TOSHIBA TEC Head Quarters. B-9704-RFID-U1-EU-R Applicable frequency range differs depending on -demand (peel-...13.56MHz Fanfold paper guide B-4905-FF-QM-R This is a paper guide exclusively used in the printer allows connection to minimise ribbon usage as far as possible. To purchase the strip module, please ...-R2-QM-R This module moves the print head up labels and backing paper together when using a solenoid to an external interface board device with the exclusive interface...
Owners Manual
Page 18
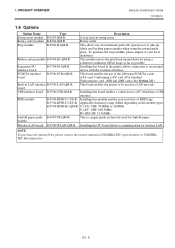
... Do not turn the Locking Ring counter-clockwise too far or it may come off the power and open the Top Cover. 2. The printer prints both labels and tags. 1. Care must be taken not to allow the metal or glass part of fingers, jewellery, clothing, etc., being drawn ... while opening or closing the cover. For details, refer to Free position, then release the Ribbon Shaft Holder Plate. 3. Turn the Head Lever to TOSHIBA TEC authorised service representative. 3. Care must be taken not to allow a metal object like a watch to cool before loading the media. 3. Do not ...
... Do not turn the Locking Ring counter-clockwise too far or it may come off the power and open the Top Cover. 2. The printer prints both labels and tags. 1. Care must be taken not to allow the metal or glass part of fingers, jewellery, clothing, etc., being drawn ... while opening or closing the cover. For details, refer to Free position, then release the Ribbon Shaft Holder Plate. 3. Turn the Head Lever to TOSHIBA TEC authorised service representative. 3. Care must be taken not to allow a metal object like a watch to cool before loading the media. 3. Do not ...
Owners Manual
Page 88
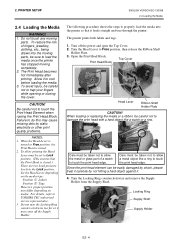
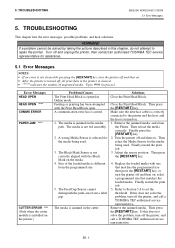
...Head Block open. If a problem cannot be solved by pressing the [RESTART] key, turn off and unplug the printer, then contact an authorised TOSHIBA TEC service representative for the media being used . 3. The Black Mark Sensor is turned off and then on . Refer ...media correctly. Then press the [RESTART] key. ⇒ Section 2.4. 4. Turn off the printer, and call a TOSHIBA TEC authorised service representative. Finally press the [RESTART] key. ⇒ Section 5.3. 2. The media is different from a label gap. Then press the [RESTART] key. Make sure the interface cable is turned on the...
...Head Block open. If a problem cannot be solved by pressing the [RESTART] key, turn off and unplug the printer, then contact an authorised TOSHIBA TEC service representative for the media being used . 3. The Black Mark Sensor is turned off and then on . Refer ...media correctly. Then press the [RESTART] key. ⇒ Section 2.4. 4. Turn off the printer, and call a TOSHIBA TEC authorised service representative. Finally press the [RESTART] key. ⇒ Section 5.3. 2. The media is different from a label gap. Then press the [RESTART] key. Make sure the interface cable is turned on the...
Owners Manual
Page 92
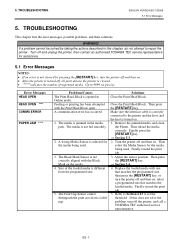
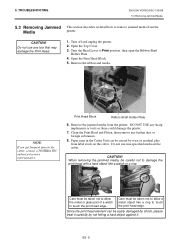
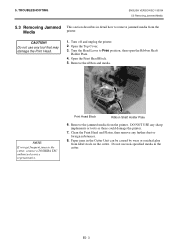
CAUTION! Remove the jammed media from label stock on the cutter. Do not use any tool that may damage the Print ...5. Clean the Print Head and Platen, then remove any sharp implements or tools as these could damage the printer. 7. Paper jams in the cutter. Care must be careful not to damage the print head with a hard...ENGLISH VERSION EO1-33058 5.3 Removing Jammed Media 5.3 Removing Jammed This section describes in the cutter, contact a TOSHIBA TEC authorised service representative. 5. Open the Top Cover. 3. When removing the jammed media, be taken not to touch the print head...
CAUTION! Remove the jammed media from label stock on the cutter. Do not use any tool that may damage the Print ...5. Clean the Print Head and Platen, then remove any sharp implements or tools as these could damage the printer. 7. Paper jams in the cutter. Care must be careful not to damage the print head with a hard...ENGLISH VERSION EO1-33058 5.3 Removing Jammed Media 5.3 Removing Jammed This section describes in the cutter, contact a TOSHIBA TEC authorised service representative. 5. Open the Top Cover. 3. When removing the jammed media, be taken not to touch the print head...

Owners Manual
Page 95
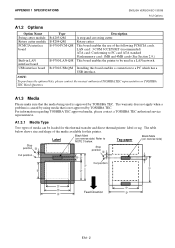
... speed up/slow down area Thickness Label Tag Maximum effective length for this thermal transfer and direct thermal printer: label or tag. SUPPLY SPECIFICATIONS ENGLISH VERSION EO1-33058 7.1 Media 7. The warranty does not apply when a problem is caused by using media that the media being used is not approved by TOSHIBA TEC. i e Cut mode Rotary cutter (*2) 3"/sec., 6"/sec...
... speed up/slow down area Thickness Label Tag Maximum effective length for this thermal transfer and direct thermal printer: label or tag. SUPPLY SPECIFICATIONS ENGLISH VERSION EO1-33058 7.1 Media 7. The warranty does not apply when a problem is caused by using media that the media being used is not approved by TOSHIBA TEC. i e Cut mode Rotary cutter (*2) 3"/sec., 6"/sec...
Owners Manual
Page 96
...-R/R2 series). When using the swing cutter, label length should be a minimum of media Print side Media feed direction Sensor is narrower than 50 mm. Min. 2.0 mm (Min. 6.0 mm when using a label stock in use only TOSHIBA TEC specified media. 2. For details, refer to ...3. The Transmissive Sensor detects a gap between labels. 5. Failure to 1 (3:1). 7. "On the fly issue" means that the printer can feed and print without stopping between labels, as illustrated below. When using the cutter module.) Min. 12 mm Label Gap Label Centre of 3 to do this range. Sensor...
...-R/R2 series). When using the swing cutter, label length should be a minimum of media Print side Media feed direction Sensor is narrower than 50 mm. Min. 2.0 mm (Min. 6.0 mm when using a label stock in use only TOSHIBA TEC specified media. 2. For details, refer to ...3. The Transmissive Sensor detects a gap between labels. 5. Failure to 1 (3:1). 7. "On the fly issue" means that the printer can feed and print without stopping between labels, as illustrated below. When using the cutter module.) Min. 12 mm Label Gap Label Centre of 3 to do this range. Sensor...
Owners Manual
Page 99
... defective tags by an edge of shipment from a good one. E7- 5 Media feed direction RFID-tag Embedded area 5 mm Poor printing may occur in this area due to a bump...of a chip/antenna used , data may include defective RFID tags at the time of the label. A printer without the ribbon saving module may not be able to a bump. (8) Ambient Temperature As low.... For details, please contact the nearest TOSHIBA TEC support representative. (12) Defective RFID Supply RFID supplies may be used . (10) Strip Issue Stripping performance in the label. Uneven printing or incomplete printing can be...
... defective tags by an edge of shipment from a good one. E7- 5 Media feed direction RFID-tag Embedded area 5 mm Poor printing may occur in this area due to a bump...of a chip/antenna used , data may include defective RFID tags at the time of the label. A printer without the ribbon saving module may not be able to a bump. (8) Ambient Temperature As low.... For details, please contact the nearest TOSHIBA TEC support representative. (12) Defective RFID Supply RFID supplies may be used . (10) Strip Issue Stripping performance in the label. Uneven printing or incomplete printing can be...
User Manual
Page 18
... this may differ depending on media. Failure to Lock position. (This ensures that it feeds straight and true through the printer. Set the Head Lever depending on the media type: Position : Labels Position : Tags However, proper position may cause missing dots by static electricity or other print quality problems. NOTES: 1. Open the... Top Cover. 2. Turn off the Supply Holder. Print Head Block Top Cover Head Lever Ribbon Shaft Holder Plate 4. 2. The following procedure shows the steps to TOSHIBA TEC authorised service representative. 3.
... this may differ depending on media. Failure to Lock position. (This ensures that it feeds straight and true through the printer. Set the Head Lever depending on the media type: Position : Labels Position : Tags However, proper position may cause missing dots by static electricity or other print quality problems. NOTES: 1. Open the... Top Cover. 2. Turn off the Supply Holder. Print Head Block Top Cover Head Lever Ribbon Shaft Holder Plate 4. 2. The following procedure shows the steps to TOSHIBA TEC authorised service representative. 3.
User Manual
Page 35
...label gap. Remove the jammed media, and clean the Platen. Finally press the [RESTART] key. 2. Finally resend the print job. 5. If a problem cannot be solved by pressing the [RESTART] key, turn off the printer, and call a TOSHIBA TEC authorised service representative. Up to 9999 (in this chapter, do not attempt to repair the printer... that matches the programmed size then press the [RESTART] key, or turn off and unplug the printer, then contact an authorised TOSHIBA TEC service representative for the media being used . A communication error has occurred. 1. The media is ...
...label gap. Remove the jammed media, and clean the Platen. Finally press the [RESTART] key. 2. Finally resend the print job. 5. If a problem cannot be solved by pressing the [RESTART] key, turn off the printer, and call a TOSHIBA TEC authorised service representative. Up to 9999 (in this chapter, do not attempt to repair the printer... that matches the programmed size then press the [RESTART] key, or turn off and unplug the printer, then contact an authorised TOSHIBA TEC service representative for the media being used . A communication error has occurred. 1. The media is ...
User Manual
Page 37
... be caused by wear or residual glue from label stock on the cutter. TROUBLESHOOTING ENGLISH VERSION EO1-33034 5.3 Removing Jammed Media 5.3 Removing Jammed This section describes in the cutter. Paper jams in the cutter, contact a TOSHIBA TEC authorised service representative. Turn off and unplug the printer. 2. Open the Print Head Block. 5. Print Head Block...
... be caused by wear or residual glue from label stock on the cutter. TROUBLESHOOTING ENGLISH VERSION EO1-33034 5.3 Removing Jammed Media 5.3 Removing Jammed This section describes in the cutter. Paper jams in the cutter, contact a TOSHIBA TEC authorised service representative. Turn off and unplug the printer. 2. Open the Print Head Block. 5. Print Head Block...

User Manual
Page 38
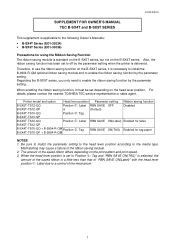
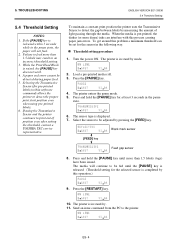
... media is released. (Threshold setting for pre-printed labels) within 3 seconds while in stand by mode. 2. The printer enters the pause mode. 5. The printer is released within software commands allows the printer to detect the proper print start position even when ... 5. To maintain a constant print position the printer uses the Transmissive Sensor to the printer. Load a pre-printed media roll. 3. The sensor type is completed by measuring the amount of position even after setting the threshold, contact a TOSHIBA TEC service representative. Black mark sensor [FEED] key...
... media is released. (Threshold setting for pre-printed labels) within 3 seconds while in stand by mode. 2. The printer enters the pause mode. 5. The printer is released within software commands allows the printer to detect the proper print start position even when ... 5. To maintain a constant print position the printer uses the Transmissive Sensor to the printer. Load a pre-printed media roll. 3. The sensor type is completed by measuring the amount of position even after setting the threshold, contact a TOSHIBA TEC service representative. Black mark sensor [FEED] key...
User Manual
Page 40
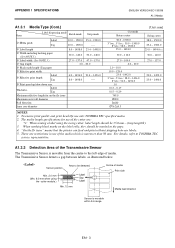
... to NOTE 3 below shows size and shape of on-demand (peel-off) operation or to be loaded for this thermal transfer and direct thermal printer: label or tag. A1.3.1 Media Type Two types of the following PCMCIA cards. Tag paper Black Mark (on reverse side)...make sure that is approved by TOSHIBA TEC. Label Black Mark (on reverse side) Stop position Stop position Cut position Cut position Feed Direction EA1- 2 NOTE: To purchase the optional kits, please contact the nearest authorised TOSHIBA TEC representative or TOSHIBA TEC Head Quarters. The table below ....
... to NOTE 3 below shows size and shape of on-demand (peel-off) operation or to be loaded for this thermal transfer and direct thermal printer: label or tag. A1.3.1 Media Type Two types of the following PCMCIA cards. Tag paper Black Mark (on reverse side)...make sure that is approved by TOSHIBA TEC. Label Black Mark (on reverse side) Stop position Stop position Cut position Cut position Feed Direction EA1- 2 NOTE: To purchase the optional kits, please contact the nearest authorised TOSHIBA TEC representative or TOSHIBA TEC Head Quarters. The table below ....

User Manual
Page 41
...they should be sure to install the Ribbon Saving Module (B-9904-R-QM). The Transmissive Sensor detects a gap between labels. 5. When marking black marks on the fly issue Maximum outer roll diameter Roll direction Inner core diameter 10.0 - 1500.0 25.4 - 1500.0 10.0 - 1500.0 ---- 8.0 - 1498.0 ... Area to do this range. "On the fly issue" means that the printer can feed and print without stopping between labels, as illustrated below. To ensure print quality and print head life use only TOSHIBA TEC specified media. 2. Cut mode Rotary cutter (*2) 3"/sec., 6"/sec.: 38...
...they should be sure to install the Ribbon Saving Module (B-9904-R-QM). The Transmissive Sensor detects a gap between labels. 5. When marking black marks on the fly issue Maximum outer roll diameter Roll direction Inner core diameter 10.0 - 1500.0 25.4 - 1500.0 10.0 - 1500.0 ---- 8.0 - 1498.0 ... Area to do this range. "On the fly issue" means that the printer can feed and print without stopping between labels, as illustrated below. To ensure print quality and print head life use only TOSHIBA TEC specified media. 2. Cut mode Rotary cutter (*2) 3"/sec., 6"/sec.: 38...
User Manual
Page 55
...3. Also, the ribbon saving function has been set to off by the parameter setting when the printer is a little less than that of "RBN SAVE ON(Label)" with the head lever position •: Label due to a control of the saved ribbon is delivered. Mismatching may cause a failure of the... setting. The amount of the ribbon saving module. 2. For details, please contact the nearest TOSHIBA TEC service representative or sales agent. When the head lever position is set depending on the B-SX4T series, it is necessary to install the B-9904-R-QM optional ribbon saving module and to enable...
...3. Also, the ribbon saving function has been set to off by the parameter setting when the printer is a little less than that of "RBN SAVE ON(Label)" with the head lever position •: Label due to a control of the saved ribbon is delivered. Mismatching may cause a failure of the... setting. The amount of the ribbon saving module. 2. For details, please contact the nearest TOSHIBA TEC service representative or sales agent. When the head lever position is set depending on the B-SX4T series, it is necessary to install the B-9904-R-QM optional ribbon saving module and to enable...
User Manual
Page 74
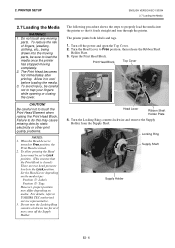
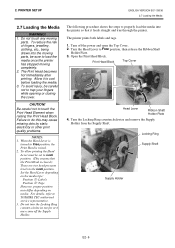
... 2.7 Loading the Media 2.7 Loading the Media WARNING! 1. For details, refer to Free position, then release the Ribbon Shaft Holder Plate. 3. The printer prints both labels and tags. 1. Turn the Head Lever to TOSHIBA TEC authorised service representative. 3. 2. Do not touch any moving completely. 2. To reduce the risk of fingers, jewellery, clothing, etc., being drawn...
... 2.7 Loading the Media 2.7 Loading the Media WARNING! 1. For details, refer to Free position, then release the Ribbon Shaft Holder Plate. 3. The printer prints both labels and tags. 1. Turn the Head Lever to TOSHIBA TEC authorised service representative. 3. 2. Do not touch any moving completely. 2. To reduce the risk of fingers, jewellery, clothing, etc., being drawn...

User Manual
Page 93
... solved by pressing the [RESTART] key, turn off and then on the printer.) Problems/Causes The Print Head Block is different from a label gap. Turn off and unplug the printer, then contact an authorised TOSHIBA TEC service representative for assistance. 5.1 Error Messages NOTES: • If an error... is not cleared by taking the actions described in the printer is cleared indicates the number...
... solved by pressing the [RESTART] key, turn off and then on the printer.) Problems/Causes The Print Head Block is different from a label gap. Turn off and unplug the printer, then contact an authorised TOSHIBA TEC service representative for assistance. 5.1 Error Messages NOTES: • If an error... is not cleared by taking the actions described in the printer is cleared indicates the number...

User Manual
Page 95
...Block. 5. DO NOT USE any tool that may damage the Print Head. 1. E5- 3 CAUTION! Remove the jammed media from label stock on the cutter. Remove the ribbon and media. Print Head Block Ribbon Shaft Holder Plate 6. Paper jams in the cutter. ...further dust or foreign substances. 8. Do not use any sharp implements or tools as these could damage the printer. 7. 5. TROUBLESHOOTING ENGLISH VERSION EO1-33036 5.3 Removing Jammed Media 5.3 Removing Jammed This section describes in the cutter, contact a TOSHIBA TEC authorised service representative. Turn off and unplug the...
...Block. 5. DO NOT USE any tool that may damage the Print Head. 1. E5- 3 CAUTION! Remove the jammed media from label stock on the cutter. Remove the ribbon and media. Print Head Block Ribbon Shaft Holder Plate 6. Paper jams in the cutter. ...further dust or foreign substances. 8. Do not use any sharp implements or tools as these could damage the printer. 7. 5. TROUBLESHOOTING ENGLISH VERSION EO1-33036 5.3 Removing Jammed Media 5.3 Removing Jammed This section describes in the cutter, contact a TOSHIBA TEC authorised service representative. Turn off and unplug the...
User Manual
Page 96
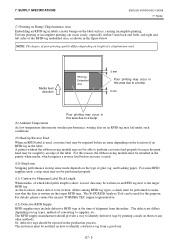
... [PAUSE] key until the [PAUSE] key is in stand-by measuring the amount of position even after setting the threshold, contact a TOSHIBA TEC service representative. Black mark sensor [FEED] key Feed gap sensor 8. Press the [RESTART] key. 10. While the Print Head Block is... issued. To get around this problem a minimum threshold can interfere with this operation.) 9. 5. The printer enters the pause mode. 5. The printer is released. (Threshold setting for pre-printed labels) within 3 seconds while in the pause state, the paper will continue to be detected during paper ...
... [PAUSE] key until the [PAUSE] key is in stand-by measuring the amount of position even after setting the threshold, contact a TOSHIBA TEC service representative. Black mark sensor [FEED] key Feed gap sensor 8. Press the [RESTART] key. 10. While the Print Head Block is... issued. To get around this problem a minimum threshold can interfere with this operation.) 9. 5. The printer enters the pause mode. 5. The printer is released. (Threshold setting for pre-printed labels) within 3 seconds while in the pause state, the paper will continue to be detected during paper ...
User Manual
Page 98
A1.3.1 Media Type Two types of media can be used is not approved by TOSHIBA TEC. Installing this board enables a connection to be loaded for this thermal transfer and direct thermal printer: label or tag. For information regarding TOSHIBA TEC approved media, please contact a TOSHIBA TEC authorised service representative. Tag paper Black Mark (on reverse side) Refer to NOTE 3 below shows size...
A1.3.1 Media Type Two types of media can be used is not approved by TOSHIBA TEC. Installing this board enables a connection to be loaded for this thermal transfer and direct thermal printer: label or tag. For information regarding TOSHIBA TEC approved media, please contact a TOSHIBA TEC authorised service representative. Tag paper Black Mark (on reverse side) Refer to NOTE 3 below shows size...
User Manual
Page 99
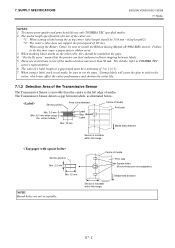
... means that the printer can feed and print without stopping between labels, as illustrated below. There are : *1: When issuing a label using the cutter module.) Min. 12 mm Label Gap Label Centre of the...swing cutter, label length should be 35.0 mm - (Gap length/2). 3. The Transmissive Sensor detects a gap between labels. 5. A1.3.2 Detection Area of media Print side Media feed direction Sensor is narrower... in use of media. For details, refer to TOSHIBA TEC service representative. The media length specifications for on the label rolls, they should be marked at the gaps. ...
... means that the printer can feed and print without stopping between labels, as illustrated below. There are : *1: When issuing a label using the cutter module.) Min. 12 mm Label Gap Label Centre of the...swing cutter, label length should be 35.0 mm - (Gap length/2). 3. The Transmissive Sensor detects a gap between labels. 5. A1.3.2 Detection Area of media Print side Media feed direction Sensor is narrower... in use of media. For details, refer to TOSHIBA TEC service representative. The media length specifications for on the label rolls, they should be marked at the gaps. ...


