Owners Manual
Page 7
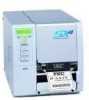
... that there is the risk of the printer could cause injury. • Care must be exposed to direct sunlight, high temperatures, high humidity, dust, or gas. • Ensure the printer is not used for a long period of the specification * Direct sunlight * High humidity * Shared power source... should be cleaned by wiping with a dry cloth or a cloth slightly dampened with the printer paper cutter. • Unplug the machine when it . • Keep your authorised TOSHIBA TEC representative for assistance. • Using insecticides and other work environment static free. • Do...
... that there is the risk of the printer could cause injury. • Care must be exposed to direct sunlight, high temperatures, high humidity, dust, or gas. • Ensure the printer is not used for a long period of the specification * Direct sunlight * High humidity * Shared power source... should be cleaned by wiping with a dry cloth or a cloth slightly dampened with the printer paper cutter. • Unplug the machine when it . • Keep your authorised TOSHIBA TEC representative for assistance. • Using insecticides and other work environment static free. • Do...
Owners Manual
Page 9
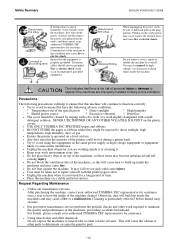
ENGLISH VERSION EO1-33058 Page 4. PRINTER SPECIFICATIONS E6- 1 7. CAUTION! 1. This manual may not be copied in whole or in this manual may be changed without prior written permission of this manual. ... may cause radio interference in which case the user may be required to any queries you may have in part without notification. 3. The contents of TOSHIBA TEC. 2. SUPPLY SPECIFICATIONS E7- 1 7.1 Media...E7- 1 7.1.1 Media Type...E7- 1 7.1.2 Detection Area of the Transmissive Sensor E7- 2 7.1.3 Detection Area of the Reflective Sensor E7- 3 7.1.4 Effective Print Area...
ENGLISH VERSION EO1-33058 Page 4. PRINTER SPECIFICATIONS E6- 1 7. CAUTION! 1. This manual may not be copied in whole or in this manual may be changed without prior written permission of this manual. ... may cause radio interference in which case the user may be required to any queries you may have in part without notification. 3. The contents of TOSHIBA TEC. 2. SUPPLY SPECIFICATIONS E7- 1 7.1 Media...E7- 1 7.1.1 Media Type...E7- 1 7.1.2 Detection Area of the Transmissive Sensor E7- 2 7.1.3 Detection Area of the Reflective Sensor E7- 3 7.1.4 Effective Print Area...
Owners Manual
Page 10
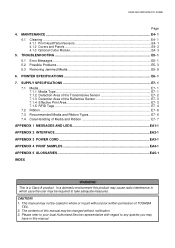
..., please note that TOSHIBA TEC shall have no liability for damage or scratches on the printer. Unpack the printer as the media sensors can be moved from your TOSHIBA TEC representative for future transportation... of the product. 2. Check for any damage of any kind sustained during transportation of the printer. Keep the cartons and pads for further information concerning this manual and keep it safe for choosing the TEC B-SX4T series thermal printer...
..., please note that TOSHIBA TEC shall have no liability for damage or scratches on the printer. Unpack the printer as the media sensors can be moved from your TOSHIBA TEC representative for future transportation... of the product. 2. Check for any damage of any kind sustained during transportation of the printer. Keep the cartons and pads for further information concerning this manual and keep it safe for choosing the TEC B-SX4T series thermal printer...
Owners Manual
Page 14
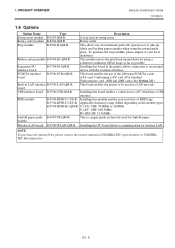
...USB-QM-R Installing this board in a LAN network. NOTE: To purchase the optional kits, please contact the nearest authorised TOSHIBA TEC representative or TOSHIBA TEC Head Quarters. E1- 5 Ribbon saving module B-9904-R2-QM-R This module moves the print head up labels and ...backing paper together when using a solenoid to 928MHz U1-EU: UHF, 869.5MHz H1-QM: HF, 13.56MHz Fanfold paper guide B-4905-FF-QM-R This is a paper guide exclusively used in the printer...
...USB-QM-R Installing this board in a LAN network. NOTE: To purchase the optional kits, please contact the nearest authorised TOSHIBA TEC representative or TOSHIBA TEC Head Quarters. E1- 5 Ribbon saving module B-9904-R2-QM-R This module moves the print head up labels and ...backing paper together when using a solenoid to 928MHz U1-EU: UHF, 869.5MHz H1-QM: HF, 13.56MHz Fanfold paper guide B-4905-FF-QM-R This is a paper guide exclusively used in the printer...
Owners Manual
Page 16
...2. therefore you should never remove any of the moving parts of the printer with a clean dry cloth or a clean cloth slightly dampened with a mild detergent solution. • Use caution when cleaning the thermal print head as it has had time to remove the power cord from...or loading the media, or when cleaning the printer. • For best results, and longer printer life, use only TOSHIBA TEC recommended media and ribbons. • Store the media and ribbons in a location free from excessive humidity, high temperature, dust, vibration or direct sunlight. • Keep your work environment ...
...2. therefore you should never remove any of the moving parts of the printer with a clean dry cloth or a clean cloth slightly dampened with a mild detergent solution. • Use caution when cleaning the thermal print head as it has had time to remove the power cord from...or loading the media, or when cleaning the printer. • For best results, and longer printer life, use only TOSHIBA TEC recommended media and ribbons. • Store the media and ribbons in a location free from excessive humidity, high temperature, dust, vibration or direct sunlight. • Keep your work environment ...
Owners Manual
Page 18
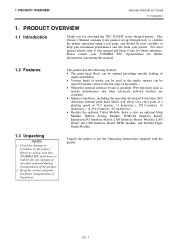
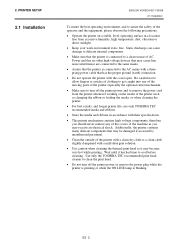
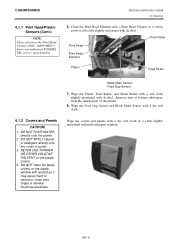
...Position d: Tags However, proper position may cause missing dots by not hitting a hard object against it feeds straight and true through the printer. Open the Print Head Block. Care must be set to trap your fingers while opening or closing the cover. The following procedure shows ...4 Allow it may come off the power and open the Top Cover. 2. Since the print head element can be taken not to TOSHIBA TEC authorised service representative. 3. The Print Head becomes hot immediately after printing. Top Cover Print Head Block c d Head Lever Ribbon Shaft Holder Plate ...
...Position d: Tags However, proper position may cause missing dots by not hitting a hard object against it feeds straight and true through the printer. Open the Print Head Block. Care must be set to trap your fingers while opening or closing the cover. The following procedure shows ...4 Allow it may come off the power and open the Top Cover. 2. Since the print head element can be taken not to TOSHIBA TEC authorised service representative. 3. The Print Head becomes hot immediately after printing. Top Cover Print Head Block c d Head Lever Ribbon Shaft Holder Plate ...
Owners Manual
Page 24
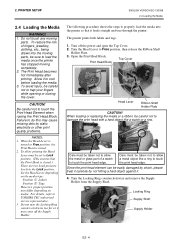
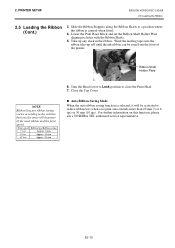
For further information on this function, please ask a TOSHIBA TEC authorised service representative. Print speed Ribbon loss/Ribbon saving 3"/sec. Approx. 20 mm 6. Turn the Head Lever to Lock position to a position where the ribbon ... holes with the Ribbon Shafts. 5. Take up roll until the ink ribbon can be activated to the relation between the outer roll diameter of the printer. Approx. 6 mm 6"/sec. Close the Top Cover. E2-10 Wind the leading tape onto the ribbon take-up any slack in the ribbon. Approx. 10...
For further information on this function, please ask a TOSHIBA TEC authorised service representative. Print speed Ribbon loss/Ribbon saving 3"/sec. Approx. 20 mm 6. Turn the Head Lever to Lock position to a position where the ribbon ... holes with the Ribbon Shafts. 5. Take up roll until the ink ribbon can be activated to the relation between the outer roll diameter of the printer. Approx. 6 mm 6"/sec. Close the Top Cover. E2-10 Wind the leading tape onto the ribbon take-up any slack in the ribbon. Approx. 10...

Owners Manual
Page 28
...] EXPAND MODE [FEED] [RESTART] RESET PARAMETER SET This menu is used to clear print data sent from a PC and return the printer to your nearest TOSHIBA TEC service representative. Refer to Section 2.12 Position and Print Tone Fine Adjustment. This menu is used to print the data in the System Mode... print start the program for three seconds until "RESET" is pressed with "RESET" being displayed, the printer will turn to an idle state and the message will change to the B-SX4T/SX5T Series Key Operation Specification stored in the CD-ROM. E2-14 LCD Message Display FEED key NOTE: ...
...] EXPAND MODE [FEED] [RESTART] RESET PARAMETER SET This menu is used to clear print data sent from a PC and return the printer to your nearest TOSHIBA TEC service representative. Refer to Section 2.12 Position and Print Tone Fine Adjustment. This menu is used to print the data in the System Mode... print start the program for three seconds until "RESET" is pressed with "RESET" being displayed, the printer will turn to an idle state and the message will change to the B-SX4T/SX5T Series Key Operation Specification stored in the CD-ROM. E2-14 LCD Message Display FEED key NOTE: ...
Owners Manual
Page 51
... listing "Manufacturers and Printers" is displayed. (4) Click on the [OK] button. Specify the "\driver" folder in the CD-ROM drive, then click on the [Have Disk...] button. Driver name TEC B-372 TEC B-431 TEC B-472 TEC B-492 TEC B-682 TEC B-872 TEC B-SA4T TEC B-SV4 TEC B-SX5 TEC B-SX8T-R Model B-...SX4T-GS10-QQ B-SX4T-GS10-QQ-US B-SX4T-GS10-QP B-SX4T-GS20-QQ B-SX4T-GS20-QQ-US B-SX4T-GS20-QP B-SX4T-GS20-QM-R B-SX5T-TS12-CN B-SX5T-TS22-CN CB-416-T3-QQ CB-416-T3-QQ-US CB-416-T3-QP Driver name TEC B-419 TEC B-452H TEC B-482 TEC B-672 TEC B-852-R TEC B-SA4G TEC B-SP2D TEC B-SX4-CN TEC B-SX6T-R TEC...
... listing "Manufacturers and Printers" is displayed. (4) Click on the [OK] button. Specify the "\driver" folder in the CD-ROM drive, then click on the [Have Disk...] button. Driver name TEC B-372 TEC B-431 TEC B-472 TEC B-492 TEC B-682 TEC B-872 TEC B-SA4T TEC B-SV4 TEC B-SX5 TEC B-SX8T-R Model B-...SX4T-GS10-QQ B-SX4T-GS10-QQ-US B-SX4T-GS10-QP B-SX4T-GS20-QQ B-SX4T-GS20-QQ-US B-SX4T-GS20-QP B-SX4T-GS20-QM-R B-SX5T-TS12-CN B-SX5T-TS22-CN CB-416-T3-QQ CB-416-T3-QQ-US CB-416-T3-QP Driver name TEC B-419 TEC B-452H TEC B-482 TEC B-672 TEC B-852-R TEC B-SA4G TEC B-SP2D TEC B-SX4-CN TEC B-SX6T-R TEC...

Owners Manual
Page 53
... (5) Select the port to be used for printing from "Printers" list, then click on the [Next] button. (4) Select "Local printer". 2. Driver name TEC B-372 TEC B-431 TEC B-472 TEC B-492 TEC B-682 TEC B-872 TEC B-SA4T TEC B-SV4 TEC B-SX5 TEC B-SX8T-R Model B-372-QP B-431-GS10-QP B-431-GS10...SX4T-GS10-QQ B-SX4T-GS10-QQ-US B-SX4T-GS10-QP B-SX4T-GS20-QQ B-SX4T-GS20-QQ-US B-SX4T-GS20-QP B-SX4T-GS20-QM-R B-SX5T-TS12-CN B-SX5T-TS22-CN CB-416-T3-QQ CB-416-T3-QQ-US CB-416-T3-QP Driver name TEC B-419 TEC B-452H TEC B-482 TEC B-672 TEC B-852-R TEC B-SA4G TEC B-SP2D TEC B-SX4-CN TEC B-SX6T-R TEC...
... (5) Select the port to be used for printing from "Printers" list, then click on the [Next] button. (4) Select "Local printer". 2. Driver name TEC B-372 TEC B-431 TEC B-472 TEC B-492 TEC B-682 TEC B-872 TEC B-SA4T TEC B-SV4 TEC B-SX5 TEC B-SX8T-R Model B-372-QP B-431-GS10-QP B-431-GS10...SX4T-GS10-QQ B-SX4T-GS10-QQ-US B-SX4T-GS10-QP B-SX4T-GS20-QQ B-SX4T-GS20-QQ-US B-SX4T-GS20-QP B-SX4T-GS20-QM-R B-SX5T-TS12-CN B-SX5T-TS22-CN CB-416-T3-QQ CB-416-T3-QQ-US CB-416-T3-QP Driver name TEC B-419 TEC B-452H TEC B-482 TEC B-672 TEC B-852-R TEC B-SA4G TEC B-SP2D TEC B-SX4-CN TEC B-SX6T-R TEC...

Owners Manual
Page 57
PRINTER SETUP ENGLISH VERSION EO1-33058 2.10 Installing the Printer Drivers (5) When the screen which indicates the USB Printing Support driver has been installed, is displayed. Select "Specify the location of the driver (Advanced)", then click on the [Finish] button. (6) After a while, "TEC B-SA4T" is detected as a new hardware. (7) The "Add New Hardware Wizard" dialog box is displayed, click on the [Next] button. E2-43 2.
PRINTER SETUP ENGLISH VERSION EO1-33058 2.10 Installing the Printer Drivers (5) When the screen which indicates the USB Printing Support driver has been installed, is displayed. Select "Specify the location of the driver (Advanced)", then click on the [Finish] button. (6) After a while, "TEC B-SA4T" is detected as a new hardware. (7) The "Add New Hardware Wizard" dialog box is displayed, click on the [Next] button. E2-43 2.

Owners Manual
Page 58
PRINTER SETUP ENGLISH VERSION EO1-33058 2.10 Installing the Printer Drivers (8) Select "Search for the best driver for your device. (Recommended)". E2-44 Mark the "Specify a location" checkbox, then click on the [Next] button. Specify "\driver" folder, then click on the [Next] button. (9) Check to see that the "TEC B-SA4T" driver is detected, then click on the [Browse] button. 2.
PRINTER SETUP ENGLISH VERSION EO1-33058 2.10 Installing the Printer Drivers (8) Select "Search for the best driver for your device. (Recommended)". E2-44 Mark the "Specify a location" checkbox, then click on the [Next] button. Specify "\driver" folder, then click on the [Next] button. (9) Check to see that the "TEC B-SA4T" driver is detected, then click on the [Browse] button. 2.

Owners Manual
Page 59
Click on the [Finish] button. (11) When the screen, which indicates TEC B-SA4T has been installed, is displayed, click on the [Finish] button. (12) When installation is completed, the new printer icon is added in the "Printers" folder. E2-45 PRINTER SETUP ENGLISH VERSION EO1-33058 2.10 Installing the Printer Drivers (10) Change the printer name if necessary, and select whether or not you use the printer as the default printer ("Yes" or "No"). 2.
Click on the [Finish] button. (11) When the screen, which indicates TEC B-SA4T has been installed, is displayed, click on the [Finish] button. (12) When installation is completed, the new printer icon is added in the "Printers" folder. E2-45 PRINTER SETUP ENGLISH VERSION EO1-33058 2.10 Installing the Printer Drivers (10) Change the printer name if necessary, and select whether or not you use the printer as the default printer ("Yes" or "No"). 2.
Owners Manual
Page 60
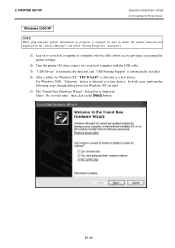
...though dialog boxes for Windows XP, "TEC B-SA4T" is detected as a new device. PRINTER SETUP ENGLISH VERSION EO1-33058 2.10 Installing the Printer Drivers Windows 2000/XP NOTE: When plug-and-play printer installation in progress is stopped, be sure to delete the printer detected and displayed on the "Device... "No, not this time", then click on to your host computer as a member who has full control access privilege concerning the printer settings. (2) Turn the printer ON, then connect it to your host computer with the USB cable. (3) "USB Device" is automatically detected, and "USB Printing...
...though dialog boxes for Windows XP, "TEC B-SA4T" is detected as a new device. PRINTER SETUP ENGLISH VERSION EO1-33058 2.10 Installing the Printer Drivers Windows 2000/XP NOTE: When plug-and-play printer installation in progress is stopped, be sure to delete the printer detected and displayed on the "Device... "No, not this time", then click on to your host computer as a member who has full control access privilege concerning the printer settings. (2) Turn the printer ON, then connect it to your host computer with the USB cable. (3) "USB Device" is automatically detected, and "USB Printing...
Owners Manual
Page 64
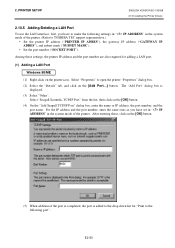
...LAN port. (1) Adding a LAN Port Windows 98/ME (1) Right-click on the [OK] button. (5) When addition of the printer. (Refer to TOSHIBA TEC support representative.) • Set the printer IP address ("PRINTER IP ADRES"), the gateway IP address ("GATEWAY IP ADRES"), and subnet mask ("SUBNET MASK"). • Set the port number ("...added to make the following port". Select "Properties" to the following settings in " IP ADDRESS" in the system mode of the printer. Select "Seagull Scientific TCP/IP Port" from the list, then click on the [Add Port...] button. 2. Among these , click on the...
...LAN port. (1) Adding a LAN Port Windows 98/ME (1) Right-click on the [OK] button. (5) When addition of the printer. (Refer to TOSHIBA TEC support representative.) • Set the printer IP address ("PRINTER IP ADRES"), the gateway IP address ("GATEWAY IP ADRES"), and subnet mask ("SUBNET MASK"). • Set the port number ("...added to make the following port". Select "Properties" to the following settings in " IP ADDRESS" in the system mode of the printer. Select "Seagull Scientific TCP/IP Port" from the list, then click on the [Add Port...] button. 2. Among these , click on the...

Owners Manual
Page 69
Regarding how to use the Printer Driver, refer to the Help for the Printer Driver or TPCL (TEC Printer Command Language) in the CD-ROM. To gain maximum performance and life from the Cutter Module or Strip Module, periodic cleaning is necessary to the B-SX4T/SX5T Series External Equipment Interface Specification stored in accordance with your...
Regarding how to use the Printer Driver, refer to the Help for the Printer Driver or TPCL (TEC Printer Command Language) in the CD-ROM. To gain maximum performance and life from the Cutter Module or Strip Module, periodic cleaning is necessary to the B-SX4T/SX5T Series External Equipment Interface Specification stored in accordance with your...
Owners Manual
Page 86
...their shape or develop structural weakness. NEVER USE THINNER OR OTHER VOLATILE SOLVENT on the plastic covers. 4. 4. DO NOT POUR WATER directly onto the printer. 2. DO NOT clean the panel, covers, or the supply window with a dry soft cloth. Black Mark Sensor/ Feed Gap ... Sensors (Cont.) NOTE: Please purchase the Print Head Cleaner (P/No. 24089500013) from the internal part of the printer. 8. Remove dust or foreign substances from your authorised TOSHIBA TEC service representative. Wipe the covers and panels with a dry soft cloth or a cloth slightly moistened with mild detergent...
...their shape or develop structural weakness. NEVER USE THINNER OR OTHER VOLATILE SOLVENT on the plastic covers. 4. 4. DO NOT POUR WATER directly onto the printer. 2. DO NOT clean the panel, covers, or the supply window with a dry soft cloth. Black Mark Sensor/ Feed Gap ... Sensors (Cont.) NOTE: Please purchase the Print Head Cleaner (P/No. 24089500013) from the internal part of the printer. 8. Remove dust or foreign substances from your authorised TOSHIBA TEC service representative. Wipe the covers and panels with a dry soft cloth or a cloth slightly moistened with mild detergent...
User Manual
Page 24
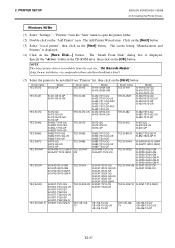
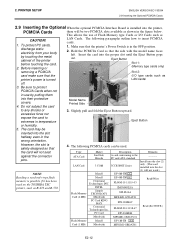
... slot halfway even in the wrong orientation. Eject Button Slot 1: (Memory type cards only) removing a PCMCIA Slot 2: card make sure that the printer's power is possible if it has been used . The following paragraphs outline how to insert PCMCIA cards. 1. Install into the slot (2) only. ...Slightly pull and fold the Eject Button upward. Flash Memory Maxell Maxell Centennial Technologies INC. The following PCMCIA cards can be used on the TOSHIBA TEC printer, such as LAN cards) off. 3. Be sure to any shocks or excessive force nor 3. Do not subject the card Model Name ...
... slot halfway even in the wrong orientation. Eject Button Slot 1: (Memory type cards only) removing a PCMCIA Slot 2: card make sure that the printer's power is possible if it has been used . The following paragraphs outline how to insert PCMCIA cards. 1. Install into the slot (2) only. ...Slightly pull and fold the Eject Button upward. Flash Memory Maxell Maxell Centennial Technologies INC. The following PCMCIA cards can be used on the TOSHIBA TEC printer, such as LAN cards) off. 3. Be sure to any shocks or excessive force nor 3. Do not subject the card Model Name ...
User Manual
Page 82
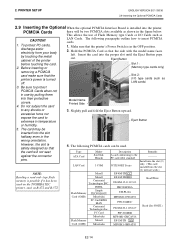
... read-only-type flash memory is installed into the proper slot until the Eject Button pops out. Flash Memory Maxell Maxell Centennial Technologies INC. PRINTER SETUP ENGLISH VERSION EO1-33036 2.9 Inserting the Optional PCMCIA Cards 2.9 Inserting the Optional When the optional PCMCIA Interface Board is possible if it ...be two PCMCIA slots available as B-472 and B-572. However, the slot is turned off. the card will be used on the TOSHIBA TEC printer, such as shown in the figure below. Eject Button Slot 1: (Memory type cards only) removing a PCMCIA card make sure that the...
... read-only-type flash memory is installed into the proper slot until the Eject Button pops out. Flash Memory Maxell Maxell Centennial Technologies INC. PRINTER SETUP ENGLISH VERSION EO1-33036 2.9 Inserting the Optional PCMCIA Cards 2.9 Inserting the Optional When the optional PCMCIA Interface Board is possible if it ...be two PCMCIA slots available as B-472 and B-572. However, the slot is turned off. the card will be used on the TOSHIBA TEC printer, such as shown in the figure below. Eject Button Slot 1: (Memory type cards only) removing a PCMCIA card make sure that the...
User Manual
Page 139
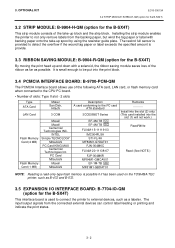
... is provide. 3.3 RIBBON SAVING MODULE: B-9904-R-QM (option for the B-SX4T) This interface board is used on the TOSHIBA TEC printer, such as B-472 and B-572. 3.5 EXPANSION I/O INTERFACE BOARD: B-7704-IO-QM (option for the B-SX4T) By moving the print head up and down with backing paper onto the ...(1 MB) Maxell Maxell Centennial Technologies INC. INTEL Simple TECNOLOGY Mitsubishi PC Card KING MAX Centennial Technologies Inc. Installing the strip module enables the printer to be put into the slot (1) will not work.) Read/Write Read (See NOTE.) NOTE: Reading a read-only-type flash memory ...
... is provide. 3.3 RIBBON SAVING MODULE: B-9904-R-QM (option for the B-SX4T) This interface board is used on the TOSHIBA TEC printer, such as B-472 and B-572. 3.5 EXPANSION I/O INTERFACE BOARD: B-7704-IO-QM (option for the B-SX4T) By moving the print head up and down with backing paper onto the ...(1 MB) Maxell Maxell Centennial Technologies INC. INTEL Simple TECNOLOGY Mitsubishi PC Card KING MAX Centennial Technologies Inc. Installing the strip module enables the printer to be put into the slot (1) will not work.) Read/Write Read (See NOTE.) NOTE: Reading a read-only-type flash memory ...


