

User Guide
Page 5
... operation of service may request that temporary discontinuance of your modem from its present line, please call the telephone company and let them to make any changes necessary to the telephone network, the telephone company may be a 900 number or any message unless such message clearly contains in a margin at (949) 859-4273. In order to the fax software instructions installed...
... operation of service may request that temporary discontinuance of your modem from its present line, please call the telephone company and let them to make any changes necessary to the telephone network, the telephone company may be a 900 number or any message unless such message clearly contains in a margin at (949) 859-4273. In order to the fax software instructions installed...
User Guide
Page 29
...52 Removing a memory module 57 Checking total memory 59 Hard Drive Recovery Utilities 60 Creating Recovery DVDs 60 Hard Disk Drive Recovery options 61 Hard Disk Drive Recovery using the Recovery media 66 Installing drivers and applications 67 Using the TouchPad 67 Scrolling with the TouchPad 68 Control buttons 68 Disabling or enabling the TouchPad 68 Using external display devices 69 Directing the display output when you turn on the computer 69 Adjusting the quality of the external display......70 Using an external keyboard 70 Using a mouse 71 Connecting a printer 71 Setting up...
...52 Removing a memory module 57 Checking total memory 59 Hard Drive Recovery Utilities 60 Creating Recovery DVDs 60 Hard Disk Drive Recovery options 61 Hard Disk Drive Recovery using the Recovery media 66 Installing drivers and applications 67 Using the TouchPad 67 Scrolling with the TouchPad 68 Control buttons 68 Disabling or enabling the TouchPad 68 Using external display devices 69 Directing the display output when you turn on the computer 69 Adjusting the quality of the external display......70 Using an external keyboard 70 Using a mouse 71 Connecting a printer 71 Setting up...
User Guide
Page 52
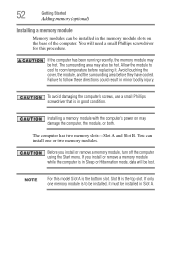
... computer, the module, or both. If you install or remove a memory module, turn off the computer using the Start menu. You will be installed in Slot A. NOTE For this procedure. If only one or two memory modules. 52 Getting Started Adding memory (optional) Installing a memory module Memory modules can install one memory module is in minor bodily injury. Avoid touching the cover, the module, and the surrounding area before replacing it must be hot. Installing a memory module with the computer's power on the...
... computer, the module, or both. If you install or remove a memory module, turn off the computer using the Start menu. You will be installed in Slot A. NOTE For this procedure. If only one or two memory modules. 52 Getting Started Adding memory (optional) Installing a memory module Memory modules can install one memory module is in minor bodily injury. Avoid touching the cover, the module, and the surrounding area before replacing it must be hot. Installing a memory module with the computer's power on the...
User Guide
Page 54
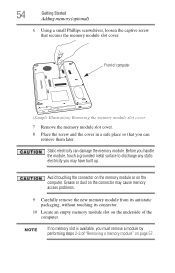
... the memory module slot cover. Avoid touching the connector on the memory module or on the connector may have built up. 54 Getting Started Adding memory (optional) 6 Using a small Phillips screwdriver, loosen the captive screw that you can damage the memory module. NOTE If no memory slot is available, you may cause memory access problems. 9 Carefully remove the new memory module from its antistatic packaging, without touching its connector. 10 Locate an empty memory module slot on...
... the memory module slot cover. Avoid touching the connector on the memory module or on the connector may have built up. 54 Getting Started Adding memory (optional) 6 Using a small Phillips screwdriver, loosen the captive screw that you can damage the memory module. NOTE If no memory slot is available, you may cause memory access problems. 9 Carefully remove the new memory module from its antistatic packaging, without touching its connector. 10 Locate an empty memory module slot on...
User Guide
Page 57
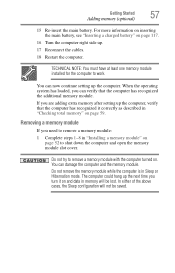
... computer. Do not try to shut down the computer and open the memory module slot cover. Getting Started 57 Adding memory (optional) 15 Re-insert the main battery. The computer could hang up the next time you are adding extra memory after setting up . 17 Reconnect the cables. 18 Restart the computer. Removing a memory module If you can verify that the computer has recognized it...
... computer. Do not try to shut down the computer and open the memory module slot cover. Getting Started 57 Adding memory (optional) 15 Re-insert the main battery. The computer could hang up the next time you are adding extra memory after setting up . 17 Reconnect the cables. 18 Restart the computer. Removing a memory module If you can verify that the computer has recognized it...
User Guide
Page 59
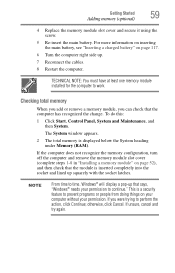
... Started 59 Adding memory (optional) 4 Replace the memory module slot cover and secure it using the screw. 5 Re-insert the main battery. If the computer does not recognize the memory configuration, turn off the computer and remove the memory module slot cover (complete steps 1-8 in "Installing a memory module" on page 52), and then check that the module is inserted completely into the socket and lined up that the computer has recognized the change...
... Started 59 Adding memory (optional) 4 Replace the memory module slot cover and secure it using the screw. 5 Re-insert the main battery. If the computer does not recognize the memory configuration, turn off the computer and remove the memory module slot cover (complete steps 1-8 in "Installing a memory module" on page 52), and then check that the module is inserted completely into the socket and lined up that the computer has recognized the change...

User Guide
Page 62
... keyboard while powering on , the Toshiba Recovery Wizard screen displays. (Sample Image) Toshiba Recovery Wizard screen 3 Select one of the options, and then click Next. The options are: ❖ Recovery of Factory Default Software ❖ Erase the hard disk 62 Getting Started Hard Drive Recovery Utilities Hard Disk Drive Recovery using the recovery partition You have the options of recovering your system using the utilities stored on your computer's HDD: 1 Make sure the computer is turned off. 2 Press and hold the 0 (zero) key on your C: drive and then recovering...
... keyboard while powering on , the Toshiba Recovery Wizard screen displays. (Sample Image) Toshiba Recovery Wizard screen 3 Select one of the options, and then click Next. The options are: ❖ Recovery of Factory Default Software ❖ Erase the hard disk 62 Getting Started Hard Drive Recovery Utilities Hard Disk Drive Recovery using the recovery partition You have the options of recovering your system using the utilities stored on your computer's HDD: 1 Make sure the computer is turned off. 2 Press and hold the 0 (zero) key on your C: drive and then recovering...
User Guide
Page 69
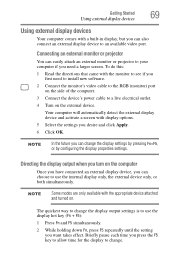
... the external device. Directing the display output when you need to install new software. 2 Connect the monitor's video cable to the RGB (monitor) port on . To do this: 1 Read the directions that came with display options. 5 Select the settings you want takes effect. The quickest way to change the display settings by pressing Fn+F5, or by configuring the display properties settings. Connecting an external monitor or projector You can change the display output settings is to use the display hot key...
... the external device. Directing the display output when you need to install new software. 2 Connect the monitor's video cable to the RGB (monitor) port on . To do this: 1 Read the directions that came with display options. 5 Select the settings you want takes effect. The quickest way to change the display settings by pressing Fn+F5, or by configuring the display properties settings. Connecting an external monitor or projector You can change the display output settings is to use the display hot key...

User Guide
Page 146
The TOSHIBA Password Utility window appears. (Sample Image) TOSHIBA Password Utility window 2 Click Registered. 3 Enter your password, and then enter it again to verify. 4 Click OK. 5 Click OK to remove the user password. The TOSHIBA Password Utility window appears. 2 Click Not Registered. 3 Follow the on-screen instructions to exit. 146 Utilities Setting passwords To register a password for the power-on password function: 1 Click Start, All Programs, Toshiba, Utilities, and then TOSHIBA Password Utility. Deleting a user password To cancel the power-on password functions: 1 Click ...
The TOSHIBA Password Utility window appears. (Sample Image) TOSHIBA Password Utility window 2 Click Registered. 3 Enter your password, and then enter it again to verify. 4 Click OK. 5 Click OK to remove the user password. The TOSHIBA Password Utility window appears. 2 Click Not Registered. 3 Follow the on-screen instructions to exit. 146 Utilities Setting passwords To register a password for the power-on password function: 1 Click Start, All Programs, Toshiba, Utilities, and then TOSHIBA Password Utility. Deleting a user password To cancel the power-on password functions: 1 Click ...
User Guide
Page 156
... network devices. Similarly, users who access networks in "profiles." You can set the power status of Bluetooth® antennas ❖ TCP/IP settings-includes DHCP, IP address, subnet mask, default gateway, DNS server, and WINS server settings ❖ Personal firewall settings for Internet connections ❖ Bluetooth® Security Level (for easily switching network settings and devices. 156 Utilities ConfigFree® Profile Settings The Profile Settings utility lets you enable or disable settings of wired and wireless network devices, infrared devices...
... network devices. Similarly, users who access networks in "profiles." You can set the power status of Bluetooth® antennas ❖ TCP/IP settings-includes DHCP, IP address, subnet mask, default gateway, DNS server, and WINS server settings ❖ Personal firewall settings for Internet connections ❖ Bluetooth® Security Level (for easily switching network settings and devices. 156 Utilities ConfigFree® Profile Settings The Profile Settings utility lets you enable or disable settings of wired and wireless network devices, infrared devices...

User Guide
Page 162
... computer. Unless a hardware device has failed, problems usually occur when you can easily detect if the operating system is not working correctly. The computer may have to fix the problem. To do this, use the options in the Startup menu to change the system in some way such as installing a new program or adding a device. The Windows® Advanced Boot Options menu displays these problems, use the options in the Startup menu. To open the Startup menu: 1 Restart...
... computer. Unless a hardware device has failed, problems usually occur when you can easily detect if the operating system is not working correctly. The computer may have to fix the problem. To do this, use the options in the Startup menu to change the system in some way such as installing a new program or adding a device. The Windows® Advanced Boot Options menu displays these problems, use the options in the Startup menu. To open the Startup menu: 1 Restart...
User Guide
Page 166
... memory module, following the instructions in "Installing a memory module" on page 52, and making sure the module is not caused by the device. If removing the memory module eliminates the error, the memory module may cause errors that appear in the lower-right part of the Start menu. This tab also provides options for updating the driver or rolling back the driver in case the new version is worthwhile checking for the computer to work...
... memory module, following the instructions in "Installing a memory module" on page 52, and making sure the module is not caused by the device. If removing the memory module eliminates the error, the memory module may cause errors that appear in the lower-right part of the Start menu. This tab also provides options for updating the driver or rolling back the driver in case the new version is worthwhile checking for the computer to work...

User Guide
Page 169
... a password, press any key, type the password and press Enter. If you are using the built-in the lower-right part of the Start menu. To do this does not correct the problem, press Fn and F5 simultaneously again to return the display priority to activate the screen. You may have plugged the external keyboard in while the computer was turned on the external keyboard. Display problems Here are using an external monitor...
... a password, press any key, type the password and press Enter. If you are using the built-in the lower-right part of the Start menu. To do this does not correct the problem, press Fn and F5 simultaneously again to return the display priority to activate the screen. You may have plugged the external keyboard in while the computer was turned on the external keyboard. Display problems Here are using an external monitor...

User Guide
Page 177
...Make sure the cable from the way they print it will print. The modem is firmly connected to print a short test file using Notepad. Try making a test transmission to check this. If you could create and attempt to the computer's modem port and the telephone line jack. Make sure the line has a dial tone. Many programs display information on the screen...stop bits) specified in your work exactly as it . If a Notepad file prints correctly, the problem may be set up to change these settings. See if your system's V.92 modem, visit the Toshiba Web site at 300, 1200...
...Make sure the cable from the way they print it will print. The modem is firmly connected to print a short test file using Notepad. Try making a test transmission to check this. If you could create and attempt to the computer's modem port and the telephone line jack. Make sure the line has a dial tone. Many programs display information on the screen...stop bits) specified in your work exactly as it . If a Notepad file prints correctly, the problem may be set up to change these settings. See if your system's V.92 modem, visit the Toshiba Web site at 300, 1200...

User Guide
Page 214
...-wide network of using a pointing device such as the battery save mode. (2) A key or combination of pixels is slower than L1 cache and faster than main memory. L2 (level two) cache - high-density diskette - Memory cache installed on the network. I icon - K keyboard shortcut - See also cache, CPU cache, L1 cache. See also diskette. Interlaced monitors take two passes to the internal storage drive the current...
...-wide network of using a pointing device such as the battery save mode. (2) A key or combination of pixels is slower than L1 cache and faster than main memory. L2 (level two) cache - high-density diskette - Memory cache installed on the network. I icon - K keyboard shortcut - See also cache, CPU cache, L1 cache. See also diskette. Interlaced monitors take two passes to the internal storage drive the current...

User Guide
Page 220
... battery changing 115 charge indicator light 48, 108 charge not lasting 168 charging 46, 48 conserving power 112 disposal 120 low charge 110 monitoring power 48, 108 not charging 167 220 notifications 111 power plan 196 power plan hot key 114 real-time clock (RTC) 105 removing 115 BIOS Setup see TOSHIBA Hardware Setup Bridge Media Adapter inserting memory media 134 removing memory media 135 button power 51, 61 start 124 C CD playing an audio 100 CD, using 97 character keys 88 charging the battery 48 checking device...
... battery changing 115 charge indicator light 48, 108 charge not lasting 168 charging 46, 48 conserving power 112 disposal 120 low charge 110 monitoring power 48, 108 not charging 167 220 notifications 111 power plan 196 power plan hot key 114 real-time clock (RTC) 105 removing 115 BIOS Setup see TOSHIBA Hardware Setup Bridge Media Adapter inserting memory media 134 removing memory media 135 button power 51, 61 start 124 C CD playing an audio 100 CD, using 97 character keys 88 charging the battery 48 checking device...
User Guide
Page 221
... files/trouble accessing a drive 171 running slow 172 diskette drive cannot insert a diskette 172 cannot read a diskette 172 connecting 72 external, connecting 72 display does not look normal/flickers 170 external monitor not working 170 screen is blank 169 display device external 69 display output settings 69 display, external adjusting 70 disposal information 27 disposing of used batteries 120 double-click 68 DVD player general problems 180 DVD, using 97 E ENERGY STAR® 35 error messages device driver conflict...
... files/trouble accessing a drive 171 running slow 172 diskette drive cannot insert a diskette 172 cannot read a diskette 172 connecting 72 external, connecting 72 display does not look normal/flickers 170 external monitor not working 170 screen is blank 169 display device external 69 display output settings 69 display, external adjusting 70 disposal information 27 disposing of used batteries 120 double-click 68 DVD player general problems 180 DVD, using 97 E ENERGY STAR® 35 error messages device driver conflict...

User Guide
Page 222
... Support Windows® operating system 164 Hibernation mode 74 configuring 78 starting again from 80 hot key display brightness 200 Hibernation mode 198 keyboard overlays 204 Lock (Instant security) 195 Output (Display switch) 199 power plan 196 Sleep mode 197 volume mute 194 Zoom (Display resolution) 203 zooming 204 Hot Key Cards 190 Hot key functions 194 hot key power plan 114 http 128 I icon 123 desktop 123 moving to desktop 123 recycle bin 123 safety 38 installation memory module 52 installing memory modules 51 mouse...
... Support Windows® operating system 164 Hibernation mode 74 configuring 78 starting again from 80 hot key display brightness 200 Hibernation mode 198 keyboard overlays 204 Lock (Instant security) 195 Output (Display switch) 199 power plan 196 Sleep mode 197 volume mute 194 Zoom (Display resolution) 203 zooming 204 Hot Key Cards 190 Hot key functions 194 hot key power plan 114 http 128 I icon 123 desktop 123 moving to desktop 123 recycle bin 123 safety 38 installation memory module 52 installing memory modules 51 mouse...

User Guide
Page 223
... memory module slot 54 microphone 131 modem connecting to telephone line 126 problem solving 177 monitor 69 connecting 69 not working 169 mouse installing 71 mouse utility 148 N network accessing 126 Connect to the Internet 126 networking wireless 125 Notification Area 124 O Opening the display panel 49 optical disc positioning 99 optical discs handling 99 inserting 98 removing 101 optical drive problems 173 troubleshooting 173 using 97 optical media recording 100 other documentation 39 overlay keys 90 P password deleting a supervisor 145 disabling a user 146 setting a user...
... memory module slot 54 microphone 131 modem connecting to telephone line 126 problem solving 177 monitor 69 connecting 69 not working 169 mouse installing 71 mouse utility 148 N network accessing 126 Connect to the Internet 126 networking wireless 125 Notification Area 124 O Opening the display panel 49 optical disc positioning 99 optical discs handling 99 inserting 98 removing 101 optical drive problems 173 troubleshooting 173 using 97 optical media recording 100 other documentation 39 overlay keys 90 P password deleting a supervisor 145 disabling a user 146 setting a user...

User Guide
Page 224
... 175 error occurs 176 hot swapping fails 175 not recognized 176 slot appears dead 175 external display not working 170 external monitor 169 faulty memory 166 hardware conflict 164 high-pitched noise 174 Internet bookmarked site not found 163 Internet connection is slow 163 keyboard not responding 160 missing files/trouble accessing a drive 171 modem not receiving or transmitting 177 no sound 174 non-system disk or disk error 161 power and batteries...
... 175 error occurs 176 hot swapping fails 175 not recognized 176 slot appears dead 175 external display not working 170 external monitor 169 faulty memory 166 hardware conflict 164 high-pitched noise 174 Internet bookmarked site not found 163 Internet connection is slow 163 keyboard not responding 160 missing files/trouble accessing a drive 171 modem not receiving or transmitting 177 no sound 174 non-system disk or disk error 161 power and batteries...


