

Owners Manual
Page 1
Before use OWNER'S MANUAL 3LCD DATA PROJECTOR TLP560 TLP561 TLP260 TLP261 (WITH DOCUMENT IMAGING CAMERA) (WITH DOCUMENT IMAGING CAMERA) MENU CONTENTS 1 TLP560/TLP260 Downloaded from www.Manualslib.com manuals search engine
Before use OWNER'S MANUAL 3LCD DATA PROJECTOR TLP560 TLP561 TLP260 TLP261 (WITH DOCUMENT IMAGING CAMERA) (WITH DOCUMENT IMAGING CAMERA) MENU CONTENTS 1 TLP560/TLP260 Downloaded from www.Manualslib.com manuals search engine
Owners Manual
Page 3
...erroneous or improper operation and other problems. • Toshiba Corporation bears no responsibility for incidental damages (lost profit, work interruption, corruption or loss of the memory contents, etc.) arising from the use of your LCD projector. Avoid Volatile Liquid Do not use volatile liquids, ...from a cold location to a warm location. They will come in handy if you ever have to ship your LCD projector. When the unit is exposed to Toshiba Corporation. CONTENTS 3 In the spaces provided below, record the Model and Serial No. Model No. Moisture Condensation Never ...
...erroneous or improper operation and other problems. • Toshiba Corporation bears no responsibility for incidental damages (lost profit, work interruption, corruption or loss of the memory contents, etc.) arising from the use of your LCD projector. Avoid Volatile Liquid Do not use volatile liquids, ...from a cold location to a warm location. They will come in handy if you ever have to ship your LCD projector. When the unit is exposed to Toshiba Corporation. CONTENTS 3 In the spaces provided below, record the Model and Serial No. Model No. Moisture Condensation Never ...

Owners Manual
Page 7
... any way. This product incorporates glass components, including a lens and a lamp. In the unlikely event of the lamp rupturing, thoroughly clean the area around the projector and discard any service or repairs to this product yourself as opening or removing covers may cause to determine that area. 18. Servicing Do not...
... any way. This product incorporates glass components, including a lens and a lamp. In the unlikely event of the lamp rupturing, thoroughly clean the area around the projector and discard any service or repairs to this product yourself as opening or removing covers may cause to determine that area. 18. Servicing Do not...
Owners Manual
Page 8
... the letters on the unit or near of the air exhaust for long periods of time. Doing so can result in position when moving the projector. Do not carry by the camera arm. Downloaded from www.Manualslib.com manuals search engine Before use IMPORTANT SAFETY INSTRUCTIONS (continued) CONTENTS 8 21... injury or damage may cause damage to get your eyes or sight. 22. Do not move the projector while the arm is lit. The strong light may result. Do not carry the projector by the camera arm. To avoid injury, be particularly careful. 23. Families with children should be ...
... the letters on the unit or near of the air exhaust for long periods of time. Doing so can result in position when moving the projector. Do not carry by the camera arm. Downloaded from www.Manualslib.com manuals search engine Before use IMPORTANT SAFETY INSTRUCTIONS (continued) CONTENTS 8 21... injury or damage may cause damage to get your eyes or sight. 22. Do not move the projector while the arm is lit. The strong light may result. Do not carry the projector by the camera arm. To avoid injury, be particularly careful. 23. Families with children should be ...
Owners Manual
Page 10
...Projection on the main unit 11 Names of COMPUTER IN, COMPUTER OUT connector .... 69 Applicable signal 70 Controlling the projector by using RS-232C 72 Specifications 77 Downloaded from www.Manualslib.com manuals search engine Audio 49 FULL MENU adjustments ... Remote control operation 16 Installation and connections Floor-mounted projector placement 17 Lens shift function 20 Projector placement angle adjustment (Foot adjuster) .. 21 Ceiling-mounted projector placement 22 Connecting a computer 23 Connecting video equipment 24 Projector operation control by a computer 26 How to use...
...Projection on the main unit 11 Names of COMPUTER IN, COMPUTER OUT connector .... 69 Applicable signal 70 Controlling the projector by using RS-232C 72 Specifications 77 Downloaded from www.Manualslib.com manuals search engine Audio 49 FULL MENU adjustments ... Remote control operation 16 Installation and connections Floor-mounted projector placement 17 Lens shift function 20 Projector placement angle adjustment (Foot adjuster) .. 21 Ceiling-mounted projector placement 22 Connecting a computer 23 Connecting video equipment 24 Projector operation control by a computer 26 How to use...
Owners Manual
Page 11
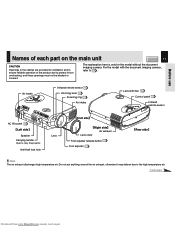
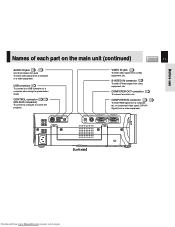
... put anything around the air exhaust, otherwise it from www.Manualslib.com manuals search engine Before use Names of the product and to carry the projector. Air intake Infrared remote sensor 16 Zooming lever 31 Focusing ring 31 Air intake Lens shift dial 20 Control panel 12 Infrared remote sensor AC...
... put anything around the air exhaust, otherwise it from www.Manualslib.com manuals search engine Before use Names of the product and to carry the projector. Air intake Infrared remote sensor 16 Zooming lever 31 Focusing ring 31 Air intake Lens shift dial 20 Control panel 12 Infrared remote sensor AC...

Owners Manual
Page 12
... to enlarge the image. 38 EXIT button Selection buttons ENTER button MENU button ON LAMP ON / STANDBY ON/STANDBY button 28 33 To turn the projector on the menu. Top side Control panel Continued Downloaded from www.Manualslib.com manuals search engine To adjust the volume when the menu is not... automatically. ON indicator 28 33 61 LAMP indicator 28 33 61 TEMP indicator 61 FAN indicator 28 33 61 To indicate the status of the projector. TEMP FAN VOL/ADJ buttons 43 32 To set and/or adjust values on or off (standby).
... to enlarge the image. 38 EXIT button Selection buttons ENTER button MENU button ON LAMP ON / STANDBY ON/STANDBY button 28 33 To turn the projector on the menu. Top side Control panel Continued Downloaded from www.Manualslib.com manuals search engine To adjust the volume when the menu is not... automatically. ON indicator 28 33 61 LAMP indicator 28 33 61 TEMP indicator 61 FAN indicator 28 33 61 To indicate the status of the projector. TEMP FAN VOL/ADJ buttons 43 32 To set and/or adjust values on or off (standby).
Owners Manual
Page 13
... To enter RGB signal from a computer or a video equipment. COMPUTER OUT connector 27 To connect a monitor, etc. USB connector 41 To connect to control the projector.
... To enter RGB signal from a computer or a video equipment. COMPUTER OUT connector 27 To connect a monitor, etc. USB connector 41 To connect to control the projector.
Owners Manual
Page 14
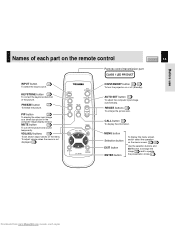
... ON / STANDBY AUTO SET FREEZE MUTE PIP CALL RESIZE MENU VOL / ADJ ENTER CT-90106 EXIT / P.MODE ON/STANDBY button 28 33 To turn the projector on the remote control CONTENTS 14 Remote control transmission part CLASS 1 LED PRODUCT INPUT button 30 To select the input source. PIP button 39 To...
... ON / STANDBY AUTO SET FREEZE MUTE PIP CALL RESIZE MENU VOL / ADJ ENTER CT-90106 EXIT / P.MODE ON/STANDBY button 28 33 To turn the projector on the remote control CONTENTS 14 Remote control transmission part CLASS 1 LED PRODUCT INPUT button 30 To select the input source. PIP button 39 To...
Owners Manual
Page 16
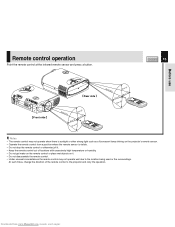
...it . • Do not disassemble the remote control. • Under unusual circumstances the remote control may not operate well due to the projector and retry the operation. Before use Remote control operation Point the remote control at the infrared remote sensor and press a button. At such ... of locations with excessively high temperature or humidity. • Do not get water on the remote control or place wet objects on the projector's remote sensor. • Operate the remote control from www.Manualslib.com manuals search engine Downloaded from a position where the remote sensor is...
...it . • Do not disassemble the remote control. • Under unusual circumstances the remote control may not operate well due to the projector and retry the operation. Before use Remote control operation Point the remote control at the infrared remote sensor and press a button. At such ... of locations with excessively high temperature or humidity. • Do not get water on the remote control or place wet objects on the projector's remote sensor. • Operate the remote control from www.Manualslib.com manuals search engine Downloaded from a position where the remote sensor is...
Owners Manual
Page 17
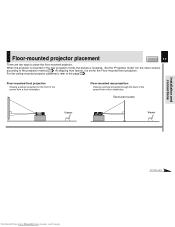
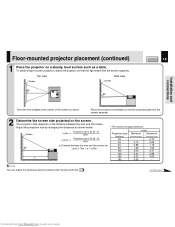
Installation and connections Floor-mounted projector placement CONTENTS 17 There are two ways to the page 22 . Set the "Projection mode" (on the front of the screen from factory, it is ... screen Viewer CONTROL USB AUDIO IN VIDEO IN S-VIDEO IN COMPUTER OUT (Y/PB/PR ) COMPUTER IN (Y/PB/PR ) Viewer Downloaded from a floor installation. When the projector is mounted in the rear projection mode, the picture is set for the Floor-mounted front projection. For the ceiling-mounted...
Installation and connections Floor-mounted projector placement CONTENTS 17 There are two ways to the page 22 . Set the "Projection mode" (on the front of the screen from factory, it is ... screen Viewer CONTROL USB AUDIO IN VIDEO IN S-VIDEO IN COMPUTER OUT (Y/PB/PR ) COMPUTER IN (Y/PB/PR ) Viewer Downloaded from a floor installation. When the projector is mounted in the rear projection mode, the picture is set for the Floor-mounted front projection. For the ceiling-mounted...
Owners Manual
Page 18
Place the projector horizontally so that the light beam hits the screen squarely. Projection size (inches) 30 36 50 80 100 120 150 180 a (m) Minimum Maximum (At maximum ... - Adjust the projection size by changing the distances as a table. Installation and connections Floor-mounted projector placement (continued) 1 Place the projector on a steady, level surface such as shown below. To obtain proper screen projection, place the projector so that the projecting light hits the screen squarely. 2 Determine the screen size projected on the...
Place the projector horizontally so that the light beam hits the screen squarely. Projection size (inches) 30 36 50 80 100 120 150 180 a (m) Minimum Maximum (At maximum ... - Adjust the projection size by changing the distances as a table. Installation and connections Floor-mounted projector placement (continued) 1 Place the projector on a steady, level surface such as shown below. To obtain proper screen projection, place the projector so that the projecting light hits the screen squarely. 2 Determine the screen size projected on the...

Owners Manual
Page 19
...STANDBY TEMP FAN Light (Orange) CONTENTS 19 Power cord (Supplied) 4 Take off the lens cover. In such a case, leave the projector for several seconds and then the ON indicator lights in the projection room has risen suddenly, moisture may be distorted. Notes • When the... projector is moved from www.Manualslib.com manuals search engine Installation and connections Floor-mounted projector placement (continued) 3 Connect the power cord. • Insert one end into the AC IN...
...STANDBY TEMP FAN Light (Orange) CONTENTS 19 Power cord (Supplied) 4 Take off the lens cover. In such a case, leave the projector for several seconds and then the ON indicator lights in the projection room has risen suddenly, moisture may be distorted. Notes • When the... projector is moved from www.Manualslib.com manuals search engine Installation and connections Floor-mounted projector placement (continued) 3 Connect the power cord. • Insert one end into the AC IN...
Owners Manual
Page 20
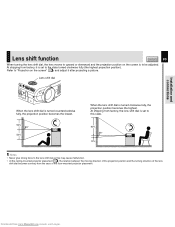
... 10% Notes • Never give strong force to the lens shift dial as this may cause malfunction. • At the ceiling-mounted projector placement 22 , the relation between the moving direction of the projection position and the turning direction of the lens shift dial becomes contrary from the... case of the floor-mounted projector placement. Lens shift dial When the lens shift dial is turned counterclockwise fully, the projection position becomes the lowest. 50% 90°...
... 10% Notes • Never give strong force to the lens shift dial as this may cause malfunction. • At the ceiling-mounted projector placement 22 , the relation between the moving direction of the projection position and the turning direction of the lens shift dial becomes contrary from the... case of the floor-mounted projector placement. Lens shift dial When the lens shift dial is turned counterclockwise fully, the projection position becomes the lowest. 50% 90°...
Owners Manual
Page 21
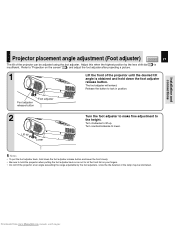
...lift up Lower Turn the foot adjuster to make fine adjustment to the height. Refer to "Projection on your fingers. • Do not tilt the projector at an angle exceeding the range adjustable by the lens shift dial 20 is obtained and hold down the foot adjuster release button and lower... www.Manualslib.com manuals search engine Foot adjuster release button Foot adjuster 2 Lift up . Notes • To put the foot adjuster back, hold the projector when putting the foot adjuster back so as not to hold down the foot adjuster release button. Installation and connections...
...lift up Lower Turn the foot adjuster to make fine adjustment to the height. Refer to "Projection on your fingers. • Do not tilt the projector at an angle exceeding the range adjustable by the lens shift dial 20 is obtained and hold down the foot adjuster release button and lower... www.Manualslib.com manuals search engine Foot adjuster release button Foot adjuster 2 Lift up . Notes • To put the foot adjuster back, hold the projector when putting the foot adjuster back so as not to hold down the foot adjuster release button. Installation and connections...
Owners Manual
Page 22
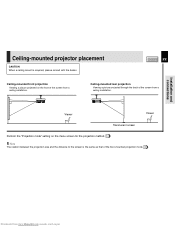
... (Y/PB/PR ) Viewer Viewer Translucent screen Perform the "Projection mode" setting on the front of the screen from a ceiling installation. Installation and connections Ceiling-mounted projector placement CAUTION When a ceiling mount is the same as that of the floor-mounted projection mode 18 .
... (Y/PB/PR ) Viewer Viewer Translucent screen Perform the "Projection mode" setting on the front of the screen from a ceiling installation. Installation and connections Ceiling-mounted projector placement CAUTION When a ceiling mount is the same as that of the floor-mounted projection mode 18 .
Owners Manual
Page 23
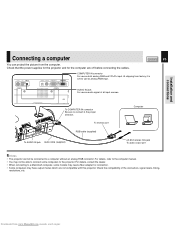
... a computer without an analog RGB connector. For details, consult the dealer. • When connecting to a Macintosh computer, some computers to the projector. To monitor port RGB cable (supplied) To AUDIO IN jack Audio cable (supplied) Computer ø3.5mm stereo mini-jack To audio output port Notes... • The projector cannot be able to the computer manual. • You may have output modes which are off before connecting the cables. Downloaded from the ...
... a computer without an analog RGB connector. For details, consult the dealer. • When connecting to a Macintosh computer, some computers to the projector. To monitor port RGB cable (supplied) To AUDIO IN jack Audio cable (supplied) Computer ø3.5mm stereo mini-jack To audio output port Notes... • The projector cannot be able to the computer manual. • You may have output modes which are off before connecting the cables. Downloaded from the ...
Owners Manual
Page 24
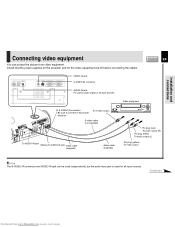
... S-VIDEO IN connector and VIDEO IN jack can project the picture from www.Manualslib.com manuals search engine Check that the power supplies for the projector and for all input sources. Installation and connections Connecting video equipment You can be used independently, but the audio input jack is used for the...
... S-VIDEO IN connector and VIDEO IN jack can project the picture from www.Manualslib.com manuals search engine Check that the power supplies for the projector and for all input sources. Installation and connections Connecting video equipment You can be used independently, but the audio input jack is used for the...
Owners Manual
Page 25
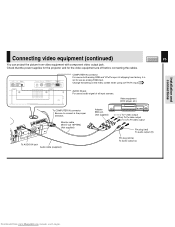
Check that the power supplies for the projector and for use as audio signal of all input sources. Video equipment (DVD player, etc.) To COMPUTER IN connector Be sure to connect in the ...
Check that the power supplies for the projector and for use as audio signal of all input sources. Video equipment (DVD player, etc.) To COMPUTER IN connector Be sure to connect in the ...
Owners Manual
Page 26
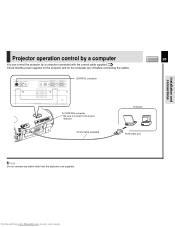
... a computer connected with the control cable supplied. 72 Check that the power supplies for the projector and for the computer are off before connecting the cables. Downloaded from www.Manualslib.com manuals search engine Control cable (supplied) Computer To RS-232C ...
... a computer connected with the control cable supplied. 72 Check that the power supplies for the projector and for the computer are off before connecting the cables. Downloaded from www.Manualslib.com manuals search engine Control cable (supplied) Computer To RS-232C ...


