
Owners Manual
Page 4
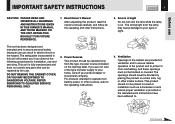
... procedures for ventilation and to ensure reliable operation of power source indicated on the marking label. The openings should never be operated only from overheating, and these openings must not be repaired by placing the product on . Before use and servicing. REFER SERVICING TO QUALIFIED SERVICE PERSONNEL ONLY. 2. This product should be blocked by the user. Read Owner's Manual After unpacking this unit will protect you...
... procedures for ventilation and to ensure reliable operation of power source indicated on the marking label. The openings should never be operated only from overheating, and these openings must not be repaired by placing the product on . Before use and servicing. REFER SERVICING TO QUALIFIED SERVICE PERSONNEL ONLY. 2. This product should be blocked by the user. Read Owner's Manual After unpacking this unit will protect you...
Owners Manual
Page 7
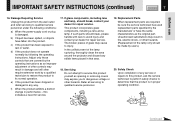
.... 18. Refer all servicing to rain or water. Continued Adjust only those controls that are required, be made by following conditions: a) When the power-supply cord or plug is in any service or repairs to this product yourself as the original part. The broken pieces of other hazards. (Replacement of the lamp rupturing, thoroughly clean the area around the projector and discard any...
.... 18. Refer all servicing to rain or water. Continued Adjust only those controls that are required, be made by following conditions: a) When the power-supply cord or plug is in any service or repairs to this product yourself as the original part. The broken pieces of other hazards. (Replacement of the lamp rupturing, thoroughly clean the area around the projector and discard any...
Owners Manual
Page 10
... Connecting video equipment 24 Projector operation control by a computer 26 How to use Audio 49 FULL MENU adjustments and settings - Default setting 51 FULL MENU settings - Position 47 FULL MENU adjustments - Reset 52 PIP menu setting 53 Document imaging camera Part names (of the document imaging camera model) ... 54 Preparation of the document imaging camera 55 Picture projection with the document imaging camera .. 56 Overlaying projection 59 Locking the white balance 60 Correcting illuminated defects 61 Maintenance Trouble indications 62 Air filter cleaning 63 Lens and...
... Connecting video equipment 24 Projector operation control by a computer 26 How to use Audio 49 FULL MENU adjustments and settings - Default setting 51 FULL MENU settings - Position 47 FULL MENU adjustments - Reset 52 PIP menu setting 53 Document imaging camera Part names (of the document imaging camera model) ... 54 Preparation of the document imaging camera 55 Picture projection with the document imaging camera .. 56 Overlaying projection 59 Locking the white balance 60 Correcting illuminated defects 61 Maintenance Trouble indications 62 Air filter cleaning 63 Lens and...
Owners Manual
Page 18
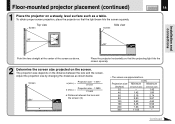
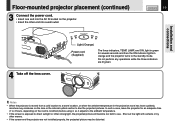
... are approximations. Screen 90° Projection size - 1.6017 a (min.) = 27.041 a (max.) = Projection size - 1.2699 21.463 a: Distance between the lens and the screen. Place the projector horizontally so that the light beam hits the screen squarely. Top view Screen Side view Screen 90° 90° CONTENTS 18 Installation and connections Point the lens straight at the center of the screen as a table. Adjust the projection size by changing the distances as shown...
... are approximations. Screen 90° Projection size - 1.6017 a (min.) = 27.041 a (max.) = Projection size - 1.2699 21.463 a: Distance between the lens and the screen. Place the projector horizontally so that the light beam hits the screen squarely. Top view Screen Side view Screen 90° 90° CONTENTS 18 Installation and connections Point the lens straight at the center of the screen as a table. Adjust the projection size by changing the distances as shown...
Owners Manual
Page 19
ON LAMP ON / STANDBY TEMP FAN Light (Orange) Power cord (Supplied) The three indicators, TEMP, LAMP, and ON, light in green for an adequate time (1 to 2 hours, depending on the projector. • Insert the other end into the AC IN socket on the room's condition) before using it, so it adjusts to the ambient temperature. • If the screen is moved from a cold location to see. In such a case, leave the projector for several...
ON LAMP ON / STANDBY TEMP FAN Light (Orange) Power cord (Supplied) The three indicators, TEMP, LAMP, and ON, light in green for an adequate time (1 to 2 hours, depending on the projector. • Insert the other end into the AC IN socket on the room's condition) before using it, so it adjusts to the ambient temperature. • If the screen is moved from a cold location to see. In such a case, leave the projector for several...
Owners Manual
Page 23
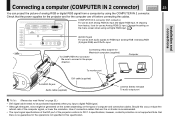
... 22.) • DVI digital cable needs to DVI 1.0 specifications; Change the setting on the types of computer and connection cables. Should this specification. Use of connection cables that there is no guarantee for the operations not specified in the proper direction. Installation and connections Connecting a computer (COMPUTER IN 2 connector) CONTENTS 23 You can project the picture of analog RGB or digital RGB signal from factory, it set for use as Analog RGB (2) input.
... 22.) • DVI digital cable needs to DVI 1.0 specifications; Change the setting on the types of computer and connection cables. Should this specification. Use of connection cables that there is no guarantee for the operations not specified in the proper direction. Installation and connections Connecting a computer (COMPUTER IN 2 connector) CONTENTS 23 You can project the picture of analog RGB or digital RGB signal from factory, it set for use as Analog RGB (2) input.
Owners Manual
Page 28
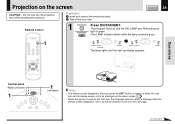
... Control panel (Main unit side) 1 ON LAMP ON / STANDBY TEMP FAN 1 Indicators MENU ENTER EXIT AUTO SET INPUT VOL / ADJ Notes • The startup screen disappears when you push the EXIT button or wait for the first time, the language selection menu is warming up.) ON LAMP ON / STANDBY TEMP FAN ON LAMP ON / STANDBY TEMP FAN (Green) (Green Flashing) (Green) (Green) (Green) The lamp lights and the start up with procedures 2 and 3 on the menu screen. 51 • When a projector is used for a while. Preparation 1 Install...
... Control panel (Main unit side) 1 ON LAMP ON / STANDBY TEMP FAN 1 Indicators MENU ENTER EXIT AUTO SET INPUT VOL / ADJ Notes • The startup screen disappears when you push the EXIT button or wait for the first time, the language selection menu is warming up.) ON LAMP ON / STANDBY TEMP FAN ON LAMP ON / STANDBY TEMP FAN (Green) (Green Flashing) (Green) (Green) (Green) The lamp lights and the start up with procedures 2 and 3 on the menu screen. 51 • When a projector is used for a while. Preparation 1 Install...
Owners Manual
Page 29
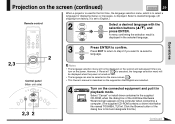
... menu will be displayed when the power is described on the supposition that English was selected. 4 Turn on the second and subsequent times you want to English.) Remote control INPUT KEYSTONE ON / STANDBY AUTO SET 2 Select a desired language with the selection buttons ( / ), and ENTER ENTER press ENTER. Click the Browse button of the Add New Hardware Wizard screen appears on the screen (continued) CONTENTS 29 When a projector is used...
... menu will be displayed when the power is described on the supposition that English was selected. 4 Turn on the second and subsequent times you want to English.) Remote control INPUT KEYSTONE ON / STANDBY AUTO SET 2 Select a desired language with the selection buttons ( / ), and ENTER ENTER press ENTER. Click the Browse button of the Add New Hardware Wizard screen appears on the screen (continued) CONTENTS 29 When a projector is used...
Owners Manual
Page 31
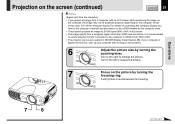
... on controlling the computer display, etc., refer to the computer's manual and description on the picture by turning the focusing ring. Turn to the left to the DDC, start up your computer after turning on the computer model. A still picture is recommended for the computer used. • The projector projects an image by SVGA signal (800 x 600) in full screen. • The image quality from a computer with an LCD screen...
... on controlling the computer display, etc., refer to the computer's manual and description on the picture by turning the focusing ring. Turn to the left to the DDC, start up your computer after turning on the computer model. A still picture is recommended for the computer used. • The projector projects an image by SVGA signal (800 x 600) in full screen. • The image quality from a computer with an LCD screen...

Owners Manual
Page 32
... to turn the power off when the panel is clogged up, the main unit inner temperature rises. Operations KEYSTONE INPUT KEYSTONE ON / STANDBY AUTO SET FREEZE MUTE PIP CALL RESIZE MENU VOL / ADJ 8 ENTER CT-90113 EXIT Control panel (Main unit side) ON LAMP ON / STANDBY TEMP FAN MENU ENTER VOL / ADJ EXIT AUTO SET 8 Notes • To change the projecting angle, adjust the foot adjuster. 20 • If the screen image suffers keystone distortion, press the KEYSTONE button to adjust...
... to turn the power off when the panel is clogged up, the main unit inner temperature rises. Operations KEYSTONE INPUT KEYSTONE ON / STANDBY AUTO SET FREEZE MUTE PIP CALL RESIZE MENU VOL / ADJ 8 ENTER CT-90113 EXIT Control panel (Main unit side) ON LAMP ON / STANDBY TEMP FAN MENU ENTER VOL / ADJ EXIT AUTO SET 8 Notes • To change the projecting angle, adjust the foot adjuster. 20 • If the screen image suffers keystone distortion, press the KEYSTONE button to adjust...
Owners Manual
Page 33
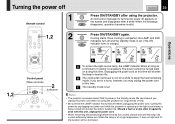
... projector is operating or the light source lamp is set . If you are in the standby mode. Should a fault or some other irregularity arise with this time. The power cannot be shortened. When the message disappears, operation becomes invalid. Operations KEYSTONE INPUT KEYSTONE ON / STANDBY AUTO SET FREEZE MUTE PIP CALL RESIZE 1,2 MENU VOL / ADJ ENTER CT-90113 EXIT 1,2 INPUT Control panel (Main unit side) ON LAMP ON / STANDBY TEMP FAN 2 Indicators MENU ENTER VOL / ADJ EXIT AUTO SET 2 ON/STANDBY ON/STANDBY...
... projector is operating or the light source lamp is set . If you are in the standby mode. Should a fault or some other irregularity arise with this time. The power cannot be shortened. When the message disappears, operation becomes invalid. Operations KEYSTONE INPUT KEYSTONE ON / STANDBY AUTO SET FREEZE MUTE PIP CALL RESIZE 1,2 MENU VOL / ADJ ENTER CT-90113 EXIT 1,2 INPUT Control panel (Main unit side) ON LAMP ON / STANDBY TEMP FAN 2 Indicators MENU ENTER VOL / ADJ EXIT AUTO SET 2 ON/STANDBY ON/STANDBY...
Owners Manual
Page 41
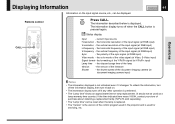
... changes. CONTENTS 41 Remote control CALL INPUT KEYSTONE ON / STANDBY AUTO SET FREEZE MUTE PIP CALL RESIZE MENU VOL / ADJ ENTER CT-90113 EXIT CALL Press CALL. the horizontal resolution of the input signal (at RGB input) Video mode - the vertical resolution of the input signal (at document imaging camera input) Operations Notes • The information displayed is performed. • The "Lamp time" shows an approximate time for servicing, etc. the polarity of the input signal (at RGB input) Sync...
... changes. CONTENTS 41 Remote control CALL INPUT KEYSTONE ON / STANDBY AUTO SET FREEZE MUTE PIP CALL RESIZE MENU VOL / ADJ ENTER CT-90113 EXIT CALL Press CALL. the horizontal resolution of the input signal (at RGB input) Video mode - the vertical resolution of the input signal (at document imaging camera input) Operations Notes • The information displayed is performed. • The "Lamp time" shows an approximate time for servicing, etc. the polarity of the input signal (at RGB input) Sync...
Owners Manual
Page 43
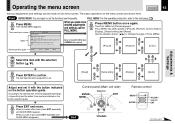
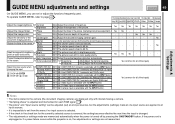
...Picture], [Position], [Color], [Audio], [Display], [Default setting] and [Reset]. Adjust the image flicker. MENU The current input source Items GUIDE MENU Analog RGB Adjust the image brightness. Select the input source when changing the input. Use the selection button ( / ) to the next page. 44 MENU Press MENU. The item selected can be used frequently. When you select other items, press EXIT repeatedly until GUIDE MENU disappears. [Reset] [Default setting] [Display] [Audio] Control panel (Main unit side) ENTER MENU Selection ON LAMP ON / STANDBY TEMP FAN EXIT MENU...
...Picture], [Position], [Color], [Audio], [Display], [Default setting] and [Reset]. Adjust the image flicker. MENU The current input source Items GUIDE MENU Analog RGB Adjust the image brightness. Select the input source when changing the input. Use the selection button ( / ) to the next page. 44 MENU Press MENU. The item selected can be used frequently. When you select other items, press EXIT repeatedly until GUIDE MENU disappears. [Reset] [Default setting] [Display] [Audio] Control panel (Main unit side) ENTER MENU Selection ON LAMP ON / STANDBY TEMP FAN EXIT MENU...
Owners Manual
Page 45
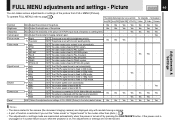
... a power failure occurs while the projector is on, the adjustments or settings are displayed only with the INPUT button. Yes Yes Yes Yes Yes Yes Yes Adjust the image flicker. Adjust the document imaging camera's gain. - - - - - - V-keystone EXEC. Adjust the color depth of the document imaging camera's picture. SET The picture is set with its color quality priority. The relationship between input source and item Yes: Adjustable -: Not displayed Analog RGB(1) Analog RGB(2) Digital RGB Y/PB/PR Video S-Video...
... a power failure occurs while the projector is on, the adjustments or settings are displayed only with the INPUT button. Yes Yes Yes Yes Yes Yes Yes Adjust the image flicker. Adjust the document imaging camera's gain. - - - - - - V-keystone EXEC. Adjust the color depth of the document imaging camera's picture. SET The picture is set with its color quality priority. The relationship between input source and item Yes: Adjustable -: Not displayed Analog RGB(1) Analog RGB(2) Digital RGB Y/PB/PR Video S-Video...
Owners Manual
Page 46
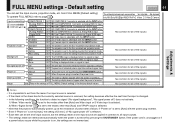
... picture is turned off by pressing the ON/STANDBY button. NTSC PAL SECAM PAL-N PAL-M PAL60 NTSC4.43 SET The video mode (color system) is fixed to NTSC system. SET The video mode is set automatically. SET The shutter speed is fixed to NTSC4.43 system. - - - - Reset EXEC. Return the adjustments and settings of the picture. (In Y/PB/PR input mode, sharpness is fixed at 50 Hz. To operate FULL MENU, refer to the factory default...
... picture is turned off by pressing the ON/STANDBY button. NTSC PAL SECAM PAL-N PAL-M PAL60 NTSC4.43 SET The video mode (color system) is fixed to NTSC system. SET The video mode is set automatically. SET The shutter speed is fixed to NTSC4.43 system. - - - - Reset EXEC. Return the adjustments and settings of the picture. (In Y/PB/PR input mode, sharpness is fixed at 50 Hz. To operate FULL MENU, refer to the factory default...
Owners Manual
Page 51
... ceiling-mounted front projection mode. To operate FULL MENU, refer to the factory default values. SET The projector is set to all of FULL MENU [Default setting] to page 44 . Return the settings of the inputs) Background Logo Blue None SET The TOSHIBA logo is displayed when no signal status continues for all of "No signal power off by pressing the ON/STANDBY button. FULL MENU settings - from the menu if no signal is set to exit from FULL MENU [Default setting]. SET Nothing is displayed...
... ceiling-mounted front projection mode. To operate FULL MENU, refer to the factory default values. SET The projector is set to all of FULL MENU [Default setting] to page 44 . Return the settings of the inputs) Background Logo Blue None SET The TOSHIBA logo is displayed when no signal status continues for all of "No signal power off by pressing the ON/STANDBY button. FULL MENU settings - from the menu if no signal is set to exit from FULL MENU [Default setting]. SET Nothing is displayed...
Owners Manual
Page 53
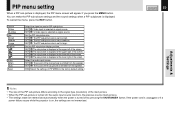
...-picture display position. SET :The sub-picture is displayed at the upper right of the sub picture is displayed at the lower left of the main picture is turned off by pressing the ON/STANDBY button. SET : The sound of the screen. Return the settings of the screen. SET :The sub-picture is emitted from the speaker. Select the audio input source. If the power cord is unplugged or if a power failure occurs while the projector...
...-picture display position. SET :The sub-picture is displayed at the upper right of the sub picture is displayed at the lower left of the main picture is turned off by pressing the ON/STANDBY button. SET : The sound of the screen. Return the settings of the screen. SET :The sub-picture is emitted from the speaker. Select the audio input source. If the power cord is unplugged or if a power failure occurs while the projector...

Owners Manual
Page 62
... KEYSTONE CONTENTS 62 ON LAMP TEMP FAN (Off) Or (Lit in red) The power does not come on again. Trouble indications If there is some problem inside is too hot, or the projector has been working in an area of high (Lit in green) temperature. ON LAMP TEMP FAN The power turns off or does not come on again, the lamp is at a high temperature, it for about 2 minutes. Or • Clean the air filter...
... KEYSTONE CONTENTS 62 ON LAMP TEMP FAN (Off) Or (Lit in red) The power does not come on again. Trouble indications If there is some problem inside is too hot, or the projector has been working in an area of high (Lit in green) temperature. ON LAMP TEMP FAN The power turns off or does not come on again, the lamp is at a high temperature, it for about 2 minutes. Or • Clean the air filter...

Owners Manual
Page 68
... calling service personal CONTENTS 68 Check the following points before asking for the proper input signal type. 45 Use a proper signal cable. 23 At the menu screen, set so that the source can be selected by the INPUT button. Refer also to the projector. The power turns off the lens cover. Correction Firmly plug in the power cord. Take off while using the projector. Make the "Picture" adjustments. 45 Make the "Picture" adjustments. 45 Replace the lamp. 66...
... calling service personal CONTENTS 68 Check the following points before asking for the proper input signal type. 45 Use a proper signal cable. 23 At the menu screen, set so that the source can be selected by the INPUT button. Refer also to the projector. The power turns off the lens cover. Correction Firmly plug in the power cord. Take off while using the projector. Make the "Picture" adjustments. 45 Make the "Picture" adjustments. 45 Replace the lamp. 66...
Owners Manual
Page 79
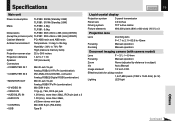
...; AUDIO IN 1.3V(rms), more than 22kΩ, ø3.5mm stereo mini jack • CONTROL Mini DIN 8-pin (RS-232C) • USB Type B CONTENTS 79 Liquid crystal display Projection system Panel size Driving system Picture elements 3-panel transmission 0.9 inches TFT active matrix 480,000 pixels (800 x 600 dots) (H./V.) x 3 Projection lens Lens Focusing Zooming Zooming lens F=1.7 to 2.1 f=33.6 to 42mm Manual operation Manual operation Document imaging camera (with camera model) Lens F = 3.1, f = 6.4mm Focusing Manual operation Zoom None (adjusted by distance to...
...; AUDIO IN 1.3V(rms), more than 22kΩ, ø3.5mm stereo mini jack • CONTROL Mini DIN 8-pin (RS-232C) • USB Type B CONTENTS 79 Liquid crystal display Projection system Panel size Driving system Picture elements 3-panel transmission 0.9 inches TFT active matrix 480,000 pixels (800 x 600 dots) (H./V.) x 3 Projection lens Lens Focusing Zooming Zooming lens F=1.7 to 2.1 f=33.6 to 42mm Manual operation Manual operation Document imaging camera (with camera model) Lens F = 3.1, f = 6.4mm Focusing Manual operation Zoom None (adjusted by distance to...


