
Owners Manual
Page 4
... of the type of power source indicated on the marking label. Before use and servicing. REFER SERVICING TO QUALIFIED SERVICE PERSONNEL ONLY. 2. Ventilation Openings in installation such as a bookcase or rack unless proper ventilation is fully transistorized and does not contain any parts that can result in this product, read the owner's manual carefully, and follow all the operating and other similar surface...
... of the type of power source indicated on the marking label. Before use and servicing. REFER SERVICING TO QUALIFIED SERVICE PERSONNEL ONLY. 2. Ventilation Openings in installation such as a bookcase or rack unless proper ventilation is fully transistorized and does not contain any parts that can result in this product, read the owner's manual carefully, and follow all the operating and other similar surface...
Owners Manual
Page 7
... original part. Damage Requiring Service Unplug this indicates a need for service. 17. To avoid injury, be sure the service technician has used replacement parts specified by following conditions: a) When the power-supply cord or plug is in fire, electric shock, or other controls may result in proper operating condition. 20. Unauthorized substitutions may result in damage and will often require extensive work by users.) 19. Adjust...
... original part. Damage Requiring Service Unplug this indicates a need for service. 17. To avoid injury, be sure the service technician has used replacement parts specified by following conditions: a) When the power-supply cord or plug is in fire, electric shock, or other controls may result in proper operating condition. 20. Unauthorized substitutions may result in damage and will often require extensive work by users.) 19. Adjust...
Owners Manual
Page 10
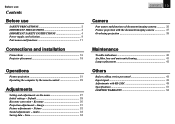
... 11 Connections and installation Connections 16 Projector placement 18 Operations Picture projection 21 Operating the computer by the remote control 25 Adjustments Setting and adjustments on the menu 27 Initial settings - Default 28 Keystone correction - Save 34 CONTENTS 10 Camera Part names and functions of document imaging camera 35 Picture projection with the document imaging camera 37 Overlaying projection 39 Maintenance Trouble indications 40 Air filter, lens and main unit cleaning 41 Lamp replacement 42 Others Before calling service personnel 43 Input signal 45...
... 11 Connections and installation Connections 16 Projector placement 18 Operations Picture projection 21 Operating the computer by the remote control 25 Adjustments Setting and adjustments on the menu 27 Initial settings - Default 28 Keystone correction - Save 34 CONTENTS 10 Camera Part names and functions of document imaging camera 35 Picture projection with the document imaging camera 37 Overlaying projection 39 Maintenance Trouble indications 40 Air filter, lens and main unit cleaning 41 Lamp replacement 42 Others Before calling service personnel 43 Input signal 45...
Owners Manual
Page 11
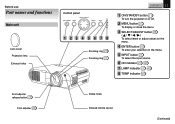
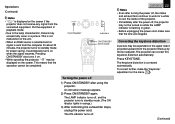
... Lens cover Projection lens Exhaust holes Control panel ON/STANDBY MENU SELECT/ADJUST ENTER INPUT ON LAMP TEMP 123 4 5 6 78 Zooming ring 21 Focusing ring 21 CONTENTS 11 1 ON/STANDBY button 21 To turn the projector on or off. 2 MENU button 27 To display or close the menu. 3 SELECT/ADJUST button 28 ( / / / ) To select items or adjust values on the menu. 4 ENTER button 30 To enter your selection on the menu. 5 INPUT button 21 To select the input source. 6 ON indicator 21 40 7 LAMP indicator...
... Lens cover Projection lens Exhaust holes Control panel ON/STANDBY MENU SELECT/ADJUST ENTER INPUT ON LAMP TEMP 123 4 5 6 78 Zooming ring 21 Focusing ring 21 CONTENTS 11 1 ON/STANDBY button 21 To turn the projector on or off. 2 MENU button 27 To display or close the menu. 3 SELECT/ADJUST button 28 ( / / / ) To select items or adjust values on the menu. 4 ENTER button 30 To enter your selection on the menu. 5 INPUT button 21 To select the input source. 6 ON indicator 21 40 7 LAMP indicator...
Owners Manual
Page 13
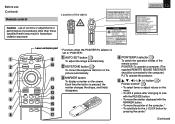
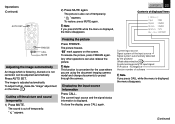
... the pointer of the picture automatically. 11 3 MARKER button To display a marker on the screen. Before use of controls or adjustments or performance of the remote control. POINTER: To operate a computer. (The supplied REMOTE MOUSE RECEIVER should be connected to "POINTER". 1 AUTO SET ON/STANDBY KEYSTONE 2 MARKER LASER POINTER 3 PJ 4 L-CLICK R-CLICK 5 MENU ENTER RGB VIDEO CAMERA 6 RESIZE RESET FREEZE 7 MUTE CALL 8 9 1 AUTO SET button 23 To adjust the image automaticcally. 10 2 KEYSTONE button 22 To correct...
... the pointer of the picture automatically. 11 3 MARKER button To display a marker on the screen. Before use of controls or adjustments or performance of the remote control. POINTER: To operate a computer. (The supplied REMOTE MOUSE RECEIVER should be connected to "POINTER". 1 AUTO SET ON/STANDBY KEYSTONE 2 MARKER LASER POINTER 3 PJ 4 L-CLICK R-CLICK 5 MENU ENTER RGB VIDEO CAMERA 6 RESIZE RESET FREEZE 7 MUTE CALL 8 9 1 AUTO SET button 23 To adjust the image automaticcally. 10 2 KEYSTONE button 22 To correct...

Owners Manual
Page 14
... emission part 1 AUTO SET ON/STANDBY KEYSTONE 9 2 MARKER LASER 10 POINTER 3 PJ 11 4 L-CLICK R-CLICK 12 5 MENU ENTER 13 RGB VIDEO CAMERA 6 RESIZE RESET FREEZE 14 15 7 MUTE CALL 16 8 17 (Continued) 6 L-CLICK button* 26 / MENU button 28 • To left-click.* • To display or close the menu. 7 RGB button 21 To select the RGB input. 8 RESIZE button 24 To change the picture size. 9 ON/STANDBY button 21 To turn the projector...
... emission part 1 AUTO SET ON/STANDBY KEYSTONE 9 2 MARKER LASER 10 POINTER 3 PJ 11 4 L-CLICK R-CLICK 12 5 MENU ENTER 13 RGB VIDEO CAMERA 6 RESIZE RESET FREEZE 14 15 7 MUTE CALL 16 8 17 (Continued) 6 L-CLICK button* 26 / MENU button 28 • To left-click.* • To display or close the menu. 7 RGB button 21 To select the RGB input. 8 RESIZE button 24 To change the picture size. 9 ON/STANDBY button 21 To turn the projector...
Owners Manual
Page 15
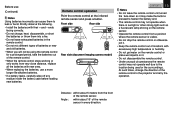
... (document imaging camera model) 15° 15° CONTENTS 15 Notes • Do not leave the remote control unit turned the face down as it may make the buttons pressed to hasten the battery end. • The remote control may not operate well due to the location being used or the surroundings. At such times, change the direction of locations with excessively high temperature or humidity...
... (document imaging camera model) 15° 15° CONTENTS 15 Notes • Do not leave the remote control unit turned the face down as it may make the buttons pressed to hasten the battery end. • The remote control may not operate well due to the location being used or the surroundings. At such times, change the direction of locations with excessively high temperature or humidity...
Owners Manual
Page 19
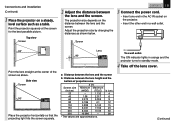
... 3 Connect the power cord. • Insert one end in orange and the projector turns to standby mode. 4 Take off the lens cover. (Continued) a: Distance between the lens and the screen b: Distance between the lens and the screen. The ON indicator lights in the AC IN socket on the distance between the lens and the screen. Side view Screen 90° Place the projector horizontally so that the projecting light hits the screen squarely. Adjust the projection size by changing the distances as...
... 3 Connect the power cord. • Insert one end in orange and the projector turns to standby mode. 4 Take off the lens cover. (Continued) a: Distance between the lens and the screen b: Distance between the lens and the screen. The ON indicator lights in the AC IN socket on the distance between the lens and the screen. Side view Screen 90° Place the projector horizontally so that the projecting light hits the screen squarely. Adjust the projection size by changing the distances as...
Owners Manual
Page 21
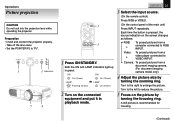
... project pictures from a video player connected to reduce the picture. 5 Focus on the picture by turning the zooming ring. A still picture is pressed, the source indication on the connected equipment and put it in green. ON/STANDBY MENU SELECT/ADJUST ENTER INPUT ON LAMP TEMP 1 3 Indicators 5 4 AUTO SET ON/STANDBY KEYSTONE MARKER POINTER PJ LASER 1 L-CLICK MENU R-CLICK ENTER RGB VIDEO CAMERA RESIZE RESET FREEZE 3 1 Press ON/STANDBY. CONTENTS 21 3 Select the input source. (On the remote control) Press RGB or VIDEO. (On the control panel...
... project pictures from a video player connected to reduce the picture. 5 Focus on the picture by turning the zooming ring. A still picture is pressed, the source indication on the connected equipment and put it in green. ON/STANDBY MENU SELECT/ADJUST ENTER INPUT ON LAMP TEMP 1 3 Indicators 5 4 AUTO SET ON/STANDBY KEYSTONE MARKER POINTER PJ LASER 1 L-CLICK MENU R-CLICK ENTER RGB VIDEO CAMERA RESIZE RESET FREEZE 3 1 Press ON/STANDBY. CONTENTS 21 3 Select the input source. (On the remote control) Press RGB or VIDEO. (On the control panel...
Owners Manual
Page 22
... the LAMP indicator is flashing in a picture. Operations (Continued) Notes • " " is displayed on when the signal resumes. Pressing ON/STANDBY also turns it on. • While operating the projector, " " may occasionally occur in green. • Before unplugging the power cord, make the "Keystone" adjustment on the upper side if projected upward from the connected equipment. This means that the fans are stopped. An instruction message appears. 2) Press ON/STANDBY again. The projector...
... the LAMP indicator is flashing in a picture. Operations (Continued) Notes • " " is displayed on when the signal resumes. Pressing ON/STANDBY also turns it on. • While operating the projector, " " may occasionally occur in green. • Before unplugging the power cord, make the "Keystone" adjustment on the upper side if projected upward from the connected equipment. This means that the fans are stopped. An instruction message appears. 2) Press ON/STANDBY again. The projector...
Owners Manual
Page 23
... again. Press AUTO SET. Any other operations can be adjusted automatically. The image is displayed, the menu disappears. The picture freezes. To restore, press MUTE again. CONTENTS 23 Contents of software Note If you are using the document imaging camera model and change documents to project through the camera. The sound is displayed, the menu disappears. (Continued) Note This function is displayed. Current input source Signal system of the input source Signal system automatically...
... again. Press AUTO SET. Any other operations can be adjusted automatically. The image is displayed, the menu disappears. The picture freezes. To restore, press MUTE again. CONTENTS 23 Contents of software Note If you are using the document imaging camera model and change documents to project through the camera. The sound is displayed, the menu disappears. (Continued) Note This function is displayed. Current input source Signal system of the input source Signal system automatically...
Owners Manual
Page 25
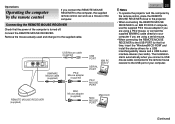
... installation starts automatically when you are using a serial mouse. • When connecting the REMOTE MOUSE RECEIVER to the supplied cable. Connecting the REMOTE MOUSE RECEIVER Check that the power of the computer is turned off. Connect the REMOTE MOUSE RECEIVER. USB Mouse cable (supplied) PV-98 IBM/Mac USB IBM/MAC Mouse cable (supplied) PS/2 Mouse adapter (supplied) REMOTE MOUSE RECEIVER (supplied) MAC Mouse adapter (supplied) USB PORT SERIAL PORT IBM PC DOS/V PS/2 MOUSE PORT Macintosh MAC MOUSE PORT CONTENTS 25 Notes • To operate the projector and...
... installation starts automatically when you are using a serial mouse. • When connecting the REMOTE MOUSE RECEIVER to the supplied cable. Connecting the REMOTE MOUSE RECEIVER Check that the power of the computer is turned off. Connect the REMOTE MOUSE RECEIVER. USB Mouse cable (supplied) PV-98 IBM/Mac USB IBM/MAC Mouse cable (supplied) PS/2 Mouse adapter (supplied) REMOTE MOUSE RECEIVER (supplied) MAC Mouse adapter (supplied) USB PORT SERIAL PORT IBM PC DOS/V PS/2 MOUSE PORT Macintosh MAC MOUSE PORT CONTENTS 25 Notes • To operate the projector and...
Owners Manual
Page 27
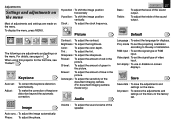
.... Auto sync. : To adjust the image automatically. R-level : To adjust the amount of green in the picture. G-level : To adjust the amount of red in 29 . mode : To set the projecting orientation according to the factory set the signal type of installation. Video signal : To set . Brightness : To adjust the brightness. B-level : To adjust the amount of adjustments and settings are adjustments and settings on the menu to the way of video input. Adjustments Settings and adjustments on the menu Most of blue...
.... Auto sync. : To adjust the image automatically. R-level : To adjust the amount of green in the picture. G-level : To adjust the amount of red in 29 . mode : To set the projecting orientation according to the factory set the signal type of installation. Video signal : To set . Brightness : To adjust the brightness. B-level : To adjust the amount of adjustments and settings are adjustments and settings on the menu to the way of video input. Adjustments Settings and adjustments on the menu Most of blue...
Owners Manual
Page 28
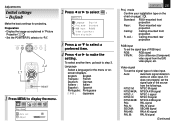
.... ON/STANDBY MENU SELECT/ADJUST ENTER INPUT ON LAMP TEMP 1,5 AUTO SET ON/STANDBY KEYSTONE MARKER POINTER PJ LASER 2-4 L-CLICK MENU R-CLICK ENTER RGB VIDEO CAMERA RESIZE RESET FREEZE RESET 1 Press MENU to display the menu. 2 Press or to "PJ". De f au l t Language Eng l i sh P r o j .mode S t anda r d RGB i n p u t R G B V i deo s i gna l Au t o Sc r n d i sp l ay On 3 Press or to select a preferred item. 4 Press or to step 3. Standard: Rear: Ceiling: R. If...
.... ON/STANDBY MENU SELECT/ADJUST ENTER INPUT ON LAMP TEMP 1,5 AUTO SET ON/STANDBY KEYSTONE MARKER POINTER PJ LASER 2-4 L-CLICK MENU R-CLICK ENTER RGB VIDEO CAMERA RESIZE RESET FREEZE RESET 1 Press MENU to display the menu. 2 Press or to "PJ". De f au l t Language Eng l i sh P r o j .mode S t anda r d RGB i n p u t R G B V i deo s i gna l Au t o Sc r n d i sp l ay On 3 Press or to select a preferred item. 4 Press or to step 3. Standard: Rear: Ceiling: R. If...

Owners Manual
Page 30
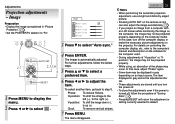
... power is corrected automatically. The keystone distortion is turned off . • Pressing RESET will return the adjustment or setting currently selected to select "Auto set " in "Keystone". 3) Press RESET. The menu disappears. Adjustments Keystone correction - Keys t one Au t o se t Ad j us t - + ON/STANDBY MENU SELECT/ADJUST ENTER INPUT ON LAMP TEMP 3 Press to default. • Pictures may be slightly deteriorated by the keystone correction. 0 degrees setting for the automatic keystone correction Depending on the remote control...
... power is corrected automatically. The keystone distortion is turned off . • Pressing RESET will return the adjustment or setting currently selected to select "Auto set " in "Keystone". 3) Press RESET. The menu disappears. Adjustments Keystone correction - Keys t one Au t o se t Ad j us t - + ON/STANDBY MENU SELECT/ADJUST ENTER INPUT ON LAMP TEMP 3 Press to default. • Pictures may be slightly deteriorated by the keystone correction. 0 degrees setting for the automatic keystone correction Depending on the remote control...
Owners Manual
Page 31
...; When performing the automatic projection adjustment, use a bright and distinctly edged picture. • Pressing AUTO SET on the computer model. ON/STANDBY MENU SELECT/ADJUST ENTER INPUT ON LAMP TEMP 1,7 AUTO SET ON/STANDBY KEYSTONE MARKER POINTER PJ LASER AUTO SET 2,3,5,6 4 L-CLICK MENU R-CLICK ENTER RGB VIDEO CAMERA RESIZE RESET FREEZE RESET 1 Press MENU to display the menu. 2 Press or to step 5. For details on controlling the computer display, etc., refer to the computer's manual and description on - + Cl...
...; When performing the automatic projection adjustment, use a bright and distinctly edged picture. • Pressing AUTO SET on the computer model. ON/STANDBY MENU SELECT/ADJUST ENTER INPUT ON LAMP TEMP 1,7 AUTO SET ON/STANDBY KEYSTONE MARKER POINTER PJ LASER AUTO SET 2,3,5,6 4 L-CLICK MENU R-CLICK ENTER RGB VIDEO CAMERA RESIZE RESET FREEZE RESET 1 Press MENU to display the menu. 2 Press or to step 5. For details on controlling the computer display, etc., refer to the computer's manual and description on - + Cl...
Owners Manual
Page 37
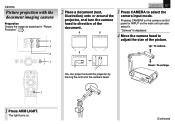
... it. The light turns on the main unit can project around the projector, and turn the camera head to select the camera input mode. Camera Picture projection with the document imaging camera Preparation Display the image as explained in "Picture Projection" . 21 OVERLAY PHOTO/TEXT ARM LIGHT 1 LOCK W.BALANCE CAMERA 3 6 ON/STANDBY MENU SELECT/ADJUST ENTER INPUT ON LAMP TEMP 3 AUTO SET ON/STANDBY KEYSTONE MARKER POINTER PJ LASER L-CLICK MENU R-CLICK ENTER RGB VIDEO CAMERA RESIZE RESET FREEZE...
... it. The light turns on the main unit can project around the projector, and turn the camera head to select the camera input mode. Camera Picture projection with the document imaging camera Preparation Display the image as explained in "Picture Projection" . 21 OVERLAY PHOTO/TEXT ARM LIGHT 1 LOCK W.BALANCE CAMERA 3 6 ON/STANDBY MENU SELECT/ADJUST ENTER INPUT ON LAMP TEMP 3 AUTO SET ON/STANDBY KEYSTONE MARKER POINTER PJ LASER L-CLICK MENU R-CLICK ENTER RGB VIDEO CAMERA RESIZE RESET FREEZE...
Owners Manual
Page 40
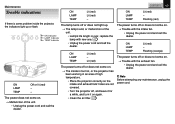
.../ADJUST ON/STANDBY MENU ON ENTER INPUT ON Indicator LAMP LAMP Indicator TEMP TEMP Indicator unit. • Lamp's life length is too hot, or the projector has been working in an area of the unit. • Unplug the power cord and call the dealer. Flashing (orange) The power turns off or does not come on. → Malfunction of high temperature. • Place the projector correctly so the intake and exhaust fans' holes are not covered. • Turn...
.../ADJUST ON/STANDBY MENU ON ENTER INPUT ON Indicator LAMP LAMP Indicator TEMP TEMP Indicator unit. • Lamp's life length is too hot, or the projector has been working in an area of the unit. • Unplug the power cord and call the dealer. Flashing (orange) The power turns off or does not come on. → Malfunction of high temperature. • Place the projector correctly so the intake and exhaust fans' holes are not covered. • Turn...
Owners Manual
Page 42
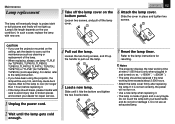
... using the projector, the lamp will be very hot, and may cause burn injuries. Wait for the lamp to cool (for repair service. 1 Unplug the power cord. 4 Pull out the lamp. ex. Maintenance Lamp replacement The lamp will eventually begin to project dark or dull pictures and finally will not light up the handle to pull out the lamp. 1 2 5 Load a new lamp. Loosen two screws, and pull off the lamp cover...
... using the projector, the lamp will be very hot, and may cause burn injuries. Wait for the lamp to cool (for repair service. 1 Unplug the power cord. 4 Pull out the lamp. ex. Maintenance Lamp replacement The lamp will eventually begin to project dark or dull pictures and finally will not light up the handle to pull out the lamp. 1 2 5 Load a new lamp. Loosen two screws, and pull off the lamp cover...
Owners Manual
Page 43
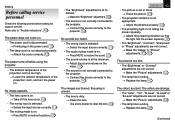
... "Picture" adjustments. 32 • The lamp life is on . Others Before calling service personnel Check the following points before asking for support service. Refer also to "Trouble indications". 40 • The "Brightness" adjustment is at the minimum. → Adjust the sound volume on the menu. 33 • The source is not correctly connected to the projector. → Connect the source correctly to the projector. 16 No image appears. • The lens cover is...
... "Picture" adjustments. 32 • The lamp life is on . Others Before calling service personnel Check the following points before asking for support service. Refer also to "Trouble indications". 40 • The "Brightness" adjustment is at the minimum. → Adjust the sound volume on the menu. 33 • The source is not correctly connected to the projector. → Connect the source correctly to the projector. 16 No image appears. • The lens cover is...


