
Owners Manual
Page 4
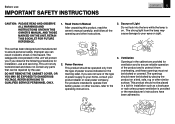
... in a built-in this product, read the owner's manual carefully, and follow all the operating and other instructions. 3. For products intended to operate from the lamp may cause damage to . Before use can be blocked or covered. Source of Light Do not look into the lens while the... lamp is fully transistorized and does not contain any parts that can result in the cabinet are not sure of the type of power source indicated ...
... in a built-in this product, read the owner's manual carefully, and follow all the operating and other instructions. 3. For products intended to operate from the lamp may cause damage to . Before use can be blocked or covered. Source of Light Do not look into the lens while the... lamp is fully transistorized and does not contain any parts that can result in the cabinet are not sure of the type of power source indicated ...
Owners Manual
Page 7
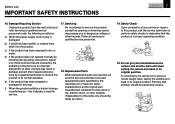
... operating instructions. Servicing Do not attempt to get your hands caught when setting the camera arm back in performance - Safety Check Upon completion of the lamp only should be careful not to service this indicates a need for service. 17. Do not get your hands between the camera arm and the main...
... operating instructions. Servicing Do not attempt to get your hands caught when setting the camera arm back in performance - Safety Check Upon completion of the lamp only should be careful not to service this indicates a need for service. 17. Do not get your hands between the camera arm and the main...
Owners Manual
Page 8
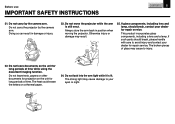
... function. Do not leave texts, papers or other documents for projection on the unit for repair service. If glass components, including lens and lamp, should break, please handle with care to injury. 22. The strong light may cause damage to your dealer for long periods of glass ...may result. 25. This product incorporates glass components, including a lens and a lamp. Do not leave documents on a thermal paper. 24. Doing so can result in position when moving the projector. Do not move the projector while...
... function. Do not leave texts, papers or other documents for projection on the unit for repair service. If glass components, including lens and lamp, should break, please handle with care to injury. 22. The strong light may cause damage to your dealer for long periods of glass ...may result. 25. This product incorporates glass components, including a lens and a lamp. Do not leave documents on a thermal paper. 24. Doing so can result in position when moving the projector. Do not move the projector while...
Owners Manual
Page 10
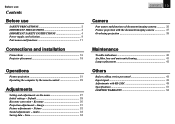
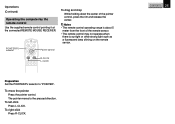
... camera 35 Picture projection with the document imaging camera 37 Overlaying projection 39 Maintenance Trouble indications 40 Air filter, lens and main unit cleaning 41 Lamp replacement 42 Others Before calling service personnel 43 Input signal 45 Adjustments with RS-232C 49 Specifications 51 LIMITED WARRANTY 53 Before use Contents Before...
... camera 35 Picture projection with the document imaging camera 37 Overlaying projection 39 Maintenance Trouble indications 40 Air filter, lens and main unit cleaning 41 Lamp replacement 42 Others Before calling service personnel 43 Input signal 45 Adjustments with RS-232C 49 Specifications 51 LIMITED WARRANTY 53 Before use Contents Before...
Owners Manual
Page 11
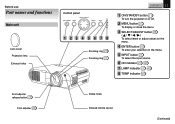
Before use Part names and functions Main unit Lens cover Projection lens Exhaust holes Control panel ON/STANDBY MENU SELECT/ADJUST ENTER INPUT ON LAMP TEMP 123 4 5 6 78 Zooming ring 21 Focusing ring 21 CONTENTS 11 1 ON/STANDBY button 21 To turn the projector on or off. 2 MENU button 27 ... on the menu. 4 ENTER button 30 To enter your selection on the menu. 5 INPUT button 21 To select the input source. 6 ON indicator 21 40 7 LAMP indicator 21 40 8 TEMP indicator 40 Foot adjuster release button 20 Foot adjuster 20 Intake holes Infrared remote sensor (Continued)
Before use Part names and functions Main unit Lens cover Projection lens Exhaust holes Control panel ON/STANDBY MENU SELECT/ADJUST ENTER INPUT ON LAMP TEMP 123 4 5 6 78 Zooming ring 21 Focusing ring 21 CONTENTS 11 1 ON/STANDBY button 21 To turn the projector on or off. 2 MENU button 27 ... on the menu. 4 ENTER button 30 To enter your selection on the menu. 5 INPUT button 21 To select the input source. 6 ON indicator 21 40 7 LAMP indicator 21 40 8 TEMP indicator 40 Foot adjuster release button 20 Foot adjuster 20 Intake holes Infrared remote sensor (Continued)
Owners Manual
Page 15
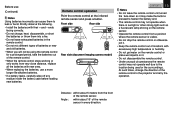
... remote control to hasten the battery end. • The remote control may not operate when there is sunlight or other strong light such as a fluorescent lamp shining on the remote sensor. • Operate the remote control from very close distance, replace all the batteries with new ones. • When replacing the...
... remote control to hasten the battery end. • The remote control may not operate when there is sunlight or other strong light such as a fluorescent lamp shining on the remote sensor. • Operate the remote control from very close distance, replace all the batteries with new ones. • When replacing the...
Owners Manual
Page 21
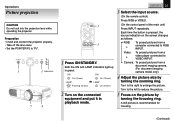
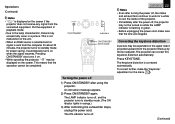
... light up in playback mode. ON On (Green) ON On (Green) LAMP Flashing (Green) LAMP On (Green) 2 Turn on the picture by turning the zooming ring. Each time the button is recommended for focusing. (Continued) A still picture is pressed, the... a video player connected to reduce the picture. 5 Focus on the connected equipment and put it in green. ON/STANDBY MENU SELECT/ADJUST ENTER INPUT ON LAMP TEMP 1 3 Indicators 5 4 AUTO SET ON/STANDBY KEYSTONE MARKER POINTER PJ LASER 1 L-CLICK MENU R-CLICK ENTER RGB VIDEO CAMERA RESIZE RESET FREEZE 3 1 Press ON/STANDBY. ...
... light up in playback mode. ON On (Green) ON On (Green) LAMP Flashing (Green) LAMP On (Green) 2 Turn on the picture by turning the zooming ring. Each time the button is recommended for focusing. (Continued) A still picture is pressed, the... a video player connected to reduce the picture. 5 Focus on the connected equipment and put it in green. ON/STANDBY MENU SELECT/ADJUST ENTER INPUT ON LAMP TEMP 1 3 Indicators 5 4 AUTO SET ON/STANDBY KEYSTONE MARKER POINTER PJ LASER 1 L-CLICK MENU R-CLICK ENTER RGB VIDEO CAMERA RESIZE RESET FREEZE 3 1 Press ON/STANDBY. ...
Owners Manual
Page 22
... in green. • Before unplugging the power cord, make sure that the operation cannot be turned on the menu. 30 (Continued) The LAMP indicator turns off , the projector may occasionally occur in orange.) 3) After confirming the exhaust fan stops, unplug the power cord. Press KEYSTONE....an RGB source is selected and no signal is sent from the connected equipment. To correct further, make the "Keystone" adjustment on while the LAMP indicator is corrected automatically. Put the equipment in playback mode. • Due to standby mode. (The ON idicator lights in a picture. ...
... in green. • Before unplugging the power cord, make sure that the operation cannot be turned on the menu. 30 (Continued) The LAMP indicator turns off , the projector may occasionally occur in orange.) 3) After confirming the exhaust fan stops, unplug the power cord. Press KEYSTONE....an RGB source is selected and no signal is sent from the connected equipment. To correct further, make the "Keystone" adjustment on while the LAMP indicator is corrected automatically. Put the equipment in playback mode. • Due to standby mode. (The ON idicator lights in a picture. ...
Owners Manual
Page 26
To left-click Press L-CLICK. Notes • The remote control operating range is sunlight or other strong light such as a fluorescent lamp shining on the remote sensor. To right-click Press R-CLICK. CONTENTS 26 To move the pointer Press the pointer control. L-CLICK MENU R-CLICK ENTER RGB ...
To left-click Press L-CLICK. Notes • The remote control operating range is sunlight or other strong light such as a fluorescent lamp shining on the remote sensor. To right-click Press R-CLICK. CONTENTS 26 To move the pointer Press the pointer control. L-CLICK MENU R-CLICK ENTER RGB ...
Owners Manual
Page 28
ON/STANDBY MENU SELECT/ADJUST ENTER INPUT ON LAMP TEMP 1,5 AUTO SET ON/STANDBY KEYSTONE MARKER POINTER PJ LASER 2-4 L-CLICK MENU R-CLICK ENTER RGB VIDEO CAMERA RESIZE RESET FREEZE RESET 1 Press MENU to display ...
ON/STANDBY MENU SELECT/ADJUST ENTER INPUT ON LAMP TEMP 1,5 AUTO SET ON/STANDBY KEYSTONE MARKER POINTER PJ LASER 2-4 L-CLICK MENU R-CLICK ENTER RGB VIDEO CAMERA RESIZE RESET FREEZE RESET 1 Press MENU to display ...

Owners Manual
Page 30
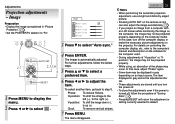
... condition setting (0 degrees setting) may be beyond the automatic keystone correction. Keys t one Au t o se t Ad j us t - + ON/STANDBY MENU SELECT/ADJUST ENTER INPUT ON LAMP TEMP 3 Press to correct the distortion. (-): To reduce the upper width. (+): To reduce the lower width. 7 Press MENU. For further correction, follow the procedure of...
... condition setting (0 degrees setting) may be beyond the automatic keystone correction. Keys t one Au t o se t Ad j us t - + ON/STANDBY MENU SELECT/ADJUST ENTER INPUT ON LAMP TEMP 3 Press to correct the distortion. (-): To reduce the upper width. (+): To reduce the lower width. 7 Press MENU. For further correction, follow the procedure of...
Owners Manual
Page 31
ON/STANDBY MENU SELECT/ADJUST ENTER INPUT ON LAMP TEMP 1,7 AUTO SET ON/STANDBY KEYSTONE MARKER POINTER PJ LASER AUTO SET 2,3,5,6 4 L-CLICK MENU R-CLICK ENTER RGB VIDEO CAMERA RESIZE RESET FREEZE RESET 1 Press MENU ...
ON/STANDBY MENU SELECT/ADJUST ENTER INPUT ON LAMP TEMP 1,7 AUTO SET ON/STANDBY KEYSTONE MARKER POINTER PJ LASER AUTO SET 2,3,5,6 4 L-CLICK MENU R-CLICK ENTER RGB VIDEO CAMERA RESIZE RESET FREEZE RESET 1 Press MENU ...
Owners Manual
Page 32
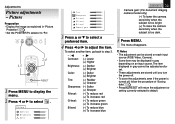
... or setting currently selected to select . level - + G- To select another item, go back to adjust the item. ON/STANDBY MENU SELECT/ADJUST ENTER INPUT ON LAMP TEMP 1,5 AUTO SET ON/STANDBY KEYSTONE MARKER POINTER PJ LASER 2-4 L-CLICK MENU R-CLICK ENTER RGB VIDEO CAMERA RESIZE RESET FREEZE RESET 1 Press MENU to display...
... or setting currently selected to select . level - + G- To select another item, go back to adjust the item. ON/STANDBY MENU SELECT/ADJUST ENTER INPUT ON LAMP TEMP 1,5 AUTO SET ON/STANDBY KEYSTONE MARKER POINTER PJ LASER 2-4 L-CLICK MENU R-CLICK ENTER RGB VIDEO CAMERA RESIZE RESET FREEZE RESET 1 Press MENU to display...
Owners Manual
Page 33
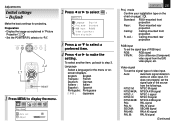
...; Display the image as explained in "Picture Projection". 21 • Set the POINTER/PJ selector to select . ON/STANDBY MENU SELECT/ADJUST ENTER INPUT ON LAMP TEMP 1,5 AUTO SET ON/STANDBY KEYSTONE MARKER POINTER PJ LASER 2-4 L-CLICK MENU R-CLICK ENTER RGB VIDEO CAMERA RESIZE RESET FREEZE RESET 1 Press MENU to display...
...; Display the image as explained in "Picture Projection". 21 • Set the POINTER/PJ selector to select . ON/STANDBY MENU SELECT/ADJUST ENTER INPUT ON LAMP TEMP 1,5 AUTO SET ON/STANDBY KEYSTONE MARKER POINTER PJ LASER 2-4 L-CLICK MENU R-CLICK ENTER RGB VIDEO CAMERA RESIZE RESET FREEZE RESET 1 Press MENU to display...
Owners Manual
Page 34
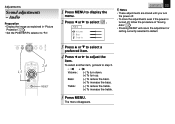
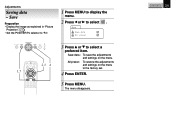
... menu. Adjustments Saving data - Save data : To save the adjustments and settings on the menu to "PJ". ON/STANDBY MENU SELECT/ADJUST ENTER INPUT ON LAMP TEMP 1,5 AUTO SET ON/STANDBY KEYSTONE MARKER POINTER PJ LASER 2,3 4 L-CLICK MENU R-CLICK ENTER RGB VIDEO CAMERA RESIZE RESET FREEZE 1 Press MENU to display the...
... menu. Adjustments Saving data - Save data : To save the adjustments and settings on the menu to "PJ". ON/STANDBY MENU SELECT/ADJUST ENTER INPUT ON LAMP TEMP 1,5 AUTO SET ON/STANDBY KEYSTONE MARKER POINTER PJ LASER 2,3 4 L-CLICK MENU R-CLICK ENTER RGB VIDEO CAMERA RESIZE RESET FREEZE 1 Press MENU to display the...
Owners Manual
Page 37
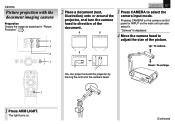
... Display the image as explained in "Picture Projection" . 21 OVERLAY PHOTO/TEXT ARM LIGHT 1 LOCK W.BALANCE CAMERA 3 6 ON/STANDBY MENU SELECT/ADJUST ENTER INPUT ON LAMP TEMP 3 AUTO SET ON/STANDBY KEYSTONE MARKER POINTER PJ LASER L-CLICK MENU R-CLICK ENTER RGB VIDEO CAMERA RESIZE RESET FREEZE 3 2 Place a document (text, illustration) onto...
... Display the image as explained in "Picture Projection" . 21 OVERLAY PHOTO/TEXT ARM LIGHT 1 LOCK W.BALANCE CAMERA 3 6 ON/STANDBY MENU SELECT/ADJUST ENTER INPUT ON LAMP TEMP 3 AUTO SET ON/STANDBY KEYSTONE MARKER POINTER PJ LASER L-CLICK MENU R-CLICK ENTER RGB VIDEO CAMERA RESIZE RESET FREEZE 3 2 Place a document (text, illustration) onto...
Owners Manual
Page 40
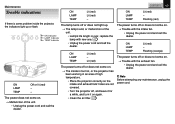
...or does not come on . → Malfunction of the unit. • Unplug the power cord and call the dealer. Maintenance CONTENTS 40 Trouble indications ON LAMP TEMP Lit (red) Lit (red) - Flashing (orange) The power turns off or does not light up or flash. Flashing (red) If there is ...(red) - The power does not come on . → The inside is some problem inside the projector, the indicators light up . → The lamp's end, or malfunction of high temperature. • Place the projector correctly so the intake and exhaust fans' holes are not covered. • Turn the ...
...or does not come on . → Malfunction of the unit. • Unplug the power cord and call the dealer. Maintenance CONTENTS 40 Trouble indications ON LAMP TEMP Lit (red) Lit (red) - Flashing (orange) The power turns off or does not light up or flash. Flashing (red) If there is ...(red) - The power does not come on . → The inside is some problem inside the projector, the indicators light up . → The lamp's end, or malfunction of high temperature. • Place the projector correctly so the intake and exhaust fans' holes are not covered. • Turn the ...
Owners Manual
Page 42
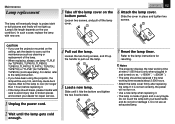
...eventually begin to project dark or dull pictures and finally will not light up the handle to pull out the lamp. 1 2 5 Load a new lamp. Loosen two screws, and pull off the lamp cover on the bottom panel. For detail, refer to carry out the maintenance such as cleaning or replacement ...TLP450U, TLP451U, TLP650U, TLP651U, TLP470U, TLP471U, TLP670U, TLP671U) or "TLPL8" (for repair service. 1 Unplug the power cord. 4 Pull out the lamp. Wait for the lamp to broken pieces and contact your bare hands and do not jolt or damage it hits the bottom and tighten the two fixed screws. 2 1 2 Wait...
...eventually begin to project dark or dull pictures and finally will not light up the handle to pull out the lamp. 1 2 5 Load a new lamp. Loosen two screws, and pull off the lamp cover on the bottom panel. For detail, refer to carry out the maintenance such as cleaning or replacement ...TLP450U, TLP451U, TLP650U, TLP651U, TLP470U, TLP471U, TLP670U, TLP671U) or "TLPL8" (for repair service. 1 Unplug the power cord. 4 Pull out the lamp. Wait for the lamp to broken pieces and contact your bare hands and do not jolt or damage it hits the bottom and tighten the two fixed screws. 2 1 2 Wait...
Owners Manual
Page 43
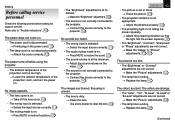
...8226; The "Color", "Tint", "R-Level", "G-Level" or "B-Level" adjustments are not correct. → Make the "Picture" adjustments. 32 • The lamp life is ending. → Replace the lamp. 42 The colors are blurred. Use a lens cleaner to restore the picture. 23 The images are faint. Focusing is uneven. • The... room, and turn the power on . • The power cord is disconnected. → Firmly plug in the power cord. 19 • The lamp cover is not attached correctly. → Attach the cover correctly. 42 The power turns off the lens cover. 19 • The wrong input is ...
...8226; The "Color", "Tint", "R-Level", "G-Level" or "B-Level" adjustments are not correct. → Make the "Picture" adjustments. 32 • The lamp life is ending. → Replace the lamp. 42 The colors are blurred. Use a lens cleaner to restore the picture. 23 The images are faint. Focusing is uneven. • The... room, and turn the power on . • The power cord is disconnected. → Firmly plug in the power cord. 19 • The lamp cover is not attached correctly. → Attach the cover correctly. 42 The power turns off the lens cover. 19 • The wrong input is ...
Owners Manual
Page 51
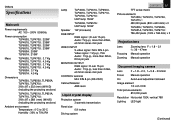
... x 288 (mm) (W/H/D) (Including the projecting sections) Ambient environment Temperature : 0°C to 35°C Humidity : 30% to 70% RH Lamp TLP450U, TLP451U, TLP650U, TLP651U, TLP470U, TLP471U, TLP670U, TLP671U : UHP lamp 150W TLP650A, TLP651A : UHP lamp 120W Speaker 1W (monaural) RGB INPUT RGB signal : (D-sub 15-pin) Audio: 1V(p-p), more than 22kΩ, ø3.5mm...
... x 288 (mm) (W/H/D) (Including the projecting sections) Ambient environment Temperature : 0°C to 35°C Humidity : 30% to 70% RH Lamp TLP450U, TLP451U, TLP650U, TLP651U, TLP470U, TLP471U, TLP670U, TLP671U : UHP lamp 150W TLP650A, TLP651A : UHP lamp 120W Speaker 1W (monaural) RGB INPUT RGB signal : (D-sub 15-pin) Audio: 1V(p-p), more than 22kΩ, ø3.5mm...

