

Owners Manual
Page 1
Before use OWNER'S MANUAL 3LCD DATA PROJECTOR TLP450U TLP451U (WITH DOCUMENT IMAGING CAMERA) TLP650U TLP651U (WITH DOCUMENT IMAGING CAMERA) TLP650A TLP651A (WITH DOCUMENT IMAGING CAMERA) TLP470U TLP471U (WITH DOCUMENT IMAGING CAMERA) TLP670U TLP671U (WITH DOCUMENT IMAGING CAMERA) CONTENTS 1
Before use OWNER'S MANUAL 3LCD DATA PROJECTOR TLP450U TLP451U (WITH DOCUMENT IMAGING CAMERA) TLP650U TLP651U (WITH DOCUMENT IMAGING CAMERA) TLP650A TLP651A (WITH DOCUMENT IMAGING CAMERA) TLP470U TLP471U (WITH DOCUMENT IMAGING CAMERA) TLP670U TLP671U (WITH DOCUMENT IMAGING CAMERA) CONTENTS 1
Owners Manual
Page 3
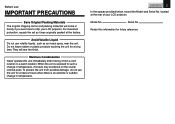
.... Moisture Condensation Never operate this information for future reference. Retain this unit immediately after moving it was originally packed at the rear of your LCD projector. Model No. Avoid Volatile Liquid Do not use volatile liquids, such as it from possible damage, do not use IMPORTANT PRECAUTIONS Save Original Packing Materials...
.... Moisture Condensation Never operate this information for future reference. Retain this unit immediately after moving it was originally packed at the rear of your LCD projector. Model No. Avoid Volatile Liquid Do not use volatile liquids, such as it from possible damage, do not use IMPORTANT PRECAUTIONS Save Original Packing Materials...
Owners Manual
Page 8
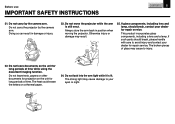
... product incorporates glass components, including a lens and a lamp. Do not leave texts, papers or other documents for long periods of time. Do not move the projector while the arm is lit. Do not leave documents on the unit for projection on a thermal paper. 24. Do not carry by the camera arm...
... product incorporates glass components, including a lens and a lamp. Do not leave texts, papers or other documents for long periods of time. Do not move the projector while the arm is lit. Do not leave documents on the unit for projection on a thermal paper. 24. Do not carry by the camera arm...
Owners Manual
Page 10
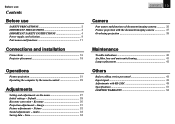
... use Contents Before use SAFETY PRECAUTIONS 2 IMPORTANT PRECAUTIONS 3 IMPORTANT SAFETY INSTRUCTIONS 4 Power supply cord selection 9 Part names and functions 11 Connections and installation Connections 16 Projector placement 18 Operations Picture projection 21 Operating the computer by the remote control 25 Adjustments Setting and adjustments on the menu 27 Initial settings - Image...
... use Contents Before use SAFETY PRECAUTIONS 2 IMPORTANT PRECAUTIONS 3 IMPORTANT SAFETY INSTRUCTIONS 4 Power supply cord selection 9 Part names and functions 11 Connections and installation Connections 16 Projector placement 18 Operations Picture projection 21 Operating the computer by the remote control 25 Adjustments Setting and adjustments on the menu 27 Initial settings - Image...
Owners Manual
Page 11
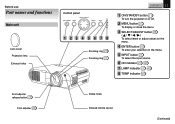
... MENU SELECT/ADJUST ENTER INPUT ON LAMP TEMP 123 4 5 6 78 Zooming ring 21 Focusing ring 21 CONTENTS 11 1 ON/STANDBY button 21 To turn the projector on or off. 2 MENU button 27 To display or close the menu. 3 SELECT/ADJUST button 28 ( / / / ) To select items or adjust values on the menu...
... MENU SELECT/ADJUST ENTER INPUT ON LAMP TEMP 123 4 5 6 78 Zooming ring 21 Focusing ring 21 CONTENTS 11 1 ON/STANDBY button 21 To turn the projector on or off. 2 MENU button 27 To display or close the menu. 3 SELECT/ADJUST button 28 ( / / / ) To select items or adjust values on the menu...
Owners Manual
Page 12
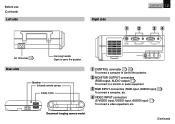
AUDIO -R Rear side Speaker Infrared remote sensor Intake holes 1 CONTROL connector 17 49 To connect a computer to control the projector. 2 MONITOR OUTPUT connectors (RGB output, AUDIO output) 17 To connect to carry the projetor. Before use (Continued) Left side Right side CONTENTS 12 1 2 34 RS-...
AUDIO -R Rear side Speaker Infrared remote sensor Intake holes 1 CONTROL connector 17 49 To connect a computer to control the projector. 2 MONITOR OUTPUT connectors (RGB output, AUDIO output) 17 To connect to carry the projetor. Before use (Continued) Left side Right side CONTENTS 12 1 2 34 RS-...
Owners Manual
Page 13
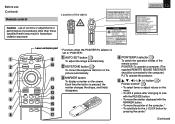
...To substitute for the L-CLICK button by pressing the center.* (Continued) Each time the button is set to the computer.) PJ: To operate the projector. 5 button 28 / Pointer control* 26 • To select items or adjust values on the screen. Location of the labels AUTO SET ON/...CAUTION LASER RADIATION DO NOT STARE INTO BEAM WAVE LENGTH: 650nm MAX OUTPUT: 1mW CLASS II LASER PRODUCT COMPLIES WITH DHHS 21 CFR SUBCHAPTER J TOSHIBA AMERICA CONSUMER PRODUCTS, INC. 82 TOTOWA RD., WAYNE, NJ 07470, U.S.A REMOTE CONTROL MODEL CT-90009 MANUFACTURED: SEPTEMBER 1999 PLACE OF MANUFACTURER: A...
...To substitute for the L-CLICK button by pressing the center.* (Continued) Each time the button is set to the computer.) PJ: To operate the projector. 5 button 28 / Pointer control* 26 • To select items or adjust values on the screen. Location of the labels AUTO SET ON/...CAUTION LASER RADIATION DO NOT STARE INTO BEAM WAVE LENGTH: 650nm MAX OUTPUT: 1mW CLASS II LASER PRODUCT COMPLIES WITH DHHS 21 CFR SUBCHAPTER J TOSHIBA AMERICA CONSUMER PRODUCTS, INC. 82 TOTOWA RD., WAYNE, NJ 07470, U.S.A REMOTE CONTROL MODEL CT-90009 MANUFACTURED: SEPTEMBER 1999 PLACE OF MANUFACTURER: A...

Owners Manual
Page 14
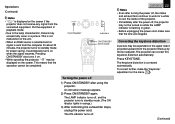
... the menu. 7 RGB button 21 To select the RGB input. 8 RESIZE button 24 To change the picture size. 9 ON/STANDBY button 21 To turn the projector on or off the picture and sound temporarily. 17 CALL button 23 To display the current input source and signal status information. Make sure that...
... the menu. 7 RGB button 21 To select the RGB input. 8 RESIZE button 24 To change the picture size. 9 ON/STANDBY button 21 To turn the projector on or off the picture and sound temporarily. 17 CALL button 23 To display the current input source and signal status information. Make sure that...
Owners Manual
Page 15
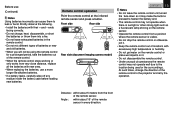
... wet objects on it. • Do not disassemble the remote control. • Under unusual circumstances the remote control may not operate well due to the projector and retry the operation. At such times, change the direction of the remote sensor. Remote control operation Point the remote control at the infrared remote...
... wet objects on it. • Do not disassemble the remote control. • Under unusual circumstances the remote control may not operate well due to the projector and retry the operation. At such times, change the direction of the remote sensor. Remote control operation Point the remote control at the infrared remote...
Owners Manual
Page 16
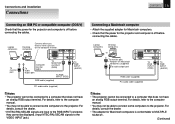
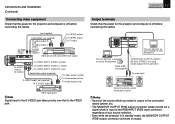
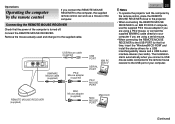
... INPUT jack.) Connecting a Macintosh computer • Attach the supplied adapter for Macintosh computers. • Check that the power for the projector and computer is off before connecting the cables. For details, consult the dealer. • The adapter for Macintosh computers (supplied) To...- AUDIO -R To RGB INPUT (RGB) To RGB INPUT (AUDIO) RGB cable (supplied) PC audio cable (supplied) Notes • The projector cannot be displayed. (Input NTSC/PAL/SECAM signals to MULTIPLE SCAN 21. (Continued) Laptop computers To monitor port Desktop computers Connect when you want...
... INPUT jack.) Connecting a Macintosh computer • Attach the supplied adapter for Macintosh computers. • Check that the power for the projector and computer is off before connecting the cables. For details, consult the dealer. • The adapter for Macintosh computers (supplied) To...- AUDIO -R To RGB INPUT (RGB) To RGB INPUT (AUDIO) RGB cable (supplied) PC audio cable (supplied) Notes • The projector cannot be displayed. (Input NTSC/PAL/SECAM signals to MULTIPLE SCAN 21. (Continued) Laptop computers To monitor port Desktop computers Connect when you want...
Owners Manual
Page 17
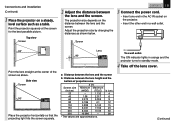
...RGB AUDIO RGB INPUT VIDEO INPUT S-VIDEO VIDEO L - Connections and installation (Continued) Connecting video equipment Check that the power for the projector and computer is off before connecting the cables. (not supplied) To CR(PR) output To RGB INPUT (RGB) Audio cable (not ...- AUDIO -R You can connect a computer to the RGB INPUT (RGB input) connector regardless of your source selection. • Even while the projector is off before connecting the cables. CONTENTS 17 Output terminals Check that to view the picture. AUDIO -R To VIDEO INPUT To VIDEO INPUT (AUDIO ...
...RGB AUDIO RGB INPUT VIDEO INPUT S-VIDEO VIDEO L - Connections and installation (Continued) Connecting video equipment Check that the power for the projector and computer is off before connecting the cables. (not supplied) To CR(PR) output To RGB INPUT (RGB) Audio cable (not ...- AUDIO -R You can connect a computer to the RGB INPUT (RGB input) connector regardless of your source selection. • Even while the projector is off before connecting the cables. CONTENTS 17 Output terminals Check that to view the picture. AUDIO -R To VIDEO INPUT To VIDEO INPUT (AUDIO ...

Owners Manual
Page 18
... be darkened. • Refer to the table on the next page 19 for the screen size and required distance. Connections and installation Projector placement There are four ways of the projecting orientation on the menu. 28 (Continued) CAUTION • When a ceiling mount is required...front of the floor-mounted front projection. Translucent screen Viewer Viewer • When installed the projector in the way except the floor-mounted front projection, make the setting of installing this projector as shown right. This section explains the standard case of the screen from a ceiling ...
... be darkened. • Refer to the table on the next page 19 for the screen size and required distance. Connections and installation Projector placement There are four ways of the projecting orientation on the menu. 28 (Continued) CAUTION • When a ceiling mount is required...front of the floor-mounted front projection. Translucent screen Viewer Viewer • When installed the projector in the way except the floor-mounted front projection, make the setting of installing this projector as shown right. This section explains the standard case of the screen from a ceiling ...
Owners Manual
Page 19
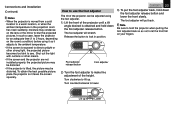
...screen squarely. CONTENTS 19 3 Connect the power cord. • Insert one end in the AC IN socket on the projector. • Insert the other end in orange and the projector turns to standby mode. 4 Take off the lens cover. (Continued) The ON indicator lights in a wall outlet. ...The projection size depends on the distance between the lens and the screen. Adjust the projection size by changing the distances as a table. Point the projector squarely at the center of projection area a (m) Screen size Minimum Maximum (inches) (WIDE) (TELE) 23 - 1.132 40 1.56 2.017 60 2.373 3....
...screen squarely. CONTENTS 19 3 Connect the power cord. • Insert one end in the AC IN socket on the projector. • Insert the other end in orange and the projector turns to standby mode. 4 Take off the lens cover. (Continued) The ON indicator lights in a wall outlet. ...The projection size depends on the distance between the lens and the screen. Adjust the projection size by changing the distances as a table. Point the projector squarely at the center of projection area a (m) Screen size Minimum Maximum (inches) (WIDE) (TELE) 23 - 1.132 40 1.56 2.017 60 2.373 3....
Owners Manual
Page 20
... room has risen suddenly, moisture may condense on the lens or the mirror to lift up Lower To obtain the best possible picture, place the projector so it adjusts to the ambient temperature. • If the screen is exposed to direct sunlight or other means. • If the screen and ...(1 to 2 hours, depending on your fingers. Foot adjuster release button Foot adjuster 2) Turn the foot adjuster to use the foot adjuster The tilt of the projector can be distorted. Shut out the light with curtains or other strong light, the projected picture becomes too faint to let the front fall on...
... room has risen suddenly, moisture may condense on the lens or the mirror to lift up Lower To obtain the best possible picture, place the projector so it adjusts to the ambient temperature. • If the screen is exposed to direct sunlight or other means. • If the screen and ...(1 to 2 hours, depending on your fingers. Foot adjuster release button Foot adjuster 2) Turn the foot adjuster to use the foot adjuster The tilt of the projector can be distorted. Shut out the light with curtains or other strong light, the projected picture becomes too faint to let the front fall on...
Owners Manual
Page 21
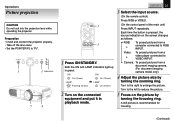
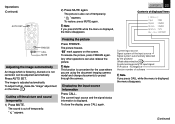
... the zooming ring. Camera: To project pictures from a video player connected to VIDEO INPUT. Preparation • Install and connect the projector properly. • Take off the lens cover. • Set the POINTER/PJ to enlarge the picture. Operations Picture projection CAUTION ...Do not look into the projection lens while operating the projector. A still picture is pressed, the source indication on the screen changes as follows: → → RGB: To project pictures ...
... the zooming ring. Camera: To project pictures from a video player connected to VIDEO INPUT. Preparation • Install and connect the projector properly. • Take off the lens cover. • Set the POINTER/PJ to enlarge the picture. Operations Picture projection CAUTION ...Do not look into the projection lens while operating the projector. A still picture is pressed, the source indication on the screen changes as follows: → → RGB: To project pictures ...
Owners Manual
Page 22
... ON/STANDBY again. The keystone distortion is flashing in a picture. Pressing ON/STANDBY also turns it on. • While operating the projector, " " may be displayed on the upper side if projected upward from the connected equipment. Press KEYSTONE. Correcting the keystone distortion A picture... may be expanded on the screen. CONTENTS 22 Notes • Even after using the projector. The LAMP indicator turns off . To correct further, make sure that the operation cannot be turned on the menu. 30 (Continued...
... ON/STANDBY again. The keystone distortion is flashing in a picture. Pressing ON/STANDBY also turns it on. • While operating the projector, " " may be displayed on the upper side if projected upward from the connected equipment. Press KEYSTONE. Correcting the keystone distortion A picture... may be expanded on the screen. CONTENTS 22 Notes • Even after using the projector. The LAMP indicator turns off . To correct further, make sure that the operation cannot be turned on the menu. 30 (Continued...
Owners Manual
Page 23
... model and change documents to project through the camera. " " appears. Current input source Signal system of the input source Signal system automatically detected by the projector (Mode determination 45 ) Synchronizing polarity of input signal P=Positive N=Negative Version number of displayed items [ St atus ] I n p u t : RGB S i g n a l : XGA6 0 Sc r e e n : XGA6 0 Synch ro . :N/N Ve r . / r ev...
... model and change documents to project through the camera. " " appears. Current input source Signal system of the input source Signal system automatically detected by the projector (Mode determination 45 ) Synchronizing polarity of input signal P=Positive N=Negative Version number of displayed items [ St atus ] I n p u t : RGB S i g n a l : XGA6 0 Sc r e e n : XGA6 0 Synch ro . :N/N Ve r . / r ev...
Owners Manual
Page 25
... adapter (supplied) USB PORT SERIAL PORT IBM PC DOS/V PS/2 MOUSE PORT Macintosh MAC MOUSE PORT CONTENTS 25 Notes • To operate the projector and the computer by the remote control If you connect the iREMOTE MOUSE RECEIVER to the computer, the supplied remote control can work as a mouse... actually used and change it to the supplied cable. Operations Operating the computer by the remote control, place the REMOTE MOUSE RECEIVER close to the projector. • When connecting the REMOTE MOUSE RECEIVER to an IBM PC/DOS V computer, use the supplied PS/2 mouse adapter if you are using a...
... adapter (supplied) USB PORT SERIAL PORT IBM PC DOS/V PS/2 MOUSE PORT Macintosh MAC MOUSE PORT CONTENTS 25 Notes • To operate the projector and the computer by the remote control If you connect the iREMOTE MOUSE RECEIVER to the computer, the supplied remote control can work as a mouse... actually used and change it to the supplied cable. Operations Operating the computer by the remote control, place the REMOTE MOUSE RECEIVER close to the projector. • When connecting the REMOTE MOUSE RECEIVER to an IBM PC/DOS V computer, use the supplied PS/2 mouse adapter if you are using a...
Owners Manual
Page 27
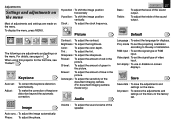
... of the 31 speaker. Color : To adjust the color depth. RGB input : To set the projecting orientation according to the factory set. When using this projector for displays. Contrast : To adjust the contrast. Sharpness : To adjust the sharpness. Proj. Default 28 The followings are made on the menu. Brightness : To adjust...
... of the 31 speaker. Color : To adjust the color depth. RGB input : To set the projecting orientation according to the factory set. When using this projector for displays. Contrast : To adjust the contrast. Sharpness : To adjust the sharpness. Proj. Default 28 The followings are made on the menu. Brightness : To adjust...

Owners Manual
Page 30
... "Picture Projection". 21 • Set the POINTER/PJ selector to "PJ". 1 Press MENU to display the menu. 2 Press or to correct the distortion. 1) Place the projector on the remote control can also correct the keystone distortion automatically. 22 • These adjustments are stored until you turn the power off , follow the...
... "Picture Projection". 21 • Set the POINTER/PJ selector to "PJ". 1 Press MENU to display the menu. 2 Press or to correct the distortion. 1) Place the projector on the remote control can also correct the keystone distortion automatically. 22 • These adjustments are stored until you turn the power off , follow the...


