

Owners Manual
Page 7
...lens and lamp, should break, contact your dealer for repair service. If such parts should be sure the service technician has used replacement parts specified by users.) 20. The broken pieces of any service or repairs to this product from the wall outlet and refer servicing... to determine that are required, be made by the manufacturer or have fallen into the product. Replacement Parts When replacement parts are covered by the operating instructions as the original part. This product incorporates glass components, including a lens and a lamp....
...lens and lamp, should break, contact your dealer for repair service. If such parts should be sure the service technician has used replacement parts specified by users.) 20. The broken pieces of any service or repairs to this product from the wall outlet and refer servicing... to determine that are required, be made by the manufacturer or have fallen into the product. Replacement Parts When replacement parts are covered by the operating instructions as the original part. This product incorporates glass components, including a lens and a lamp....
Owners Manual
Page 9
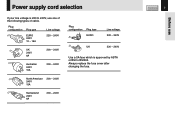
Plug configuration Plug type Line voltage EURO 240V 10 - 15A 220 - 240V UK 240V 6A 200 - 240V Australian 240V 10A 200 - 240V North American 240V 15A 200 - 240V Switzerland 240V 6A 200 - 240V Plug configuration Plug type EURO Line voltage 220 - 240V UK 220 - 240V Use a 5A fuse which is 220 to BSI362. CONTENTS 9 Before use one of the following types of cable. Power supply cord selection If your line voltage is approved by ASTA or BSI to 240V, use Always replace the fuse cover after changing the fuse.
Plug configuration Plug type Line voltage EURO 240V 10 - 15A 220 - 240V UK 240V 6A 200 - 240V Australian 240V 10A 200 - 240V North American 240V 15A 200 - 240V Switzerland 240V 6A 200 - 240V Plug configuration Plug type EURO Line voltage 220 - 240V UK 220 - 240V Use a 5A fuse which is 220 to BSI362. CONTENTS 9 Before use one of the following types of cable. Power supply cord selection If your line voltage is approved by ASTA or BSI to 240V, use Always replace the fuse cover after changing the fuse.

Owners Manual
Page 10
... .. 55 Locking the white balance 58 Correcting illuminated defects 59 Maintenance Trouble indications 60 Air filter cleaning 61 Lens and main unit cleaning 63 Lamp replacement 64 Others Before calling service personal 66 Pin assignment of each part on the screen 27 Turning the power off 32 Adjusting the picture automatically...
... .. 55 Locking the white balance 58 Correcting illuminated defects 59 Maintenance Trouble indications 60 Air filter cleaning 61 Lens and main unit cleaning 63 Lamp replacement 64 Others Before calling service personal 66 Pin assignment of each part on the screen 27 Turning the power off 32 Adjusting the picture automatically...
Owners Manual
Page 15
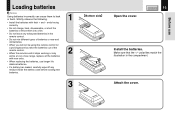
... for a prolonged period, take the batteries out of the remote control. • When the remote control stops working or only works at very close range, replace all the batteries with their + and - Attach the cover. CONTENTS 15 Install the batteries. Strictly observe the following. • Install the batteries with new ones...
... for a prolonged period, take the batteries out of the remote control. • When the remote control stops working or only works at very close range, replace all the batteries with their + and - Attach the cover. CONTENTS 15 Install the batteries. Strictly observe the following. • Install the batteries with new ones...

Owners Manual
Page 31
...and make sure that these are constantly lit) on the screen (continued) CONTENTS 31 Remote control 8 VOL/ADJ Press VOL/ADJ (+/-) to time 61 and replace it regularly. It is limited. The state of the lamp being extinguished helps enhance the effect of the LCD is not malfunction of the unit.... • The lamp may rarely burst with dust. 60 About the LCD Panel The life of this replacement be black spots (pixels that do not light) or bright spots (pixels that this panel, never fail to lamp characteristics, flickers may also occur. ...
...and make sure that these are constantly lit) on the screen (continued) CONTENTS 31 Remote control 8 VOL/ADJ Press VOL/ADJ (+/-) to time 61 and replace it regularly. It is limited. The state of the lamp being extinguished helps enhance the effect of the LCD is not malfunction of the unit.... • The lamp may rarely burst with dust. 60 About the LCD Panel The life of this replacement be black spots (pixels that do not light) or bright spots (pixels that this panel, never fail to lamp characteristics, flickers may also occur. ...

Owners Manual
Page 39
... (at RGB input) H-frequency - the color mode of the input signal (at Video, S-Video input) Signal format- the shutter speed of purchase about obtaining a replacement lamp (TLPL55, sold separately). • The "Lamp time" can be displayed. CONTENTS 39 Operations Remote control CALL INPUT KEYSTONE ON / STANDBY AUTO SET FREEZE MUTE...Notes • The information displayed is not refreshed even if it back on the input signal source, etc., can be reset when the lamp is replaced. • The "Version" is the version of the control program used in the projector and is used for lamp...
... (at RGB input) H-frequency - the color mode of the input signal (at Video, S-Video input) Signal format- the shutter speed of purchase about obtaining a replacement lamp (TLPL55, sold separately). • The "Lamp time" can be displayed. CONTENTS 39 Operations Remote control CALL INPUT KEYSTONE ON / STANDBY AUTO SET FREEZE MUTE...Notes • The information displayed is not refreshed even if it back on the input signal source, etc., can be reset when the lamp is replaced. • The "Version" is the version of the control program used in the projector and is used for lamp...

Owners Manual
Page 60
... in about 2 minutes. When the lamp is at the end of its life duration or the unit has a fault. • Lamp's life duration is over, replace the lamp with the cooling fan. (Lit or flashing in red) • Unplug the power cord and call the dealer. If the projector does not...
... in about 2 minutes. When the lamp is at the end of its life duration or the unit has a fault. • Lamp's life duration is over, replace the lamp with the cooling fan. (Lit or flashing in red) • Unplug the power cord and call the dealer. If the projector does not...
Owners Manual
Page 62
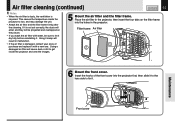
... dirt to fix it. Using a damaged air filter will result in malfunction. • If the air filter is impaired. Insert the hooks of purchase and replace it . If it to the lens side to get inside the projector to let it dry fully before reinstalling it with water, be sure to...
... dirt to fix it. Using a damaged air filter will result in malfunction. • If the air filter is impaired. Insert the hooks of purchase and replace it . If it to the lens side to get inside the projector to let it dry fully before reinstalling it with water, be sure to...
Owners Manual
Page 63
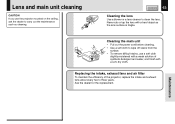
... Lens and main unit cleaning CAUTION If you use a soft cloth slightly moistened with a weak solution of the projector, replace the intake and exhaust fans about every two to wipe off stains from the surface. • To remove difficult stains, use the projector mounted on...clean the lens. CONTENTS 63 Cleaning the lens Use a blower or a lens cleaner to carry out the maintenance such as the lens surface is fragile. Replacing the intake, exhaust fans and air filter To maintain the efficiency of synthetic detergent and water, and finish with a hard object as cleaning. Cleaning the...
... Lens and main unit cleaning CAUTION If you use a soft cloth slightly moistened with a weak solution of the projector, replace the intake and exhaust fans about every two to wipe off stains from the surface. • To remove difficult stains, use the projector mounted on...clean the lens. CONTENTS 63 Cleaning the lens Use a blower or a lens cleaner to carry out the maintenance such as the lens surface is fragile. Replacing the intake, exhaust fans and air filter To maintain the efficiency of synthetic detergent and water, and finish with a hard object as cleaning. Cleaning the...
Owners Manual
Page 64
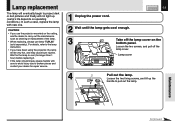
... • If you use lamp "TLPL55" (sold separately). For details, refer to carry out the maintenance such as cleaning or replacement of the lamp. • When replacing, always use the projector mounted on the ceiling, ask the dealer to the lamp instruction. • If you have been using ...the projector, the lamp will be very hot, and may cause burn injuries. Lamp replacement The lamp will eventually begin to pull out the lamp. 3 2 Maintenance Continued Lamp cover 4 1 Pull out the lamp. Loosen the two fixing ...
... • If you use lamp "TLPL55" (sold separately). For details, refer to carry out the maintenance such as cleaning or replacement of the lamp. • When replacing, always use the projector mounted on the ceiling, ask the dealer to the lamp instruction. • If you have been using ...the projector, the lamp will be very hot, and may cause burn injuries. Lamp replacement The lamp will eventually begin to pull out the lamp. 3 2 Maintenance Continued Lamp cover 4 1 Pull out the lamp. Loosen the two fixing ...

Owners Manual
Page 65
... use an exhausted lamp. Do not try to the rules of inorganic mercury harmful to the lamp instructions for the lamp. Slide until it . Lamp replacement (continued) CONTENTS 65 Notes • When the CALL button is very fragile. When the "Lamp time" is used ) will disappear when you do not... it hits the bottom and tighten the two fixing screws. 6 3 Attach the lamp cover. They will be displayed. 39 • The lamp should be replaced if the total working time exceeds about 1,500 hours. A small amount of your bare hands and do some operation. • Attach the lamp cover firmly...
... use an exhausted lamp. Do not try to the rules of inorganic mercury harmful to the lamp instructions for the lamp. Slide until it . Lamp replacement (continued) CONTENTS 65 Notes • When the CALL button is very fragile. When the "Lamp time" is used ) will disappear when you do not... it hits the bottom and tighten the two fixing screws. 6 3 Attach the lamp cover. They will be displayed. 39 • The lamp should be replaced if the total working time exceeds about 1,500 hours. A small amount of your bare hands and do some operation. • Attach the lamp cover firmly...

Owners Manual
Page 66
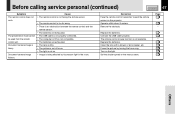
..."Brightness" adjustment. Adjust the sound volume. Connect the source correctly to restore the picture. Focus the picture. Make the "Picture" adjustments. Replace the lamp. No image appears. The picture is heard. Press MUTE to the projector. Press MUTE to "Trouble indications". 60 CONTENTS 66 Symptom... is dim. On the menu screen, set so that it 's minimum. • The source is faint. Make the "Picture" adjustments. Replace the lamp. Take off while using the projector. By default, only the Analog RGB and Video input modes can be selected with a blower or...
..."Brightness" adjustment. Adjust the sound volume. Connect the source correctly to restore the picture. Focus the picture. Make the "Picture" adjustments. Replace the lamp. No image appears. The picture is heard. Press MUTE to the projector. Press MUTE to "Trouble indications". 60 CONTENTS 66 Symptom... is dim. On the menu screen, set so that it 's minimum. • The source is faint. Make the "Picture" adjustments. Replace the lamp. Take off while using the projector. By default, only the Analog RGB and Video input modes can be selected with a blower or...
Owners Manual
Page 67
...is dirty. • The picture is out of focus. • The light is not on the projector. Operate within about 5 meters. Replace the batteries. Turn on the menu screen. Document camera image is being affected by turning the focus ring. The presentation made cannot be used ...40 - 15 63 56 55 44 Others Correction Face the remote control transmitter toward the remote sensor on . • Image is blurry. Replace the batteries. Remove the obstacle. Connect the USB cable properly. The remote control mouse function is not available. Focus the picture by fluorescent...
...is dirty. • The picture is out of focus. • The light is not on the projector. Operate within about 5 meters. Replace the batteries. Turn on the menu screen. Document camera image is being affected by turning the focus ring. The presentation made cannot be used ...40 - 15 63 56 55 44 Others Correction Face the remote control transmitter toward the remote sensor on . • Image is blurry. Replace the batteries. Remove the obstacle. Connect the USB cable properly. The remote control mouse function is not available. Focus the picture by fluorescent...
Owners Manual
Page 77
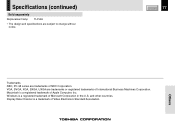
Display Data Channel is a registered trademark of Apple Computer, Inc. Macintosh is a trademark of NEC Corporation. VGA, SVGA, XGA, SXGA, UXGA are trademarks of Video Electronics Standard Association. and other countries. Others Windows is a registered trademark of International Business Machines Corporation. CONTENTS 77 Trademarks NEC, PC-98 series are trademarks or registered trademarks of Microsoft Corporation in the U.S. Specifications (continued) Sold separately Replacement lamp TLPL55 • The design and specifications are subject to change without notice.
Display Data Channel is a registered trademark of Apple Computer, Inc. Macintosh is a trademark of NEC Corporation. VGA, SVGA, XGA, SXGA, UXGA are trademarks of Video Electronics Standard Association. and other countries. Others Windows is a registered trademark of International Business Machines Corporation. CONTENTS 77 Trademarks NEC, PC-98 series are trademarks or registered trademarks of Microsoft Corporation in the U.S. Specifications (continued) Sold separately Replacement lamp TLPL55 • The design and specifications are subject to change without notice.


