

Owners Manual
Page 1
Before use OWNER'S MANUAL 3LCD DATA PROJECTOR TLP450U TLP451U (WITH DOCUMENT IMAGING CAMERA) TLP650U TLP651U (WITH DOCUMENT IMAGING CAMERA) TLP650A TLP651A (WITH DOCUMENT IMAGING CAMERA) TLP470U TLP471U (WITH DOCUMENT IMAGING CAMERA) TLP670U TLP671U (WITH DOCUMENT IMAGING CAMERA) CONTENTS 1
Before use OWNER'S MANUAL 3LCD DATA PROJECTOR TLP450U TLP451U (WITH DOCUMENT IMAGING CAMERA) TLP650U TLP651U (WITH DOCUMENT IMAGING CAMERA) TLP650A TLP651A (WITH DOCUMENT IMAGING CAMERA) TLP470U TLP471U (WITH DOCUMENT IMAGING CAMERA) TLP670U TLP671U (WITH DOCUMENT IMAGING CAMERA) CONTENTS 1
Owners Manual
Page 3
They will come in handy if you ever have to ship your LCD projector. located at the factory. Do not leave rubber or plastic products touching the unit for at least 2 hours when there is exposed to a warm location. .... Model No. Before use the unit for a long time. Retain this unit immediately after moving it was originally packed at the rear of your LCD projector. Moisture Condensation Never operate this information for future reference. Serial No. Avoid Volatile Liquid Do not use volatile liquids, such as it from possible damage...
They will come in handy if you ever have to ship your LCD projector. located at the factory. Do not leave rubber or plastic products touching the unit for at least 2 hours when there is exposed to a warm location. .... Model No. Before use the unit for a long time. Retain this unit immediately after moving it was originally packed at the rear of your LCD projector. Moisture Condensation Never operate this information for future reference. Serial No. Avoid Volatile Liquid Do not use volatile liquids, such as it from possible damage...
Owners Manual
Page 8
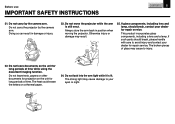
... by the camera arm. If such parts should break, contact your eyes or sight. Do not carry the projector by the camera arm. Doing so can result in position when moving the projector. Do not look into the arm light while it is still erect. Before use IMPORTANT SAFETY INSTRUCTIONS CONTENTS 8 21... heat could erase the letters on the unit for repair service. Always store the arm back in damage or injury. 23. Do not move the projector while the arm is lit. Otherwise injury or damage may result. 25.
... by the camera arm. If such parts should break, contact your eyes or sight. Do not carry the projector by the camera arm. Doing so can result in position when moving the projector. Do not look into the arm light while it is still erect. Before use IMPORTANT SAFETY INSTRUCTIONS CONTENTS 8 21... heat could erase the letters on the unit for repair service. Always store the arm back in damage or injury. 23. Do not move the projector while the arm is lit. Otherwise injury or damage may result. 25.
Owners Manual
Page 10
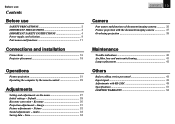
... use Contents Before use SAFETY PRECAUTIONS 2 IMPORTANT PRECAUTIONS 3 IMPORTANT SAFETY INSTRUCTIONS 4 Power supply cord selection 9 Part names and functions 11 Connections and installation Connections 16 Projector placement 18 Operations Picture projection 21 Operating the computer by the remote control 25 Adjustments Setting and adjustments on the menu 27 Initial settings - Image...
... use Contents Before use SAFETY PRECAUTIONS 2 IMPORTANT PRECAUTIONS 3 IMPORTANT SAFETY INSTRUCTIONS 4 Power supply cord selection 9 Part names and functions 11 Connections and installation Connections 16 Projector placement 18 Operations Picture projection 21 Operating the computer by the remote control 25 Adjustments Setting and adjustments on the menu 27 Initial settings - Image...
Owners Manual
Page 11
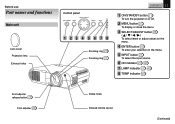
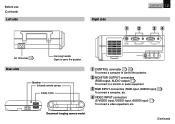
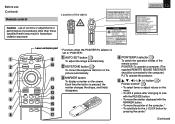
... MENU SELECT/ADJUST ENTER INPUT ON LAMP TEMP 123 4 5 6 78 Zooming ring 21 Focusing ring 21 CONTENTS 11 1 ON/STANDBY button 21 To turn the projector on or off. 2 MENU button 27 To display or close the menu. 3 SELECT/ADJUST button 28 ( / / / ) To select items or adjust values on the menu...
... MENU SELECT/ADJUST ENTER INPUT ON LAMP TEMP 123 4 5 6 78 Zooming ring 21 Focusing ring 21 CONTENTS 11 1 ON/STANDBY button 21 To turn the projector on or off. 2 MENU button 27 To display or close the menu. 3 SELECT/ADJUST button 28 ( / / / ) To select items or adjust values on the menu...
Owners Manual
Page 12
... equipment, etc. VIDEO INPUT S-VIDEO VIDEO L - AUDIO -R Rear side Speaker Infrared remote sensor Intake holes 1 CONTROL connector 17 49 To connect a computer to control the projector. 2 MONITOR OUTPUT connectors (RGB output, AUDIO output) 17 To connect to carry the projetor.
... equipment, etc. VIDEO INPUT S-VIDEO VIDEO L - AUDIO -R Rear side Speaker Infrared remote sensor Intake holes 1 CONTROL connector 17 49 To connect a computer to control the projector. 2 MONITOR OUTPUT connectors (RGB output, AUDIO output) 17 To connect to carry the projetor.
Owners Manual
Page 13
... CAUTION LASER RADIATION DO NOT STARE INTO BEAM WAVE LENGTH: 650nm MAX OUTPUT: 1mW CLASS II LASER PRODUCT COMPLIES WITH DHHS 21 CFR SUBCHAPTER J TOSHIBA AMERICA CONSUMER PRODUCTS, INC. 82 TOTOWA RD., WAYNE, NJ 07470, U.S.A REMOTE CONTROL MODEL CT-90009 MANUFACTURED: SEPTEMBER 1999 PLACE OF MANUFACTURER: A.../PJ selector 26 To switch the operation modes of the remote control. Each time the button is set to the computer.) PJ: To operate the projector. 5 button 28 / Pointer control* 26 • To select items or adjust values on the screen. POINTER: To operate a computer. (The ...
... CAUTION LASER RADIATION DO NOT STARE INTO BEAM WAVE LENGTH: 650nm MAX OUTPUT: 1mW CLASS II LASER PRODUCT COMPLIES WITH DHHS 21 CFR SUBCHAPTER J TOSHIBA AMERICA CONSUMER PRODUCTS, INC. 82 TOTOWA RD., WAYNE, NJ 07470, U.S.A REMOTE CONTROL MODEL CT-90009 MANUFACTURED: SEPTEMBER 1999 PLACE OF MANUFACTURER: A.../PJ selector 26 To switch the operation modes of the remote control. Each time the button is set to the computer.) PJ: To operate the projector. 5 button 28 / Pointer control* 26 • To select items or adjust values on the screen. POINTER: To operate a computer. (The ...

Owners Manual
Page 14
... the menu. 7 RGB button 21 To select the RGB input. 8 RESIZE button 24 To change the picture size. 9 ON/STANDBY button 21 To turn the projector on or off the picture and sound temporarily. 17 CALL button 23 To display the current input source and signal status information. polarities match the...
... the menu. 7 RGB button 21 To select the RGB input. 8 RESIZE button 24 To change the picture size. 9 ON/STANDBY button 21 To turn the projector on or off the picture and sound temporarily. 17 CALL button 23 To display the current input source and signal status information. polarities match the...
Owners Manual
Page 15
... the location being used or the surroundings. ends facing correctly. • Do not charge, heat, disassemble, or short the batteries or throw them to the projector and retry the operation. Angle : within about 15° of the remote sensor in the remote control. • Do not mix different types of batteries...
... the location being used or the surroundings. ends facing correctly. • Do not charge, heat, disassemble, or short the batteries or throw them to the projector and retry the operation. Angle : within about 15° of the remote sensor in the remote control. • Do not mix different types of batteries...
Owners Manual
Page 16
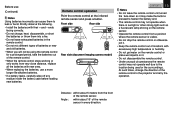
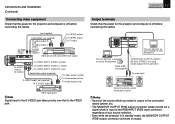
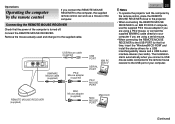
... AUDIO RGB INPUT To MONITOR OUTPUT (RGB) VIDEO INPUT S-VIDEO VIDEO L - Laptop computers Desktop computers or To monitor port Adapter for the projector and computer is off before connecting the cables. AUDIO -R To RGB INPUT (RGB) To RGB INPUT (AUDIO) RGB cable (supplied) PC ...output terminal. AUDIO -R To RGB INPUT (AUDIO) To RGB INPUT (RGB) RGB cable (supplied) PC audio cable (supplied) Notes • The projector cannot be displayed. (Input NTSC/PAL/SECAM signals to the VIDEO INPUT jack.) Connecting a Macintosh computer • Attach the supplied adapter for Macintosh ...
... AUDIO RGB INPUT To MONITOR OUTPUT (RGB) VIDEO INPUT S-VIDEO VIDEO L - Laptop computers Desktop computers or To monitor port Adapter for the projector and computer is off before connecting the cables. AUDIO -R To RGB INPUT (RGB) To RGB INPUT (AUDIO) RGB cable (supplied) PC ...output terminal. AUDIO -R To RGB INPUT (AUDIO) To RGB INPUT (RGB) RGB cable (supplied) PC audio cable (supplied) Notes • The projector cannot be displayed. (Input NTSC/PAL/SECAM signals to the VIDEO INPUT jack.) Connecting a Macintosh computer • Attach the supplied adapter for Macintosh ...
Owners Manual
Page 17
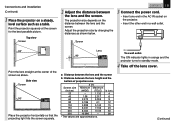
.... AUDIO -R You can connect a computer to the RGB INPUT (RGB input) connector regardless of your source selection. • Even while the projector is off before connecting the cables. Notes • Sound of the source which you select is output to the connected stereo system, etc. •...; The MONITOR OUTPUT (RGB output) connector always sends out a signal which is input to control the projector. 49 Audio cable (not supplied) To MONITOR OUTPUT (AUDIO) Ø3.5mm STEREO mini plug (Audio output level is off before connecting the cables...
.... AUDIO -R You can connect a computer to the RGB INPUT (RGB input) connector regardless of your source selection. • Even while the projector is off before connecting the cables. Notes • Sound of the source which you select is output to the connected stereo system, etc. •...; The MONITOR OUTPUT (RGB output) connector always sends out a signal which is input to control the projector. 49 Audio cable (not supplied) To MONITOR OUTPUT (AUDIO) Ø3.5mm STEREO mini plug (Audio output level is off before connecting the cables...

Owners Manual
Page 18
...mounted on the ceiling.) Viewing a picture projected on the menu. 28 (Continued) Translucent screen Viewer Viewer • When installed the projector in the way except the floor-mounted front projection, make the setting of the projecting orientation on the front of the screen from... a ceiling installation. Connections and installation Projector placement There are four ways of the floor-mounted front projection. Floor-mounted front projection Viewing a picture projected on the front ...
...mounted on the ceiling.) Viewing a picture projected on the menu. 28 (Continued) Translucent screen Viewer Viewer • When installed the projector in the way except the floor-mounted front projection, make the setting of the projecting orientation on the front of the screen from... a ceiling installation. Connections and installation Projector placement There are four ways of the floor-mounted front projection. Floor-mounted front projection Viewing a picture projected on the front ...
Owners Manual
Page 19
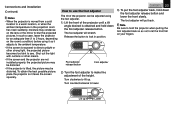
... the distance between the lens and the screen. Adjust the projection size by changing the distances as a table. Side view Screen 90° Place the projector horizontally so that the projecting light hits the screen squarely. b (cm) 4 6 9 12 15 23 30 38 To a wall outlet. Screen 90° Lens...one end in the AC IN socket on the distance between the lens and the screen. The projection size depends on the projector. • Insert the other end in orange and the projector turns to standby mode. 4 Take off the lens cover. (Continued) The ON indicator lights in a wall outlet. ...
... the distance between the lens and the screen. Adjust the projection size by changing the distances as a table. Side view Screen 90° Place the projector horizontally so that the projecting light hits the screen squarely. b (cm) 4 6 9 12 15 23 30 38 To a wall outlet. Screen 90° Lens...one end in the AC IN socket on the distance between the lens and the screen. The projection size depends on the projector. • Insert the other end in orange and the projector turns to standby mode. 4 Take off the lens cover. (Continued) The ON indicator lights in a wall outlet. ...
Owners Manual
Page 20
... to lift up Lower Note Be sure to hold down the foot adjuster release button. CONTENTS 20 3) To put back. In such a case, leave the projector for an adequate time (1 to 2 hours, depending on the lens or the mirror to blur the projected pictures. Release the button to lower. The foot..., moisture may be adjusted using it so it faces the screen squarely. Lift up . The foot adjuster will put the foot adjuster back, hold the projector when putting the foot adjuster back so as not to let the front fall on your fingers. Shut out the light with curtains or other...
... to lift up Lower Note Be sure to hold down the foot adjuster release button. CONTENTS 20 3) To put back. In such a case, leave the projector for an adequate time (1 to 2 hours, depending on the lens or the mirror to blur the projected pictures. Release the button to lower. The foot..., moisture may be adjusted using it so it faces the screen squarely. Lift up . The foot adjuster will put the foot adjuster back, hold the projector when putting the foot adjuster back so as not to let the front fall on your fingers. Shut out the light with curtains or other...
Owners Manual
Page 21
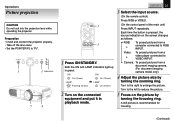
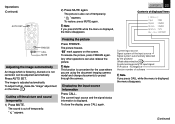
Preparation • Install and connect the projector properly. • Take off the lens cover. • Set the POINTER/PJ to enlarge the picture. Turn to the left to reduce the picture. 5 Focus .... (On the control panel of the main unit) Press INPUT repeatedly. Operations Picture projection CAUTION Do not look into the projection lens while operating the projector. Each time the button is recommended for focusing. (Continued) A still picture is pressed, the source indication on the picture by turning the zooming ring. Both...
Preparation • Install and connect the projector properly. • Take off the lens cover. • Set the POINTER/PJ to enlarge the picture. Turn to the left to reduce the picture. 5 Focus .... (On the control panel of the main unit) Press INPUT repeatedly. Operations Picture projection CAUTION Do not look into the projection lens while operating the projector. Each time the button is recommended for focusing. (Continued) A still picture is pressed, the source indication on the picture by turning the zooming ring. Both...
Owners Manual
Page 22
..., make sure that the operation cannot be turned on the upper side if projected upward from the computer for about 30 minutes, the projector turns to standby mode for a while to work for power saving. It automatically turns on the menu. 30 (Continued) An instruction message... appears. 2) Press ON/STANDBY again. CONTENTS 22 Notes • Even after using the projector. The LAMP indicator turns off . Put the equipment in playback mode. • Due to standby mode. (The ON idicator lights in a picture....
..., make sure that the operation cannot be turned on the upper side if projected upward from the computer for about 30 minutes, the projector turns to standby mode for a while to work for power saving. It automatically turns on the menu. 30 (Continued) An instruction message... appears. 2) Press ON/STANDBY again. CONTENTS 22 Notes • Even after using the projector. The LAMP indicator turns off . Put the equipment in playback mode. • Due to standby mode. (The ON idicator lights in a picture....
Owners Manual
Page 23
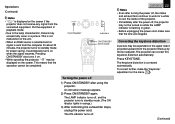
..., press FREEZE again. The image is displayed. The picture freezes. Current input source Signal system of the input source Signal system automatically detected by the projector (Mode determination 45 ) Synchronizing polarity of input signal P=Positive N=Negative Version number of displayed items [ St atus ] I n p u t : RGB S i g n a l : XGA6 0 Sc r e e n : XGA6 0 Synch ro . :N/N Ve r . / r ev...
..., press FREEZE again. The image is displayed. The picture freezes. Current input source Signal system of the input source Signal system automatically detected by the projector (Mode determination 45 ) Synchronizing polarity of input signal P=Positive N=Negative Version number of displayed items [ St atus ] I n p u t : RGB S i g n a l : XGA6 0 Sc r e e n : XGA6 0 Synch ro . :N/N Ve r . / r ev...
Owners Manual
Page 25
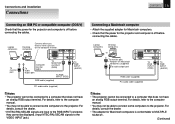
...adapter (supplied) USB PORT SERIAL PORT IBM PC DOS/V PS/2 MOUSE PORT Macintosh MAC MOUSE PORT CONTENTS 25 Notes • To operate the projector and the computer by the remote control If you connect the iREMOTE MOUSE RECEIVER to the computer, the supplied remote control can work as a mouse... actually used and change it to the supplied cable. Operations Operating the computer by the remote control, place the REMOTE MOUSE RECEIVER close to the projector. • When connecting the REMOTE MOUSE RECEIVER to an IBM PC/DOS V computer, use the supplied PS/2 mouse adapter if you are using ...
...adapter (supplied) USB PORT SERIAL PORT IBM PC DOS/V PS/2 MOUSE PORT Macintosh MAC MOUSE PORT CONTENTS 25 Notes • To operate the projector and the computer by the remote control If you connect the iREMOTE MOUSE RECEIVER to the computer, the supplied remote control can work as a mouse... actually used and change it to the supplied cable. Operations Operating the computer by the remote control, place the REMOTE MOUSE RECEIVER close to the projector. • When connecting the REMOTE MOUSE RECEIVER to an IBM PC/DOS V computer, use the supplied PS/2 mouse adapter if you are using ...
Owners Manual
Page 27
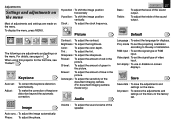
... volume of keystone distortion beyond the automatic correction. H-position : To shift the image position horizontally V-position : To shift the image position vertically. When using this projector for displays. Contrast : To adjust the contrast. G-level : To adjust the amount of green in the picture. Auto sync. : To adjust the image automatically. Default...
... volume of keystone distortion beyond the automatic correction. H-position : To shift the image position horizontally V-position : To shift the image position vertically. When using this projector for displays. Contrast : To adjust the contrast. G-level : To adjust the amount of green in the picture. Auto sync. : To adjust the image automatically. Default...

Owners Manual
Page 30
.... 22 • These adjustments are stored until you turn the power off , follow the below steps. 5 Press . 6 Press or to correct the distortion. 1) Place the projector on a level surface. 2) On the menu, select "Auto set ". 1,7 AUTO SET ON/STANDBY KEYSTONE MARKER POINTER PJ LASER KEYSTONE 2,3,5,6 L-CLICK MENU R-CLICK ENTER RGB VIDEO...
.... 22 • These adjustments are stored until you turn the power off , follow the below steps. 5 Press . 6 Press or to correct the distortion. 1) Place the projector on a level surface. 2) On the menu, select "Auto set ". 1,7 AUTO SET ON/STANDBY KEYSTONE MARKER POINTER PJ LASER KEYSTONE 2,3,5,6 L-CLICK MENU R-CLICK ENTER RGB VIDEO...


