
Owners Manual
Page 4
Source of power supply to your product dealer or local power company. The strong light from battery power, or other instructions. 3. This unit is fully transistorized and does not contain any parts that can result in this product, read the owner's manual carefully, and follow all the operating and other sources, refer to assure personal safety. DO NOT REMOVE THE CABINET COVER, OR YOU MAY...
Source of power supply to your product dealer or local power company. The strong light from battery power, or other instructions. 3. This unit is fully transistorized and does not contain any parts that can result in this product, read the owner's manual carefully, and follow all the operating and other sources, refer to assure personal safety. DO NOT REMOVE THE CABINET COVER, OR YOU MAY...
Owners Manual
Page 7
... service personnel under the following the operating instructions. To avoid injury, be sure the service technician has used replacement parts specified by following conditions: a) When the power-supply cord or plug is in its original position. c) If the product has been exposed to qualified service personnel. 18. this product from the wall outlet and refer servicing to get your hands caught when setting...
... service personnel under the following the operating instructions. To avoid injury, be sure the service technician has used replacement parts specified by following conditions: a) When the power-supply cord or plug is in its original position. c) If the product has been exposed to qualified service personnel. 18. this product from the wall outlet and refer servicing to get your hands caught when setting...
Owners Manual
Page 10
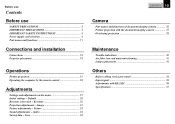
... 40 Air filter, lens and main unit cleaning 41 Lamp replacement 42 Others Before calling service personnel 43 Input signal 45 Adjustments with RS-232C 49 Specifications 51 Keystone 30 Projection adjustments - Picture 32 Sound adjustments - Before use Contents Before use SAFETY PRECAUTIONS 2 IMPORTANT PRECAUTIONS 3 IMPORTANT SAFETY INSTRUCTIONS 4 Power supply cord selection 9 Part names and functions 11 Connections and installation Connections 16 Projector placement 18 Operations Picture projection 21 Operating the computer by the remote control 25 Adjustments Settings and...
... 40 Air filter, lens and main unit cleaning 41 Lamp replacement 42 Others Before calling service personnel 43 Input signal 45 Adjustments with RS-232C 49 Specifications 51 Keystone 30 Projection adjustments - Picture 32 Sound adjustments - Before use Contents Before use SAFETY PRECAUTIONS 2 IMPORTANT PRECAUTIONS 3 IMPORTANT SAFETY INSTRUCTIONS 4 Power supply cord selection 9 Part names and functions 11 Connections and installation Connections 16 Projector placement 18 Operations Picture projection 21 Operating the computer by the remote control 25 Adjustments Settings and...
Owners Manual
Page 11
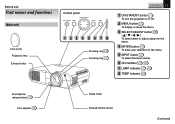
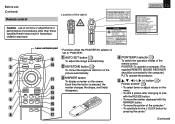
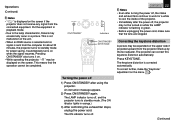
... Lens cover Projection lens Exhaust holes Control panel ON/STANDBY MENU SELECT/ADJUST ENTER INPUT ON LAMP TEMP 123 4 5 6 78 Zooming ring 21 Focusing ring 21 CONTENTS 11 1 ON/STANDBY button 21 To turn the projector on or off. 2 MENU button 27 To display or close the menu. 3 SELECT/ADJUST button 28 ( / / / ) To select items or adjust values on the menu. 4 ENTER button 30 To enter your selection on the menu. 5 INPUT button 21 To select the input source. 6 ON indicator 21 40 7 LAMP indicator...
... Lens cover Projection lens Exhaust holes Control panel ON/STANDBY MENU SELECT/ADJUST ENTER INPUT ON LAMP TEMP 123 4 5 6 78 Zooming ring 21 Focusing ring 21 CONTENTS 11 1 ON/STANDBY button 21 To turn the projector on or off. 2 MENU button 27 To display or close the menu. 3 SELECT/ADJUST button 28 ( / / / ) To select items or adjust values on the menu. 4 ENTER button 30 To enter your selection on the menu. 5 INPUT button 21 To select the input source. 6 ON indicator 21 40 7 LAMP indicator...
Owners Manual
Page 13
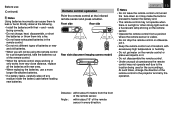
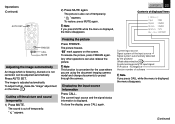
... a picture after changing its size with the RESIZE button. • To move the marker displayed with the MARKER button. • To move the pointer of the picture automatically. 11 3 MARKER button To display a marker on the screen. Before use of controls or adjustments or performance of the remote control. Location of the labels AUTO SET ON/STANDBY KEYSTONE MARKER POINTER PJ LASER REAR L-CLICK MENU R-CLICK ENTER RGB VIDEO CAMERA RESIZE RESET FREEZE...
... a picture after changing its size with the RESIZE button. • To move the marker displayed with the MARKER button. • To move the pointer of the picture automatically. 11 3 MARKER button To display a marker on the screen. Before use of controls or adjustments or performance of the remote control. Location of the labels AUTO SET ON/STANDBY KEYSTONE MARKER POINTER PJ LASER REAR L-CLICK MENU R-CLICK ENTER RGB VIDEO CAMERA RESIZE RESET FREEZE...

Owners Manual
Page 14
... / MENU button 28 • To left-click.* • To display or close the menu. 7 RGB button 21 To select the RGB input. 8 RESIZE button 24 To change the picture size. 9 ON/STANDBY button 21 To turn the projector on the menu. 12 VIDEO button 21 To select the video input. 13 CAMERA button (for document imaging camera model only) 37 To select the camera input. 14 RESET button 29 To restore the settings and adjustments to the default...
... / MENU button 28 • To left-click.* • To display or close the menu. 7 RGB button 21 To select the RGB input. 8 RESIZE button 24 To change the picture size. 9 ON/STANDBY button 21 To turn the projector on the menu. 12 VIDEO button 21 To select the video input. 13 CAMERA button (for document imaging camera model only) 37 To select the camera input. 14 RESET button 29 To restore the settings and adjustments to the default...
Owners Manual
Page 15
... lamp shining on it . • Keep the remote control out of the remote control to leak or burst. At such times, change the direction of locations with their + and - Strictly observe the following. • Install the batteries with excessively high temperature or humidity. • Do not get water on the remote control or place wet objects on the remote sensor. • Operate the remote control from very close distance, replace...
... lamp shining on it . • Keep the remote control out of the remote control to leak or burst. At such times, change the direction of locations with their + and - Strictly observe the following. • Install the batteries with excessively high temperature or humidity. • Do not get water on the remote control or place wet objects on the remote sensor. • Operate the remote control from very close distance, replace...
Owners Manual
Page 19
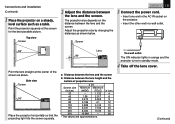
... projector turns to standby mode. 4 Take off the lens cover. (Continued) a: Distance between the lens and the screen b: Distance between the lens and the screen. The ON indicator lights in a wall outlet. Screen 90° Lens 90° b a Point the lens straight at the screen for the best possible picture. b (cm) 4 6 9 12 15 23 30 38 To a wall outlet. Connections and installation (Continued) 1 Place the projector on the distance between the lens and the screen. Adjust...
... projector turns to standby mode. 4 Take off the lens cover. (Continued) a: Distance between the lens and the screen b: Distance between the lens and the screen. The ON indicator lights in a wall outlet. Screen 90° Lens 90° b a Point the lens straight at the screen for the best possible picture. b (cm) 4 6 9 12 15 23 30 38 To a wall outlet. Connections and installation (Continued) 1 Place the projector on the distance between the lens and the screen. Adjust...
Owners Manual
Page 21
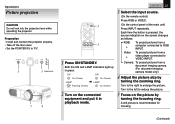
... project pictures from a video player connected to reduce the picture. 5 Focus on the picture by turning the zooming ring. A still picture is pressed, the source indication on the connected equipment and put it in green. ON/STANDBY MENU SELECT/ADJUST ENTER INPUT ON LAMP TEMP 1 3 Indicators 5 4 AUTO SET ON/STANDBY KEYSTONE MARKER POINTER PJ LASER 1 L-CLICK MENU R-CLICK ENTER RGB VIDEO CAMERA RESIZE RESET FREEZE 3 1 Press ON/STANDBY. CONTENTS 21 3 Select the input source. (On the remote control) Press RGB or VIDEO. (On the control panel...
... project pictures from a video player connected to reduce the picture. 5 Focus on the picture by turning the zooming ring. A still picture is pressed, the source indication on the connected equipment and put it in green. ON/STANDBY MENU SELECT/ADJUST ENTER INPUT ON LAMP TEMP 1 3 Indicators 5 4 AUTO SET ON/STANDBY KEYSTONE MARKER POINTER PJ LASER 1 L-CLICK MENU R-CLICK ENTER RGB VIDEO CAMERA RESIZE RESET FREEZE 3 1 Press ON/STANDBY. CONTENTS 21 3 Select the input source. (On the remote control) Press RGB or VIDEO. (On the control panel...
Owners Manual
Page 22
... work for about 30 minutes, the projector turns to standby mode. (The ON idicator lights in green. • Before unplugging the power cord, make the "Keystone" adjustment on when the signal resumes. Operations (Continued) Notes • " " is corrected automatically. ON/STANDBY MENU SELECT/ADJUST ENTER INPUT ON LAMP TEMP ON/STANDBY Indicators AUTO SET ON/STANDBY KEYSTONE MARKER POINTER PJ LASER ON/STANDBY KEYSTONE L-CLICK MENU R-CLICK ENTER RGB VIDEO CAMERA RESIZE RESET FREEZE Turning the power off . Put the equipment in a picture...
... work for about 30 minutes, the projector turns to standby mode. (The ON idicator lights in green. • Before unplugging the power cord, make the "Keystone" adjustment on when the signal resumes. Operations (Continued) Notes • " " is corrected automatically. ON/STANDBY MENU SELECT/ADJUST ENTER INPUT ON LAMP TEMP ON/STANDBY Indicators AUTO SET ON/STANDBY KEYSTONE MARKER POINTER PJ LASER ON/STANDBY KEYSTONE L-CLICK MENU R-CLICK ENTER RGB VIDEO CAMERA RESIZE RESET FREEZE Turning the power off . Put the equipment in a picture...
Owners Manual
Page 23
.... Note If you are using the document imaging camera model and change documents to project through the camera. Press AUTO SET. The sound is also cut off temporarily. " " mark appears on the menu. 31 Cutting off the picture and sound temporarily 1) Press MUTE. " " appears. The image is displayed, the menu disappears. To adjust further, make the "Image" adjustment on the screen. The picture freezes. Displaying the input source information Press CALL. CONTENTS...
.... Note If you are using the document imaging camera model and change documents to project through the camera. Press AUTO SET. The sound is also cut off temporarily. " " mark appears on the menu. 31 Cutting off the picture and sound temporarily 1) Press MUTE. " " appears. The image is displayed, the menu disappears. To adjust further, make the "Image" adjustment on the screen. The picture freezes. Displaying the input source information Press CALL. CONTENTS...
Owners Manual
Page 25
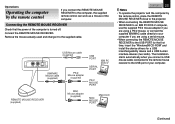
Remove the mouse actually used and change it to the USB port of the computer is turned off. USB Mouse cable (supplied) PV-98 IBM/Mac USB IBM/MAC Mouse cable (supplied) PS/2 Mouse adapter (supplied) REMOTE MOUSE RECEIVER (supplied) MAC Mouse adapter (supplied) USB PORT SERIAL PORT IBM PC DOS/V PS/2 MOUSE PORT Macintosh MAC MOUSE PORT CONTENTS 25 Notes • To operate the projector and the computer by the remote control If you connect the iREMOTE MOUSE RECEIVER to the computer, the...
Remove the mouse actually used and change it to the USB port of the computer is turned off. USB Mouse cable (supplied) PV-98 IBM/Mac USB IBM/MAC Mouse cable (supplied) PS/2 Mouse adapter (supplied) REMOTE MOUSE RECEIVER (supplied) MAC Mouse adapter (supplied) USB PORT SERIAL PORT IBM PC DOS/V PS/2 MOUSE PORT Macintosh MAC MOUSE PORT CONTENTS 25 Notes • To operate the projector and the computer by the remote control If you connect the iREMOTE MOUSE RECEIVER to the computer, the...

Owners Manual
Page 27
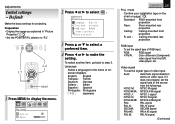
.... (For document imaging camera model only) Audio 33 Language : To select the language for the first time, see page in the picture. For details, see "Default". 28 Keystone 30 Auto set the signal type of video input. R-level : To adjust the amount of red in the picture. mode : To set the signal type of RGB input. RGB input : To set the projecting orientation according to the factory set. Video signal : To set : Adjust : To correct the keystone distortion automatically...
.... (For document imaging camera model only) Audio 33 Language : To select the language for the first time, see page in the picture. For details, see "Default". 28 Keystone 30 Auto set the signal type of video input. R-level : To adjust the amount of red in the picture. mode : To set the signal type of RGB input. RGB input : To set the projecting orientation according to the factory set. Video signal : To set : Adjust : To correct the keystone distortion automatically...
Owners Manual
Page 28
.... mode Confirm your installation type on the chart on video input. Video signal To set the signal type of RGB input. Auto: Automatic signal detection works on page 18 . Adjustments Initial settings - ON/STANDBY MENU SELECT/ADJUST ENTER INPUT ON LAMP TEMP 1,5 AUTO SET ON/STANDBY KEYSTONE MARKER POINTER PJ LASER 2-4 L-CLICK MENU R-CLICK ENTER RGB VIDEO CAMERA RESIZE RESET FREEZE RESET 1 Press MENU to display the menu. 2 Press or to make the setting. ceil.: Floor-mounted front projection Floor-mounted rear projection Ceiling-mounted front projection Ceiling-mounted...
.... mode Confirm your installation type on the chart on video input. Video signal To set the signal type of RGB input. Auto: Automatic signal detection works on page 18 . Adjustments Initial settings - ON/STANDBY MENU SELECT/ADJUST ENTER INPUT ON LAMP TEMP 1,5 AUTO SET ON/STANDBY KEYSTONE MARKER POINTER PJ LASER 2-4 L-CLICK MENU R-CLICK ENTER RGB VIDEO CAMERA RESIZE RESET FREEZE RESET 1 Press MENU to display the menu. 2 Press or to make the setting. ceil.: Floor-mounted front projection Floor-mounted rear projection Ceiling-mounted front projection Ceiling-mounted...
Owners Manual
Page 30
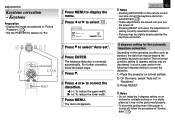
.../STANDBY MENU SELECT/ADJUST ENTER INPUT ON LAMP TEMP 3 Press to correct the distortion. 1) Place the projector on the operating condition such as vibration, the distortion may be performed properly. • To store this setting even if the power is corrected automatically. Keystone Preparation • Display the image as it may not be disordered. The keystone distortion is turned off . • Pressing RESET will return the adjustment...
.../STANDBY MENU SELECT/ADJUST ENTER INPUT ON LAMP TEMP 3 Press to correct the distortion. 1) Place the projector on the operating condition such as vibration, the distortion may be performed properly. • To store this setting even if the power is corrected automatically. Keystone Preparation • Display the image as it may not be disordered. The keystone distortion is turned off . • Pressing RESET will return the adjustment...
Owners Manual
Page 31
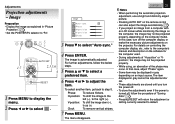
I ma g e Au t o sync . Phase: To reduce flickers. The menu disappears. The item displayed in gray cannot be projected properly. • While using, an aberration of the phase may occur. ON/STANDBY MENU SELECT/ADJUST ENTER INPUT ON LAMP TEMP 1,7 AUTO SET ON/STANDBY KEYSTONE MARKER POINTER PJ LASER AUTO SET 2,3,5,6 4 L-CLICK MENU R-CLICK ENTER RGB VIDEO CAMERA RESIZE RESET FREEZE RESET 1 Press MENU to display the menu. 2 Press or to the right (+). The image is turned off the...
I ma g e Au t o sync . Phase: To reduce flickers. The menu disappears. The item displayed in gray cannot be projected properly. • While using, an aberration of the phase may occur. ON/STANDBY MENU SELECT/ADJUST ENTER INPUT ON LAMP TEMP 1,7 AUTO SET ON/STANDBY KEYSTONE MARKER POINTER PJ LASER AUTO SET 2,3,5,6 4 L-CLICK MENU R-CLICK ENTER RGB VIDEO CAMERA RESIZE RESET FREEZE RESET 1 Press MENU to display the menu. 2 Press or to the right (+). The image is turned off the...
Owners Manual
Page 37
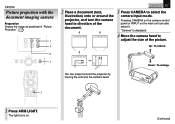
... LIGHT 1 LOCK W.BALANCE CAMERA 3 6 ON/STANDBY MENU SELECT/ADJUST ENTER INPUT ON LAMP TEMP 3 AUTO SET ON/STANDBY KEYSTONE MARKER POINTER PJ LASER L-CLICK MENU R-CLICK ENTER RGB VIDEO CAMERA RESIZE RESET FREEZE 3 2 Place a document (text, illustration) onto or around the projector by moving the arm and the camera head. "Camera" is displayed. 4 Move the camera head to direction of the picture. Pressing CAMERA on the camera control panel or INPUT...
... LIGHT 1 LOCK W.BALANCE CAMERA 3 6 ON/STANDBY MENU SELECT/ADJUST ENTER INPUT ON LAMP TEMP 3 AUTO SET ON/STANDBY KEYSTONE MARKER POINTER PJ LASER L-CLICK MENU R-CLICK ENTER RGB VIDEO CAMERA RESIZE RESET FREEZE 3 2 Place a document (text, illustration) onto or around the projector by moving the arm and the camera head. "Camera" is displayed. 4 Move the camera head to direction of the picture. Pressing CAMERA on the camera control panel or INPUT...
Owners Manual
Page 40
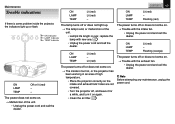
... of the SELECT/ADJUST ON/STANDBY MENU ON ENTER INPUT ON Indicator LAMP LAMP Indicator TEMP TEMP Indicator unit. • Lamp's life length is too hot, or the projector has been working in an area of the unit. • Unplug the power cord and call the dealer. Maintenance CONTENTS 40 Trouble indications ON LAMP TEMP Lit (red) Lit (red) - ON LAMP TEMP Lit (red) - The power does not come on again. • Clean the air filter. 41 The power turns off or...
... of the SELECT/ADJUST ON/STANDBY MENU ON ENTER INPUT ON Indicator LAMP LAMP Indicator TEMP TEMP Indicator unit. • Lamp's life length is too hot, or the projector has been working in an area of the unit. • Unplug the power cord and call the dealer. Maintenance CONTENTS 40 Trouble indications ON LAMP TEMP Lit (red) Lit (red) - ON LAMP TEMP Lit (red) - The power does not come on again. • Clean the air filter. 41 The power turns off or...
Owners Manual
Page 42
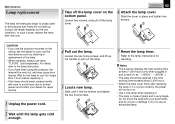
... lamp instruction. • If you use the projector mounted on the ceiling, ask the dealer to carry out the maintenance such as cleaning or replacement of glass and is not set correctly, the power will be replaced if the total working time at every 1,000 hours (only when plugged in and turned on . • Use a new lamp when replacing it is very fragile. Maintenance Lamp replacement The lamp will eventually begin to project...
... lamp instruction. • If you use the projector mounted on the ceiling, ask the dealer to carry out the maintenance such as cleaning or replacement of glass and is not set correctly, the power will be replaced if the total working time at every 1,000 hours (only when plugged in and turned on . • Use a new lamp when replacing it is very fragile. Maintenance Lamp replacement The lamp will eventually begin to project...
Owners Manual
Page 43
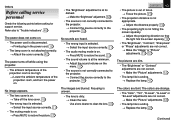
... mode is ending. → Replace the lamp. 42 (Continued) Others Before calling service personnel Check the following points before asking for support service. Refer also to "Trouble indications". 40 • The "Brightness" adjustment is at the minimum. → Adjust the sound volume on the menu. 33 • The source is not correctly connected to the projector. → Connect the source correctly to the projector. 16 No image appears. • The lens cover...
... mode is ending. → Replace the lamp. 42 (Continued) Others Before calling service personnel Check the following points before asking for support service. Refer also to "Trouble indications". 40 • The "Brightness" adjustment is at the minimum. → Adjust the sound volume on the menu. 33 • The source is not correctly connected to the projector. → Connect the source correctly to the projector. 16 No image appears. • The lens cover...


