Owners Manual
Page 4
... contain any parts that can result in the cabinet are not sure of the type of Light Do not look into the lens while the lamp is provided or the manufacturer's instructions have been adhered to the operating instructions. 4. If you observe the following procedures for ventilation and to assure ... or local power company. DO NOT REMOVE THE CABINET COVER, OR YOU MAY BE EXPOSED TO DANGEROUS VOLTAGE. For products intended to operate from the lamp may cause damage to your home, consult your eyes or sight. The openings should never be repaired by placing the product on a bed, sofa, ...
... contain any parts that can result in the cabinet are not sure of the type of Light Do not look into the lens while the lamp is provided or the manufacturer's instructions have been adhered to the operating instructions. 4. If you observe the following procedures for ventilation and to assure ... or local power company. DO NOT REMOVE THE CABINET COVER, OR YOU MAY BE EXPOSED TO DANGEROUS VOLTAGE. For products intended to operate from the lamp may cause damage to your home, consult your eyes or sight. The openings should never be repaired by placing the product on a bed, sofa, ...
Owners Manual
Page 7
...18. c) If the product has been exposed to qualified service personnel. 19. This product incorporates glass components, including a lens and a lamp. d) If the product does not operate normally by users.) 20. b) If liquid has been spilled, or objects have the same characteristics ...as opening or removing covers may result in proper operating condition. In the unlikely event of the lamp only should break, please handle with care to qualified service personnel under the following the operating instructions. Before use IMPORTANT SAFETY ...
...18. c) If the product has been exposed to qualified service personnel. 19. This product incorporates glass components, including a lens and a lamp. d) If the product does not operate normally by users.) 20. b) If liquid has been spilled, or objects have the same characteristics ...as opening or removing covers may result in proper operating condition. In the unlikely event of the lamp only should break, please handle with care to qualified service personnel under the following the operating instructions. Before use IMPORTANT SAFETY ...

Owners Manual
Page 10
... projection 59 Lock the white balance 60 Correcting illuminated defects 61 Maintenance Trouble indications 62 Air filter cleaning 63 Lens and main unit cleaning 65 Lamp replacement 66 Others Before calling service personal 68 Pin assignment of each part on the remote control 13 Loading batteries 15 Remote control operation 16...
... projection 59 Lock the white balance 60 Correcting illuminated defects 61 Maintenance Trouble indications 62 Air filter cleaning 63 Lens and main unit cleaning 65 Lamp replacement 66 Others Before calling service personal 68 Pin assignment of each part on the remote control 13 Loading batteries 15 Remote control operation 16...
Owners Manual
Page 12
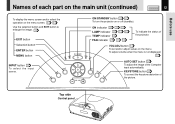
... set and/or adjust values on or off (standby). KEYSTONE button 35 To correct the keystone distortion of the projector. ON indicator 28 33 62 LAMP indicator 28 33 62 TEMP indicator 62 FAN indicator 28 33 62 To indicate the status of the picture. To adjust volume when the menu...
... set and/or adjust values on or off (standby). KEYSTONE button 35 To correct the keystone distortion of the projector. ON indicator 28 33 62 LAMP indicator 28 33 62 TEMP indicator 62 FAN indicator 28 33 62 To indicate the status of the picture. To adjust volume when the menu...
Owners Manual
Page 16
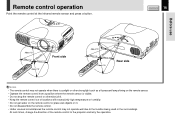
... disassemble the remote control. • Under unusual circumstances the remote control may not operate when there is sunlight or other strong light such as a fluorescent lamp shining on it . • Keep the remote control out of the remote control to the location being used or the surroundings. Remote control operation Point...
... disassemble the remote control. • Under unusual circumstances the remote control may not operate when there is sunlight or other strong light such as a fluorescent lamp shining on it . • Keep the remote control out of the remote control to the location being used or the surroundings. Remote control operation Point...
Owners Manual
Page 19
... / STANDBY TEMP FAN Light (Orange) Power cord (Supplied) The three indicators, TEMP, LAMP, and ON, light in green for an adequate time (1 to 2 hours, depending on the room's condition) before using it, so it adjusts to the ambient ...
... / STANDBY TEMP FAN Light (Orange) Power cord (Supplied) The three indicators, TEMP, LAMP, and ON, light in green for an adequate time (1 to 2 hours, depending on the room's condition) before using it, so it adjusts to the ambient ...
Owners Manual
Page 20
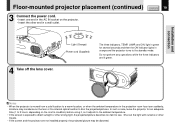
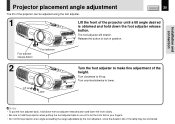
... your fingers. • Do not tilt the projector at an angle exceeding the range adjustable by the foot adjusters, since the duration life of the lamp may be adjusted using the foot adjuster. 1 Lift the front of the projector until a tilt angle desired is obtained and hold down the foot adjuster...
... your fingers. • Do not tilt the projector at an angle exceeding the range adjustable by the foot adjusters, since the duration life of the lamp may be adjusted using the foot adjuster. 1 Lift the front of the projector until a tilt angle desired is obtained and hold down the foot adjuster...
Owners Manual
Page 28
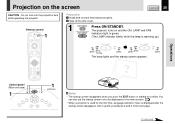
TEMP FAN (Green) MENU ENTER EXIT PIP FREEZE CALL RESIZE MUTE Control panel (Main unit side) 1 ON LAMP ON / STANDBY TEMP FAN 1 Indicators MENU ENTER EXIT AUTO SET INPUT VOL / ADJ Notes • The startup screen disappears when you push the EXIT...1 ON/STANDBY Press ON/STANDBY. The projector turns on and the ON, LAMP and FAN ON/STANDBY indicators light in green. (The LAMP indicator blinks while the lamp is displayed after the startup screen disappears. Set it up .) ON LAMP ON / STANDBY TEMP FAN ON LAMP ON / STANDBY (Green) (Green) Flashing (Green) (Green) (Green) ...
TEMP FAN (Green) MENU ENTER EXIT PIP FREEZE CALL RESIZE MUTE Control panel (Main unit side) 1 ON LAMP ON / STANDBY TEMP FAN 1 Indicators MENU ENTER EXIT AUTO SET INPUT VOL / ADJ Notes • The startup screen disappears when you push the EXIT...1 ON/STANDBY Press ON/STANDBY. The projector turns on and the ON, LAMP and FAN ON/STANDBY indicators light in green. (The LAMP indicator blinks while the lamp is displayed after the startup screen disappears. Set it up .) ON LAMP ON / STANDBY TEMP FAN ON LAMP ON / STANDBY (Green) (Green) Flashing (Green) (Green) (Green) ...
Owners Manual
Page 29
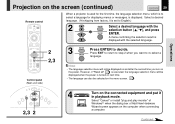
...-select a ENTER language. However, if "Reset all" 52 is executed, the language selection menu will not be selected on the menu screen. 50 INPUT ON LAMP ON / STANDBY TEMP FAN MENU ENTER VOL / ADJ EXIT AUTO SET 2,3 2 4 Turn on the screen (continued) CONTENTS 29 Remote control INPUT ON/STANDBY LASER KEYSTONE...
...-select a ENTER language. However, if "Reset all" 52 is executed, the language selection menu will not be selected on the menu screen. 50 INPUT ON LAMP ON / STANDBY TEMP FAN MENU ENTER VOL / ADJ EXIT AUTO SET 2,3 2 4 Turn on the screen (continued) CONTENTS 29 Remote control INPUT ON/STANDBY LASER KEYSTONE...
Owners Manual
Page 30
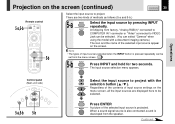
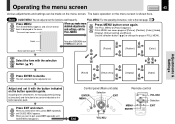
... here to VIDEO Jack can be selected. (You can be selected. The input source selection menu appears. Operations KEYSTONE Control panel (Main unit side) ON LAMP ON / STANDBY TEMP FAN MENU ENTER VOL / ADJ EXIT AUTO SET INPUT 5-a,5-b 5-b Select the input source to project. ENTER Press ENTER ENTER A picture of input...
... here to VIDEO Jack can be selected. (You can be selected. The input source selection menu appears. Operations KEYSTONE Control panel (Main unit side) ON LAMP ON / STANDBY TEMP FAN MENU ENTER VOL / ADJ EXIT AUTO SET INPUT 5-a,5-b 5-b Select the input source to project. ENTER Press ENTER ENTER A picture of input...
Owners Manual
Page 32
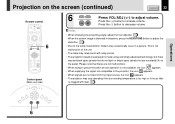
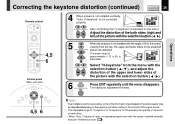
...L-CLICK R-CLICK VOLUME/ADJUST 6 MENU ENTER EXIT PIP FREEZE CALL RESIZE MUTE Control panel (Main unit side) ON LAMP ON / STANDBY TEMP FAN 6 Press VOL/ADJ (+/-) to the lamp characteristic, flickers may occasionally occur in keystone, press the KEYSTONE button to adjust the distortion. 35 • Due ...to adjust volume. Press the (+) button to decrease volume. This is not malfunction of the unit. • The lamp may be black spots (pixels that do not light) or bright spots (pixels that these are not malfunctions. • When trying to press ...
...L-CLICK R-CLICK VOLUME/ADJUST 6 MENU ENTER EXIT PIP FREEZE CALL RESIZE MUTE Control panel (Main unit side) ON LAMP ON / STANDBY TEMP FAN 6 Press VOL/ADJ (+/-) to the lamp characteristic, flickers may occasionally occur in keystone, press the KEYSTONE button to adjust the distortion. 35 • Due ...to adjust volume. Press the (+) button to decrease volume. This is not malfunction of the unit. • The lamp may be black spots (pixels that do not light) or bright spots (pixels that these are not malfunctions. • When trying to press ...
Owners Manual
Page 33
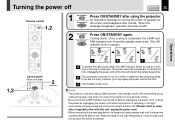
...STANDBY LASER KEYSTONE AUTO SET 1,2 L-CLICK R-CLICK VOLUME/ADJUST MENU ENTER EXIT PIP FREEZE CALL RESIZE MUTE 1,2 INPUT Control panel (Main unit side) ON LAMP ON / STANDBY TEMP FAN 2 Indicators MENU ENTER VOL / ADJ EXIT AUTO SET 1 ON/STANDBY Press ON/STANDBY after a while. mum of power...Press ON/STANDBY again. Unplugging the power cord at a high temperature, it may unplug the power cord at this time will shorten the lamp's duration life. Should a fault or some other irregularity arise with this time. We recommend you may not light and the duration life ...
...STANDBY LASER KEYSTONE AUTO SET 1,2 L-CLICK R-CLICK VOLUME/ADJUST MENU ENTER EXIT PIP FREEZE CALL RESIZE MUTE 1,2 INPUT Control panel (Main unit side) ON LAMP ON / STANDBY TEMP FAN 2 Indicators MENU ENTER VOL / ADJ EXIT AUTO SET 1 ON/STANDBY Press ON/STANDBY after a while. mum of power...Press ON/STANDBY again. Unplugging the power cord at a high temperature, it may unplug the power cord at this time will shorten the lamp's duration life. Should a fault or some other irregularity arise with this time. We recommend you may not light and the duration life ...
Owners Manual
Page 34
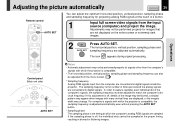
... (computer) and project the image. Operations KEYSTONE L-CLICK R-CLICK VOLUME/ADJUST MENU ENTER EXIT PIP FREEZE CALL RESIZE MUTE Control panel (Main unit side) ON LAMP ON / STANDBY TEMP FAN MENU ENTER VOL / ADJ EXIT AUTO SET AUTO SET 2 SET Press AUTO SET. The sampling frequency is off , details of times...
... (computer) and project the image. Operations KEYSTONE L-CLICK R-CLICK VOLUME/ADJUST MENU ENTER EXIT PIP FREEZE CALL RESIZE MUTE Control panel (Main unit side) ON LAMP ON / STANDBY TEMP FAN MENU ENTER VOL / ADJ EXIT AUTO SET AUTO SET 2 SET Press AUTO SET. The sampling frequency is off , details of times...
Owners Manual
Page 35
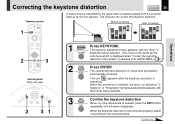
... executing. Before correcting After correcting Operations KEYSTONE L-CLICK R-CLICK VOLUME/ADJUST 2 MENU ENTER EXIT PIP FREEZE CALL RESIZE MUTE 3 Control panel (Main unit side) ON LAMP ON / STANDBY TEMP FAN MENU ENTER VOL / ADJ EXIT AUTO SET 2 31 1 KEYSTONE KEYSTONE Press KEYSTONE The keystone adjustment menu appears, with the former being...
... executing. Before correcting After correcting Operations KEYSTONE L-CLICK R-CLICK VOLUME/ADJUST 2 MENU ENTER EXIT PIP FREEZE CALL RESIZE MUTE 3 Control panel (Main unit side) ON LAMP ON / STANDBY TEMP FAN MENU ENTER VOL / ADJ EXIT AUTO SET 2 31 1 KEYSTONE KEYSTONE Press KEYSTONE The keystone adjustment menu appears, with the former being...
Owners Manual
Page 36
... repeatedly until the menu disappears. Operations KEYSTONE L-CLICK R-CLICK VOLUME/ADJUST MENU ENTER EXIT PIP FREEZE CALL RESIZE MUTE 4,5 6 Control panel (Main unit side) ON LAMP ON / STANDBY TEMP FAN MENU ENTER VOL / ADJ EXIT AUTO SET 4,5 6 5 6 EXIT EXIT When the projector is not installed with the angle of 90 to...
... repeatedly until the menu disappears. Operations KEYSTONE L-CLICK R-CLICK VOLUME/ADJUST MENU ENTER EXIT PIP FREEZE CALL RESIZE MUTE 4,5 6 Control panel (Main unit side) ON LAMP ON / STANDBY TEMP FAN MENU ENTER VOL / ADJ EXIT AUTO SET 4,5 6 5 6 EXIT EXIT When the projector is not installed with the angle of 90 to...
Owners Manual
Page 41
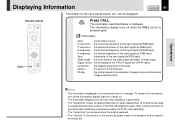
... time counter.) If the time indicated here nears 1000, contact your store of purchase about obtaining a replacement lamp (TLPL78, sold separately). • The "Lamp time" can be reset when the lamp is replaced. • The "Version" is the version of the document imaging camera (at RGB input...the vertical resolution of the Y/PB/PR signal (at RGB input) H-frequency - the formatting of the input signal (at Y/PB/PR input) Lamp time - To refresh the information, turn off the information display, then turn it changes. Displaying Information Information on . • The information ...
... time counter.) If the time indicated here nears 1000, contact your store of purchase about obtaining a replacement lamp (TLPL78, sold separately). • The "Lamp time" can be reset when the lamp is replaced. • The "Version" is the version of the document imaging camera (at RGB input...the vertical resolution of the Y/PB/PR signal (at RGB input) H-frequency - the formatting of the input signal (at Y/PB/PR input) Lamp time - To refresh the information, turn off the information display, then turn it changes. Displaying Information Information on . • The information ...
Owners Manual
Page 43
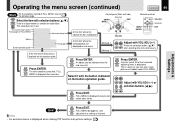
... select other items, press EXIT repeatedly EXIT until GUIDE MENU disappears. [Reset] [Default setting] [Display] [Audio] Control panel (Main unit side) ENTER MENU Selection ON LAMP ON / STANDBY TEMP FAN EXIT MENU ENTER VOL / ADJ EXIT AUTO SET INPUT End VOL/ADJ Remote control VOLUME/ADJUST MENU ENTER MENU ENTER EXIT...
... select other items, press EXIT repeatedly EXIT until GUIDE MENU disappears. [Reset] [Default setting] [Display] [Audio] Control panel (Main unit side) ENTER MENU Selection ON LAMP ON / STANDBY TEMP FAN EXIT MENU ENTER VOL / ADJ EXIT AUTO SET INPUT End VOL/ADJ Remote control VOLUME/ADJUST MENU ENTER MENU ENTER EXIT...
Owners Manual
Page 44
... bar At the item where the adjustment bar is displayed; This state does not in fact. Control panel (Main unit side) ENTER MENU Selection ON LAMP ON / STANDBY TEMP FAN EXIT MENU ENTER VOL / ADJ EXIT AUTO SET INPUT VOL/ADJ Remote control VOLUME/ADJUST MENU ENTER MENU ENTER EXIT PIP...
... bar At the item where the adjustment bar is displayed; This state does not in fact. Control panel (Main unit side) ENTER MENU Selection ON LAMP ON / STANDBY TEMP FAN EXIT MENU ENTER VOL / ADJ EXIT AUTO SET INPUT VOL/ADJ Remote control VOLUME/ADJUST MENU ENTER MENU ENTER EXIT PIP...
Owners Manual
Page 57
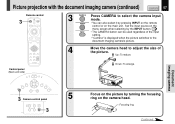
... 3 INPUT ON/STANDBY LASER KEYSTONE AUTO SET L-CLICK R-CLICK VOLUME/ADJUST MENU ENTER EXIT PIP FREEZE CALL RESIZE MUTE Control panel (Main unit side) ON LAMP ON / STANDBY TEMP FAN 3 CAMERA Press CAMERA to adjust the size of the picture. Up: To reduce. FOCUS Down: To enlarge. 123 INPUT MENU ENTER...
... 3 INPUT ON/STANDBY LASER KEYSTONE AUTO SET L-CLICK R-CLICK VOLUME/ADJUST MENU ENTER EXIT PIP FREEZE CALL RESIZE MUTE Control panel (Main unit side) ON LAMP ON / STANDBY TEMP FAN 3 CAMERA Press CAMERA to adjust the size of the picture. Up: To reduce. FOCUS Down: To enlarge. 123 INPUT MENU ENTER...
Owners Manual
Page 59
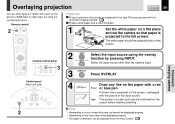
... pressing INPUT. INPUT Select the input source other than the camera input. 3 OVERLAY Press OVERLAY Document imaging camera KEYSTONE Control panel (Main unit side) ON LAMP ON / STANDBY TEMP FAN MENU ENTER VOL / ADJ EXIT AUTO SET 2 4 Draw any line on the paper with a red RGB picture Screen or blue pen...
... pressing INPUT. INPUT Select the input source other than the camera input. 3 OVERLAY Press OVERLAY Document imaging camera KEYSTONE Control panel (Main unit side) ON LAMP ON / STANDBY TEMP FAN MENU ENTER VOL / ADJ EXIT AUTO SET 2 4 Draw any line on the paper with a red RGB picture Screen or blue pen...

